

Introduction to Raspberry Pi

The Raspberry Pi is a microcomputer with a circuit board size that is only the size of a credit card; its CPU architecture is based on ARM, allowing it to run Linux, Windows 10 ARM, and Windows 10 IoT systems (and possibly Android in the future).
Since its inception, the Raspberry Pi has been embraced by numerous computer enthusiasts and makers. Despite its small appearance, it is powerful: it can be used as a web server, live streaming device, router, drone core board, smart car, etc. It is truly a “small bird with complete organs”.

Raspberry Pi 3B+

Deploying Raspberry Pi

Preparation Work
Before installing the Raspberry Pi and deploying the system, the following preparations are needed:
1. Raspberry Pi Basic Kit
-
Raspberry Pi 3B+
-
Raspberry Pi case
-
Cooling fan
-
Heat sink
-
Monitor with HDMI interface (if only VGA interface is available, you can purchase an adapter)
-
HDMI data cable
-
5V 2A power supply (note that the output voltage must be 5V, and the minimum output current must be 2A)
-
USB Micro B power or data cable (old Android data cable, ensure the cable supports the required voltage and current)
-
Micro SD storage card (it is recommended to use a Class 10 speed SD card, otherwise the system may be slow; a capacity of 32GB is recommended)
-
Network cable (the Raspberry Pi supports gigabit networks, so it is recommended to use a category 6 network cable)
-
Mouse and keyboard
2. Prepare the following files on your computer
-
System image file for Raspberry Pi 3B+
-
Micro SD card reader (if your computer has a built-in card reader, you can just buy a card adapter)
-
Win32DiskImager (for burning the system)
1. Burning the Image
Insert the Micro SD storage card into the computer, open Win32DiskImager, select the Raspberry Pi 3B+ image file, and then press write to start burning the image to the Micro SD card. Once the burning is complete, safely eject the device and remove the storage card.


Win32DiskImager
2. Installing the Raspberry Pi
-
Please follow the instructions or the installation method provided by the supplier of the Raspberry Pi case to install the Raspberry Pi into the protective case and assemble the cooling module (this article uses the “Raspberry Pi nine-layer protective case”, the installation methods may vary for different cases);
-
Insert the burned Micro SD storage card into the card slot at the back of the Raspberry Pi, ensuring it is firmly inserted;
-
Connect the display, mouse, and keyboard to the Raspberry Pi first, and finally connect the power supply;
-
If you need internet access, you can use Wi-Fi or plug in the network cable.
-
The Raspberry Pi will start working. Once the desktop environment loads successfully, follow the prompts to set up the Linux account, password, software source, etc., and you can start using it!

Raspberry Pi System Loading Screen

Raspberry Pi System Desktop
3. System Initialization Settings
-
After entering the desktop, please click “Next” to proceed to the next step;
-
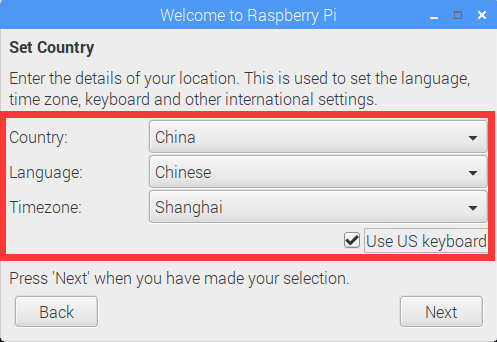
Set region and language:
Country: China
Language: English
Timezone: Shanghai
-
Set the Raspberry Pi user password;
-
Update software:
Since the Raspberry Pi’s server is located abroad, the update speed may be slow, it is recommended to skip this step;
-
The basic setup of the Raspberry Pi is complete; press Reboot to restart and begin using the Raspberry Pi!


Raspberry Pi Applications

The applications of the Raspberry Pi are numerous. As an example, the author uses the Raspberry Pi as a web server to build a blog, but it can also be used to create a music playback page, etc.

So, how about getting a Raspberry Pi?

Text: Yu Yuping
Layout: Yu Yuping
The images in this article are sourced from the author and the publicity department, Luo Yushu


Follow Us


Department of Information Engineering, Guangdong Polytechnic College
Long press to identify the QR code on the left