YOLO Object Detection Results
In the first part of this article, I tested the “retro” version of the popular object detection library YOLO (You Only Look Once). Running deep learning models using only OpenCV, without heavy frameworks like PyTorch or Keras, is promising for low-power devices. Therefore, I decided to delve into this topic to see how the latest YOLO v8 model performs on the Raspberry Pi.
Running any model in the cloud is usually not a problem, as resources are nearly unlimited. However, there are more limitations with hardware “on-site”. Limited RAM, CPU power, and even different CPU architectures, older or incompatible software versions, and lack of high-speed internet connection, etc. Another important issue with cloud infrastructure is cost. Let’s assume we are making a smart doorbell and we want to add person detection to it. We could run a model in the cloud, but every API call costs money. Who pays for that? Not every customer is willing to pay a monthly fee for a doorbell or any similar “smart” device, so running the model locally may be crucial, even if the results may not be as good.
In this test, I will run the YOLO v8 model on a Raspberry Pi:
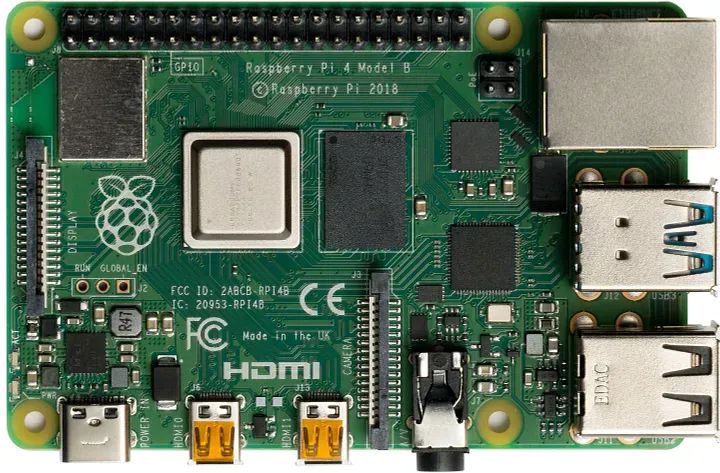
The Raspberry Pi is an inexpensive credit card-sized single-board computer that runs Raspbian or Ubuntu Linux. I will test two different versions:
-
Raspberry Pi 3 Model B, manufactured in 2015. It features a 1.2 GHz Cortex-A53 ARM CPU and 1 GB RAM.
-
Raspberry Pi 4, manufactured in 2019. It features a 1.8 GHz Cortex-A72 ARM CPU and 1, 4, or 8 GB RAM.
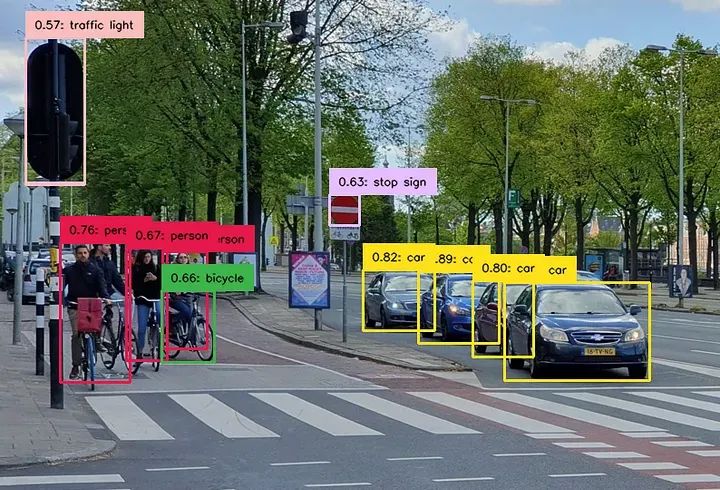
Raspberry Pi computers are now widely used not just for hobbies and DIY projects, but also for embedded industrial applications (Raspberry Pi compute modules designed specifically for this purpose). Therefore, it is interesting to see how these boards handle computationally demanding tasks like object detection. For all upcoming tests, I will use this image:
Now, let’s see how it works.
Standard Version of YOLOv8
As a warm-up, let’s try the standard version, just as described on its official GitHub page:
from ultralytics import YOLO
import cv2
import time
model = YOLO('yolov8n.pt')
img = cv2.imread('test.jpg')
# First run to 'warm-up' the model
model.predict(source=img, save=False, save_txt=False, conf=0.5, verbose=False)
# Second run
t_start = time.monotonic()
results = model.predict(source=img, save=False, save_txt=False, conf=0.5, verbose=False)
dt = time.monotonic() - t_start
print("dT:", dt)
# Show results
boxes = results[0].boxes
names = model.names
confidence, class_ids = boxes.conf, boxes.cls.int()
rects = boxes.xyxy.int()
for ind in range(boxes.shape[0]):
    print("Rect:", names[class_ids[ind].item()], confidence[ind].item(), rects[ind].tolist())
In a “production” system, images can be acquired from a camera; for our test, I used a file named “test.jpg” as mentioned earlier. I also executed the “predict” method twice to make the time estimates more accurate (the first run typically takes longer because the model needs to “warm-up” and allocate all necessary memory). The Raspberry Pi operates in “headless” mode without a monitor, so I used the console as output; this is a more or less standard way of working for most embedded systems.
On the Raspberry Pi 3 with a 32-bit operating system, this version does not work: pip cannot install the “ultralytics” module due to the following error:
ERROR: Cannot install ultralytics
The conflict is caused by:
    ultralytics 8.0.124 depends on torch>=1.7.0
It turns out that PyTorch is only available for ARM 64-bit operating systems.On the Raspberry Pi 4 with a 64-bit operating system, the code actually works, with a computation time of about 0.9 seconds.The console output is as follows:
I also conducted the same experiment on a desktop computer to visualize the results:
YOLO v8 Nano Detection Results
As we can see, even for the “nano” size model, the results are quite good.
ONNX (Open Neural Network Exchange) is an open format used to represent machine learning models. It is also supported by OpenCV, so we can easily run our model this way. The developers of YOLO have provided a command-line tool for this conversion:
yolo export model=yolov8n.pt imgsz=640 format=onnx opset=12
Here, “yolov8n.pt” is the PyTorch model file to be converted. The last letter “n” in the filename indicates “nano”. Different models are available (“n” — nano, “s” — small, “m” — medium, “l” — large), and obviously, I will use the smallest and fastest model for the Raspberry Pi.The conversion can be done on a desktop computer, and then the model can be copied to the Raspberry Pi using the “scp” command:
scp yolov8n.onnx pi@raspberrypi:/home/pi/Documents/YOLO
Now we are ready to prepare the source code. I used a sample from the Ultralytics repository, slightly modified to run on the Raspberry Pi:
import cv2
import time

model: cv2.dnn.Net = cv2.dnn.readNetFromONNX("yolov8n.onnx")
names = "person;bicycle;car;motorbike;aeroplane;bus;train;truck;boat;traffic light;fire hydrant;stop sign;parking meter;bench;bird;" \
"cat;dog;horse;sheep;cow;elephant;bear;zebra;giraffe;backpack;umbrella;handbag;tie;suitcase;frisbee;skis;snowboard;sports ball;kite;" \
"baseball bat;baseball glove;skateboard;surfboard;tennis racket;bottle;wine glass;cup;fork;knife;spoon;bowl;banana;apple;sandwich;" \
"orange;broccoli;carrot;hot dog;pizza;donut;cake;chair;sofa;pottedplant;bed;diningtable;toilet;tvmonitor;laptop;mouse;remote;keyboard;" \
"cell phone;microwave;oven;toaster;sink;refrigerator;book;clock;vase;scissors;teddy bear;hair dryer;toothbrush".split(";")
img = cv2.imread('test.jpg')
height, width, _ = img.shape
length = max((height, width))
image = np.zeros((length, length, 3), np.uint8)
image[0:height, 0:width] = img
scale = length / 640
# First run to 'warm-up' the model
blob = cv2.dnn.blobFromImage(image, scalefactor=1 / 255, size=(640, 640), swapRB=True)
model.setInput(blob)
model.forward()
# Second run
t1 = time.monotonic()
blob = cv2.dnn.blobFromImage(image, scalefactor=1 / 255, size=(640, 640), swapRB=True)
model.setInput(blob)
outputs = model.forward()
print("dT:", time.monotonic() - t1)
# Show results
outputs = np.array([cv2.transpose(outputs[0])])
rows = outputs.shape[1]
boxes = []
scores = []
class_ids = []
output = outputs[0]
for i in range(rows):
    classes_scores = output[i][4:]
    minScore, maxScore, minClassLoc, (x, maxClassIndex) = cv2.minMaxLoc(classes_scores)
    if maxScore >= 0.25:
        box = [output[i][0] - 0.5 * output[i][2], output[i][1] - 0.5 * output[i][3],
               output[i][2], output[i][3]]
        boxes.append(box)
        scores.append(maxScore)
        class_ids.append(maxClassIndex)
result_boxes = cv2.dnn.NMSBoxes(boxes, scores, 0.25, 0.45, 0.5)
for index in result_boxes:
    box = boxes[index]
    box_out = [round(box[0]*scale), round(box[1]*scale),
               round((box[0] + box[2])*scale), round((box[1] + box[3])*scale)]
    print("Rect:", names[class_ids[index]], scores[index], box_out)
As we can see, we no longer use PyTorch and the original Ultralytics library, but the required code is larger.We need to convert the image into a blob, which is required by the YOLO model.Before printing the results, we also need to convert the output rectangles back to the original coordinates.But as an advantage, this code runs on “pure” OpenCV without any additional dependencies.
On the Raspberry Pi 3, the computation time was 28 seconds. Just for fun, I also loaded the “medium” model (which is a 101 MB ONNX file!) to see what would happen. Surprisingly, the application did not crash, but the computation time was 224 seconds (almost 4 minutes). Obviously, the 2015 hardware is not suitable for running SOTA models from 2023, but it is still interesting to see how it works.
On the Raspberry Pi 4, the computation time was 1.08 seconds.
Finally, let’s try the “heaviest” weapon in our toolkit and write the same code in C++. But before that, we need to install the OpenCV library and headers for C++. The easiest way is to run a command like “sudo apt install libopencv-dev”. However, at least for Raspbian, it does not work. The latest version available through “apt” is 4.2, while the minimum required version of OpenCV to load the YOLO model is 4.5. Therefore, we need to build OpenCV from source.I will use OpenCV 4.7, the same version I used in my Python tests:
sudo apt update
sudo apt install g++ cmake libavcodec-dev libavformat-dev libswscale-dev libgstreamer-plugins-base1.0-dev libgstreamer1.0-dev
sudo apt install libgtk2.0-dev libcanberra-gtk* libgtk-3-dev libpng-dev libjpeg-dev libtiff-dev
sudo apt install libxvidcore-dev libx264-dev libgtk-3-dev libgstreamer1.0-dev gstreamer1.0-gtk3
wget https://github.com/opencv/opencv/archive/refs/tags/4.7.0.tar.gz
tar -xvzf 4.7.0.tar.gz
rm 4.7.0.tar.gz
cd opencv-4.7.0
mkdir build && cd build
cmake -D WITH_QT=OFF -D WITH_VTK=OFF -D CMAKE_BUILD_TYPE=RELEASE -D CMAKE_INSTALL_PREFIX=/usr/local -D WITH_FFMPEG=ON -D PYTHON3_PACKAGES_PATH=/usr/lib/python3/dist-packages -D BUILD_EXAMPLES=OFF ..
make -j2 && sudo make install && sudo ldconfig
The Raspberry Pi is not the fastest Linux computer in the world, and the compilation process takes about 2 hours.For the Raspberry Pi 3 with 1GB RAM, the swap file size should be increased to at least 512MB; otherwise, the compilation will fail.
The C++ code itself is quite short:
#include <opencv2/opencv.hpp>
#include <vector>
#include <ctime>
#include "inference.h"
int main(int argc, char **argv) {
    Inference inf("yolov8n.onnx", cv::Size(640, 640), "", false);
    cv::Mat frame = cv::imread("test.jpg");
    // First run to 'warm-up' the model
    inf.runInference(frame);
    // Second run
    const clock_t begin_time = clock();
    std::vector<Detection> output = inf.runInference(frame);
    printf("dT: %f\n",  float(clock() - begin_time)/CLOCKS_PER_SEC);
    // Show results
    for (auto &detection : output) {
        cv::Rect box = detection.box;
        printf("Rect: %s %f: %d %d %d %d\n", detection.className.c_str(), detection.confidence,
               box.x, box.y, box.width, box.height);
    }
    return 0;
}
In this code, I used the “inference.h” and “inference.cpp” files from the Ultralitics GitHub repository, which should be placed in the same folder.I also executed the “runInference” method twice, just like in previous tests.We can now compile the source code using this command:
c++ yolo1.cpp inference.cpp -I/usr/local/include/opencv4 -L/usr/local/lib -lopencv_core -lopencv_dnn -lopencv_imgcodecs -lopencv_imgproc -O3 -o yolo1
The results are surprising. The C++ version is significantly slower than the previous versions! On the Raspberry Pi 3, the execution time was 110 seconds, more than three times slower than the Python version. On the Raspberry Pi 4, the computation time was 1.79 seconds, about 1.5 times slower. Overall, it is hard to say why. The OpenCV library for Python was installed using pip, but the OpenCV for C++ was built from source, and perhaps some ARM CPU optimizations were not enabled. If any readers know the reason, please indicate it in the comments below. Regardless, it is really interesting to see such effects happening.
I can “reasonably guess” that most data scientists and data engineers use their models in the cloud, or at least on high-end devices, and have never tried to run code “on-site” on embedded hardware. The goal of this article is to provide readers with some insights into how it works. In this article, we tried to run the YOLO v8 model on different versions of the Raspberry Pi, and the results were very interesting.
-
Running deep learning models on low-power devices can be challenging. Even the Raspberry Pi 4, which is the best model based on Raspbian at the time of writing, can only deliver the YOLO v8 Tiny model at about 1 FPS. Of course, there is room for improvement. Some optimizations might be possible, such as converting the model to FP16 (a lower precision floating-point format) or even INT8 format. Finally, code running on specialized single-board computers like the NVIDIA Jetson Nano, which supports CUDA, may be faster.
-
At the beginning of this article, I wrote that “running deep learning models using only OpenCV, without heavy frameworks like PyTorch or Keras, is promising for low-power devices.” In reality, PyTorch is an efficient and highly optimized framework. The original YOLO version based on PyTorch is the fastest, while the OpenCV-based ONNX code is 10-20% slower. However, at the time of writing this article, PyTorch is not available on 32-bit ARM CPUs, so there may be no choice on some platforms.
-
The results of the C++ version are even more interesting. As we can see, running it with proper optimizations can be a challenge, especially for embedded architectures. Moreover, without delving into these details, custom-built OpenCV C++ code may even run slower than the Python version provided by the board vendor.
This article is for learning and exchange purposes only. If there is any infringement, please contact the author for deletion.