1. Background
In the application of robots, object detection is an important topic. The rapid development of deep learning has shown significant advantages in detection performance compared to most traditional detection algorithms. However, deploying deep learning models to edge devices for efficient inference remains a challenging area.
In robotic control, the Raspberry Pi and Jetson series single-board computers are widely used. This blog demonstrates how to deploy deep learning models on low-computing platforms using the Raspberry Pi 4B as an example.
Unlike inference on GPUs, which typically uses direct Python inference code, efficient inference is generally achieved through inference frameworks. Common inference frameworks on the CPU side include ncnn, MNN, and OpenVINO; on the GPU side, TensorRT is used. Qualcomm also has inference frameworks such as SNPE and QNN for HTP.
This blog uses the CPU of the Raspberry Pi for inference and employs ncnn as the inference framework.
2. Results
The results of inferring the NanoDet-M network on the Raspberry Pi 4B are shown in the figure below.
In the two scenarios depicted, even in cases with dense detected objects, the detection algorithm can achieve 11fps with a high recognition rate.


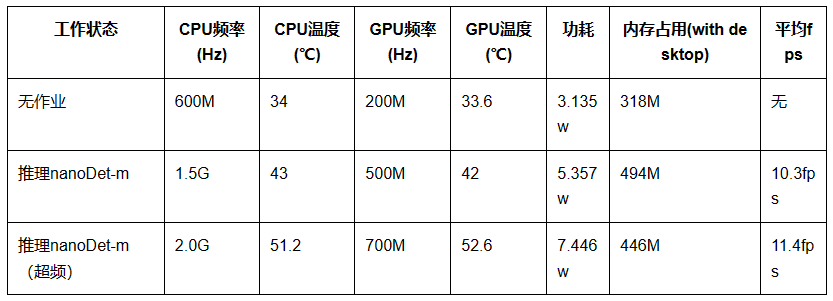
In addition to the inference results on the Raspberry Pi side, I also gathered some relevant information about the Raspberry Pi during inference.
After overclocking the Raspberry Pi, the average fps for a video of more than one minute can reach 11.4, with a maximum of 12fps. The temperature remains within a reasonable range. After overclocking, power consumption increased by about 2.1W compared to the non-overclocked state.
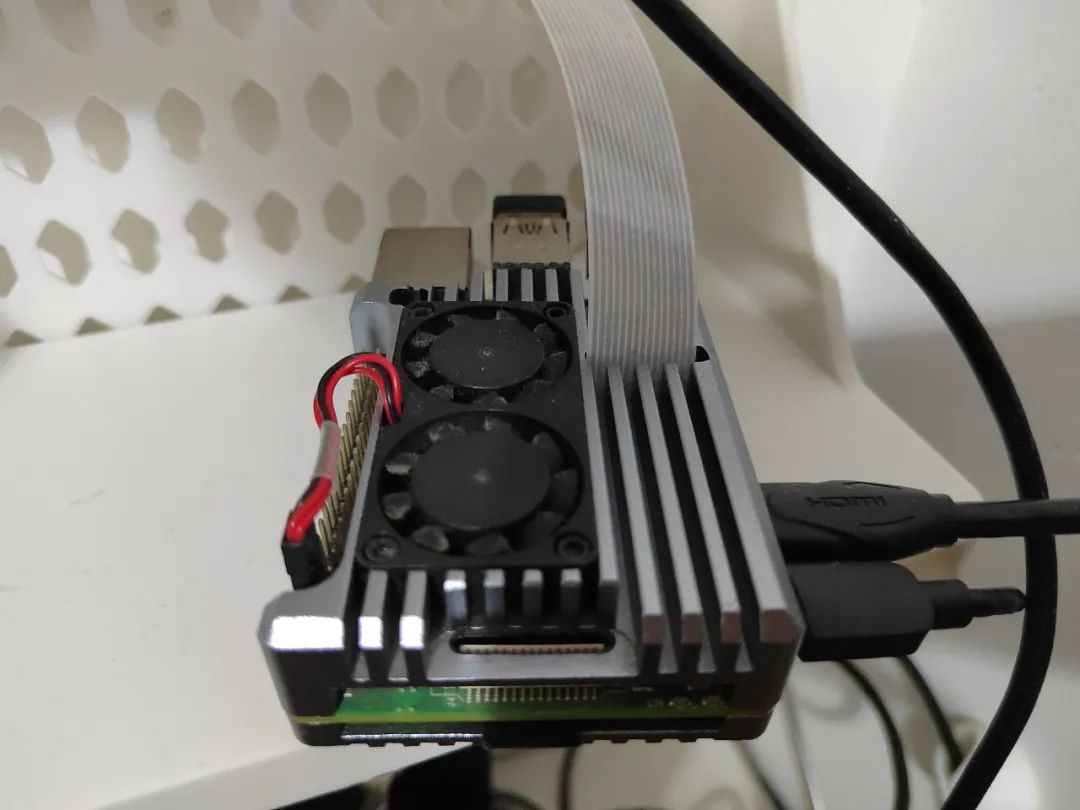
The following image shows the power consumption testing device I used.

3. NanoDet-M Network
The following figure shows the network to be deployed this time, with parts of the backbone and heads networks depicted.


The following table compares the data with YOLOv4 tiny. NanoDet-M achieves good mAP values with relatively low FLOPs and parameters, making it a very suitable network structure for inference on low-computing edge devices.

4. My Raspberry Pi Information
Hardware: Raspberry Pi 4B, 2G RAM, 32G ROM, powered by Honor Tablet 8 charging head, with a complete cooling set, as shown in the figure below.
Software: Raspberry OS, upstream branch Debian GNU/Linux 11 (bullseye).
5. ncnn Inference Related Software Installation
The following introduces the components and installation methods required for inferring the NanoDet-M network on the Raspberry Pi 4B.
5.1 Install ncnn
Execute uname -a to ensure the system is of aarch64 architecture.
Execute the following installation commands:
# check for updates
sudo apt-get update
sudo apt-get upgrade
# install dependencies
sudo apt-get install cmake wget
sudo apt-get install build-essential gcc g++
sudo apt-get install libprotobuf-dev protobuf-compiler
# download ncnn
git clone --depth=1 https://github.com/Tencent/ncnn.git
# install ncnn
cd ncnn
mkdir build
cd build
# build 64-bit ncnn
cmake -D NCNN_DISABLE_RTTI=OFF -D NCNN_BUILD_TOOLS=ON \
-D CMAKE_TOOLCHAIN_FILE=../toolchains/aarch64-linux-gnu.toolchain.cmake ..
make -j4
sudo make install
# copy output to dirs
sudo mkdir /usr/local/lib/ncnn
sudo cp -r install/include/ncnn /usr/local/include/ncnn
sudo cp -r install/lib/libncnn.a /usr/local/lib/ncnn/libncnn.a
In the ~/ncnn/build/install/bin folder, there are many model conversion tools that will be used in our later blogs to convert ONNX models to ncnn-supported models.
5.2 Install OpenCV 4.5.5
(1) Update EEPROM
The Raspberry Pi 4B supports updating the firmware in EEPROM, which can effectively reduce the operating temperature of the Raspberry Pi.
sudo rpi-eeprom-update
sudo rpi-eeprom-update -a
sudo reboot
(2) Compile and install OpenCV from source
Do not use pip or apt to install OpenCV, as these methods cannot guarantee a 64-bit version, which does not fully utilize the Raspberry Pi’s performance.
In Preferences -> Raspberry Pi Configuration -> Performance -> GPU Memory settings, allocate at least 128M video memory to the GPU.
Execute the following commands to install:
# check for updates
sudo apt-get update
sudo apt-get upgrade
# dependencies
sudo apt-get install build-essential cmake git unzip pkg-config
sudo apt-get install libjpeg-dev libpng-dev
sudo apt-get install libavcodec-dev libavformat-dev libswscale-dev
sudo apt-get install libgtk2.0-dev libcanberra-gtk* libgtk-3-dev
sudo apt-get install libgstreamer1.0-dev gstreamer1.0-gtk3
sudo apt-get install libgstreamer-plugins-base1.0-dev gstreamer1.0-gl
sudo apt-get install libxvidcore-dev libx264-dev
sudo apt-get install python3-dev python3-numpy python3-pip
sudo apt-get install libtbb2 libtbb-dev libdc1394-22-dev
sudo apt-get install libv4l-dev v4l-utils
sudo apt-get install libopenblas-dev libatlas-base-dev libblas-dev
sudo apt-get install liblapack-dev gfortran libhdf5-dev
sudo apt-get install libprotobuf-dev libgoogle-glog-dev libgflags-dev
sudo apt-get install protobuf-compiler
Download the source package for OpenCV 4.5.5:
cd ~
# If the network connection fails, access this URL on another computer, download it, and then place it in the ~/ directory of the Raspberry Pi
wget -O opencv.zip https://github.com/opencv/opencv/archive/4.5.5.zip
wget -O opencv_contrib.zip https://github.com/opencv/opencv_contrib/archive/4.5.5.zip
unzip opencv.zip
unzip opencv_contrib.zip
mv opencv-4.5.5 opencv
mv opencv_contrib-4.5.5 opencv_contrib
Before compiling, if you have a 2G RAM Raspberry Pi, you need to expand the swap partition; this step can be ignored for versions with more than 2G RAM.
Expanding swap method (for 2G RAM only):
Use the open-source code rpi_zram to expand swap, following the instructions in the README on GitHub.
rpi_zram: https://github.com/novaspirit/rpi_zram
Compile OpenCV 4.5.5:
cd ~/opencv
mkdir build
cd build
cmake -D CMAKE_BUILD_TYPE=RELEASE \
-D CMAKE_INSTALL_PREFIX=/usr/local \
-D OPENCV_EXTRA_MODULES_PATH=~/opencv_contrib/modules \
-D ENABLE_NEON=ON \
-D WITH_OPENMP=ON \
-D WITH_OPENCL=OFF \
-D BUILD_TIFF=ON \
-D WITH_FFMPEG=ON \
-D WITH_TBB=ON \
-D BUILD_TBB=ON \
-D WITH_GSTREAMER=ON \
-D BUILD_TESTS=OFF \
-D WITH_EIGEN=OFF \
-D WITH_V4L=ON \
-D WITH_LIBV4L=ON \
-D WITH_VTK=OFF \
-D WITH_QT=OFF \
-D OPENCV_ENABLE_NONFREE=ON \
-D INSTALL_C_EXAMPLES=OFF \
-D INSTALL_PYTHON_EXAMPLES=OFF \
-D PYTHON3_PACKAGES_PATH=/usr/lib/python3/dist-packages \
-D OPENCV_GENERATE_PKGCONFIG=ON \
-D BUILD_EXAMPLES=OFF ..
make -j4
sudo make install
sudo ldconfig
Verify the installation by entering the Python programming environment:
import cv2
print(cv2.__version__)
5.3 Install Code::Blocks
Use Code::Blocks for development on the Raspberry Pi. Those who prefer remote development can also directly use the remote development feature of VSCode.
6. Inference Path Code
This part of the content, along with model conversion and Raspberry Pi overclocking, will be elaborated in the next section.

“Developing Intelligent Cars from Scratch • Gu Yue & Qian Mo”
Created by the core team of Gu Yue Ju, this will guide everyone in designing and developing an intelligent car from scratch, covering a wide range of knowledge including structure, electronics, embedded systems, ROS, and artificial intelligence, quickly understanding the complete path of robot design and mastering the core methods of robot development.

(Scan the QR code to view course details)