This article covers the following content:
-
Entering AT mode for basic Bluetooth parameter settings
-
Arduino Bluetooth control LED circuit design and code writing
-
Testing functionality using Android Bluetooth serial debugging software

Entering AT Mode for Basic Bluetooth Parameter Settings
To use the Bluetooth module with Arduino, you first need to configure the basic parameters of the Bluetooth module. The basic parameter settings mainly include: Bluetooth name, mode, and pairing password, etc. You can set the Bluetooth module using USB-TTL to connect to a computer and use serial debugging software to enter AT mode, or you can use Arduino to connect to the Bluetooth module for settings. This article mainly introduces the latter method.
Precautions
When connecting Bluetooth, pay attention to whether the wiring is correct. Check carefully before powering on. In addition, be careful not to short-circuit the pins. When I first used the Bluetooth module, I damaged one because I didn’t pay attention to the wiring; it could only send messages but not receive them. So to avoid unnecessary losses, pay attention to this.
Arduino HC05 AT Mode Wiring
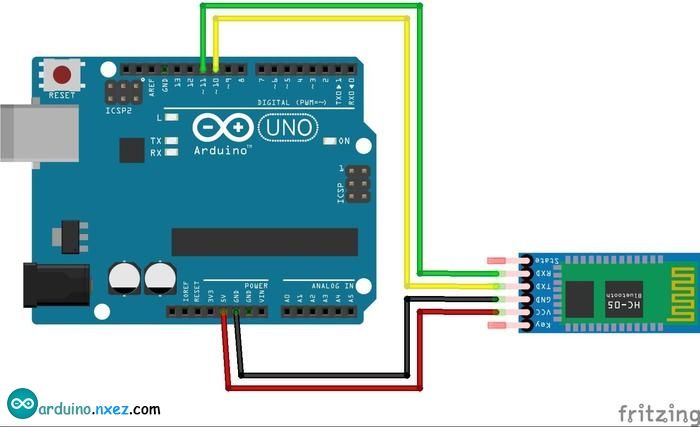
The wiring for entering AT mode to set up Bluetooth is as follows:
Arduino 5V – VCC
Arduino GND – GND
Arduino Pin10 – TXD
Arduino Pin11 – RXD
Check the wiring for correct connections before powering on
Arduino Code for Entering AT Mode
Next, we need to write a program to set the Bluetooth module to AT mode using Arduino. This program allows us to configure the Bluetooth module through the serial monitor provided by the Arduino IDE. The detailed Arduino code is as follows:
#include // Pin10 is RX, connected to HC05 TXD
// Pin11 is TX, connected to HC05 RXD
SoftwareSerial BT(10, 11);
char val;

void setup() {
  Serial.begin(38400);
  Serial.println("BT is ready!");
  // HC-05 default, 38400
  BT.begin(38400);
}

void loop() {
  if (Serial.available()) {
    val = Serial.read();
    BT.print(val);
  }

  if (BT.available()) {
    val = BT.read();
    Serial.print(val);
  }
}
Debugging with Arduino IDE Serial Monitor
First, power off the Arduino, then press the black button on the Bluetooth module, and power on the Arduino. If the Bluetooth module’s indicator light flashes at a frequency of 2 seconds, it indicates that the Bluetooth module has correctly entered AT mode.
Open the serial monitor in the Arduino IDE, select the correct port, set the output format to Both: NL & CR, and set the baud rate to 38400. You should see the message “BT is ready!” displayed in the serial monitor.
Then, enter AT. If everything is normal, the serial monitor will display OK.
Next, we can configure the Bluetooth module. The commonly used AT commands are as follows:
AT+ORGL    # Restore factory settings
AT+NAME=# Set Bluetooth name
AT+ROLE=0    # Set Bluetooth to slave mode
AT+CMODE=1    # Set Bluetooth to connect to any device
AT+PSWD=# Set Bluetooth pairing password
Under normal circumstances, after sending a command, it will return OK. If no information is returned, please check whether the wiring is correct, and whether the Bluetooth module has entered AT mode. If both points are fine, it may be an issue with the Bluetooth module; you can consult the Bluetooth module supplier.
After completing the settings, power off, and power on again. At this time, the Bluetooth module’s indicator light will flash quickly, indicating that Bluetooth has entered normal working mode.

Using Android Phone to Connect Arduino and Control LED Light Switch
After completing the configuration of the Bluetooth module, we will do a small experiment to control the Arduino switch LED light via mobile Bluetooth connection.
Arduino Circuit Design
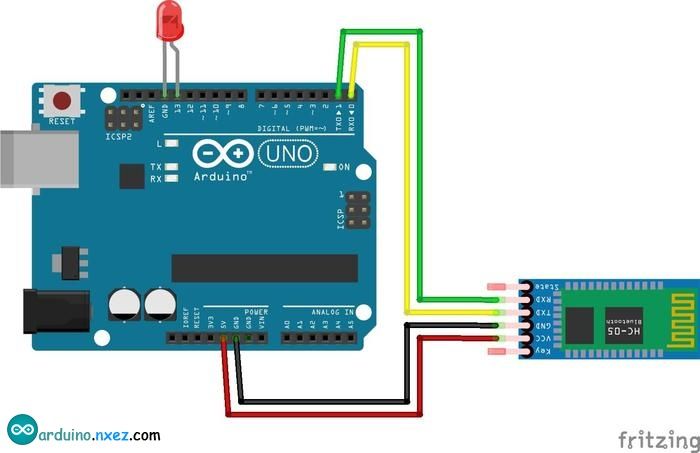
The circuit design here is relatively simple, mainly consisting of two parts:
-
Connection between Arduino and HC05 module
-
Connection between Arduino and LED
There are two points to note here: the TXD on the Arduino should connect to the RXD on the HC05 module, and the RXD on the Arduino should connect to the TXD on the HC05 module.
In the diagram below, my LED is directly connected to Arduino Pin13, but in the actual circuit connection, consider whether to use a series resistor based on the design of the connected LED light.
Arduino Bluetooth Control LED Light Program Design
The Arduino program code is as follows:
void setup()
{
  // Set baud rate to 38400
  Serial.begin(38400);
  pinMode(13, OUTPUT);
}

void loop()
{
  while(Serial.available())
  {
    char c=Serial.read();
      if(c=='1')
      {
        Serial.println("BT is ready!");
        // Return to mobile debugging program
        Serial.write("Serial--13--high");
        digitalWrite(13, HIGH);
      }
     if(c=='2')
     {
       Serial.write("Serial--13--low");
       digitalWrite(13, LOW);
     }
  }
}
Debugging on Android Phone
For debugging on the Android side, you need to download a Bluetooth serial debugging APP, which can be searched and downloaded from major app stores based on your preference.
After downloading and installing the APP, first open the Bluetooth settings on your phone, search for and pair with our Bluetooth module. Then open the Bluetooth serial debugging APP and connect to the Bluetooth module. After that, you can enter 1 in the APP, and you will see the LED light up, and you can see the return Serial–13–high in the APP (some APPs may not return the value on the same line). Then enter 2 in the APP, and you will see the LED turn off, with Serial–13–low returned in the APP.
Conclusion
In this article, we learned the two main steps of using the HC05 Bluetooth module in Arduino. First, enter AT mode to configure the Bluetooth module, paying attention to the correctness of the wiring. After the configuration is complete, connect the Bluetooth module’s TX to Arduino’s RX, and RX to Arduino’s TX, then use Serial in the Arduino program to achieve data transmission and reading. Finally, we tested our experiment’s success using the Bluetooth serial debugging APP on Android.
Author: speculatecat Original text: www.jianshu.com/p/4ebf1a01df51

More exciting content
Clever Prank Cannon
Magical Arduino Series: Make a Gesture Mouse with A4 Paper
Indian Guy Makes Smart Glasses for Less Than $10
Top 10 Most Interesting Arduino Music Projects