0. Why Perform Camera Calibration?
Camera calibration is a fundamental task in computer vision, and its core significance lies in establishing an accurate mathematical relationship between two-dimensional image pixels and the three-dimensional physical world. In simpler terms, the purpose of camera calibration is to determine the camera’s intrinsic and extrinsic parameters. The intrinsic parameters include the camera’s focal length, aperture, and distortion coefficients, while the extrinsic parameters refer to the camera’s position and orientation. As the saying goes, knowing yourself and your enemy ensures victory in a hundred battles. Only by understanding the camera’s intrinsic and extrinsic parameters can we accurately convert two-dimensional image pixels into three-dimensional physical world coordinates. So, what can we do with the camera’s real parameters? 1. We can eliminate camera distortion, ensuring that there are no significant measurement errors regardless of whether the object is at the center or edge of the lens. This will be the task of the next lesson. 2. We can calculate the coordinates of 3D points, which correspond to the three-dimensional physical world coordinates of the two-dimensional image pixels captured by the camera. This is the cornerstone of 3D reconstruction, which we won’t be using for a while.
For some theoretical background on camera calibration, please refer to my previous article “Camera Calibration”. This time, we will use OpenCV for camera calibration. Please refer to the official documentation: OpenCV Camera Calibration Documentation
1. Preparation Work
1.1 Prepare a Chessboard Pattern
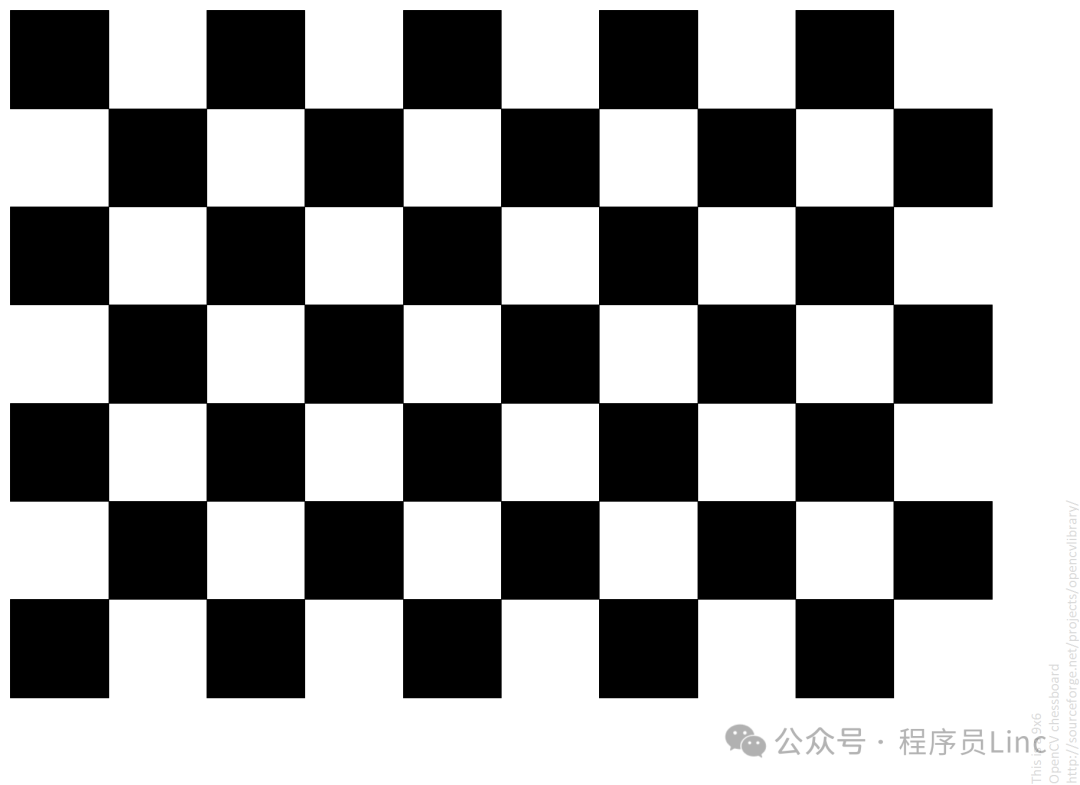
The chessboard pattern is the standard for camera calibration. It is a two-dimensional grid with fixed square sizes. You can purchase a chessboard pattern specifically for OpenCV online or print one yourself. I am using the chessboard pattern provided by OpenCV, which is 9×6 in size. See the image below:
1.2 Image Acquisition
Hold the chessboard pattern and capture multiple images. With the help of my friends, I took a total of 25 pictures. Yes, I used my webcam. During the shoot, the chessboard pattern should be placed at the center of the image, moving up, down, left, and right to ensure that every corner point is captured. See the image below: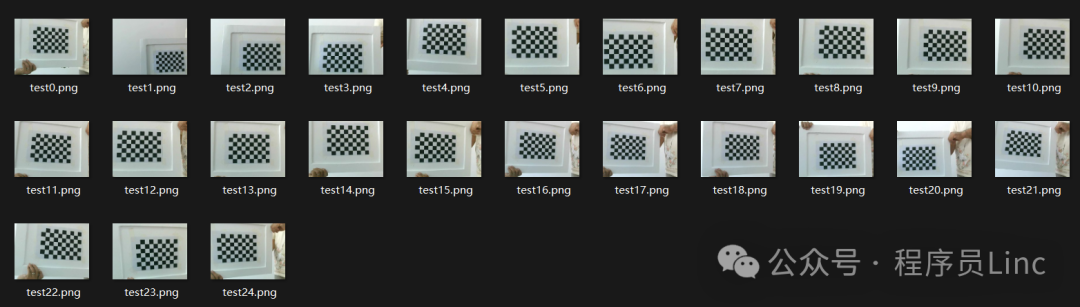
2. Calibration
The example provided by the official documentation is as follows:
import numpy as np
import cv2 as cv
import glob

# Termination criteria
criteria = (cv.TERM_CRITERIA_EPS + cv.TERM_CRITERIA_MAX_ITER, 30, 0.001)

# Prepare object points (3D) such as: (0,0,0), (1,0,0), (2,0,0) ....,(6,5,0)
# Here (0,0,0) is the bottom-left corner of the chessboard, (1,0,0) is the bottom-right corner, (2,0,0) is the top-right corner, and so on.
objp = np.zeros((6 * 9, 3), np.float32)
objp[:, :2] = np.mgrid[0:9, 0:6].T.reshape(-1, 2)

# Initialize arrays to store point sets
objpoints = []  # 3D points in the real world
imgpoints = []  # 2D points in the image

images = glob.glob(r'C:\Pictures\mv\camcal\netcamera\*.png')

for fname in images:
    img = cv.imread(fname)
    gray = cv.cvtColor(img, cv.COLOR_BGR2GRAY)

    # Find the chessboard corners
    ret, corners = cv.findChessboardCorners(gray, (9, 6), None)

    # If found, add object points and image points (after refinement)
    if ret:
        objpoints.append(objp)

        corners2 = cv.cornerSubPix(gray, corners, (11, 11), (-1, -1), criteria)
        imgpoints.append(corners2)

        # Draw the corners
        cv.drawChessboardCorners(img, (9, 6), corners2, ret)
        # Camera calibration
        ret, mtx, dist, rvecs, tvecs = cv.calibrateCamera(objpoints, imgpoints, gray.shape[::-1], None, None)
        print(ret, mtx, dist, rvecs, tvecs)
        cv.imshow('img', img)
        cv.waitKey(500)

cv.destroyAllWindows()
The results are as follows: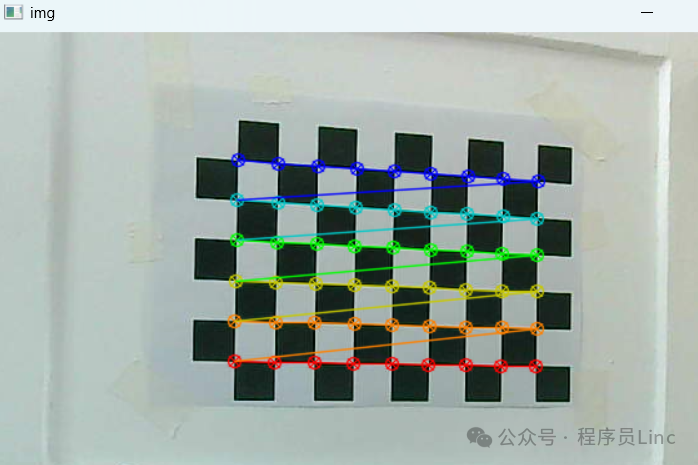
Please check your own output logs.
3. Explanation of Functions Used in Calibration
3.1 cv2.findChessboardCorners
This function is the core function in OpenCV for detecting chessboard corners, widely used in camera calibration, AR/VR, 3D reconstruction, and other fields.
Function Prototype
retval, corners = cv2.findChessboardCorners(
    image,  # Input image (8-bit grayscale or color)
    patternSize,  # Number of inner corners in the chessboard (columns, rows)
    corners=None,  # Output corner array (optional)
    flags=None  # Detection flags
)
Input Parameters:
- image
- Type: numpy.ndarray
- Description: The input image, must be an 8-bit grayscale or color image.
- patternSize
- Type: tuple (int, int)
- Description: Number of inner corners in the chessboard (columns, rows)
- corners
- Type: numpy.ndarray (N,1,2)
- Description: Output corner array, each element is the coordinate of a 2D point (x,y)
- Shape: If 8×6 corners are detected, the shape will be (48,1,2)
- flags
- Type: int
- Description: Detection flags used to adjust detection behavior.
- Default value: None
- Common values:
- cv2.CALIB_CB_ADAPTIVE_THRESH: Use adaptive thresholding to preprocess the image.
- cv2.CALIB_CB_NORMALIZE_IMAGE: Normalize the image.
- cv2.CALIB_CB_FAST_CHECK: Quick check, only detect the outer contours of the chessboard.
- cv2.CALIB_CB_FILTER_QUADS: Filter out incomplete quadrilaterals.
- cv2.CALIB_CB_ASYMMETRIC_GRID: Detect asymmetric chessboards.
- cv2.CALIB_CB_PARTIAL_OK: Allow detection of incomplete chessboards.
Output Parameters:
- retval
- Type: bool
- Description: Whether all corners were successfully detected
- corners
- Type: numpy.ndarray (N,1,2)
- Description: Detected corner pixel coordinates (in row-major order)
- Shape: If 8×6 corners are detected, the shape will be (48,1,2)
Example:
ret, corners = cv2.findChessboardCorners(
    gray,
    patternSize=(8,6),  # 8x6 inner corners
    flags=cv2.CALIB_CB_ADAPTIVE_THRESH + cv2.CALIB_CB_NORMALIZE_IMAGE
)
3.2 cv2.cornerSubPix
This function is used in OpenCV for sub-pixel level precise localization around detected corners. It is typically used in conjunction with functions like cv2.findChessboardCorners or cv2.findCirclesGrid to improve corner detection accuracy.
Function Prototype
cv2.cornerSubPix(
    image,  # Input grayscale image
    corners,  # Initial corner coordinates
    winSize,  # Search window size
    zeroZone,  # Dead zone size
    criteria  # Termination criteria
) -> refined_corners
Output Parameters:
- refined_corners
- Type: numpy.ndarray (N,1,2)
- Description: Pixel coordinates of corners after precise localization (in row-major order)
- Shape: Same as the input parameter corners
Input Parameters:
<span>winSize</span> – Search Window
- Type:
<span>(width, height)</span>tuple - Meaning: Size of the area around the initial corner for sub-pixel search
- Typical Values:
<span>(11,11)</span>or<span>(15,15)</span> - Selection Principle:
- Large window: Suitable for high-noise images, but increases computation.
- Small window: Suitable for clear images, but may miss the best position.
<span>zeroZone</span> – Dead Zone Size
- Type:
<span>(width, height)</span>tuple - Function: Square area at the center of the search window that does not participate in calculations
- Typical Values:
<span>(-1,-1)</span>indicates no dead zone - Application Scenario: When the initial corner is already quite accurate, a dead zone can be set to avoid over-correction
<span>criteria</span> – Termination Criteria
- Type:
<span>(type, max_iter, epsilon)</span>tuple - Composition:
<span>type</span>: Type of termination criteria (usually combined)<span>cv2.TERM_CRITERIA_EPS</span>– Stop when the precision threshold is reached<span>cv2.TERM_CRITERIA_MAX_ITER</span>– Stop when the maximum number of iterations is reached<span>max_iter</span>: Maximum number of iterations (typical values: 30-100)<span>epsilon</span>: Required precision (typical values: 0.001-0.01)
3.3 cv2.calibrateCamera
This function is the core function in OpenCV for camera calibration, used to compute the camera’s intrinsic matrix, distortion coefficients, rotation vectors, and translation vectors.
Function Prototype
retval, cameraMatrix, distCoeffs, rvecs, tvecs = cv2.calibrateCamera(
    objectPoints,  # Object point coordinates
    imagePoints,  # Image point coordinates
    imageSize,  # Image size
    cameraMatrix=None,  # Initial camera intrinsic matrix
    distCoeffs=None,  # Initial distortion coefficients
    flags=None,  # Calibration flags
    criteria=None  # Termination criteria
)
There is not much to say about the input parameters; a lot of code was spent to piece together the parameters. Below, I will focus on the return values.
- retval
- Type: float
- Description: Calibration error (root mean square error), the smaller the value, the higher the calibration accuracy. The ideal value should be less than 0.5 pixels.
- cameraMatrix
- Type: numpy.ndarray (3,3)
- Description: Camera intrinsic matrix
[[fx, 0, cx],
 [0, fy, cy],
 [0, 0, 1]]
<span>fx</span>,<span>fy</span>: Focal lengths in the x and y directions (in pixel units)<span>cx</span>,<span>cy</span>: Principal point coordinates (usually close to the center of the image)
- distCoeffs
- Type: numpy.ndarray (1,5)
- Description: Distortion coefficients, typically a vector of 5 elements
<span>[k1, k2, p1, p2, k3]</span> <span>k1</span>,<span>k2</span>,<span>k3</span>: Radial distortion coefficients<span>p1</span>,<span>p2</span>: Tangential distortion coefficients
- rvecs
- Type: list of numpy.ndarray (1,3)
- Description: Rotation vectors, the rotation vector from the world coordinate system to the camera coordinate system for each image (in Rodrigues representation), which can be converted to a 3×3 rotation matrix using
<span>cv.Rodrigues()</span>
- tvecs
- Type: list of numpy.ndarray (1,3)
- Description: Translation vectors, the translation vector from the world coordinate system to the camera coordinate system for each image
Interpretation of Actual Return Values
{
    "camera_matrix": [
        [
            624.1808123263625,
            0.0,
            356.3566689152541
        ],
        [
            0.0,
            633.7963074790043,
            257.6309298986105
        ],
        [
            0.0,
            0.0,
            1.0
        ]
    ],
    "dist_coeffs": [
        [
            -0.015038081393187793,
            0.043925788430321196,
            -0.0012532117000972945,
            0.0005417778377368488,
            -0.054404653779681594
        ]
    ],
    "reprojection_error": 0.18664516840125386
}
- reprojection_error is 0.186, which is considered excellent in the industry
- camera_matrix
| Parameter | Value | Evaluation Criteria | Conclusion |
|---|---|---|---|
| fx | 624.18 | Reasonable range (200-3000 pixels) | ✅ Normal |
| fy | 633.80 | Difference with fx should be <5% | ⚠️ Difference 1.5% |
| cx | 356.36 | Should be within ±15% of the image center | ✅ Normal (50% of 712×515 image) |
| cy | 257.63 | Same as above | ✅ Normal (50% of image height) |
- dist_coeffs are the distortion coefficients
[k1=-0.015, k2=0.044, p1=-0.00125, p2=0.00054, k3=-0.054]
Distortion Type Diagnosis
- Radial Distortion:
- k1 is negative → Barrel distortion (edges curve inward)
- k3 is negative → Enhanced barrel effect (higher-order compensation)
- k2 is positive → Suppresses excessive correction of mid-region distortion
- Tangential Distortion:
- Absolute values of p1/p2 <0.002 → Minimal eccentricity in lens installation
4. Conclusion
With the intrinsic matrix and distortion coefficients, distortion correction can be performed. We will continue in the next lesson. Attached is the OpenCV chessboard pattern: