Click the blue text Follow the blogger
1. Introduction
In the world of software development, code is just the first step. To turn this code into an executable program, we need the help of build tools. Today, we will get to know a very important tool – CMake.
A previous article titled “Don’t Know How to Learn CMake? This Concise Learning Path Will Save You!” detailed the roadmap for learning CMake. It explained how to start with basic concepts and gradually master advanced techniques while continuously exploring through practice.
You may wonder, what is CMake? Why should we learn it? In simple terms, CMake is like an excellent “project manager” that is responsible for managing your project build process, allowing your code to compile and run smoothly in various environments.
This article begins CMake’s first lesson: What is CMake? Why do we need CMake? And how to install CMake?

CMake has become an indispensable part of modern software development, especially in the development of compiled languages such as C++ and C. Mastering CMake can be said to be a necessary step for your advancement. If you are learning or using C++ development, this series of tutorials is tailored for you, as modern C++ projects almost all rely on CMake.
2. What Is CMake?
The definition of CMake: CMake (Cross-platform Make) is an open-source, cross-platform build system generator. It can be understood as an architect who wants to build a house; instead of directly picking up bricks to start stacking, they will first draw design blueprints to clarify the structure of the house and the materials used; CMake is similar to this design blueprint, but it serves software projects.
CMake is not a compiler, nor is it a tool that directly executes builds. You can think of it as a “build system generator.” The main task of CMake is to read the project description (a file named <span>CMakeLists.txt</span>) and generate the build system files needed for a specific platform based on the description. For example, a <span>Makefile</span> file on Linux/macOS.
Therefore, CMake itself does not compile your code. It acts like a “translator,” translating the project description into a “language” that different platforms can understand, and then allows the build tools on these platforms (such as <span>make</span>, Visual Studio, etc.) to actually perform compilation, linking, and other operations.
More importantly, CMake is cross-platform! So, whether developing on Windows, macOS, Linux, or other platforms, you only need to write one <span>CMakeLists.txt</span> file, and CMake can generate the build system suitable for various platforms, thus avoiding the hassle of writing different build scripts for each platform.
Now that we understand what CMake is, let’s see how it works. 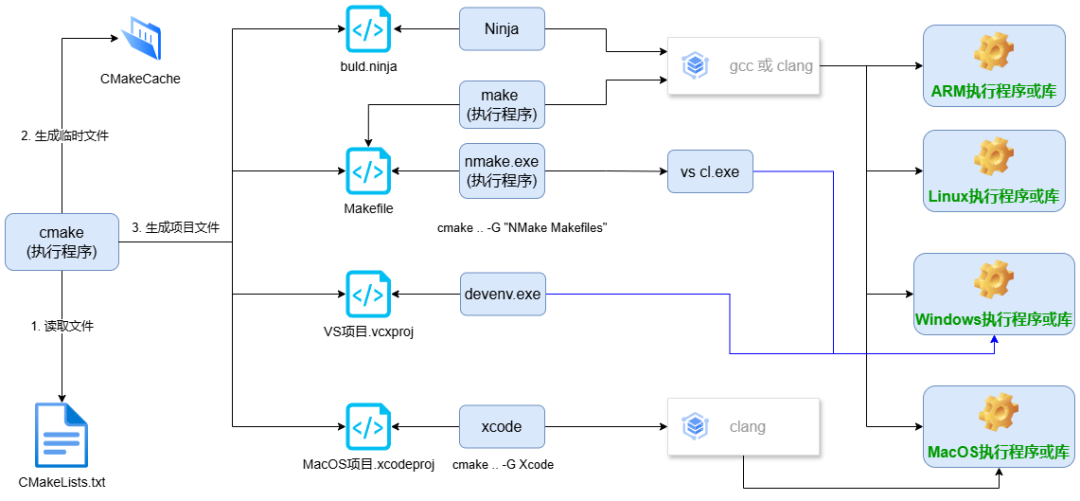
The workflow of CMake can be simplified into the following steps:
-
Read the
<span>CMakeLists.txt</span>file. -
Analyze the project structure and dependencies based on the description in the
<span>CMakeLists.txt</span>file. At this stage, CMake will detect the system environment, compiler information, and other necessary configurations. It will generate an internal “project model” that contains all the necessary information about the project. -
CMake selects the appropriate build system generator (such as
<span>Makefile</span>generator or Visual Studio project file generator) based on the previously generated “project model” and converts the project model into build system files for specific platforms. -
Use the corresponding build tools (such as
<span>make</span>or Visual Studio) to actually compile the code. The build tools will read the files generated by CMake and perform compilation, linking, and other operations, ultimately generating executable programs or libraries.
In addition to CMake, there are many different build tools, all aimed at solving the same problem: How to convert source code into executable programs or libraries. For example, <span>make</span>, <span>Automake</span>, and <span>SCons</span>, etc.
-
<span>make</span>: A very basic build tool that reads the<span>Makefile</span>file to perform build operations. Although<span>make</span>is powerful, writing<span>Makefile</span>files requires some experience and skills, and different platforms require different<span>Makefile</span>files. The downside of<span>make</span>is its poor portability, and for large projects, maintaining<span>Makefile</span>files can become very complex. -
<span>Automake</span>: Aims to simplify the writing of<span>Makefile</span>files, but it needs to be used in conjunction with<span>Autoconf</span>.<span>Autoconf</span>detects the system environment and generates suitable<span>Makefile</span>files for the current platform. Both<span>Automake</span>and<span>Autoconf</span>are relatively complex, with a steep learning curve, and the generated files tend to be large. -
<span>SCons</span>: A build tool written in Python that can automatically detect dependencies and is relatively easy to configure. The downside is that it requires a Python environment to be installed, which can be a bit heavyweight for simple projects.
The advantages of CMake:
-
The focus of CMake is on “generating build systems” rather than executing builds. It reads the
<span>CMakeLists.txt</span>file and then generates build system files suitable for different platforms (such as<span>Makefile</span>, Visual Studio project files, etc.). Therefore, you only need to maintain one<span>CMakeLists.txt</span>file without worrying about the build details for different platforms. This is fundamentally different from the manual writing of build files with<span>make</span>and<span>Automake</span>. -
CMake’s cross-platform capability is very powerful. It can work across various operating systems (such as Linux, macOS, Windows) and compilers, generating build system files suitable for different platforms from a single
<span>CMakeLists.txt</span>file without needing to modify the build scripts. This makes code portability and deployment much simpler and more efficient. -
Compared to the complex configurations of
<span>Automake</span>and the manual writing of<span>make</span>, CMake’s<span>CMakeLists.txt</span>file is more concise and easier to understand, with a relatively gentle learning curve, making it easier to get started. -
CMake provides a rich set of modules and features to conveniently manage tasks such as dependency management, testing frameworks, and code generation.
Many beginners may have some common misconceptions when first encountering CMake. Here, I want to emphasize (even though I’ve reiterated many times, it’s worth clarifying again):
-
CMake is not a compiler: CMake itself does not compile your source code. It is just a build system generator, and its role is to generate build files (such as
<span>Makefile</span>), which are then executed by actual compilers (such as<span>gcc</span>,<span>clang</span>, Visual Studio compiler, etc.). -
CMake does not directly compile code: As mentioned above, CMake is only responsible for generating build systems; the actual compilation work is done by build tools (such as
<span>make</span>, Visual Studio) and compilers. -
CMake is not an all-in-one build tool: The goal of CMake is not to replace build tools but to make better use of them. It generates build files for different platforms, allowing developers to use different build tools in a unified environment.
-
<span>CMakeLists.txt</span>files are not scripts:<span>CMakeLists.txt</span>files describe the build information of the project using their own syntax, not shell scripts or scripts from other programming languages.
3. Why Do We Need CMake?
In the software development process, we often encounter a tricky problem: how to ensure that our code can be built correctly on different operating systems and compilers? This is where CMake comes into play.
A cross-platform project needs to run on multiple operating systems such as Linux, macOS, and Windows. If using traditional build methods, you would have to write different build scripts for each platform:
- Linux: You need to write a
<span>Makefile</span>file and use the<span>gcc</span>or<span>clang</span>compiler. - macOS: You need a
<span>Makefile</span>file and use the<span>clang</span>compiler. - Windows: You need to create Visual Studio project files and use the Visual Studio compiler.
This is very cumbersome and error-prone. Not only does it take a lot of time to write and maintain these build scripts, but you also need to be familiar with the build methods and toolchains of different platforms. Moreover, even if you write these scripts, they may still have subtle differences that cause builds to fail on some platforms.
Even worse, if the project depends on third-party libraries, you also need to consider how to link these libraries correctly across different platforms. This complicates things even further.
CMake was born to solve these problems:
-
You only need to write one
<span>CMakeLists.txt</span>file that describes the project’s structure, dependencies, and compilation options. This file is platform-independent and can be used on all platforms supported by CMake. -
CMake will read the
<span>CMakeLists.txt</span>file and automatically generate the corresponding build system files based on the current operating system and compiler, such as<span>Makefile</span>(Linux/macOS) or Visual Studio project files (Windows). -
CMake ensures that the generated build files across different platforms have a consistent structure and behavior, greatly reducing errors during the build process.
-
CMake provides powerful dependency management capabilities, making it easy to find and link third-party libraries, regardless of where they are located on different platforms. This reduces the complexity of managing dependency libraries in large projects.
With CMake, there is no longer a need to manually write and maintain different platform build scripts. You can focus on writing code without worrying too much about build details. CMake will automatically handle these tedious tasks.
CMake not only solves the problem of cross-platform builds, but it is also a powerful project management tool.
Large software projects often rely on many third-party libraries, modules, or subprojects. CMake simplifies dependency management through a series of powerful features:
-
<span>find_package</span>command: The<span>find_package</span>command is the core dependency management tool in CMake. It can automatically find third-party libraries and set the corresponding compilation and linking options. -
Modular management: CMake can easily manage complex project structures, including submodules and subprojects. The
<span>add_subdirectory</span>command includes subprojects into the main project, and the<span>target_link_libraries</span>command links different modules together. -
CMake provides many predefined modules for finding and integrating common third-party libraries, such as
<span>OpenSSL</span>,<span>ZLIB</span>,<span>Qt</span>, etc. -
CMake also provides the
<span>FetchContent</span>module for directly downloading and building dependencies from URLs, simplifying the integration process of third-party libraries.
The power of a tool depends not only on its features but also on the community support and application range behind it. CMake excels in both aspects:
- CMake has a large and active community, providing rich official documentation, tutorials, and example code.
- CMake is widely used in various types of projects, and many well-known open-source projects use CMake as their build system, such as LLVM, Qt, OpenCV, Boost, etc.
4. How to Install CMake
4.1 Install CMake on Linux
Most Linux distributions provide CMake through their package managers. You can install CMake using the following commands:
# Debian/Ubuntu:
sudo apt update && sudo apt install cmake
# Or upgrade CMake
sudo apt upgrade cmake

# Fedora:
sudo dnf install cmake
# Or upgrade CMake
sudo dnf update cmake

# CentOS/RHEL:
sudo yum install cmake
# Or upgrade CMake
sudo yum update cmake

# Arch Linux:
sudo pacman -S cmake
# Or upgrade CMake
sudo pacman -Syu cmake
However, in some distributions, the version of CMake may be outdated, so downloading the binary files provided by Kitware becomes the preferred option. The CMake official download page is https://cmake.org/download/. Below is a shell script that automatically downloads the corresponding CMake version for an X86 64 bit system:
cmake_version="3.22.1"
target_path=$HOME/workspace/cmake/${cmake_version}
cmake_url="https://cmake.org/files/v">${cmake_version%.*}/cmake-${cmake_version}-Linux-x86_64.tar.gz"
mkdir -p "${target_path}"
curl -Ls "${cmake_url}" | tar -xz -C "${target_path}" --strip-components=1
export PATH=$HOME/workspace/cmake/${cmake_version}/bin${PATH:+:$PATH}
cmake --version
If your Linux distribution also supports installing CMake via <span>snap</span> or <span>Flatpak</span>, you can install CMake using the command <span>sudo snap install cmake --classic</span>.
4.2 Install CMake on Windows
Visit the CMake official download page, and on the download page, you will see installation packages for different platforms. Download the <span>Windows Installer</span> version (a <span>.msi</span> file). Choose the version that matches your Windows system architecture (32-bit or 64-bit). It is recommended to download the latest version of CMake to ensure you have the latest features and bug fixes. 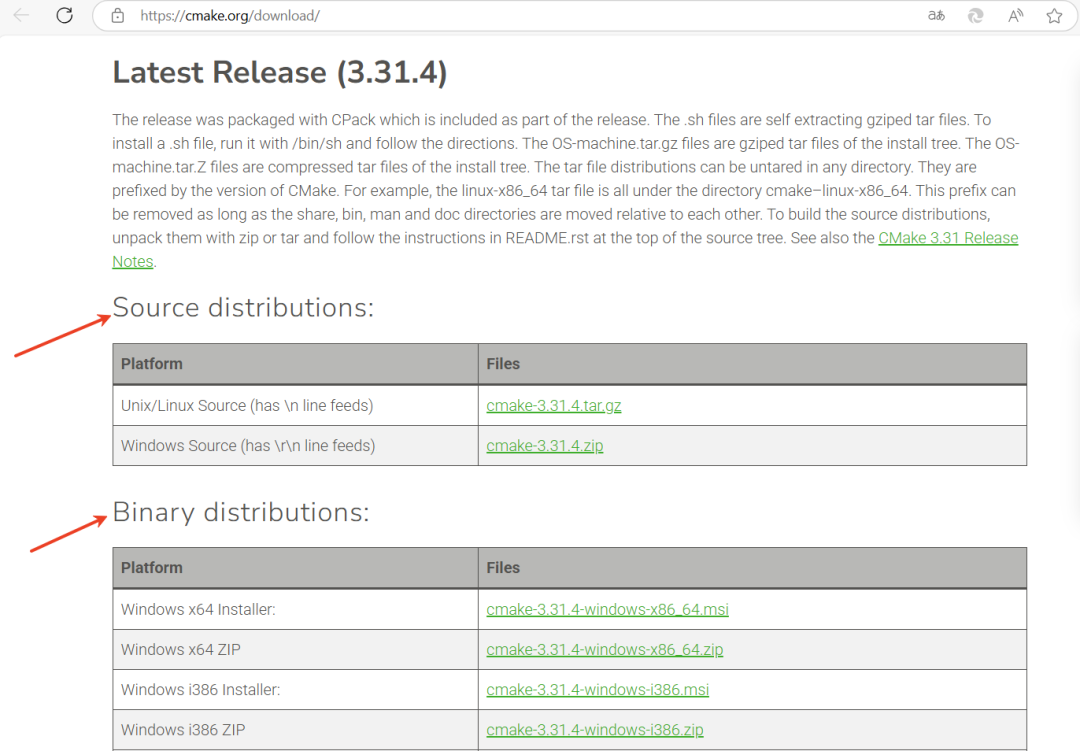
After downloading, double-click the <span>.msi</span> file to run the installer. The installation process is quite simple; just keep clicking “next” as prompted by the installer. During the installation, the installer will ask whether to add CMake to the system environment variables. Although this is optional, it is strongly recommended to check this option. If you do not check this option, you will have to manually add the installation path of CMake to the system’s <span>Path</span> environment variable later. After adding the system environment variable, you can directly use the <span>cmake</span> command in the command line (CMD or PowerShell).
In the command prompt (CMD) or PowerShell, enter <span>cmake --version</span> and press Enter to verify if the installation was successful. If CMake is installed successfully, you will see the version information of CMake.
In addition to the direct installation package mentioned earlier, there are some more “advanced” ways to install CMake on Windows.
Visual Studio’s Built-in CMake: If you are using Visual Studio 2017 or a newer version, it is convenient! Visual Studio has built-in support for CMake, so you don’t need to install CMake separately. Just check the “C++ CMake tools for Windows” component during the Visual Studio 2017 installation.
MSYS2, a “pseudo Linux” development environment: MSYS2 is a tool that simulates a Linux environment on Windows, with a command-line interface similar to Linux terminals and a powerful package manager <span>pacman</span>. You can download the MSYS2 installer from https://www.msys2.org and follow the instructions on the official website for installation. Then use the package manager <span>pacman</span> to install CMake.
To install the 64-bit version:
$ pacman -S mingw64/mingw-w64-x86_64-cmake
To install the 32-bit version:
$ pacman -S mingw64/mingw-w64-i686-cmake
4.3 Install CMake on macOS
Similarly, first visit the CMake official download page. On the download page, select the <span>macOS</span> corresponding <span>.dmg</span> file. After downloading, double-click the <span>.dmg</span> file, and then drag the <span>CMake.app</span> into the <span>Applications</span> folder. This completes the installation of CMake.
Alternatively, you can get the latest version of CMake directly:
$ brew upgrade cmake
To use the <span>cmake</span> command in the terminal, you need to create a symlink.
sudo "/Applications/CMake.app/Contents/bin/cmake" --install-prefix=/usr/local
Or create a symlink to /usr/local/bin:
    sudo ln -s /Applications/CMake.app/Contents/bin/cmake /usr/local/bin/cmake
    sudo ln -s /Applications/CMake.app/Contents/bin/cpack /usr/local/bin/cpack
    sudo ln -s /Applications/CMake.app/Contents/bin/ctest /usr/local/bin/ctest
5. Compilers
In a GNU/Linux environment, the GNU Compiler Collection (GCC) is undoubtedly the most common and straightforward choice. It is not only free and open-source software but is also natively supported by almost all Linux distributions. GCC includes compilers for multiple programming languages such as C, C++, Fortran, etc., which can meet most development needs.
Install GCC (using Ubuntu as an example):
sudo apt-get update   # Update package list (strongly recommended)
sudo apt-get install g++ gcc
Besides GCC, Clang, under the LLVM project, is also an excellent C/C++ compiler. Clang aims to provide faster compilation speeds and better error diagnostic information.
sudo apt-get install clang clang++
On macOS, Apple’s Xcode development toolkit already includes the LLVM compiler suite. This suite contains C and C++ compilers (Clang, which is the same as the one on Linux systems) and can be directly used for compiling C and C++ projects. There is no need to install the LLVM compiler separately.
On Windows, there are usually two main compiler options:
-
Visual Studio: Microsoft’s Visual Studio provides a comprehensive development environment, including C and C++ compilers. Visual Studio is commercial software, but the community edition is free.
-
MSYS2/MinGW-w64: MSYS2 is a software distribution that provides a Unix-like environment for Windows. It includes a package manager
<span>pacman</span>that can be used to install various toolchains, including GCC and Clang. MinGW-w64 is a GCC compilation suite provided by MSYS2 that offers a native compilation environment for Windows.
“Cross-compilation” is an important technique. It refers to compiling code on one platform (for example, your development machine) and running it on another different platform (such as embedded devices or other operating systems). To achieve this, you need to use a specialized “cross-compiler,” not a regular compiler.
For Debian/Ubuntu-like systems, use the <span>apt</span> package manager to install cross-compilers.
sudo apt-get update  # It is strongly recommended to update the package list first
sudo apt-get install gcc-mingw-w64 g++-mingw-w64
Once the cross-compiler is installed, you can compile executable files (such as <span>.exe</span> files) that can run on Windows from a Linux system.
On macOS, use the Homebrew package manager to install cross-compilation toolchains for Windows:
brew install mingw-w64
In addition to using package managers to directly install cross-compilers, another method is to use MXE (M Cross Environment), whose official website is (https://mxe.cc).
6. Conclusion
CMake, as a powerful build tool, plays an important role in C/C++ development. It solves the problem of cross-platform builds, providing powerful features and flexibility, but it also has a certain learning curve and configuration complexity. If you are developing C/C++ projects, especially cross-platform projects, mastering CMake is definitely a skill worth investing in.
In the next article, we will start learning how to write the first <span>CMakeLists.txt</span> file and use CMake to build projects.
 Lion Welcome to follow my public account for learning technology or submitting articles