If you don’t want to miss my updates, remember to check the public account in the upper right corner and set it as a star, take down the star and give it to me.


A new project for face recognition with Raspberry Pi, this project mainly demonstrates step by step how to use the Raspberry Pi original camera PiCam to achieve real-time face recognition. Although there are detailed steps, if you are a beginner with no foundation, it is recommended to supplement your knowledge of face recognition and the basics of using Raspberry Pi before attempting this project.
Hardware and Software Used in the Project:
Hardware: Raspberry Pi 3 Model B, Raspberry Pi 3 Camera Module
Software: OPENCV, Python3
Many Raspberry Pi projects use the open-source OpenCV, here we will use Raspberry Pi and Python for collaboration.The code writing involves three steps:
Step 1: Collect face data and face detection
Step 2: Train the face recognition model
Step 3: Face recognition inference

The entire process of face recognition
Step 1: Configure the software environment:
Install OpenCV 3 + Python on the Raspberry Pi, this is not the focus, there are plenty of installation methods online, search and install.
Step 2: Call the camera
If OpenCV is already installed on RPi, next, test to confirm whether the camera is working properly. Enter the following Python code in the IDE:
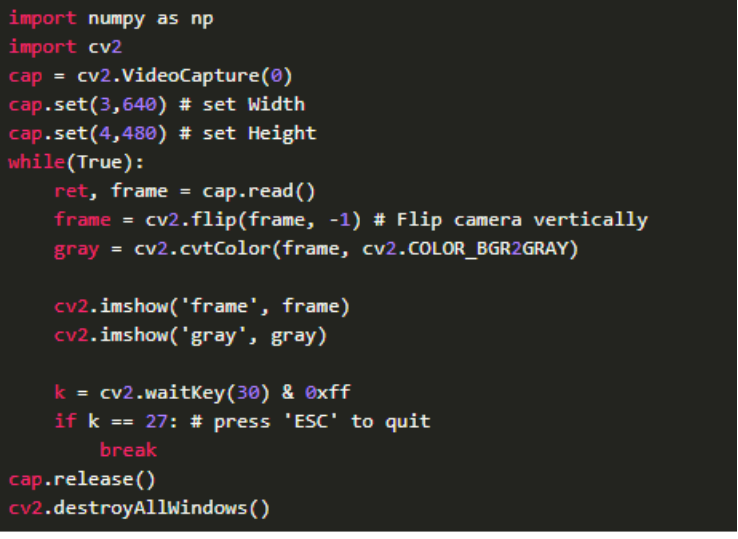
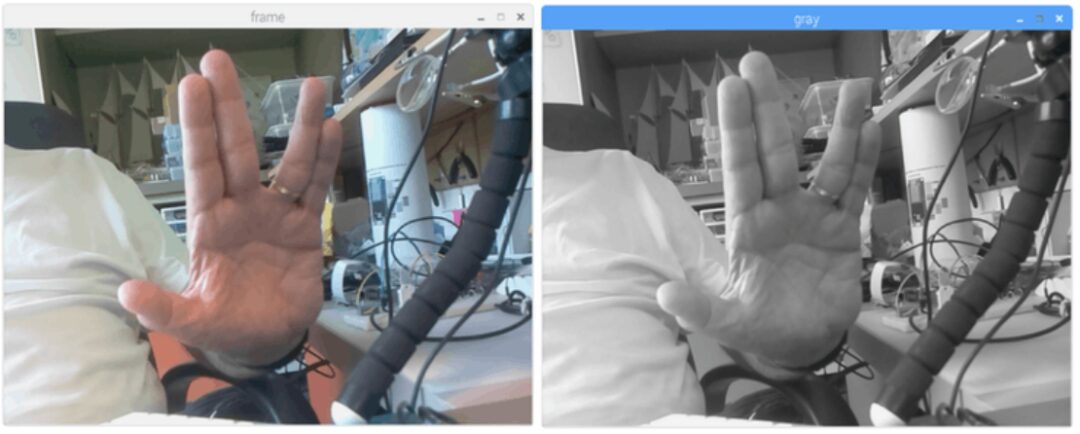
This code can call the PiCam, capture the video stream, and display it in both black and white mode and RGB mode. Press Esc to exit the program.
Step 3: Face detection
The most basic task in face recognition is to implement face detection, first capture the face in an image, and then recognize the face in the image and compare it with the face data in the database.
The most common method for face detection is to use “Haar Classifier”. The object detection based on Haar features using a cascade classifier is an effective object detection method proposed by Paul Viola and Michael Jones, based on machine learning.
To perform face detection, this algorithm requires a large number of positive images (images with faces) and negative images (images without faces) to train the classifier, and then extract features from them. OpenCV can perform training and inference for faces. If you want to train your own classifier for any object, such as cars, airplanes, etc., you can also use OpenCV for training. Of course, if you do not want to create your own classifier, OpenCV already includes many pre-trained classifiers for faces, eyes, smiles, etc. These XML files can be downloaded from the haarcascades directory.
The code is as follows, or you can visit to download the code
https://github.com/Mjrovai/OpenCV-Face-Recognition/blob/master/FaceDetection/faceDetection.py
import numpy as np
import cv2
faceCascade = cv2.CascadeClassifier('Cascades/haarcascade_frontalface_default.xml')
cap = cv2.VideoCapture(0)
cap.set(3,640) # set Width
cap.set(4,480) # set Height
while True:
    ret, img = cap.read()
    img = cv2.flip(img, -1)
    gray = cv2.cvtColor(img, cv2.COLOR_BGR2GRAY)
    faces = faceCascade.detectMultiScale(
        gray,
        scaleFactor=1.2,
        minNeighbors=5,
        minSize=(20, 20)
    )
    for (x,y,w,h) in faces:
        cv2.rectangle(img,(x,y),(x+w,y+h),(255,0,0),2)
        roi_gray = gray[y:y+h, x:x+w]
        roi_color = img[y:y+h, x:x+w]
    cv2.imshow('video',img)
    k = cv2.waitKey(30) & 0xff
    if k == 27: # press 'ESC' to quit
        break
cap.release()
cv2.destroyAllWindows()
This part of the code calls our classifier function:
 faces = faceCascade.detectMultiScale(
        gray,
        scaleFactor=1.2,
        minNeighbors=5,
        minSize=(20, 20)
    )
This part of the code is used to “mark” faces in the image,
for (x,y,w,h) in faces:
    cv2.rectangle(img,(x,y),(x+w,y+h),(255,0,0),2)
    roi_gray = gray[y:y+h, x:x+w]
    roi_color = img[y:y+h, x:x+w]
If a face is detected, it will return the detected face position as a rectangle with the top-left corner (x,y), width “w”, and height “h” = = (x,y,w,h). As shown in the figure:
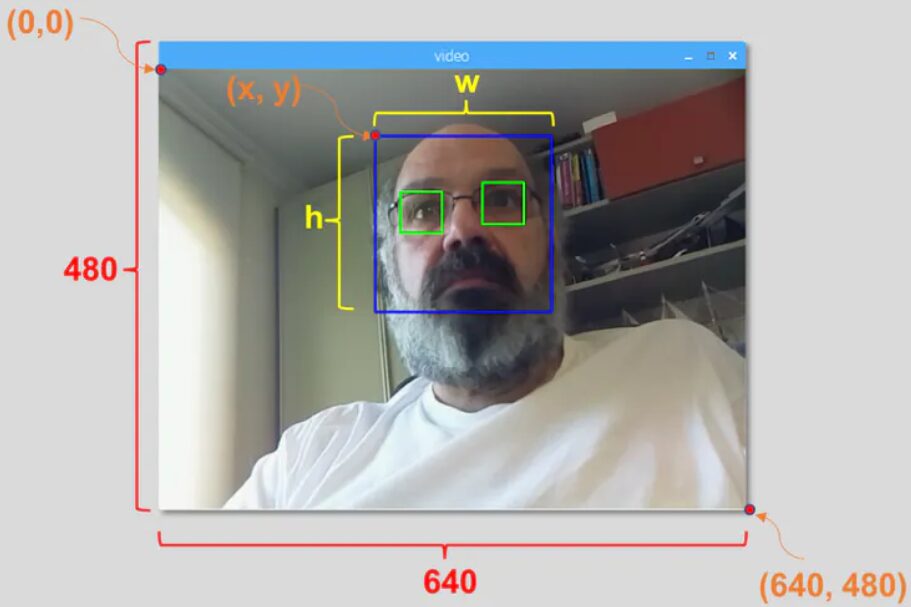
If the above functionality can be achieved, the face detection function is basically realized, and Python code can be run on RPi. The effect is as follows:

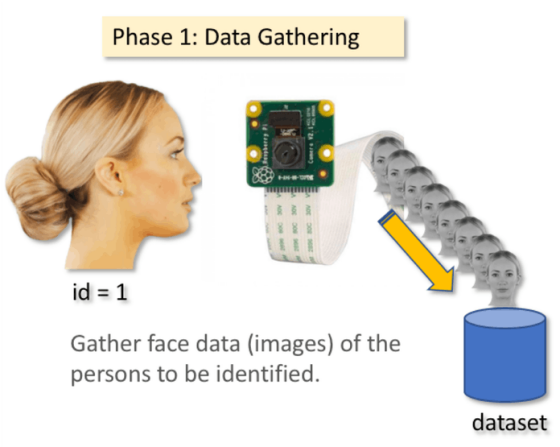
Step 4: Collect face data
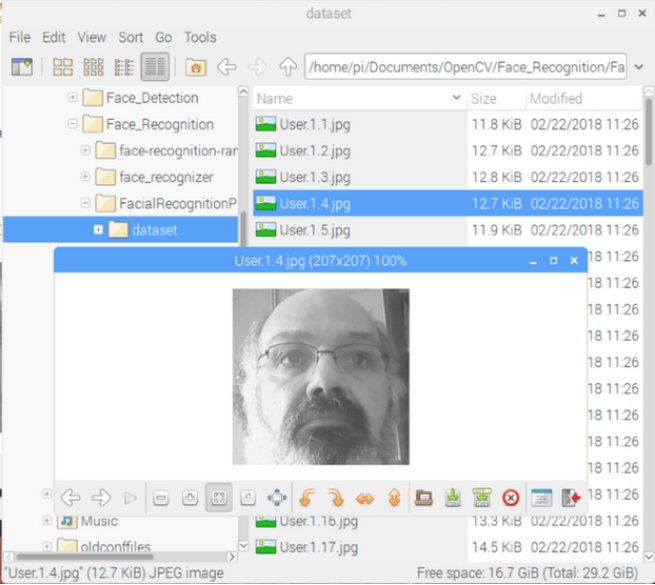
Let’s start the first phase of the project code. We will store a set of photos for each ID for subsequent face recognition.
First, create a development project: FacialRecognitionProject, create a dataset to store our facial specimen dataset. Also store the above code for calling PiCam and face detection code.
import cv2
import os
cam = cv2.VideoCapture(0)
cam.set(3, 640) # set video width
cam.set(4, 480) # set video height
face_detector = cv2.CascadeClassifier('haarcascade_frontalface_default.xml')
# For each person, enter one numeric face id
face_id = input('\n enter user id end press <return> ==>  ')
print("\n [INFO] Initializing face capture. Look at the camera and wait ...")
# Initialize individual sampling face count
count = 0
while(True):
    ret, img = cam.read()
    img = cv2.flip(img, -1) # flip video image vertically
    gray = cv2.cvtColor(img, cv2.COLOR_BGR2GRAY)
    faces = face_detector.detectMultiScale(gray, 1.3, 5)
    for (x,y,w,h) in faces:
        cv2.rectangle(img, (x,y), (x+w,y+h), (255,0,0), 2)
        count += 1
        # Save the captured image into the datasets folder
        cv2.imwrite("dataset/User." + str(face_id) + '.' + str(count) + ".jpg", gray[y:y+h,x:x+w])
        cv2.imshow('image', img)
    k = cv2.waitKey(100) & 0xff # Press 'ESC' for exiting video
    if k == 27:
        break
    elif count >= 30: # Take 30 face samples and stop video
         break
# Do a bit of cleanup
print("\n [INFO] Exiting Program and cleanup stuff")
cam.release()
cv2.destroyAllWindows()
For each captured frame, we save it in the “dataset” directory. Note, to save the above files, you must import the library “os”. The naming format for each file:
cv2.imwrite(<span>"dataset/User."</span> + str(face_id) + <span>'.'</span> + str(count) + <span>".jpg"</span>, gray[<span>y</span>:<span>y</span>+h,<span>x</span>:<span>x</span>+w])
User.face_id.count.jpgLike this:
Step 5: Model training
Now we need to extract features from the images stored for each ID number, and then use them to train the recognizer. Finally, a yml file will be generated on the recognizer.
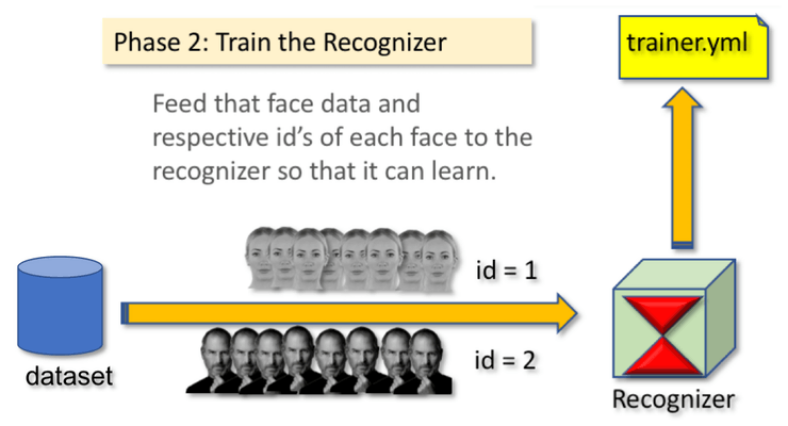
First, download the PIL library in the terminal, the function getImagesAndLabels (path) will collect the ID numbers and corresponding facial features from our dataset.
recognizer = cv2.face.LBPHFaceRecognizer_create()The function recogizer.train() trains our face recognizer with the features just read.
recognizer.train(faces, np.array(ids))The specific code is as follows:
import cv2
import numpy as np
from PIL import Image
import os
# Path for face image database
path = 'dataset'
recognizer = cv2.face.LBPHFaceRecognizer_create()
detector = cv2.CascadeClassifier("haarcascade_frontalface_default.xml");
# function to get the images and label data
def getImagesAndLabels(path):
    imagePaths = [os.path.join(path,f) for f in os.listdir(path)]
    faceSamples=[]
    ids = []
    for imagePath in imagePaths:
        PIL_img = Image.open(imagePath).convert('L') # convert it to grayscale
        img_numpy = np.array(PIL_img,'uint8')
        id = int(os.path.split(imagePath)[-1].split(".")[1])
        faces = detector.detectMultiScale(img_numpy)
        for (x,y,w,h) in faces:
            faceSamples.append(img_numpy[y:y+h,x:x+w])
            ids.append(id)
    return faceSamples,ids
print ("\n [INFO] Training faces. It will take a few seconds. Wait ...")
faces,ids = getImagesAndLabels(path)
recognizer.train(faces, np.array(ids))
# Save the model into trainer/trainer.yml
recognizer.write('trainer/trainer.yml') # recognizer.save() worked on Mac, but not on Pi
# Print the number of faces trained and end program
print("\n [INFO] {0} faces trained. Exiting Program".format(len(np.unique(ids))))
Step 6: Face recognition
The face recognizer has been implemented, now we need to capture faces on the camera. If the person has previously taken and trained their face, the recognizer will make a prediction and return the ID name and index.
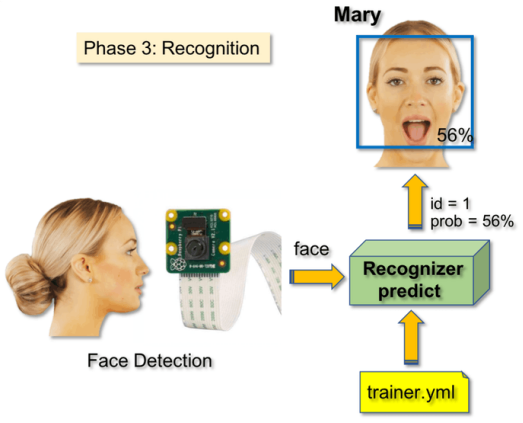
Using the newly trained recognizer model (load trainer.yml), here we use a new array, replacing the previous labels with names, and then proceed with face recognition just like the previous “face classifier” step, and recognizer.predict will return the matching rate after recognition for each image.
The specific code can be found by replying with: Raspberry Pi face recognition on “Darwin Says” WeChat.
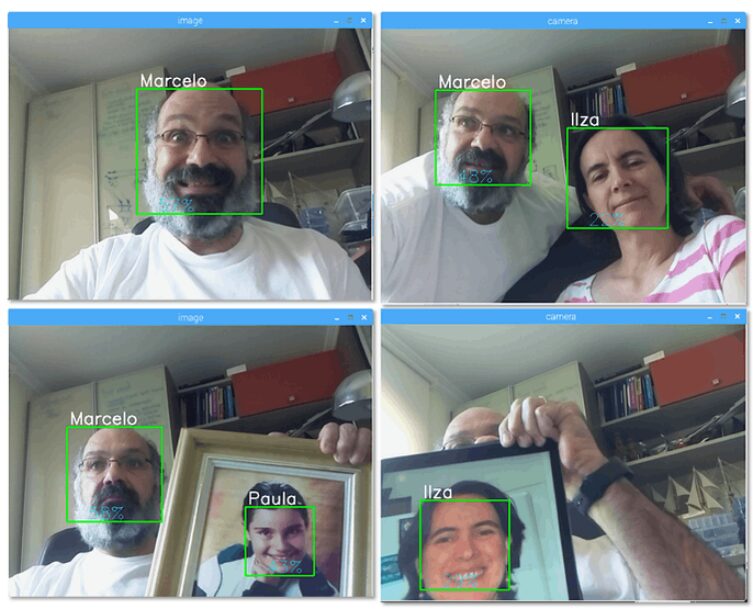
Step 7: Results
Finally, we collect images with PiCam, and the recognizer determines whether it is a face from our dataset, displaying the person’s name and matching index in the image. If the image from PiCam is not recognized in our database, we will display Unknown. The specific code can be found by replying with: Raspberry Pi face recognition on “Darwin Says” WeChat.
The effect is as follows:
Compiler: Wind Blowing Wheat Waves

Make Smart Relay Without Arc with STM32
Only 5 Components to Create Practical New Type Necklace
The Simplest Method for Heart Rate Measurement (Suitable for Secondary Development)
Crack Magnetic Levitation Globe
Magical Light Can Transmit Video? Revealing the Production Process
DIY Smart Watch with STM32 60FPS Animation
Pay Tribute to Classic Radio, Watch the Production Process
DIY Third Eye: Special Glasses with Bluetooth/OLED/Lens Function
Homemade Solar Charger that Tracks Maximum Power Point
Night Vision Glasses Without MCU, Just Connect Wires
The Correct Way to DIY Flow Meter, Interest Modifier
Homemade High-Difficulty Racing Timer (Lap/Heat Sensitive Printing)
DIY Mobile WIFI Controlled LED Dice
Gas Burning Power Bank
Homemade Simple Raspberry Pi Security System
Make a Small Weather Station with Microcontroller + ESP8266
Ultra Mini & Highly Expandable Palm Machine Car
Dream Link, Remote Develop Microcontroller with Raspberry Pi
Plant Protection Robot with Automatic Path Finding + Pest Recognition
uECG Realizes Heartbeat LED Light Ring
Wireless Smart High-Power Switch
Make ESP8266 Smart Health Watch from Scratch
Gather Waste MCU, Turn Waste into Treasure
Deploy Intruder Detection System with Pi Pico + Edge Impulse
DIY Wifi Signal Strength Detector
