Introduction: Windows IoT is a Microsoft operating system designed for embedded development boards, running Windows UWP (C# development), allowing the design of rich interactive interfaces, driving GPIO, and connecting various sensors to perform interesting tasks. This article details how to use it to build an environmental monitoring system and upload data to the Microsoft Flow cloud server.
Tools: A Windows 10 computer, Raspberry Pi 3B/3B+, (8GB or higher capacity SD card, card reader).
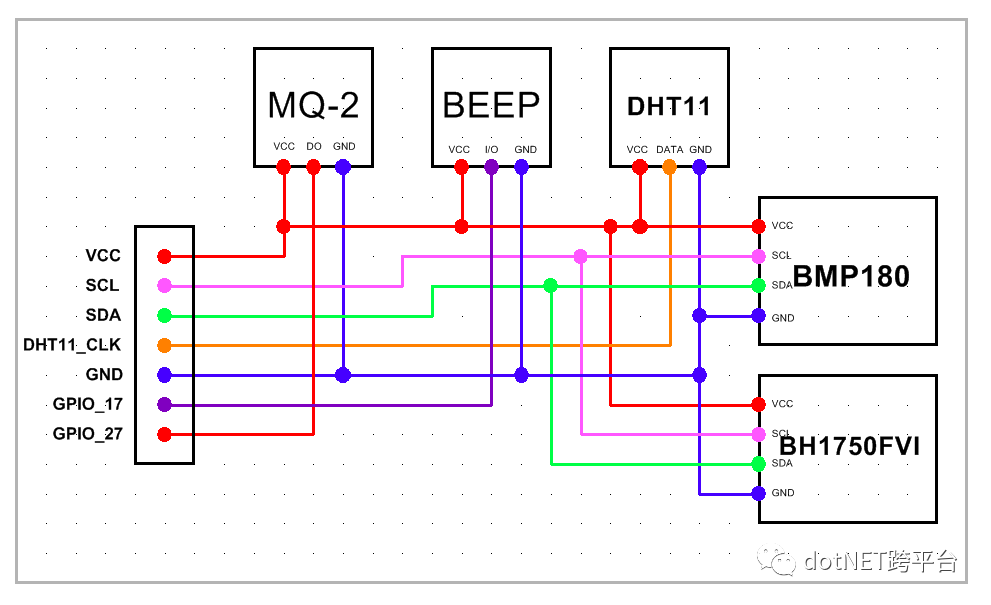
Sensors: DHT11 temperature and humidity sensor, BMP180 barometer, BH1750FVI light intensity sensor, MQ-2 smoke sensor, buzzer, and several DuPont wires.
System Framework:
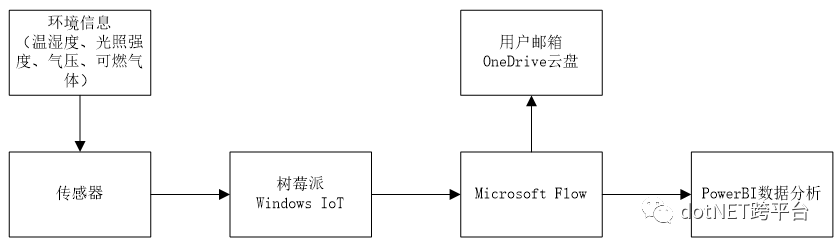
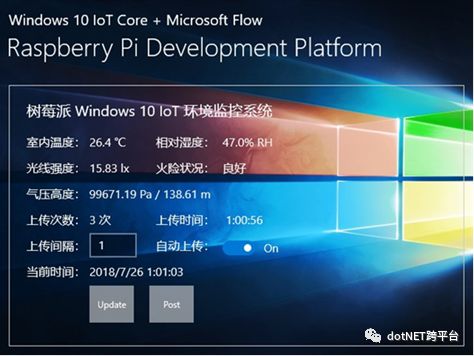
Collect indoor temperature and humidity, light intensity, and atmospheric pressure, alarm for fire situations, and upload data to the cloud.
(All from Microsoft, PowerBi part is not done)
PS:
1. The sensor driver code for this system comes from https://github.com/ZhangGaoxing/windows-iot-demo
Moved to Gitee for faster clone: https://gitee.com/xKryo/windows-iot-demo
2. The DHT11 project code has some issues; modified version download link: https://pan.baidu.com/s/11-EofiscGOnMuSyPgvFO1w Extraction code: a2p1
3. The complete code for this system: https://pan.baidu.com/s/1gTaC3vrEigzjzqDfF_uA1Q Extraction code: quau
4. Microsoft Flow server now requires a registered premium account for HTTP request triggers.
Main Content:
1. Setting Up the Development Platform
1. Install Windows IoT on Raspberry Pi
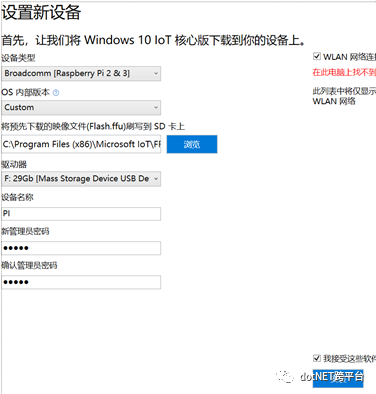
Download Windows 10 IoT Core Dashboard and the latest firmware: https://docs.microsoft.com/en-us/windows/iot-core/downloads. After downloading, extract the FFu firmware, open the Dashboard, select the firmware, set a password, and write it to the SD card.
Insert the SD card into the Raspberry Pi, wait through several reboots, during which you need to set up the Raspberry Pi using a mouse, and finally enter the system:
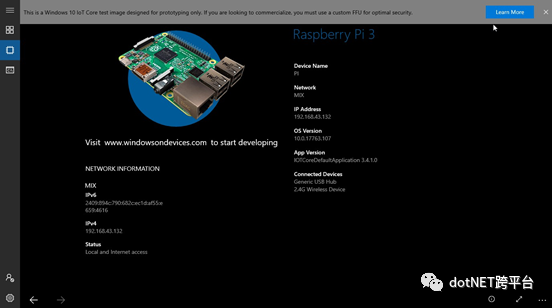
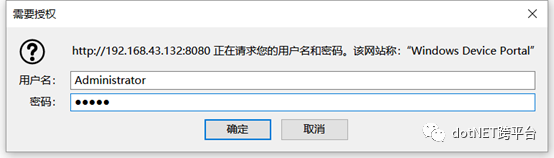
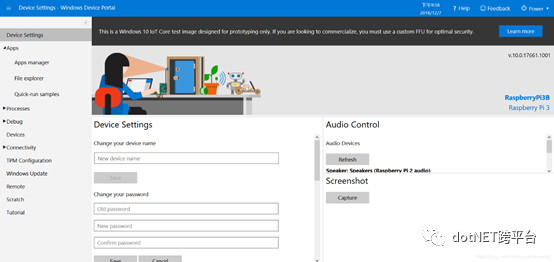
Through the Dashboard, you can scan for the Raspberry Pi on the local network, enter IP:8080 in the browser, input the username Administrator and the password just set, and access the management page of Windows IoT.
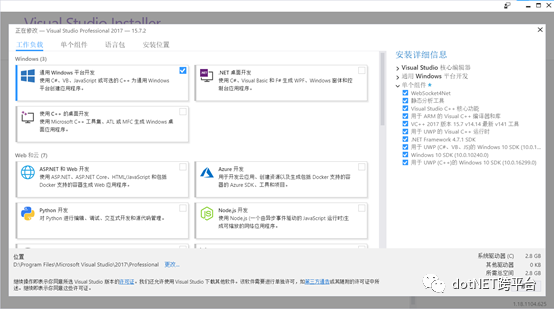
2. Install Visual Studio 2017, which can be done through the Visual Studio Installer:
2. The First Sensor Driver (DHT11 Demo)
Using the DHT11 as an example, this section explains how to connect the sensor to the Raspberry Pi, compile, package the program, and deploy it to the Raspberry Pi.
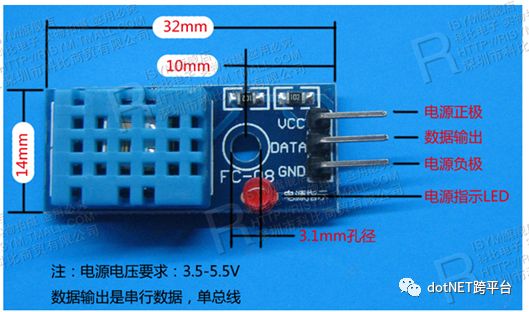
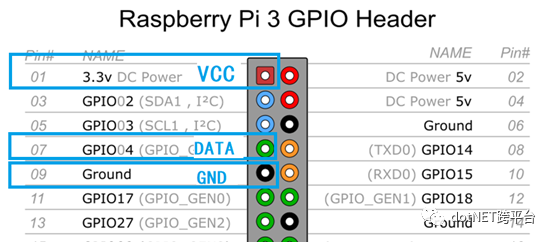
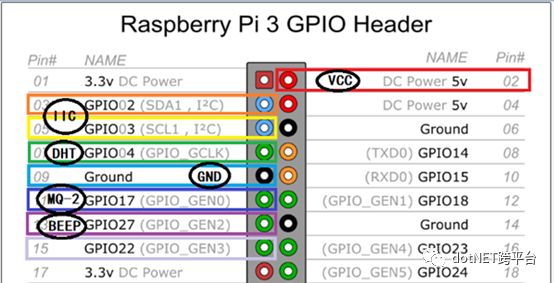
1. Connect DHT11 to Raspberry Pi. The pin definitions for DHT11 and Raspberry Pi are shown in the diagram. Connect the data output pin of DHT11 to GPIO4 (pin 7), and power (VCC) and ground (GND) should be connected nearby but not reversed.
2. Open the DHT11 Demo project in VS 2017 (the IDE may require installing some dependent components).
When generating the solution, a certificate expiration may occur:

Double-click to open the project Package.appxmanifest file:
In the new window, select the packaging tab, and in the pop-up window, select configure certificate – create test certificate (any name).
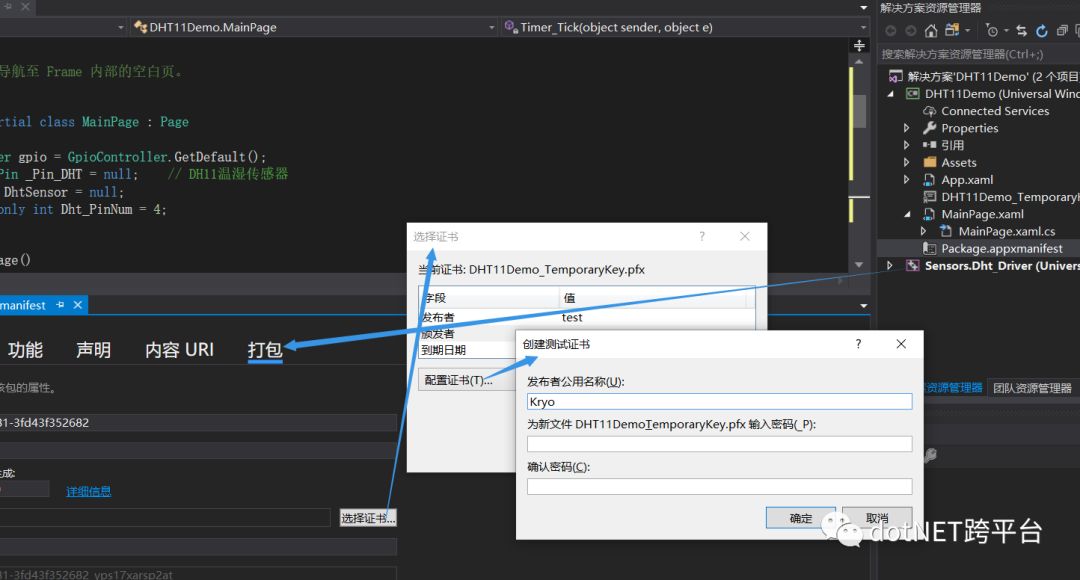
Rebuild the solution:

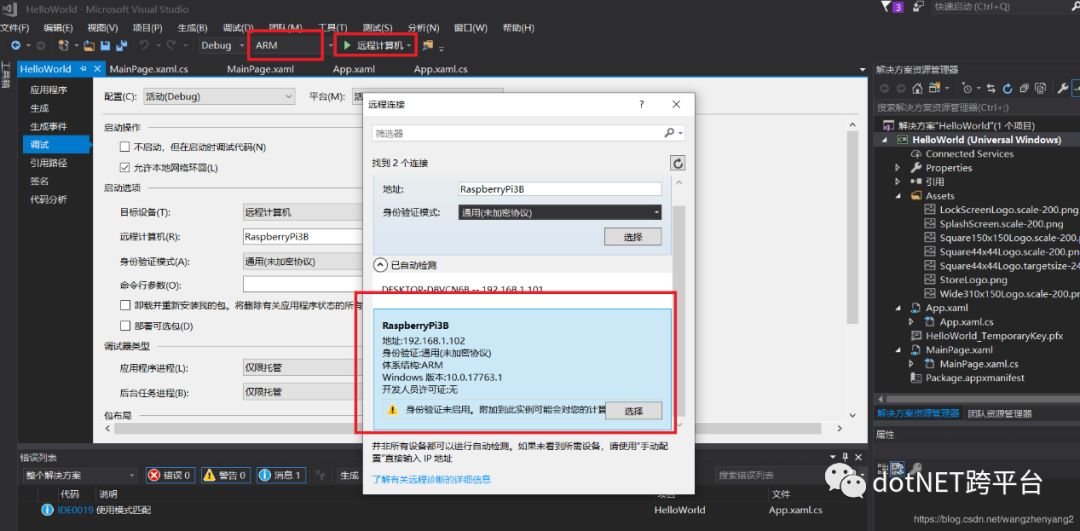
If my VS 2017 has a problem and cannot remote debug, if the debug settings show the following information, you can directly remote debug the installed application without packaging and deploying:
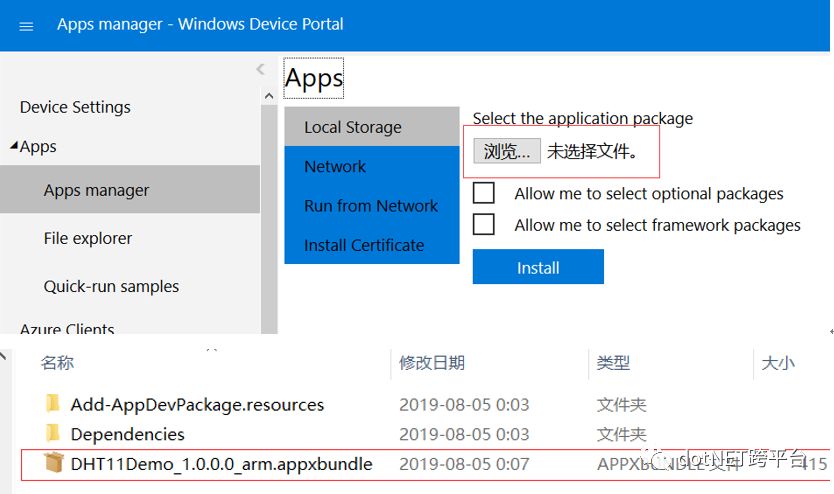
3. Package the installation package of the project:
Right-click on the project – App Store – Create App Package – Create sideload package:
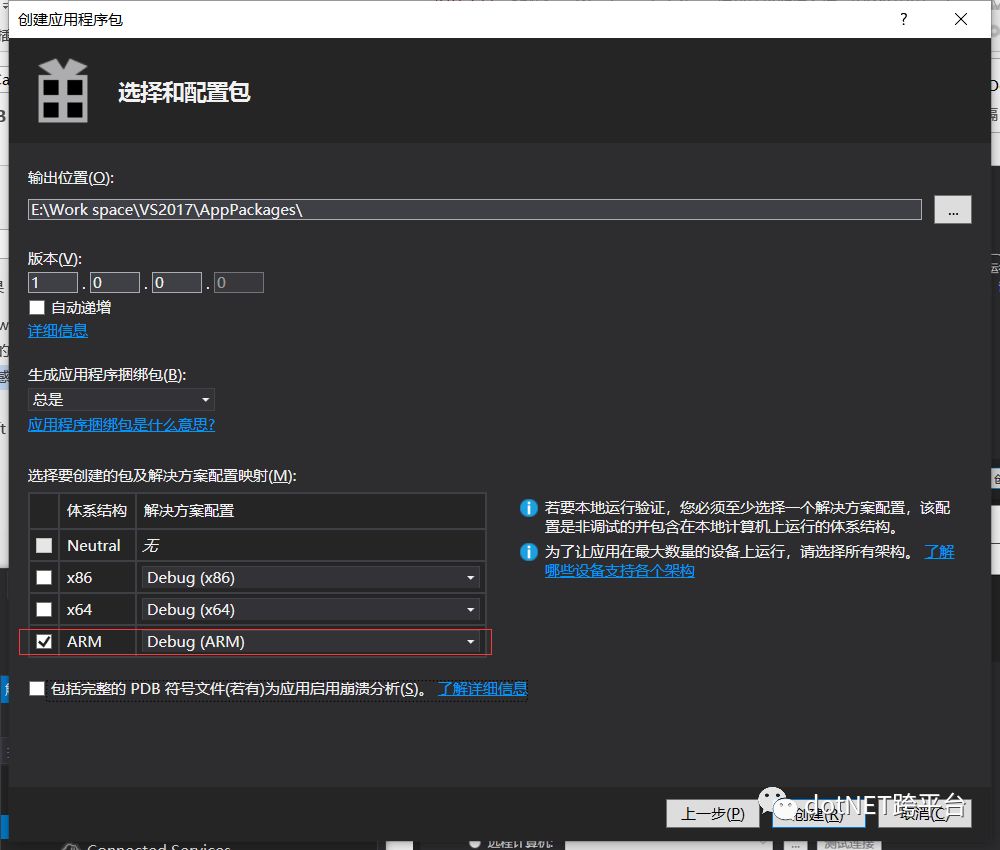
Select the path to generate the package, check the appropriate architecture, click create, and wait for the generation to complete:
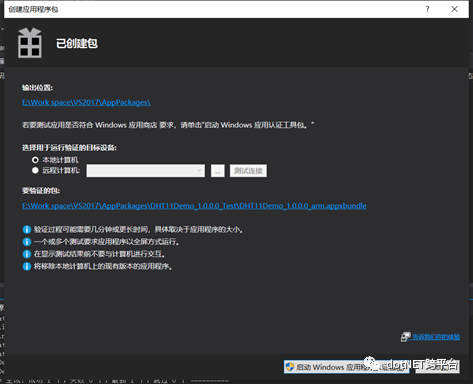
Enter the Apps Manager in the browser backend management page, select the packaged application, and click Install:
Installation successful:
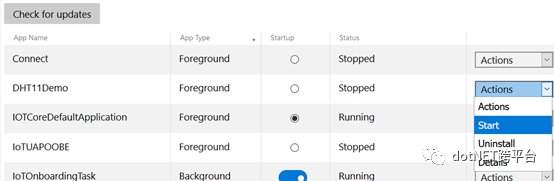
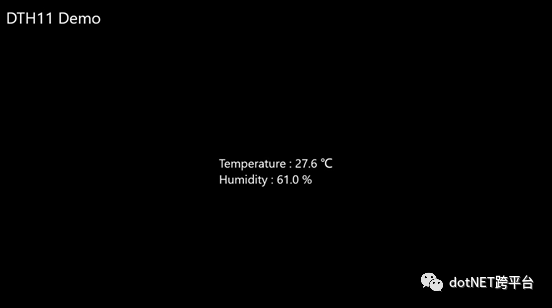
Running effect:
3. Connecting All Sensors
Download the complete code of the system, open it with VS2017, which has detailed comments, and the code modules are quite clear, so I won’t analyze the code functions here.
By redesigning the interactive interface, connect the BMP180 barometer, BH1750FVI light intensity sensor, and MQ-2 smoke sensor.
As seen in the figure, the sensor functions have been implemented, and the data upload part will be explained later.
The circuit diagram designed for the system:
Connection diagram corresponding to the Raspberry Pi pins:
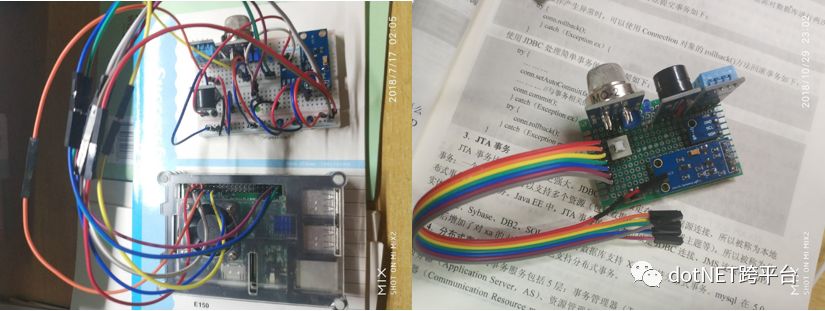
The physical diagram is as follows; first debug on the breadboard, then solder all sensor modules onto the experimental board.
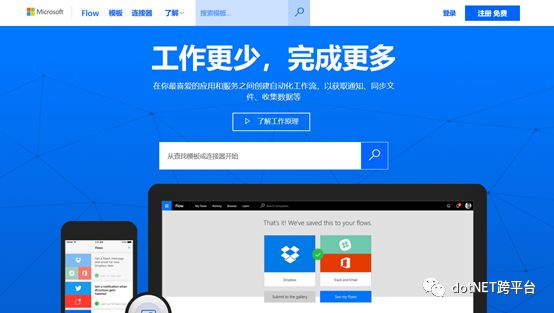
4. Microsoft Flow Cloud Service
The system uses HTTP POST to package the data into a JSON file and POST it to the flow, where the server parses it and executes the flow.
It is recommended to watch this video first: https://b23.tv/av21526828 for quick data collection from IoT devices using Microsoft Flow.
Note: After the upgrade of Microsoft Flow, the HTTP request trigger no longer supports free accounts. If you do not want to register, skip this part and upload to other required servers in other ways.
Nonetheless, the previous connection process to Flow is recorded here.
Based on the example in the video, the data encapsulation and HTTP POST part of the code:
 1 using System;
 2 using System.Diagnostics;
 3 using System.IO;
 4 using System.Threading.Tasks;
 5
 6 namespace Windows_IoT_Core
 7 {
 8     class PostFlow
 9     {
10         private string Url { get; set; }
11         private string Str { get; set; }
12         public PostFlow(String httpUri , String jsonStr)
13         {
14             this.Url = httpUri;
15             this.Str = jsonStr;
16         }
17         public PostFlow(ViewModel view)
18         {
19             //由MS-Flow产生的Https请求Url
20             Url = "https://XXX";
21
22             //有效负载的请求正文 JSON架构
23             Str = "{\n\t\"Temp\" : \" "+view.Temp+"\" ,\n\t\"Hum\" : \""+view.Hum+"\" ,\n\t\"Bright\" : \""+view.Ill+"\" ,\n\t\"Alt\" : \""+view.Alt+"\" ,\n\t\"Press\" : \""+view.Press+"\" ,\n\t\"Fire\" : \""+view.Fire+"\" ,\n\t\"Time\" : \""+view.Time+"\"\n}";
24         }
25         public async Task DoPostAsync()
26         {
27             var request = System.Net.WebRequest.Create(new Uri(Url));
28             request.ContentType = "application/json";
29             request.Method = "POST";
30
31             using (var requestStrem = await request.GetRequestStreamAsync())
32             {
33                 var writer = new StreamWriter(requestStrem);
34                 writer.Write(Str);
35                 writer.Flush();//清空缓存并发送
36             }
37
38             using (var resp = await request.GetResponseAsync())
39             {
40                 using (var responseStream = resp.GetResponseStream())
41                 {
42                     var reader = new StreamReader(responseStream);
43                     var result = reader.ReadToEnd();
44                     Debug.WriteLine(result.ToString());
45                 }
46             }
47         }
48     }
49 }
Server HTTP end trigger JSON configuration:
1. Go to the Microsoft Flow official website and register a free account
2. Create a new flow in “My Flows”, select the trigger condition, search for HTTP in the search box to add the trigger condition, and fill in the JSON configuration. Currently, free accounts cannot search for it.
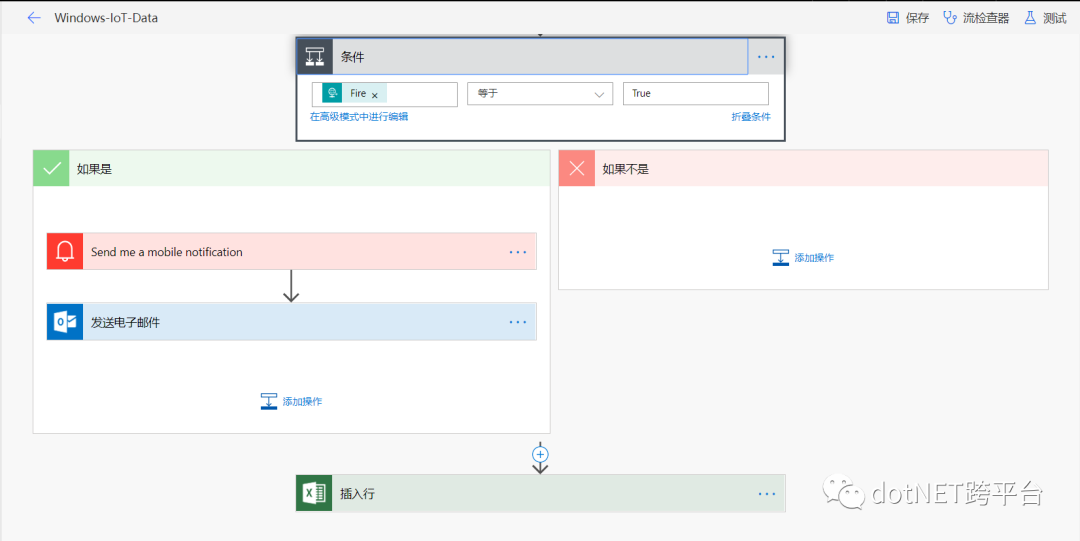
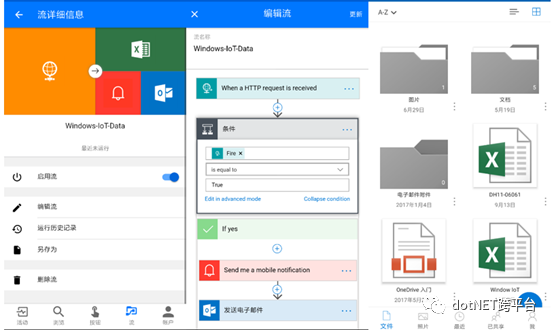
Add conditional branches; if a gas leak occurs, push an alarm and send an email via Outlook, which will ultimately insert the data into Excel (OneDrive).
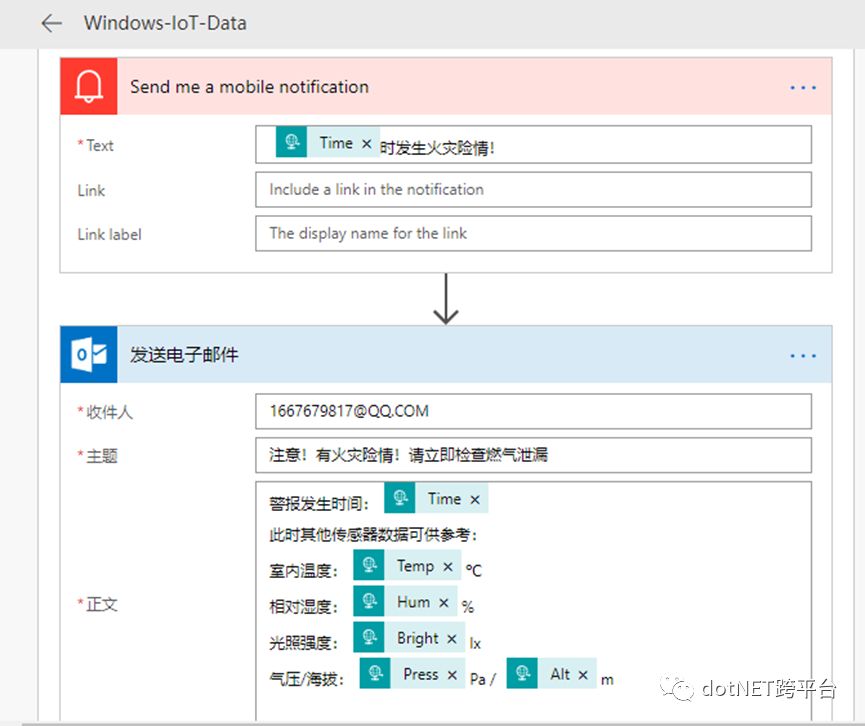
Specific email content settings:
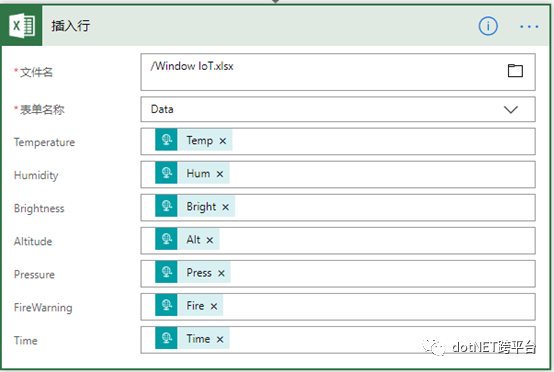
3. Create an Excel file with headers, upload it to OneDrive, and Flow will connect to OneDrive to find the file, then associate the JSON code content:
After uploading data multiple times, you can see the content in the table as follows:

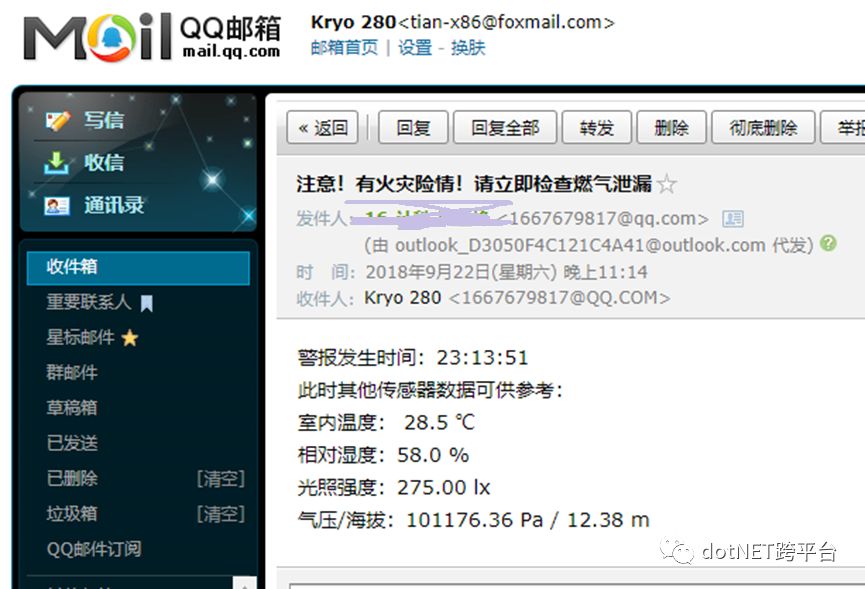
If a gas leak occurs, Flow will push the email content:
The Microsoft Flow APP can be downloaded from Google Play, and you can check it on the mobile side through the Flow APP and OneDrive APP:
5. Conclusion
The Raspberry Pi equipped with Windows IoT connects sensors, and the basic environmental data collection, display, and upload have been completed. Using Microsoft’s suite of tools for development is indeed frustrating, so I won’t delve deeper. This was developed a year ago, and some specific steps are still not clear enough. Now, looking back, it feels a bit low.