Amazon has just launched DeepLens.This is the world’s first camera designed specifically for developers that supports deep learning. The machine learning algorithms it uses can not only detect object activity and facial expressions but also recognize complex activities like playing guitar.Although DeepLens is not officially on the market yet, the concept of smart cameras has already been born.
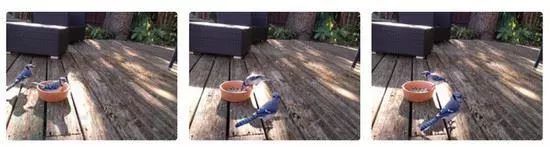
Today, we will build a deep learning-based camera ourselves that can detect birds when they appear in the camera’s view and automatically take pictures.The final product’s captured image is shown below:
The camera is not dumb; it can be very clever.
We do not plan to integrate a deep learning module into the camera; instead, we are preparing to hook a Raspberry Pi to the camera and send photos via WiFi.With the core principle of “keeping it simple” (and on a budget), we are only planning to create a prototype similar to DeepLens today. Interested readers can try it themselves.
Next, we will use Python to write a web server that the Raspberry Pi will use to send photos to the computer or perform behavior inference and image detection.
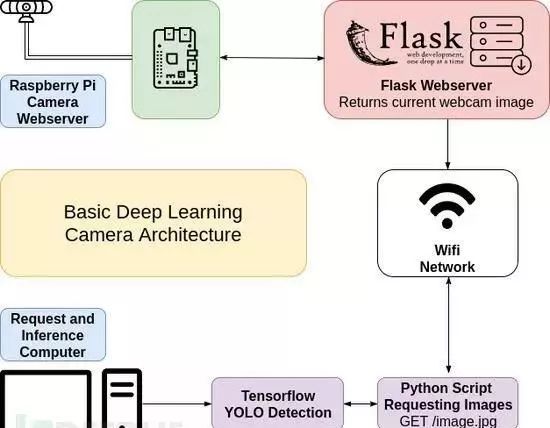
The computer we are using has greater processing power and will use a neural network architecture called YOLO to detect the input image and determine whether a bird has appeared in the camera’s view.
We need to start with the YOLO architecture because it is one of the fastest detection models available.This model has an interface specifically for TensorFlow (the second-generation artificial intelligence learning system developed by Google based on DistBelief), allowing us to easily install and run this model on different platforms.A friendly reminder: if you are using the mini model we discuss in this article, you can also perform detection using the CPU instead of relying solely on an expensive GPU.
Next, back to our concept prototype… If a bird is detected within the frame, we will save the image and proceed to the next analysis.
Detection and Photography
As we mentioned, DeepLens’s photography function is integrated into the computer, allowing it to use onboard computing power for baseline detection and determine whether the image meets our standards.
However, with something like the Raspberry Pi, we actually do not need to use its computing power for real-time calculations.Therefore, we are preparing to use another computer to infer the content present in the image.
I am using a simple Linux computer equipped with a camera and a WiFi wireless network card (Raspberry Pi 3 + camera), and this simple device will serve as my deep learning machine for image inference.For me, this is currently the ideal solution as it significantly reduces my costs and allows me to perform all calculations on my desktop.
We need to use Flask to set up a web server so we can obtain images from the camera.
from import lib import import_moduleimport osfrom flask import Flask, render_template, Response#uncomment below to use Raspberry Pi camera instead#from camera_pi import Camera#comment this out if you're not using USB webcamfrom camera_opencv import Cameraapp =Flask(__name__)@app.route('/')def index(): return "hello world!"def gen2(camera): """Returns a single imageframe""" frame = camera.get_frame() yield [email protected]('/image.jpg')def image(): """Returns a single currentimage for the webcam""" return Response(gen2(Camera()),mimetype='image/jpeg')if __name__ == '__main__':app.run(host='0.0.0.0', threaded=True)
If you are using the Raspberry Pi video camera, please ensure that the line from camera_pi is not commented out, and comment out from camera_opencv.
You can run the server directly using the command python3 app.py or gunicorn, which is the same method written by Miguel in the documentation.If we use multiple computers for image inference, we can also utilize the camera management solution developed by Miguel to manage the cameras and computation threads.
When we start the Raspberry Pi, we first need to check the server’s functionality based on the IP address and then try to access the server through a web browser.
Load the web page and image in the Raspberry Pi to determine if the server is working correctly:
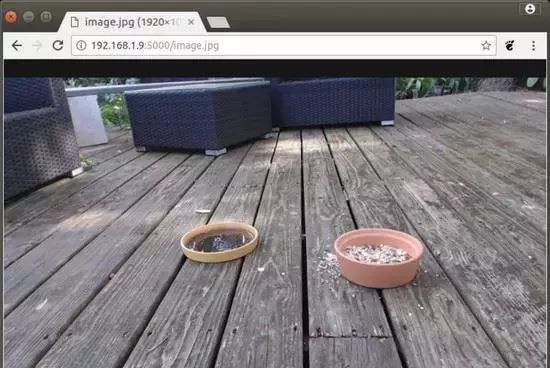
Image Import and Inference
Since we have set up the terminal to load the current image content from the camera, we can build a script to capture images and infer their content.
Here we need to use the request library (an excellent Python library for fetching file resources from URL addresses) and Darkflow (the YOLO model’s implementation based on TensorFlow).
Unfortunately, we cannot install Darkflow using methods like pip, so we need to clone the entire codebase and build and install the project ourselves.After installing the Darkflow project, we also need to download a YOLO model.
Since I am using a relatively slow computer and onboard CPU (instead of a faster GPU), I chose to use the YOLO v2 mini network.Of course, its functionality is not as accurate as the complete YOLO v2 model!
After configuration, we also need to install Pillow, numpy, and OpenCV on the computer.Finally, we can completely finish our code and perform image detection.
The final code is as follows:
from darkflow.net.build import TFNetimport cv2from io import BytesIOimport timeimport requestsfrom PIL import Imageimport numpy as npoptions= {"model": "cfg/tiny-yolo-voc.cfg", "load":"bin/tiny-yolo-voc.weights", "threshold": 0.1}tfnet= TFNet(options)birdsSeen= 0def handleBird(): passwhileTrue: r =requests.get('http://192.168.1.11:5000/image.jpg') # a bird yo curr_img = Image.open(BytesIO(r.content)) curr_img_cv2 =cv2.cvtColor(np.array(curr_img), cv2.COLOR_RGB2BGR) result = tfnet.return_predict(curr_img_cv2) print(result) for detection in result: if detection['label'] == 'bird': print("bird detected") birdsSeen += 1 curr_img.save('birds/%i.jpg' %birdsSeen) print('running again')time.sleep(4)
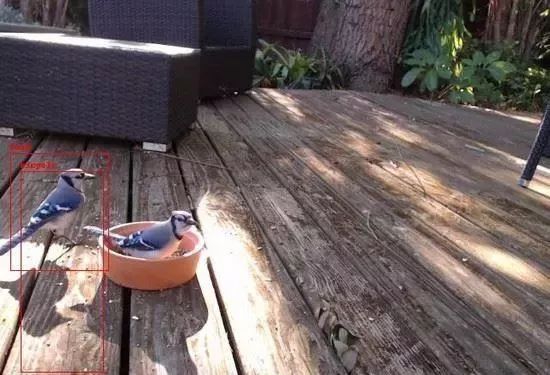
At this point, we can not only see the content detected by the Raspberry Pi in the command console but also directly check the saved bird photos on the hard drive.Next, we can use YOLO to label the birds in the images.
Balancing False Positives and False Negatives
We set a threshold key in the options dictionary in our code, which represents a certain success rate for detecting images.During testing, we set it to 0.1, but such a low threshold can lead to higher false positives and false alarm rates.Worse yet, the accuracy of the mini YOLO model we are using is significantly lower compared to the complete YOLO model, which is also a balancing factor to consider.
Lowering the threshold means we can get more model outputs (photos). In my testing environment, I set the threshold quite low because I wanted to capture more bird photos, but everyone can adjust the threshold parameters according to their needs.
-END-
全新打卡学习模式
每天30分钟
21天学会Python编程

世界正在奖励坚持学习的人!