
Source: csdn
In this article, we will introduce how to build an IoT system that monitors soil moisture and alerts users when the soil is dry. This project uses the IoT cloud platform (http://t.cn/RJGCFD1) to manage the alert system while storing data from sensors. As we all know, the Internet of Things is one of the hottest topics today, and it will change our future and way of life. Nowadays, we can build our own IoT systems because there are already some prototype boards available in the market, allowing us to start IoT projects without spending too much money and effort.
Building the IoT System Project
To construct this project, we need:
-
Arduino MKR1000;
-
Humidity sensor;
-
A free account on the IoT cloud platform Carriots(click http://t.cn/RSJBG7F to create an account);
-
IFTTT account(click https://ifttt.com/discover for more information).
The core idea of this project is to build an IoT system that monitors soil moisture. The Arduino MKR1000 controls the sensor to send data to the Carriots IoT platform. The Carriots platform, in turn, stores the data from the sensors and detects when the stored values reach a threshold. Below, we will share how to analyze the data. Now we can assume that the Carriots IoT platform can somehow call an IFTTT service and send a reminder text message to the user. By building this IoT system, we can explore how to use components of the IoT ecosystem. Additionally, this project uses an LED matrix to display the soil moisture status. Next, let’s see how to set it up.
Detecting Sensor Data
The first step is to read the sensor data. This IoT project uses the YL-38 + YL-69 sensor, which is an analog sensor that can be inserted into the soil to be checked. So how do we connect the sensor to the Arduino? As shown below:
The code is simple. We read data from pin A1 and then calculate the humidity:
float moistureHum = analogRead(A1);
moistureHum = (1023 - moistureHum) * 100 /1023;
In addition, we need to connect the Arduino MKR1000 to the internet so that it can send data:
#include "WiFi101.h"
WiFiClient client;
void setup() {
  Serial.begin(9600);
  Serial.print("Starting...");  if (WiFi.status() == WL_NO_SHIELD) {
    Serial.println("WiFi shield not present");    while (true);
  }
  connectToWifi();
}
connectToWifi() contains:
void connectToWifi() {  while ( status != WL_CONNECTED) {   Serial.print("Attempting to connect to WPA SSID: ");   Serial.println(ssid);   // Connect to WPA/WPA2 network:
   status = WiFi.begin(ssid, pass);   // wait 10 seconds for connection:
  delay(10000);
 }
}
Thus, as described in the above code, we can manage the LED matrix that displays the humidity. Next, let’s focus on the IoT cloud platform.
Connecting to the IoT Cloud Platform
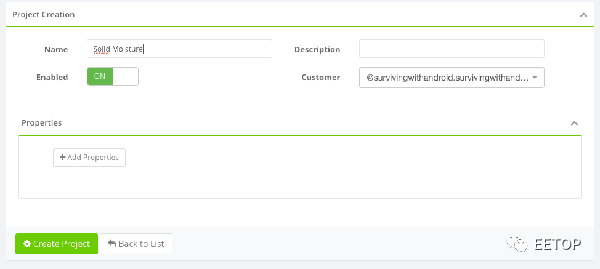
Before sending data to the cloud, we must configure the Carriots platform to manage the data. Carriots uses a hierarchical structure to group and manage devices. Therefore, this structure must be created before using the devices. Once the user logs in, first click on “Hierarchy,” then click on “Project,” and fill in the required data, as shown in the figure below:
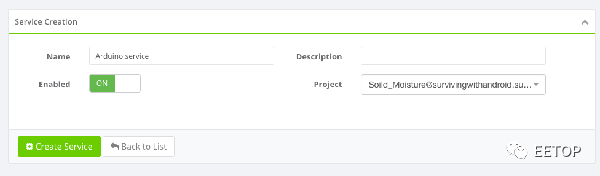
The next step is to create a service and fill in the required data:
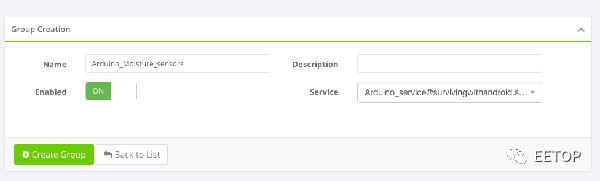
Finally, create a group:
The above steps only need to be done once. The final step is to configure the device. This represents the physical device we use to send data. The device belongs to the group created in the last step, the group belongs to the service, and the service belongs to the project. The configuration steps are very simple, as shown in the figure below:
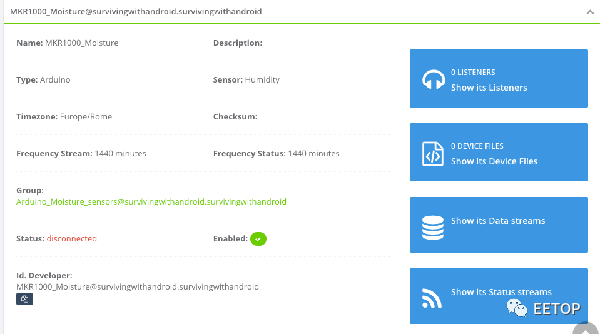
At this point, the configuration steps are complete. We need to connect the Arduino device to Carriots and start sending data. In the above image, the Id.developer parameter is very important as it represents the unique identifier that binds the data from the Arduino device to the Carriots device. Another important parameter is the API key, which can be found in the settings > API key menu. To send data, we will add this function to the above code:
void sendData(float data) { if (client.connect(server,80)) {
Serial.println("Connected to the server....");
String jsonData = "{\"protocol\":\"v2\",\"device\":\""+DEVICE_ID+ "\",\"at\":\"now\",\"data\":{\"soil\":\""+
String(data)+"\"}}"; // Make a HTTP request
client.println("POST /streams HTTP/1.1"); client.println("Host: api.carriots.com"); client.println("Accept: application/json"); client.println("User-Agent: Arduino-Carriots"); client.println("Content-Type: application/json"); client.print("carriots.apikey: "); client.println(API_KEY); client.print("Content-Length: "); int thisLength = jsonData.length(); client.println(thisLength); client.println("Connection: close"); client.println(); client.println(jsonData);
}
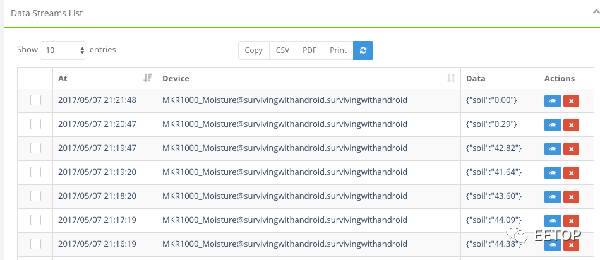
}Note that this function sends a JSON payload containing the data read from the sensor. This function must be called in the loop() method. Running this program, we can find that the device sends data to Carriots, as shown below:
Monitoring IoT Sensor Data
The next step is to monitor the data. Typically in IoT systems, we not only want to receive data from sensors but also want to monitor this information to take appropriate actions when these values exceed certain thresholds. In this project, we want to notify the user when the soil is too dry. Although Carriots has a built-in email system, we prefer to integrate with another useful platform that works with Carriots, namely IFTTT. This platform offers various integration services.
To alert the user, we need two components:
-
Monitoring data system;
-
Alert system.
As a monitoring data system, this IoT system project uses the Carriots listener. Listening is a process of analyzing input values and applying specific rules. When the rules are validated, it calls a script. An interesting aspect of Carriots is that we can use Groovy as the scripting language to call external services.
The alert system is built on IFTTT. Before completing the tasks in Carriots, it is essential to configure IFTTT. As mentioned, when the humidity reaches a threshold, we want to send a short message to remind the user. To achieve this functionality, we need to configure a short message service in IFTTT. Before that, we need a free account. So first, we create a new Applet:
Click “+” to add a service and search for the “Maker” service:
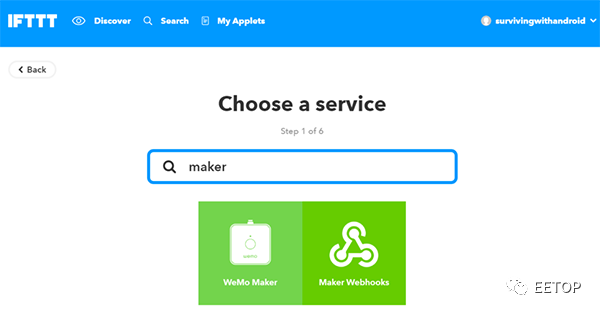
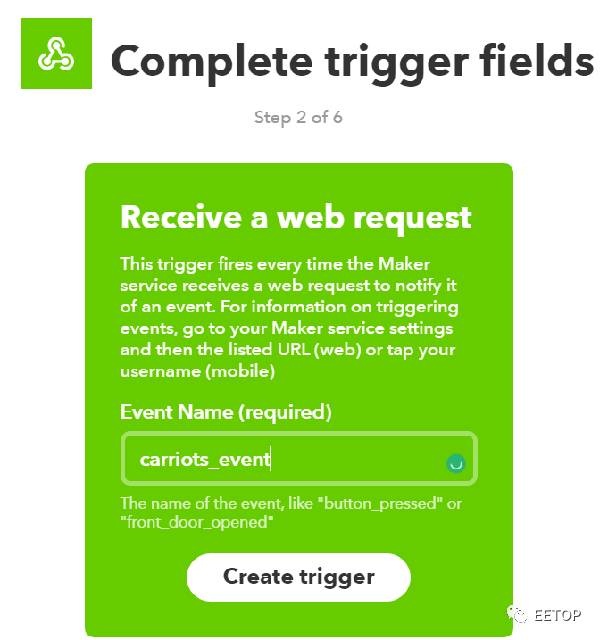
Select “Maker webhooks” to enable IoT Maker. Next, configure the maker service and fill in the event name that triggers the message sending process:
Finally, start the message sending service and configure all necessary parameters, such as the target number and message body:

Now, let’s take a look at the Carriots platform listener. First, create a new listener that calls the URL related to the previously created Applet. When the listener calls the URL, IFTTT sends a short message. The configuration process for the listener is shown in the figure below:
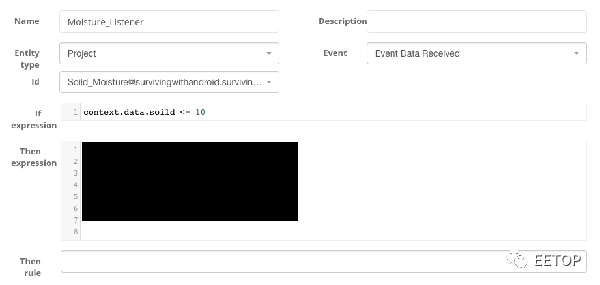
The final step is to configure the expression. We can write this case using Groovy.
In summary, we can verify whether a text message is received on the phone when the soil moisture falls below the threshold level.
Conclusion
Through this article, I believe everyone has learned how to use sensors, Arduino, and the IoT cloud platform to build an IoT system. As mentioned in this article, we can integrate existing platforms and services to build an IoT system.
To facilitate better communication and learning among everyone, EETOP has established the EETOP IoT Group. Industry professionals are welcome to join. To join the group, please add jack_eetop as a friend and send the following information: Join Group + IOT + Company

Long press the QR code to add the group owner as a friend and pull you into the group
Please make sure to share at least one EETOP WeChat article in your moments before joining the group
 Click to read the original text for more