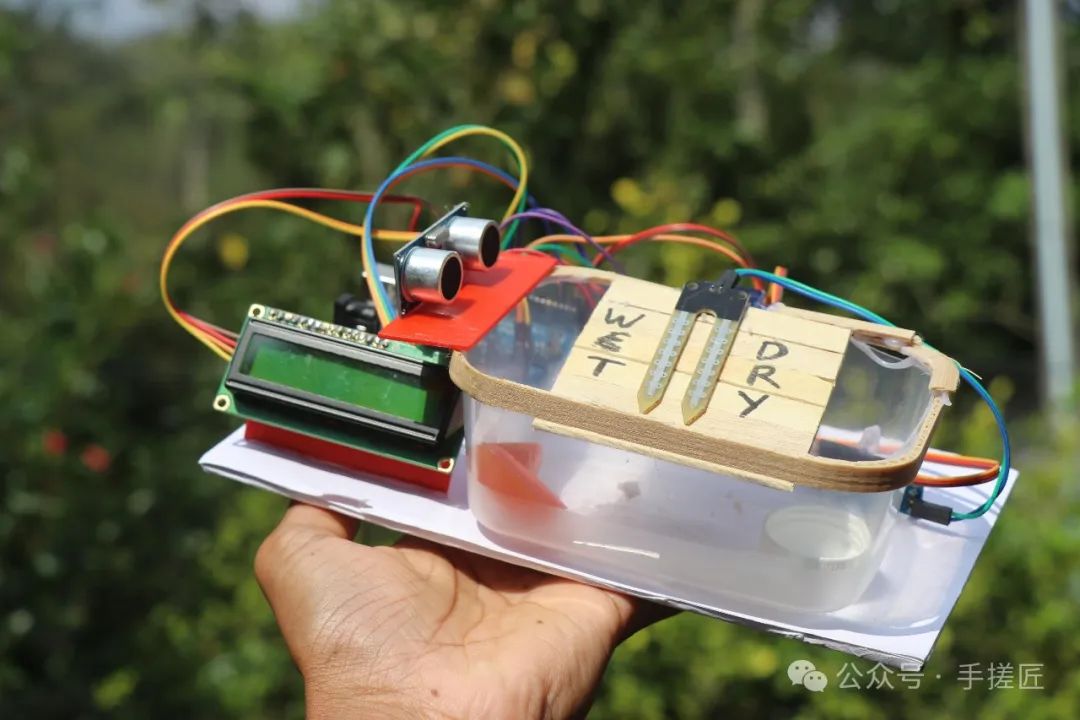
Hello everyone, in this project, I will show you how to create an Arduino-driven dry and wet waste classification system, which is a mini waste separator for small household items.
I will explain how this separator works. I will use an ultrasonic sensor to detect objects (obstacles). If the sensor does not detect wet particles, the servo will move to one side.
On the other hand, if the humidity sensor detects wet particles and the ultrasonic sensor detects any obstacles, the servo will move in the opposite direction.
These states can be seen on the LCD panel! Please note that for some reason, my LCD panel does not light up; if you use an LCD, you will have backlight.
I have provided all the details to build this project, the circuit diagram is well explained, and the program is also provided.
I strongly recommend everyone to build this project because we all know how waste is thrown around without a proper waste management system.
By building a larger version of this project, it will accelerate the separation process, helping to keep nature clean.
Materials Required
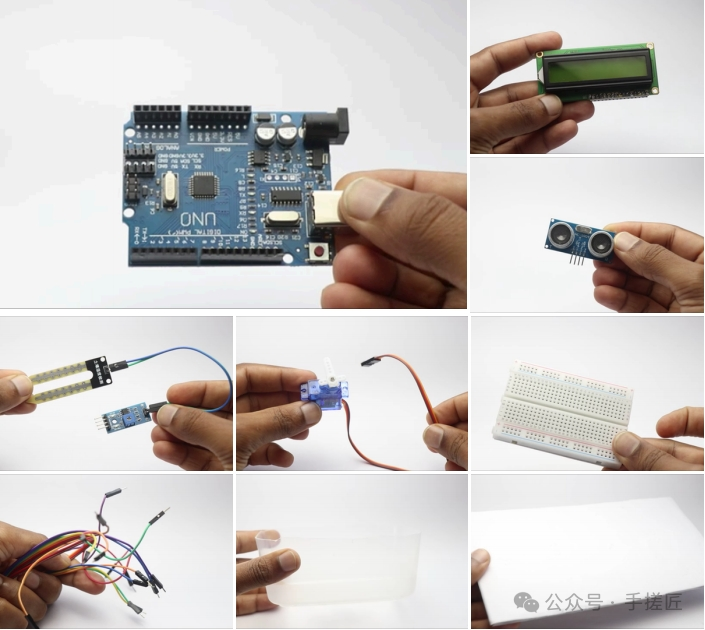
Arduino Uno, I2C LCD display, ultrasonic sensor, soil moisture sensor, micro servo, small breadboard, jumper wires, cardboard pieces, hot glue, ice cream sticks, cloth, scissors, Arduino IDE, programming cable
Step 1: Arduino Code and Circuit Diagram (Full code at the end of the document)
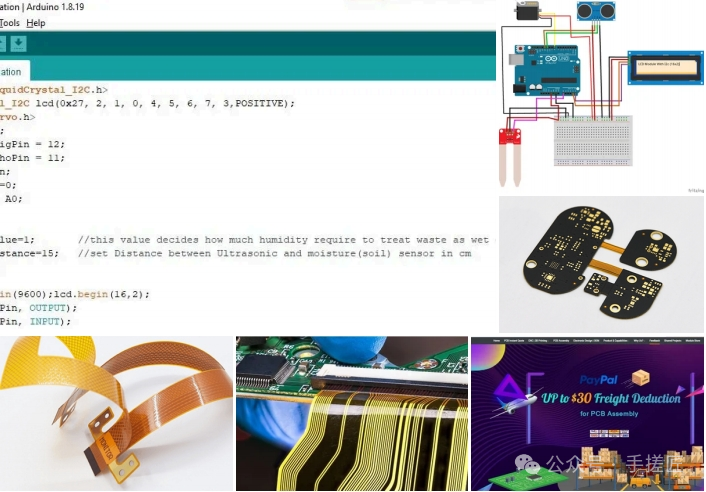
I will simplify this circuit by breaking down the connections of the components, starting with the LCD module.
The LCD module has 4 pins, and the power pin connects to the power rail on the breadboard.
The SCL and SDA pins on the LCD panel connect to pins A5 and A4 on the Uno board.
The micro servo has 3 pins, with the power pins Vcc and Gnd connecting to the power rail on the breadboard.
The signal pin of the micro servo connects to pin D8 on the Uno, completing the servo connection.
The soil moisture sensor also has 3 pins, with the power pin connecting to the power rail, and the signal pin connecting to pin A0 or an analog pin on the board.
The ultrasonic sensor, or HC-SR04, has 4 pins, with the power pin connecting to the power rail, and the Trig and Echo pins connecting to pins D12 and D11 on the Uno.
Once the connections are complete, connect the Uno board to the computer and copy the following code, selecting the appropriate port type and board type in the IDE.
Click the upload button and wait for a while for the program to upload to the board. Now we can proceed to test the circuit, which we will see in the next steps.
Step 2: Testing the Circuit
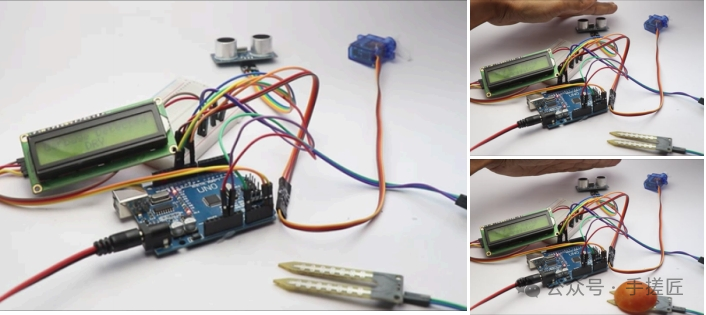
To test the circuit, I will use a USB power supply connected to the computer, with the other end connected to the Uno board. When you power the Uno board, the LCD panel will display a message, which you can customize in the code section of the IDE as needed.
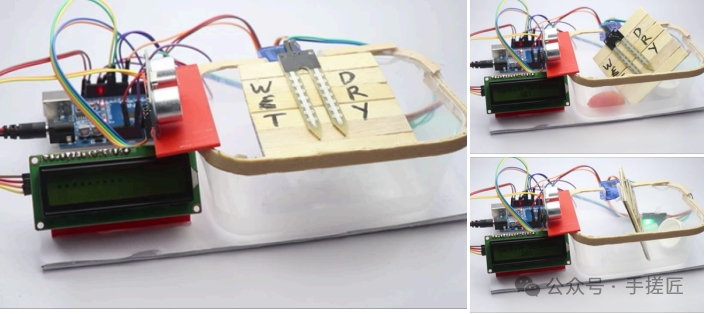
Now ensure there are no obstacles in front of the ultrasonic sensor. If you bring your hand close to the front of the ultrasonic sensor, the servo should move, and the LCD should display DRY.
On the other hand, place some wet objects (moisture content) on top of the soil moisture sensor, and then place your hand or an obstacle in front of the ultrasonic sensor. The LCD will display WET, and the servo will move in the opposite direction from before.
To make the LCD display WET, you can use a piece of tomato or any other vegetable or fruit, provided the surface is moist.
Once done, we can start building the model, for which I will use a piece of cardboard.
Step 3: Assembling the Components
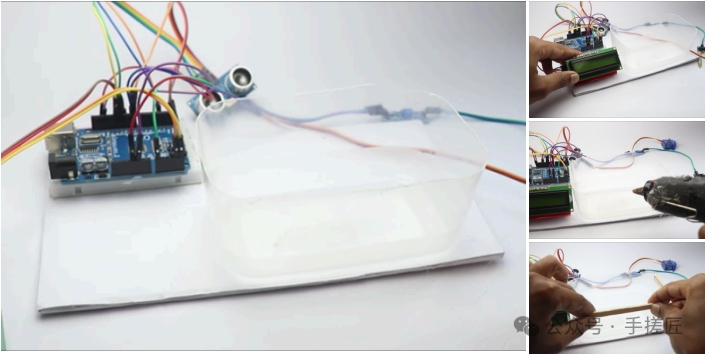
Once we ensure the circuit is working properly, we can assemble all of this on a piece of cardboard!
First, place the Arduino Uno board on the cardboard, then use double-sided tape or hot glue to secure them together, allowing it to dry for a while. Now repeat the same for the breadboard.
I will use a small plastic container to collect dry and wet objects, as it is made of plastic, making it easy to create the mechanical device, and we can also see the contents inside the container.
To make the container look cool, I will give it a lining of a 3D printed frame. If you don’t have this, you can replace the same part with cardboard or thick GSM paper; this is an optional part.
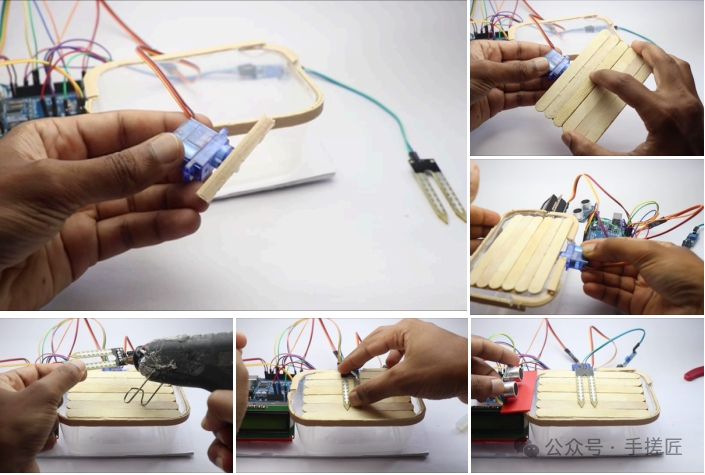
Now we have the bare bones ready! We can connect the mechanism to drop waste into this container. I will use ice cream sticks for this purpose; if you don’t have ice cream sticks, you can simply use a square piece of paper as a substitute.
Step 4: Separation Mechanism
The separation mechanism is an important part here, as it is the only part that the entire project relies on.
I will use a long ice cream stick to extend the servo shaft. Now I will take 8 ice cream sticks and glue them together to form a rectangular shape.
You can trim the excess later based on the size of the container, but considering the size of my box, this will work well. Use a mixture of hot glue and strong adhesive to attach this square to the servo shaft. I first used strong adhesive, and to increase strength, I will use hot glue and let it dry completely before proceeding to the next step.
Place the servo on the side of the box and seal it with hot glue. Now adjust the space between them so that the mechanism opens and closes perfectly.
After this, we will place the soil moisture sensor. For this, I will use a drop of hot glue, place a small piece of cardboard on the side, and add the ultrasonic sensor on top to detect obstacles.
Alright, we are now almost at the end of the building phase, and we can finally test the project. Let’s see how it works.
Step 5: How to Operate
Using it is very fun, but before that, all you need to do is collect dry and wet waste or garbage samples from around the house.
The scale of the model is built for testing with small objects. If you want a larger model, please replace all small items with larger sizes, such as plastic gear servos with heavy-duty servos, and a small container of 10cm x 7cm with your size multiplied, and all mechanisms of the same size.
Connect the Uno board to any USB power supply, and you will now see the LCD display a message (the welcome message can be customized).
Now place any object above the moisture sensor. If it contains moisture/water and is detected by that sensor, the servo will move to the left, placing the object to the left.
On the other hand, if the object detected by the moisture sensor does not contain moisture and is in front of the ultrasonic sensor, the servo will move to the right, classifying it as dry.
This is the process of making this Arduino-driven dry and wet separator. If you have any questions, please ask in the comments. Thank you for your interest in this project.
Below is the Arduino Code
#include <LiquidCrystal_I2C.h>
LiquidCrystal_I2C lcd(0x27, 2, 1, 0, 4, 5, 6, 7, 3,POSITIVE);
#include <Servo.h>
Servo servo1;
const int trigPin = 12;
const int echoPin = 11;
long duration;
int distance=0;
int potPin = A0;
int soil=0;
int fsoil;
int maxDryValue=1; //this value decides how much humidity require to treat waste as wet object
int Ultra_Distance=15; //set Distance between Ultrasonic and moisture(soil) sensor in cm
void setup()
{
Serial.begin(9600);lcd.begin(16,2);
pinMode(trigPin, OUTPUT);
pinMode(echoPin, INPUT);
servo1.attach(8);
Serial.println(“Soil Sensor Ultrasonic Servo”);
lcd.print(“………”);
delay(1000);
}
void loop()
{
lcd.clear();
lcd.setCursor(1,0);
lcd.print(“Dry Wet Waste”);
lcd.setCursor(3,1);
lcd.print(“Segregator”);
int soil=0;
for(int i=0;i<2;i++)
{
digitalWrite(trigPin, LOW);
delayMicroseconds(7);
digitalWrite(trigPin, HIGH);
delayMicroseconds(10);
digitalWrite(trigPin, LOW);
delayMicroseconds(10);
duration = pulseIn(echoPin, HIGH);
distance= duration*0.034/2+distance;
delay(10);
}
distance=distance/2;
if (distance <Ultra_Distance && distance>1)
{
delay(1000);
for(int i=0;i<3;i++)
{
soil = analogRead(potPin) ;
soil = constrain(soil, 485, 1023);
fsoil = (map(soil, 485, 1023, 100, 0))+fsoil;
delay(75);
}
fsoil=fsoil/3;
Serial.print(“Humidity: “);
Serial.print(fsoil);
Serial.print(“%”); Serial.print(” Distance: “);Serial.print(distance);Serial.print(” cm”);
if(fsoil>maxDryValue)
{delay(1000);
lcd.clear();
lcd.setCursor(0,0);
lcd.print(“Garbage Detected!”);
lcd.setCursor(6,1);
lcd.print(“WET”);
Serial.println(” ==>WET Waste “);
servo1.write(160);
delay(3000);}
else{ delay(1000);
lcd.clear();
lcd.setCursor(0,0);
lcd.print(“Garbage Detected!”);
lcd.setCursor(6,1);
lcd.print(“DRY”);
Serial.println(” ==>Dry Waste “);
servo1.write(20);
delay(3000);}
servo1.write(90);}
distance=0;
fsoil=0;delay(1000);
}