The Python-docx library encapsulates a wealth of features for manipulating Word documents, allowing direct access to objects such as Document, Paragraph, and Run. It also exposes the underlying XML structure, enabling developers to achieve limitless advanced functionality and deep customization through direct XML manipulation.In a metaphorical sense, doc = Document(word_path) is a highway built by the docx library, while manipulating the document through the underlying XML is akin to leaving the highway and driving through the rugged wilderness, filled with the thrill of adventure. However, to enjoy this experience, one must first understand some prerequisite knowledge.We know that a Word document (.docx) is essentially a ZIP archive containing multiple XML files and other resource files. This can be verified by changing the file extension to .zip and opening it with decompression software. I found an example, and after decompressing, the screenshot is as follows, where the word folder contains the actual content of the document and most of the resources. The text, formatting, images, media, styles, settings, etc., of the document are stored here, which is the focus of this attempt.After opening the word folder, we can see the following screenshot. These files store the actual content of the Word document, such as document.xml for the main content, header1.xml, header2.xml, header3.xml for header content. By modifying the corresponding XML files, we can directly change the content of the Word document.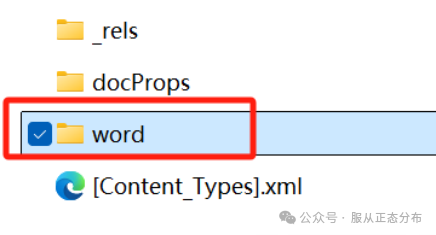
This interesting attempt involves adding page numbers to the right end of the footer. Conveniently, the docx library encapsulates some objects, allowing us to obtain the footer using footer = section.footer, without needing to manipulate the underlying XML document. However, page numbers are fields, and docx does not encapsulate them, so we need to implement this through the underlying XML.
A typical XML field has a five-layer non-nested structure.
Layer 1: <w:fldChar w:fldCharType="begin"/>, the field start tag, indicates to Word that this is the beginning of a field, which is dynamic and not static text.
Layer 2: <w:instrText>PAGE</w:instrText>, the field instruction, which is the core of the field, tells Word to perform an operation, in this case, to insert the page number PAGE.
Layer 3: <w:fldChar w:fldCharType="separate"/>, the separator, separates the instruction area of the field from the display area. When Word processes fields, it first parses the instruction and then places the computed result in the display area. This tag is the boundary between the two.
Layer 4: <w:t></w:t>, the display area, where Word will fill in the computed result of the field (such as the current page number).
Layer 5: <w:fldChar w:fldCharType="end"/>, the field end tag, tells Word: “the field ends here”.
When actually inserting the page number, we can omit the separator in Layer 3 and the display area in Layer 4; Word will automatically complete them. In the actual code, we only need to write the start, field instruction, and end.
However, before writing the actual code, we need to clarify a concept. A regular XML document looks like this, where we can see that the tag names are different. The tags of Office Open XML (OOXML) are in the form of w:fldChar, while the tag names of regular XML documents are written directly as local names, such as person, name.
<person>
<name>Zhang San</name>
<age>30</age>
</person>
Tags with a colon separator are called QName (Qualified Name), which consists of three parts: prefix, separator, and local name. Such qualified names are standard in complex XML documents.
Abbreviated form
w : p
↑ ↑ ↑
Prefix part Separator Local name
Using qualified names ensures the uniqueness of tag and attribute names. For example, both text processing and mathematical formulas have p tags, so we must use w:p and m:p to distinguish whether the p tag represents a text paragraph or a mathematical formula paragraph; otherwise, the two p tags would conflict and cause confusion.
Qualified names also have a complete version, which is {namespace URI}local name. The namespace URI and the abbreviated version’s prefix are essentially a mapping relationship.
Complete version
{namespace URI}local name
This mapping relationship can be explicitly used in the python-docx library, such as the following two mappings, from w to WordML and from m to OOXML for mathematical content, corresponding to the mapping of the namespace URI. This mapping can be converted using the built-in qn functions in python-docx.W3C introduced namespaces, which ensure the uniqueness of element and attribute names globally through a unique identifier (usually a URI), avoiding conflicts. The use of simplified prefix versions is for convenience in daily programming. Imagine w:fldChar and {http://schemas.openxmlformats.org/wordprocessingml/2006/main}fldChar; the former is clearly more favorable for programming, reading, and writing.
namespace_map = {
‘w’: ‘http://schemas.openxmlformats.org/wordprocessingml/2006/main’,‘m’: ‘ http://schemas.openxmlformats.org/officeDocument/2006/math ‘
}
Next, we can finally start programming, embarking on an exciting journey.
First, we create two auxiliary functions to create XML elements and add attributes to XML elements. The OxmlElement class is used to directly create and manipulate XML elements, and the qn function is used to convert prefixes to complete namespace URIs, both of which can be imported from python-docx. The complete code is attached at the end.
def create_element(name):    return OxmlElement(name)

def create_attribute(element, name, value):    element.set(qn(name), value
The page number format we set is 1/14, where the front part indicates the current page, and the back part indicates the total number of pages, meaning we need to set two fields. As mentioned earlier, the complete field has five layers, but in practice, we can write three layers, as Word has an auto-completion mechanism.
The field function for the current page number is as follows. First, we set the w:fldChar field character element and set its fldCharType attribute value to begin. Next, we create the field instruction text element, which stores the field’s instruction text, telling Word what operation this field should perform. We assign the instruction text with instrText.text = 'PAGE \* ARABIC \* MERGEFORMAT', where PAGE indicates the current page number, \*ARABIC indicates that the page number uses Arabic numerals, and \* MERGEFORMAT indicates that the style should be preserved when the page number content is updated. In Python, \ is an escape character, so we add another \ to use its original meaning. Finally, we add the field end tag end.
In Word’s XML structure, fields are not top-level elements but are composed of a series of XML tags (such as w:fldChar, w:instrText) that need to be wrapped in w:r (the underlying XML element corresponding to Run) to take effect. Therefore, we need to sequentially add the corresponding elements to run._r (the underlying XML element of Run) for them to take effect.
def add_page_number(run):    fldChar1 = create_element('w:fldChar')    create_attribute(fldChar1, 'w:fldCharType', 'begin')
    instrText = create_element('w:instrText')    instrText.text = 'PAGE \* ARABIC \* MERGEFORMAT'     create_attribute(instrText, 'xml:space', 'preserve')
    fldChar2 = create_element('w:fldChar')    create_attribute(fldChar2, 'w:fldCharType', 'end')
    # Add nodes in order    run._r.append(fldChar1)    run._r.append(instrText)    run._r.append(fldChar2)
In the same way, we can add the total page number field.
Completing the full code, we can test it with a Word document, and the page numbers will display as expected:
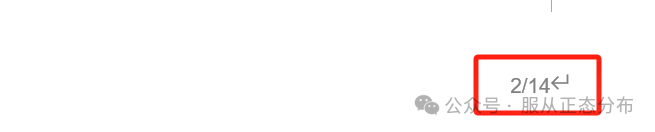
The complete code is as follows:
from docx import Document
from docx.oxml import OxmlElement
from docx.oxml.ns import qn
from docx.shared import Pt

def process_single_doc(doc_path):    doc = Document(doc_path)    for section in doc.sections:        footer = section.footer        footer.add_paragraph()        footer_para = footer.paragraphs[0]        right_run = footer_para.add_run()        add_page_number(right_run)        footer_para.add_run('/')        right_run = footer_para.add_run()        add_total_pages(right_run)        footer_para.alignment = 2 # Right align        for run in footer_para.runs:            run.font.name = 'Arial'            run.font.size = Pt(9)            run.font.bold = True    doc.save(f'Page numbers added {doc_path}')

def create_element(name):    return OxmlElement(name)

def create_attribute(element, name, value):    element.set(qn(name), value)

def add_page_number(run):    fldChar1 = create_element('w:fldChar')    create_attribute(fldChar1, 'w:fldCharType', 'begin')    instrText = create_element('w:instrText')    instrText.text = 'PAGE \* ARABIC \* MERGEFORMAT'     create_attribute(instrText, 'xml:space', 'preserve')    fldChar2 = create_element('w:fldChar')    create_attribute(fldChar2, 'w:fldCharType', 'end')    # Add nodes in order    run._r.append(fldChar1)    run._r.append(instrText)    run._r.append(fldChar2)

def add_total_pages(run):    fldChar1 = create_element('w:fldChar')    create_attribute(fldChar1, 'w:fldCharType', 'begin')    instrText = create_element('w:instrText')    create_attribute(instrText, 'xml:space', 'preserve')    instrText.text = 'NUMPAGES \* ARABIC \* MERGEFORMAT'     fldChar2 = create_element('w:fldChar')    create_attribute(fldChar2, 'w:fldCharType', 'end')    # Add nodes in order    run._r.append(fldChar1)    run._r.append(instrText)    run._r.append(fldChar2)

if __name__ == '__main__':    process_single_doc('test.docx')
After adding the page numbers, when we open Word and use the shortcut alt+F9, we can clearly see the instruction text for the field settings, as shown in the screenshot below:
