For more content, please click on the above ABB Robot Practical Skills to follow
You can also click on the WeChat public account below for more classic content
Reprint requires a message to the backend, let’s support original content together and promote the use and development of robots
This public account provides technical support for various ABB robot applications, simulations, and graduation projects. For details, please leave a message in the backend
This public account sincerely hopes to cooperate with various robot training institutions and robot user units to provide technical support, for details leave a message in the backend
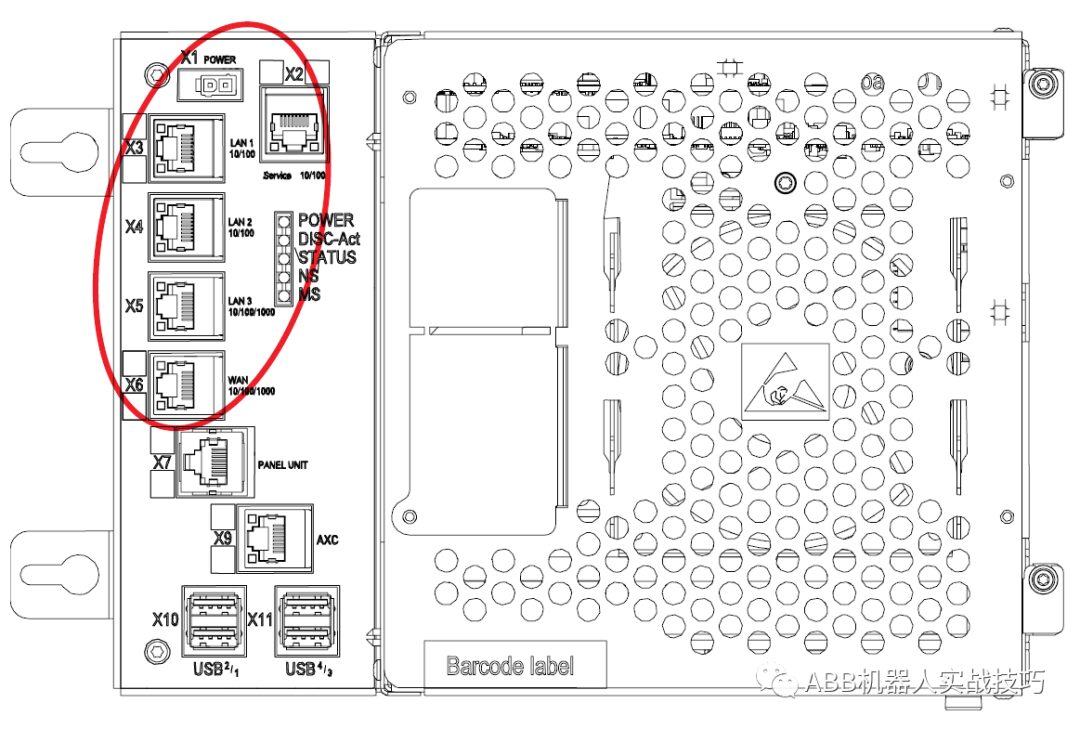
1. The ABB robot controller has several network ports defined as follows:
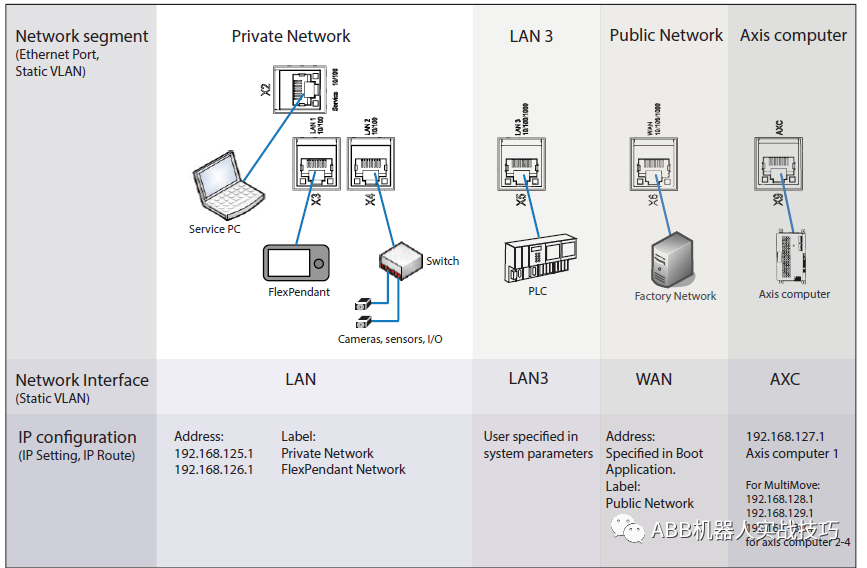
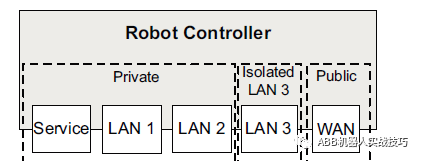
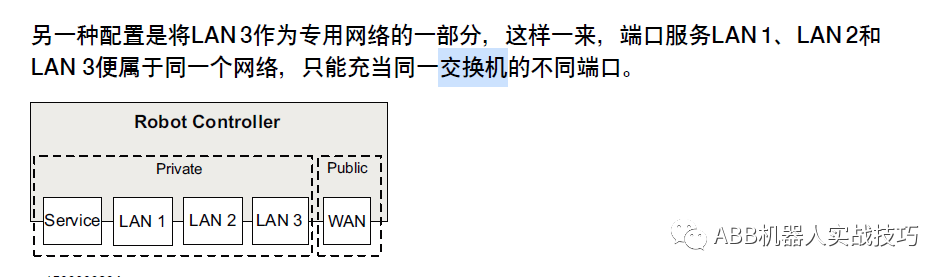
2. Several network ports within the Private Network essentially act as different ports of a switch.
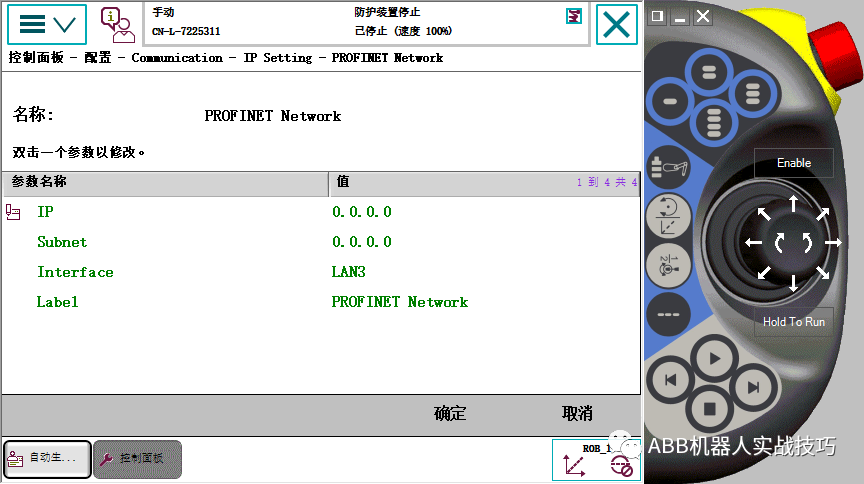
3. The default LAN3 port is isolated, as shown below. At this time, you can configure an IP for the LAN3 port in the IP settings.
4. You can also configure the LAN3 port as part of the Private network, as shown below,
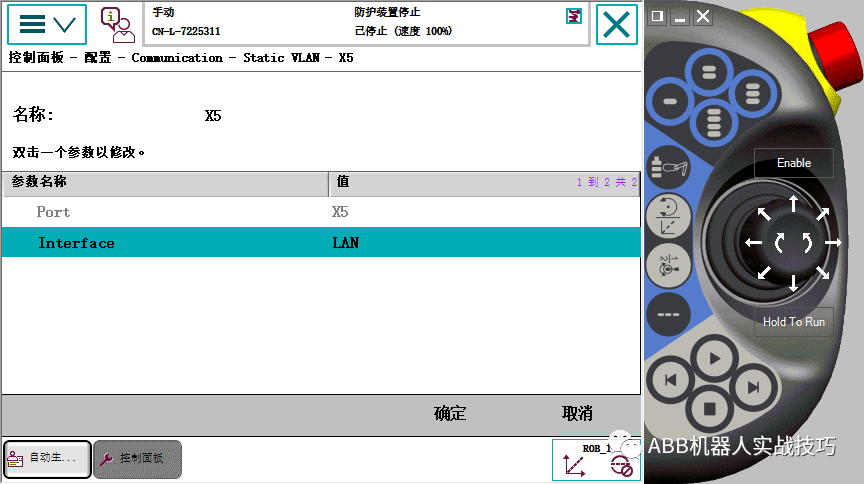
Open Control Panel – Configuration – Theme Communication – Static VLAN – X5, set the Interface to LAN (default is LAN3)
At this time, both LAN2 and LAN3 can act as different ports of a switch.
Since Service, LAN1, LAN2, and LAN3 are all part of the Private network, they essentially function as different ports of a switch. You can also connect the PC’s network cable to LAN3 or LAN2 and connect to the robot through RobotStudio (the connected robot IP is 192.168.125.1). If you configure PROFINET or Ethernet/IP associated with the PRIVATE label, you can treat the robot as a node on the ring network using the LAN2 to LAN3 connection.
Note!!!!!!!
The PRIVATE networks of two robots cannot interconnect!!!!
********************************
How to Get More Classic Articles?
Follow the public account ABB Robot Practical Skills, click on the bottom of the page for classic articles and configuration to see more classic content
Click Read the Original to learn about RobotStudio simulation and obtain complete teaching videos
More content
★ How to search for historical articles
★ Transfer files to HOME and load based on pcsdk
Send real numbers and negative integers via the bus
★ Use timed interrupts to send robot positions to PLC
★ Accurate early triggering of signals
★ Calibration of positioners
★ Secrets of zero point calibration for ABB robots
★ Create UDP communication
★ Left and right multiplication of rotational attitudes
★ Control the robot’s start and stop via socket
Upper computer dashboard displays robot speed in real-time
★ Robot drawing Doraemon
Upper computer controls robot motion in real-time via EGM
Control ABB robot movements with Python
Batch modify EIO files via Excel
Forward kinematics calculation for robots with links
Make a four-bar linkage mechanism
PROFINET for robots simultaneously as CONTROLLER and DEVICE
★ Voice control of ABB robots
★ Access robots via mobile web
★ Custom servo welding gun
★ Create conveying chain for grabbing and transporting palletizing stations
★ Random material generation and grabbing
★ Define TCP for four-axis robots
★ Custom external axes – positioners
★ Teach four points to complete palletizing
★ Multimove for dual robots and positioners
Enable and disable collision prediction in Robotware6.08
Explanation of SMB board pinouts
Coupling limits for six and four joints
Calculate distance between two points
New I/O DSQC1030 configuration
ABB robot configuration for servo welding gun
Set angle path faults not to prompt
Select robot program via external PLC
One-click return to HOME program
Modify upper and lower limits for each robot axis
Explanation of Wobjdata data
Tracking of conveying chains and their relation to vision
Wiring for emergency stop and automatic stop
For more expert explanation videos, you can visit https://www.aiimooc.com to search for ABB or scan the following QR code