
Many users encounter situations where the touch screen becomes unusable due to faults. This is primarily because touch screens are precision devices, and their widespread use leads to frequent malfunctions. Below are some common troubleshooting and maintenance methods for touch screens:
When a touch screen malfunctions, first check if the power supply to the control card is normal, whether the Windows driver is properly installed, and if the touchscreen calibration in Windows has been completed. Check if the parameters in “TouchscreenControl” are correct, and also verify that the serial port is functioning properly and that the serial cable is connected correctly.
Below are some examples illustrating the diagnostic methods for touch screen faults.
LABA JIE
1
Touch Screen Inaccuracy

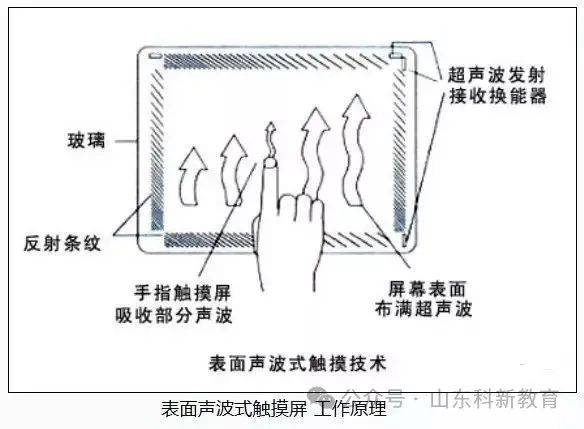
Fault Phenomenon: A surface acoustic wave touch screen does not perform the corresponding operation when touched at a specific point on the display.
Fault Analysis and Handling
This phenomenon may occur if dust covers the reflective stripes around the screen after prolonged use. Wipe it with a dry soft cloth, then power off, restart the computer, and recalibrate. It is also possible that the reflective stripes of the acoustic screen have been slightly damaged, which cannot be fully repaired.
If it is a capacitive touch screen, the screen calibration program can be run under the following conditions: (Start — Programs — MicrotouchTouchware)
1) After the driver software is installed for the first time.
2) Each time the display resolution or display mode is changed.
3) Each time the display area is adjusted.
4) Each time the controller frequency is adjusted.
5) Each time the cursor does not correspond to the touch point.
After calibration, the data is stored in the controller’s register, so there is no need to recalibrate the screen each time the system is started.
2
Touch Screen Unresponsive
Fault Phenomenon: A touch screen does not work and shows no response when any part is touched.
Fault Analysis and Handling
First, check if the wiring interfaces are loose, then check for conflicts in the serial port and interrupt number. If there is a conflict, adjust the resources to avoid it. Also, check if there are cracks on the surface of the touch screen; if there are, replace it promptly. Additionally, check if there is dirt on the touch screen surface; if so, clean it with a soft cloth. Observe the indicator light on the control box to see if it is functioning normally; it should be green and flashing.
If all the above parts are normal, use a substitution method to check the touch screen: first replace the control box, then the touch screen, and finally the host computer.
If it is a surface acoustic wave touch screen, the following repairs can be performed:
1. One of the wires connecting to the host’s keyboard port (which provides 5 volts for the touch screen) may not be connected; please check the wiring.
2. The serial port number selected during the installation of the touch screen driver may not correspond to the actual serial port number; please uninstall and reinstall the driver.
3. The host may be a domestic original machine with an OEM version of the operating system that has been adjusted by the manufacturer, causing non-standard serial communication that is incompatible with the touch screen driver. If possible, format the hard drive and install the system before installing the touch screen driver.
4. The version of the touch screen driver may be too low; please install the latest driver.
5. Check if there are any devices in the host that conflict with the serial port resources and adjust the hardware devices. For example, some network cards default to IRQ 3 after installation, which conflicts with COM2’s IRQ; in this case, change the network card’s IRQ to an unused IRQ.
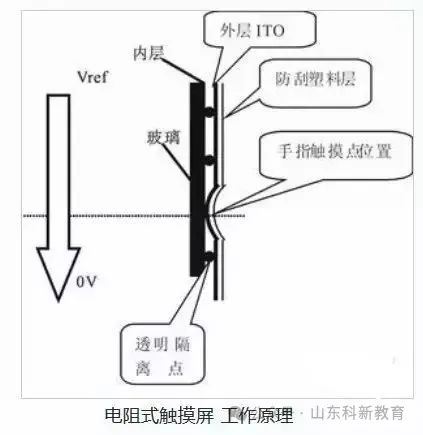
If it is a resistive touch screen, the following repairs can be performed:
1. Check if the wiring of the touch screen is correct; one of the wires connecting to the host’s keyboard port (which provides 5 volts for the touch screen) may not be connected; please check the wiring.
2. Observe the indicator light on the touch screen control box; if it is not lit or shows a red light, it indicates that the control box is faulty and should be replaced.
3. If the above conditions are not confirmed, please delete the touch screen driver and restart the computer to reinstall the driver, or replace it with a newer version of the driver.
4. Check if there are any devices in the host that conflict with the serial port resources and adjust the hardware devices. For example, some network cards default to IRQ 3 after installation, which conflicts with COM2’s IRQ; in this case, change the network card’s IRQ to an unused IRQ. It is also possible that the motherboard and the touch screen control box are incompatible; please replace the host or motherboard.
5. If the touch screen has been used for a long time (3-4 years) and some areas are unresponsive, the touch screen may be faulty and should be replaced.
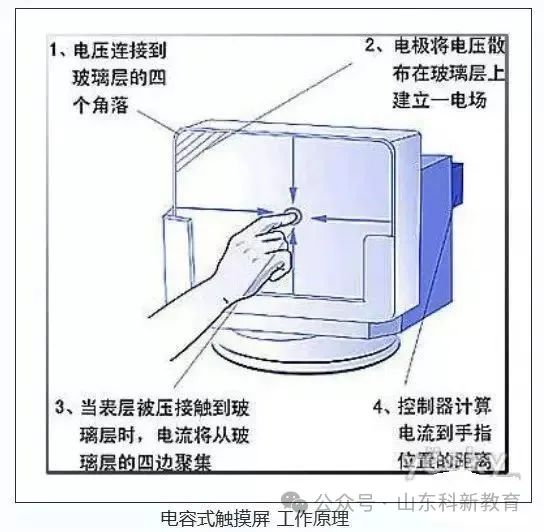
If it is a capacitive touch screen, the following repairs can be performed:
1) Check if the wiring of the touch screen is correct; if it is an external control card, the control box part connects directly to the cable extending from the touch screen. The power part connects through a keyboard adapter (the small rubber head next to the RS232 connector must be removed first to allow the power line in), with one end connected to the host’s keyboard port and the other end connected to the computer keyboard. Insert one end of the 5V power supply into the RS232 connection, and insert the RS232 connector extending from the control box into the host’s 9-pin port. If your host can use a 25-pin port, please purchase a 9-25 adapter for conversion. If your host’s keyboard port is the original small keyboard port, please purchase a pair of adapters from large keyboard to small keyboard.
2) If it is a built-in card type, check if the jumpers are set correctly according to the control card’s jumper instructions. Since user machine configurations vary, and the peripherals used are different, MicroTouch provides jumper instructions for the control card to avoid conflicts with user peripherals. Control card address jumper settings:
COM port settings
CommPortI/OA1A2A3A4A5A6
COM13F8-3FFONOFFONOFFONOFF
COM22F8-2FFOFFONONOFFONOFF
COM33E8-3EFONOFFOFFONONOFF
COM42E8-2EFOFFONOFFONONOFF
COM52E0-3E8OFFONOFFONOFFON
COM62F0-2F8OFFONONOFFOFFON
COM73E0-3E8ONOFFOFFONOFFON
COM83F0-3F8ONOFFONOFFOFFON
COM ports and interrupt jumper combinations should be set as follows, with exceptions for special cases.
COM1->IRQ4|COM2->IRQ3|COM3->IRQ4|COM4->IRQ3
3
Long Touch Screen Response Time
Fault Phenomenon: A touch screen takes a long time to respond after being touched.
Fault Analysis and Handling
This may be due to water droplets on the touch screen; simply wipe it with a dry soft cloth. It may also be that the host is of low quality, such as having a low clock frequency; in this case, it is best to replace the host.
4
Partial Touch Screen Unresponsiveness
Fault Phenomenon: A touch screen shows no response in certain areas when touched.
Fault Analysis and Handling
This may be due to the reflective stripes of the touch screen being partially covered; clean it with a dry soft cloth. It may also be that the reflective stripes have been scratched off by a hard object, which cannot be repaired.
5
Touch Screen Works Normally but Computer Cannot Operate
Fault Phenomenon: A touch screen is functioning normally, but the computer cannot operate when connected to the host.
Fault Analysis and Handling
This may occur if the touch screen control card receives an operation signal before the host loads the touch screen driver. Simply power off and restart the computer. It may also be that the touch screen driver version is too low; the latest driver needs to be installed.
6
No Response from Touch Screen After Installing Driver for the First Time
Fault Phenomenon: A touch screen shows no response after the driver is installed and the touch screen is powered on for the first time.
Fault Analysis and Handling
First, confirm that the touch screen wiring is connected correctly; if not, power off and correctly connect all wires. Then check if there are any devices in the host that conflict with the serial port resources, and adjust them, for example, some network cards default to IRQ 3 after installation, which conflicts with COM2’s IRQ; in this case, change the network card’s IRQ to an unused IRQ.
7
No Response After Using Touch Screen for a Period
Fault Phenomenon: A touch screen works normally after startup but becomes unresponsive after a period of use.
Fault Analysis and Handling
1. Check if the “Monitor Power Saving Settings” in Windows 9x is set to turn off the hard disk. To do this, right-click on the desktop, select “Properties,” then choose the “Screen Saver” tab, click the “Settings” button, and set the parameters so that all except “Power Scheme” is set to “Never.”
2. In some applications, poor grounding may cause the control box shell to accumulate static electricity, affecting the internal working electric field of the control box, leading to gradual touch failure. In this case, ground the control box shell with a wire and restart.
3. For surface acoustic wave touch screens, if the screen is not cleaned for a long time, dust accumulation can block the reflection stripes, causing the touch screen to malfunction. For touch displays, use a clean business card or banknote to gently wipe the dust from the reflective stripes through the gap between the display cover and the touch screen, then restart the computer. For touch all-in-one machines, open the front cover of the display and use a clean towel to wipe the dust from the reflective stripes, then restart the computer.
4. Many touch all-in-one machines use power from the all-in-one machine’s power supply rather than from the host, so check if the 5V output from the all-in-one machine’s power supply is correct. Sometimes, excessive instantaneous current can cause the fuse to blow, in which case the fuse needs to be replaced.
8
Decreased Touch Screen Click Accuracy
Fault Phenomenon: A touch screen has decreased click accuracy, making it difficult to position the cursor.
Fault Analysis and Handling
1. Run the touch screen calibration program. (Start — Settings — Control Panel — Acoustic Screen — Calibrate button).
2. If it is a newly purchased touch screen, try deleting the driver, then power off the host for 5 seconds, power it back on, and reinstall the driver.
3. If the above methods do not work, the reflective stripes of the acoustic screen may have been slightly damaged during transport and cannot be fully repaired. You can try calibrating by offsetting the calibration target in the opposite direction (relative to the mouse’s deviation).
4. If the acoustic screen becomes inaccurate after a period of use, it may be due to dust covering the reflective stripes or transducers around the screen. If you are using our KA model cabinet, you can open the top cover and clean the surface with a dry soft cloth dipped in industrial alcohol or glass cleaner, then restart the system. Ensure that the transducers in the upper left, upper right, and lower right corners are not damaged. Then power off and restart the computer and recalibrate.
5. If there are water droplets or other soft substances on the surface of the touch screen, they may cause the touch screen to misinterpret touches, so simply remove them.
Fault Analysis and Handling for Touch Screen Calibration Failure
1. If you are using a Lenovo host, the pre-installed MOUSEWARE software may conflict with the touch screen driver; please delete this software and restart to run the calibration program.
2. It is possible that the touch screen control card received an operation signal before the host loaded the touch screen driver; please power off and restart the computer and recalibrate.
3. The touch screen driver installation may have been abnormal; please delete the driver and reinstall it. (Delete it from the Control Panel’s Add/Remove Programs).
4. It is possible that the reflective stripes of the acoustic screen have become covered with a lot of dust after prolonged use, preventing calibration. If you are using our KA model cabinet, you can open the top cover and wipe it with a dry soft cloth, ensuring that the transducers in the upper left, upper right, and lower right corners are not damaged. Then start the computer and calibrate.
9
Mouse Stays at a Point on the Touch Screen
Fault Analysis and Handling
This situation occurs because the touch area of the resistive screen (the surface of the resistive screen is divided into touch and non-touch areas; clicking on the non-touch area has no response) is pressed by the display or cabinet shell, effectively simulating a continuous touch at a point. If the cabinet shell is pressing on the touch area, you can increase the distance between the cabinet and the display screen. If the display shell is pressing on the touch area, you can try loosening the screws of the display shell a bit.
10
Touch Screen Works Unstable
Fault Phenomenon: A touch screen works very unstably, sometimes responding normally and other times not at all.
Fault Analysis and Handling
For this phenomenon, focus on checking if the wiring interfaces are loose and if there are conflicts in the serial port and interrupt number.
Source: This article is reprinted from the internet, and the copyright belongs to the original author. If there are any copyright issues, please contact us for deletion. Thank you!

Scan to Follow
WeChat ID|13615417996
Follow the QR code on the left for free access
[Siemens Resource Collection]