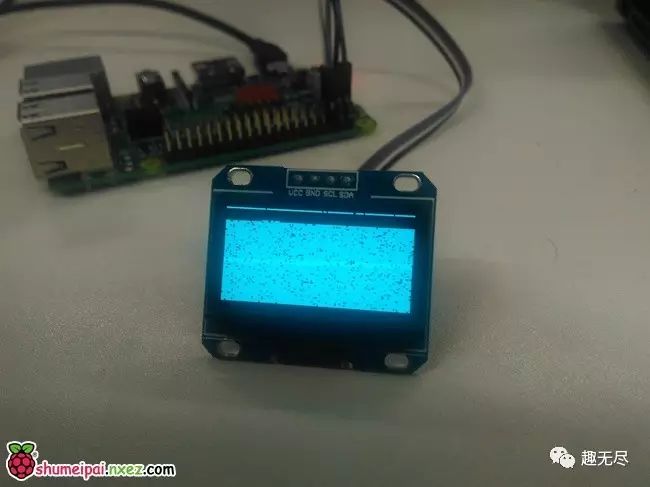
Submitted by Curious Bin, thank you~ Recently, while learning about the Raspberry Pi, I encountered a problem when driving the OLED screen, which was display issues. After two days of troubleshooting, I discovered that the driver chip for this OLED is not SSD1306 but SH1106. Therefore, using the Adafruit_Python_SSD1306 library results in display issues. There are several types of OLED driver chips, but some libraries only support the SSD1306 chip. So when your OLED screen has display issues, it is likely due to a mismatch between the chip and the library. It is best to purchase an I2C SSD1306 chip for the OLED screen, as there are more libraries available and the wiring is simpler.
There are two OLED libraries available for Python:
-
Adafruit_Python_SSD1306 library —> supports only SSD1306
-
Luma.oled library —> supports SSD1306 / SSD1322 / SSD1325 / SSD1331 / SH1106
Installation instructions for Adafruit_Python_SSD1306 and Luma.oled libraries (don’t worry if you don’t understand English, I will explain below).
-
SSD1306 OLED Displays with Raspberry Pi and BeagleBone Black
-
Luma.OLED: Display drivers for SSD1306 / SSD1322 / SSD1325 / SSD1331 / SH1106
This article references the application of the Luma.oled library with I2C interface on Raspberry Pi 3, but this is an older version; the installation method for the new version library is different. Please see below.
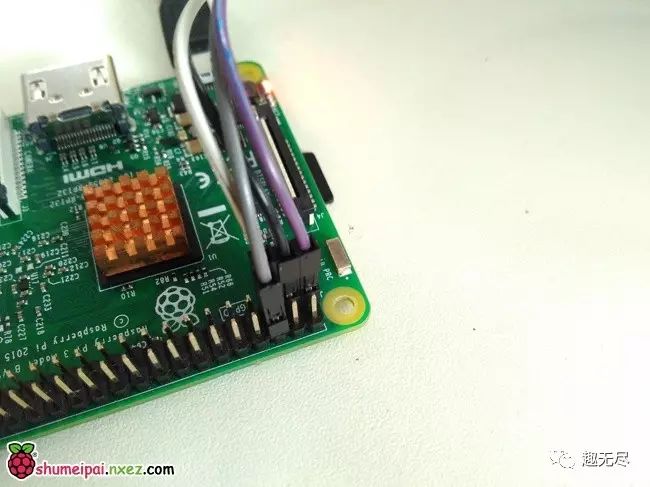
I2C Wiring
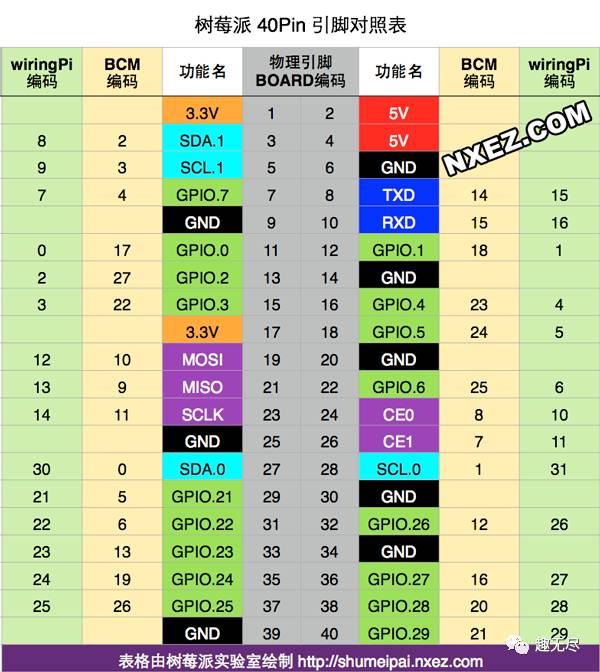
| OLED Pin | Raspberry Pi Physical BOARD Pin |
|---|---|
| VCC | Pin 1 |
| GND | Pin 6 |
| SCL | Pin 5 |
| SDA | Pin 3 |
Once the wiring is done, it should look like an L-shape.
Enable I2C Functionality
sudo apt-get install -y python-smbus
sudo apt-get install -y i2c-tools
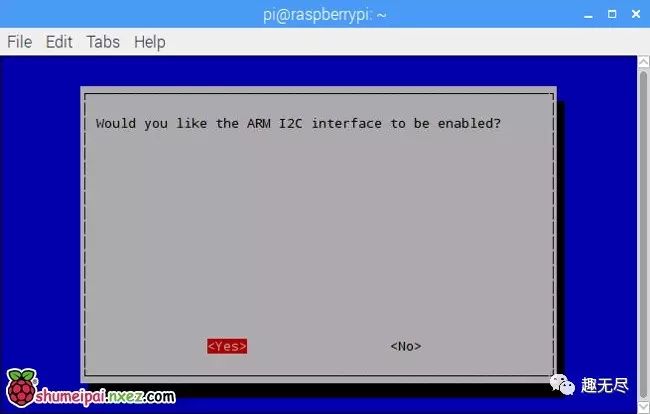
sudo raspi-configOpen the Raspberry Pi configuration and select 5 Interfacing Options.
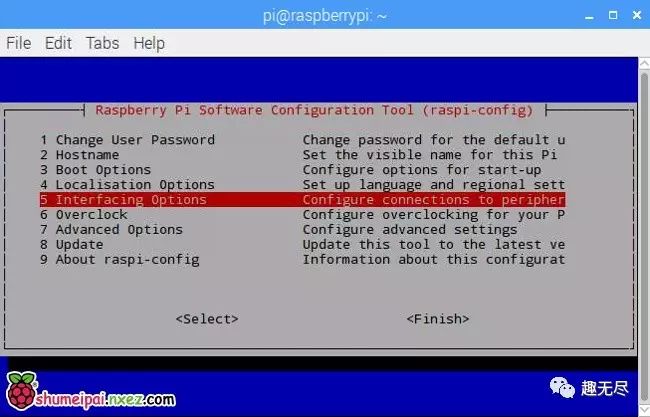
Select P5 I2C and press Enter to activate I2C.
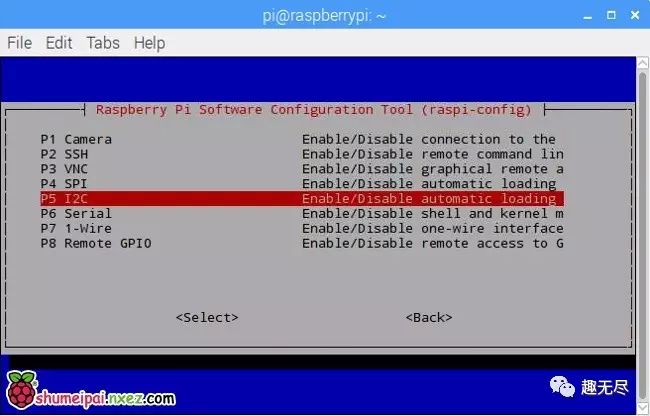
Press Enter to start.
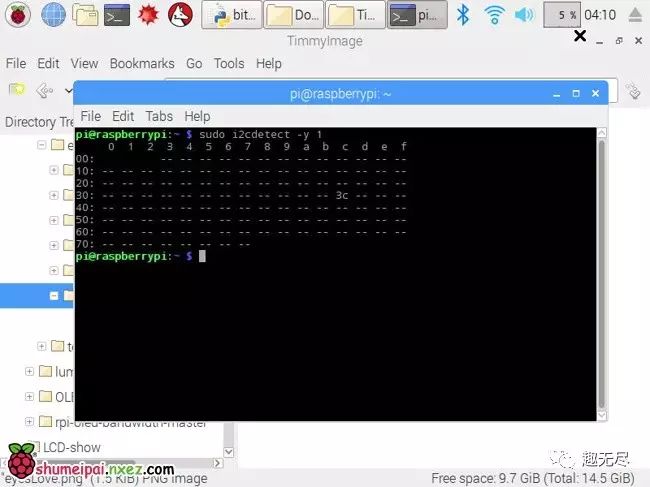
Check I2C Address
sudo i2cdetect -y 1Then you will see the address below; 3C is the I2C address of the OLED screen, indicating that I2C has been successfully enabled.
– Install Adafruit_Python_SSD1306 Library
Enter the following commands in the terminal.
sudo apt-get update
sudo apt-get install build-essential python-dev python-pip
sudo pip install RPi.GPIO
sudo apt-get install python-imaging python-smbus
sudo apt-get install git
git clone https://github.com/adafruit/Adafruit_Python_SSD1306.git
cd Adafruit_Python_SSD1306
sudo python setup.py install
After installing the Adafruit_Python_SSD1306 library, enter cd examples to go to the examples directory, and use ls to view the files, explaining the shapes.py example.
import time

import Adafruit_GPIO.SPI as SPI
import Adafruit_SSD1306

import Image
import ImageDraw
import ImageFont

# Raspberry Pi pin configuration:
RST = 24
# Note the following are only used with SPI:
DC = 23
SPI_PORT = 0
SPI_DEVICE = 0

# Beaglebone Black pin configuration:
# RST = 'P9_12'
# Note the following are only used with SPI:
# DC = 'P9_15'
# SPI_PORT = 1
# SPI_DEVICE = 0

# 128x32 display with hardware I2C:
disp = Adafruit_SSD1306.SSD1306_128_32(rst=RST)

# 128x64 display with hardware I2C:
# ddisp = Adafruit_SSD1306.SSD1306_128_64(rst=RST)

# Alternatively you can specify an explicit I2C bus number, for example
# with the 128x32 display you would use:
# ddisp = Adafruit_SSD1306.SSD1306_128_32(rst=RST, i2c_bus=2)

# 128x32 display with hardware SPI:
# ddisp = Adafruit_SSD1306.SSD1306_128_32(rst=RST, dc=DC, spi=SPI.SpiDev(SPI_PORT, SPI_DEVICE, max_speed_hz=8000000))

# 128x64 display with hardware SPI:
# ddisp = Adafruit_SSD1306.SSD1306_128_64(rst=RST, dc=DC, spi=SPI.SpiDev(SPI_PORT, SPI_DEVICE, max_speed_hz=8000000))

# Alternatively you can specify a software SPI implementation by providing
# digital GPIO pin numbers for all the required display pins.  For example
# on a Raspberry Pi with the 128x32 display you might use:
# ddisp = Adafruit_SSD1306.SSD1306_128_32(rst=RST, dc=DC, sclk=18, din=25, cs=22)

# Initialize library.
disp.begin()

# Clear display.
disp.clear()
disp.display()

# Create blank image for drawing.
# Make sure to create image with mode '1' for 1-bit color.
width = ddisp.width
height = ddisp.height
image = Image.new('1', (width, height))

# Get drawing object to draw on image.
draw = ImageDraw.Draw(image)

# Draw a black filled box to clear the image.
draw.rectangle((0,0,width,height), outline=0, fill=0)

# Draw some shapes.
# First define some constants to allow easy resizing of shapes.
padding = 2
shape_width = 20
top = padding
bottom = height-padding
# Move left to right keeping track of the current x position for drawing shapes.
x = padding
# Draw an ellipse.
draw.ellipse((x, top , x+shape_width, bottom), outline=255, fill=0)
x += shape_width+padding
# Draw a rectangle.
draw.rectangle((x, top, x+shape_width, bottom), outline=255, fill=0)
x += shape_width+padding
# Draw a triangle.
draw.polygon([(x, bottom), (x+shape_width/2, top), (x+shape_width, bottom)], outline=255, fill=0)
x += shape_width+padding
# Draw an X.
draw.line((x, bottom, x+shape_width, top), fill=255)
draw.line((x, top, x+shape_width, bottom), fill=255)
x += shape_width+padding

# Load default font.
font = ImageFont.load_default()

# Alternatively load a TTF font.
# Some other nice fonts to try: http://www.dafont.com/bitmap.php
#font = ImageFont.truetype('Minecraftia.ttf', 8)

# Write two lines of text.
draw.text((x, top),    'Hello',  font=font, fill=255)
draw.text((x, top+20), 'World!', font=font, fill=255)

# Display image.
disp.image(image)
disp.display()
Modify the code according to your OLED screen; the program defaults to 128×32. If your OLED screen is this size, you can run it directly without changes. If it is 128×64 I2C, modify it as shown below, uncommenting 128×64 and commenting out 128×32 to save.
# 128x32 display with hardware I2C:
#disp = Adafruit_SSD1306.SSD1306_128_32(rst=RST)

# 128x64 display with hardware I2C:
disp = Adafruit_SSD1306.SSD1306_128_64(rst=RST)
Enter sudo python shapes.py in the terminal or open the file with Python to see the OLED screen display.
– Install Luma.oled Library
Enter the following commands in the terminal.
sudo apt-get install python-dev python-pip libfreetype6-dev libjpeg-dev
sudo -H pip install --upgrade pip
sudo apt-get purge python-pip
sudo -H pip install --upgrade luma.oled
Note: If you need to install the Python3 version of the Luma.oled library, modify the above commands accordingly for Python3: pip ⇒ pip3, python ⇒ python3, python-dev ⇒ python3-dev, python-pip ⇒ python3-pip.
If you encounter errors in red when installing the Luma.oled library, please continue executing the commands to retry, as it may be due to network issues downloading a library called Pillow.
After successfully installing the Luma.oled library, create a new file named oled.py and copy and paste the code below. Reference the usage instructions here.
from luma.core.interface.serial import i2c, spi
from luma.core.render import canvas
from luma.oled.device import ssd1306, ssd1325, ssd1331, sh1106

# rev.1 users set port=0
# substitute spi(device=0, port=0) below if using that interface
serial = i2c(port=1, address=0x3C)

# substitute ssd1331(...) or sh1106(...) below if using that device
device = sh1106(serial)# Change to ssd1306, ssd1325, ssd1331, sh1106 as needed

with canvas(device) as draw:
    draw.rectangle(device.bounding_box, outline="white", fill="black")
    draw.text((30, 40), "Hello World", fill="white")
If your OLED driver chip is another model, find device = sh1106(serial) and change sh1106 to another model supported by the library. Open oled.py with Python 2 on Raspberry Pi to see the Hello World display.

After successfully driving the OLED, we will download the example codes for Luma.oled. How to use the examples in the examples directory? If it is not an SSD1306 chip, running it directly will still have display issues, as the example code needs to be modified. Below is an example of how to modify pi_logo.py based on the Hello World example to match your OLED chip model (the file should be placed in the examples directory).
#!/usr/bin/env python
# -*- coding: utf-8 -*-
# Copyright (c) 2014-17 Richard Hull and contributors
# See LICENSE.rst for details.
# PYTHON_ARGCOMPLETE_OK
"""
Display the Raspberry Pi logo (loads image as .png).
"""
import os.path
from PIL import Image
from luma.core.interface.serial import i2c, spi
from luma.oled.device import ssd1306, ssd1325, ssd1331, sh1106
def main():
img_path = os.path.abspath(os.path.join(os.path.dirname(__file__),
'images', 'pi_logo.png'))
logo = Image.open(img_path).convert("RGBA")
fff = Image.new(logo.mode, logo.size, (255,) * 4)
background = Image.new("RGBA", device.size, "white")
posn = ((device.width - logo.width) // 2, 0)
while True:
for angle in range(0, 360, 2):
rot = logo.rotate(angle, resample=Image.BILINEAR)
img = Image.composite(rot, fff, rot)
background.paste(img, posn)
device.display(background.convert(device.mode))
if __name__ == "__main__":
try:
serial = i2c(port=1, address=0x3C)
device = sh1106(serial)
main()
except KeyboardInterrupt:
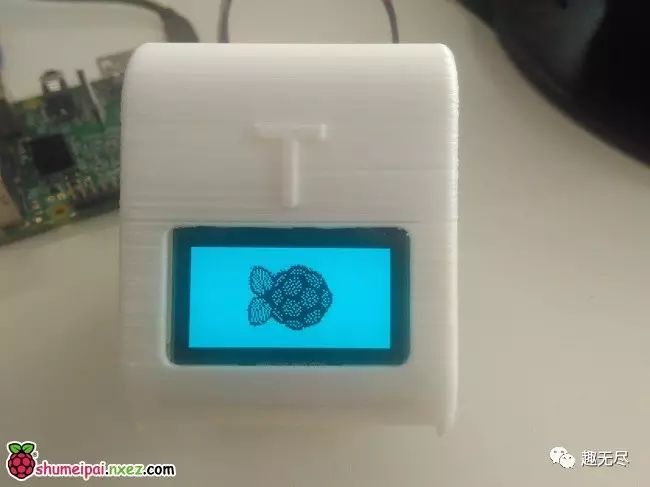
passRunning the above program with Python will display a rotating Raspberry Pi logo on the OLED screen.
End of the article. Please click the link to read the original article.