Background
CMake
CMake is a cross-platform open-source build tool used to manage and automatically generate the build process of software projects.
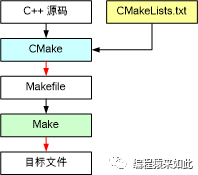
CMake automatically generates build system files suitable for different compilers and operating systems, such as Makefile and Visual Studio solutions, based on the descriptions in the CMakeLists.txt file.
Multiple Modules
Typically, a project will have multiple modules or sub-projects. In CMake, you can use add_subdirectory to add a subdirectory to the current project. This allows the project to be decomposed into multiple sub-projects, each with its own CMakeLists.txt file to manage the build process.
Managing Multiple Modules
Variable Passing
Overview
In CMake, variables defined in a directory are effective for that directory and its subdirectories, but not the other way around.
Submodules Accessing Parent Module Variables
Variables defined in the parent module are passed to the submodules.
Defining Variables in the Parent Module
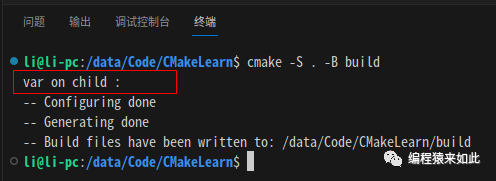
Define a variable in the parent module’s CMakeLists.txt:
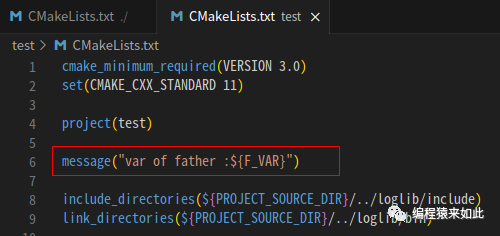
Reading Variables in the Submodule
Read the variable in the submodule’s CMakeLists.txt:
Variable Reading
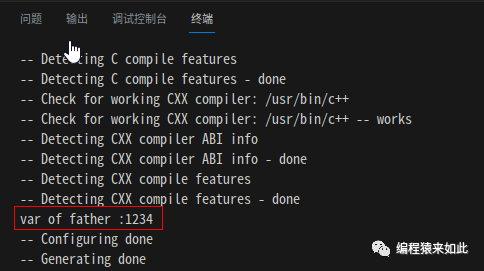
Execute the cmake command, the result is as follows:
Submodules Exposing Variables to Parent Modules
Variables defined in the submodule are not passed to the parent module by default, but can be exposed to the parent module using the PARENT_SCOPE option.
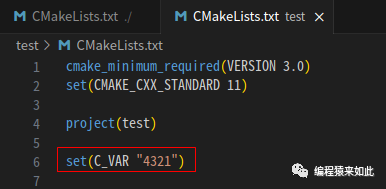
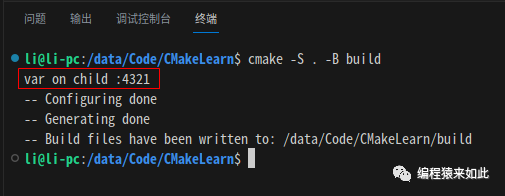
Defining Variables in the Submodule
Define a variable in the submodule’s CMakeLists.txt:
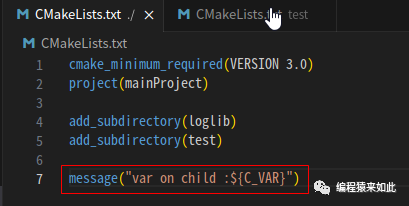
Reading Variables in the Parent Module
Read the variable in the parent module’s CMakeLists.txt:
Variable Reading
Execute the cmake command, the result is as follows:
Exposing Variables to Parent Modules
Use the PARENT_SCOPE option to expose variables to the parent module:

Execute the cmake command again, the result is as follows:
Application Example
Overview
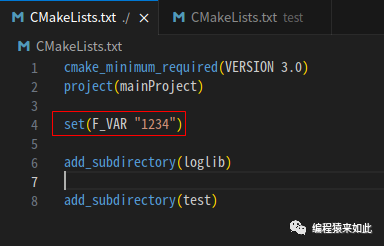
Based on the variable passing rules in CMake, some common configuration methods can be placed in the parent module:
# Common Configuration
cmake_minimum_required(VERSION 3.4)
...

# Submodules
add_subdirectory(A)
add_subdirectory(B)
Output Path Settings
Output path related parameters in CMake:
-
CMAKE_ARCHIVE_OUTPUT_DIRECTORY: Default folder for storing static libraries -
CMAKE_LIBRARY_OUTPUT_DIRECTORY: Default folder for storing dynamic libraries -
LIBRARY_OUTPUT_PATH: Default folder for storing library files -
CMAKE_RUNTIME_OUTPUT_DIRECTORY: Directory for storing executable software
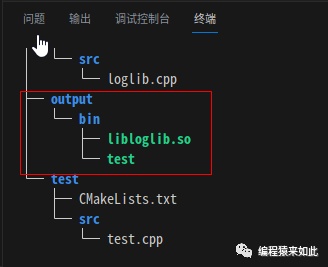
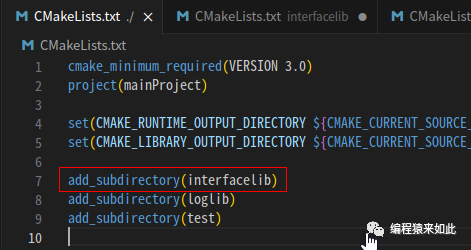
Taking the program generation path settings as an example, you can uniformly set the output path in the parent module:
cmake_minimum_required(VERSION 3.0)
project(mainProject)

set(CMAKE_RUNTIME_OUTPUT_DIRECTORY ${CMAKE_CURRENT_SOURCE_DIR}/output/bin)
set(CMAKE_LIBRARY_OUTPUT_DIRECTORY ${CMAKE_CURRENT_SOURCE_DIR}/output/bin)

add_subdirectory(loglib)
add_subdirectory(test)
The execution result is as follows:
Inter-module Dependencies
Overview
In CMake, use target_include_directories and target_link_libraries to add search directories, which can be marked with modifiers:
-
PUBLIC: This module needs it, other modules depending on this module also need it -
INTERFACE: This module does not need it, other modules depending on this module need it -
PRIVATE: This module needs it, other modules depending on this module do not need it
Application Example
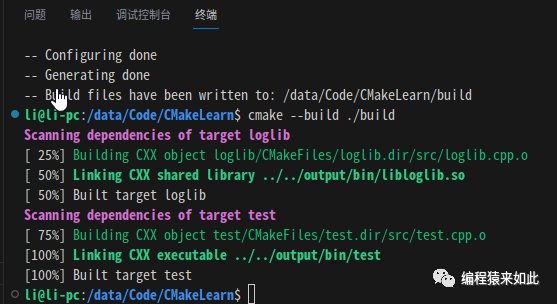
In the loglib library file, use PUBLIC to mark the header file path, while in test, only linking the library file is required.
Adding Usage Dependencies
Use PUBLIC to mark the path of the dependent header files in the CMakeLists.txt under the loglib directory:
cmake_minimum_required(VERSION 3.0)
set(CMAKE_CXX_STANDARD 11)

project(loglib)

option(BUILD_SHARED_LIBS "Build shared libraries" ON)

file(GLOB SRC_LIST ${CMAKE_CURRENT_SOURCE_DIR}/src/*.cpp)

add_library(loglib  ${SRC_LIST})

# PUBLIC mark header file path
target_include_directories(loglib PUBLIC ${PROJECT_SOURCE_DIR}/include)
Linking Library Files
In the CMakeLists.txt under the test directory, there is no need to add the header file search directory:
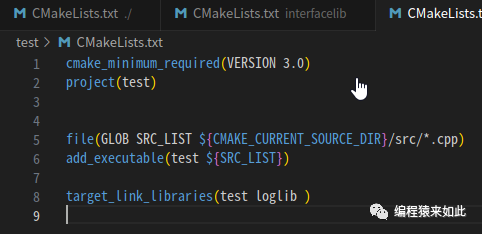
cmake_minimum_required(VERSION 3.0)
set(CMAKE_CXX_STANDARD 11)
project(test)

file(GLOB SRC_LIST ${CMAKE_CURRENT_SOURCE_DIR}/src/*.cpp)
add_executable(test ${SRC_LIST})

# Only need to add the linked library
target_link_libraries(test loglib)
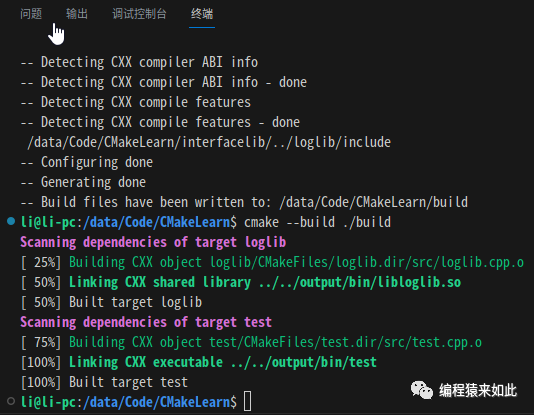
The execution build command result is as follows:
Specifying Dependency Relationships
In CMake, the add_dependencies command is used to specify that one target depends on other targets:
# target_B depends on target_A
add_dependencies(target_B target_A)
Using add_dependencies allows you to explicitly specify the build order between targets during the build process, ensuring that dependencies are correctly satisfied.
Interface Libraries
Overview
In CMake, interface libraries do not generate actual binary files and are mainly used to share compilation and linking settings between different projects or targets.
Interface Library Example
Create an interface library and place relevant common configurations in the interface library.
Creating Library Directory
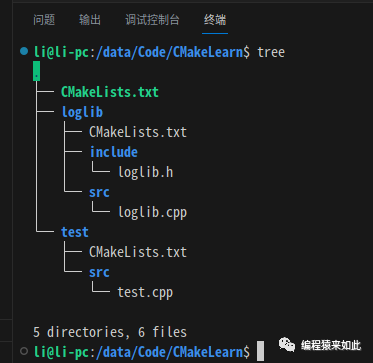
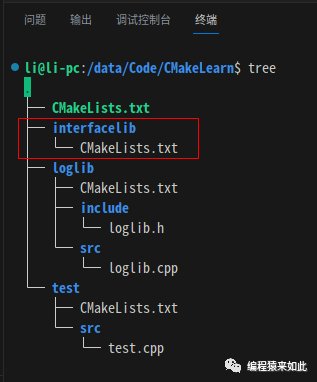
Create an interfacelib folder under the directory as shown below:
Adding an Interface Library
Use INTERFACE to add an interface library:
project(interfacelib)

# Add interface library interfacelib
add_library(interfacelib INTERFACE)
Specifying C++ Standard
target_compile_features is the command used in CMake to specify compiler features.
project(interfacelib)

# Add interface library interfacelib
add_library(interfacelib INTERFACE)
# Specify C++ 11
target_compile_features(interfacelib INTERFACE cxx_std_11)
Adding Dependent Header File Paths
project(interfacelib)

# Add interface library interfacelib
add_library(interfacelib INTERFACE)
# Specify C++ 11
target_compile_features(interfacelib INTERFACE cxx_std_11)
# Dependent header file paths
target_include_directories(interfacelib INTERFACE ${PROJECT_SOURCE_DIR}/../loglib/include)
Adding Subdirectories
Add the interface library subdirectory in the main module’s CMakeLists.txt:
Linking Interface Libraries
Link the interface library in the loglib and test modules:
Building the Entire Project
Execute the cmake command to see all projects generated successfully: