Virtualization is the underlying technology of cloud computing and an important component of infrastructure. Whether as a system administrator, infrastructure architect, or cloud architect, mastering this technology is essential.
This chapter discusses Linux virtualization technology on the x86 architecture (the article is also included in the “Rocky Linux Best Practices” and “Cloud Computing” series), covering the following topics:
- Concept of virtualization
- Role of virtualization
- Implementation principles of virtualization
- Introduction to Hypervisors
- Ways to implement virtualization
- Implementing virtualization through libvirt, qemu, and kvm
- Starting virtual machines
- Deleting virtual machines
25.1 Concept of Virtualization
Virtualization is an abstraction and simulation of computing resources, including CPU, memory, hard disk, network, etc. Virtualization creates virtual resources and maps them to computing resources. For example, on a physical server with a 32-core CPU, one or more two-core virtual machines can be created and started.
25.2 Role of Virtualization
The usage of resources by applications and their ability to scale vertically is limited. Even if all CPU and memory on a physical machine are allocated to a single application, it cannot fully utilize these resources. On the other hand, the total resources consumed by the business scale undertaken by the application may not be enough to occupy the entire physical machine’s resources. When applications cannot utilize all the resources at their disposal, it leads to resource waste, which is not acceptable in cost-sensitive teams.
While it is possible to deploy multiple applications on a single physical machine to avoid resource waste, this introduces other issues: increased management difficulty and complexity, as well as security risks. For instance, deploying 10 Tomcat instances on a single physical machine requires planning 30 ports (to avoid port conflicts that could cause Tomcat startup failures). Management costs soar, deployment efficiency decreases, and configuration errors become more likely. If a worse situation occurs, such as a trojan being implanted in one application, it can also affect other applications on the same host.
Virtualization effectively solves these problems.
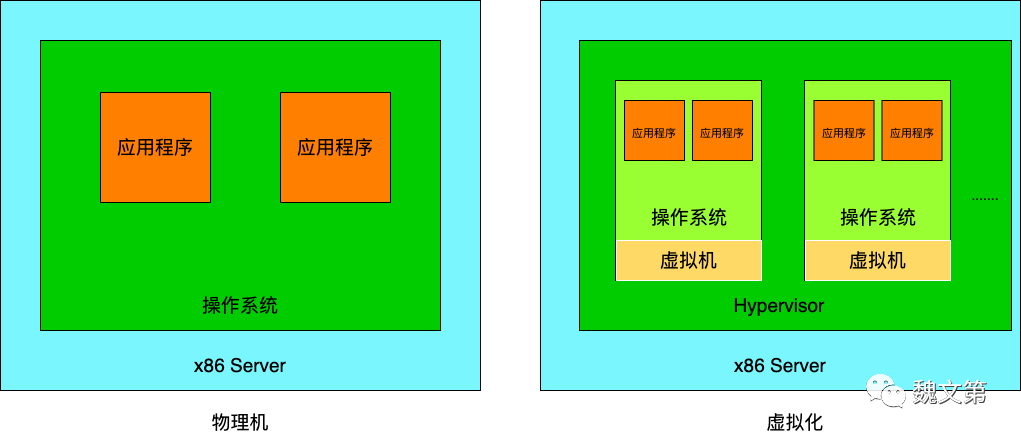
Compared to a physical environment, virtualization allows multiple independent guest operating systems (multiple virtual machines) to run on the same hardware (the same physical server) without interfering with each other, and it can allocate resources to the guest OS as needed. As shown in Figure 25-1:
25.3 Implementation Principles of Virtualization
In 1974, Gerald J. Popek and Robert P. Goldberg published a paper titled Formal Requirements for Virtualizable Third Generation Architectures, which proposed three sufficient conditions for virtualization:
- Equivalence: Programs running in a virtual machine should exhibit behavior that is essentially the same as when running directly on a physical machine;
- Resource Control: The hypervisor must have complete control over the resources being virtualized;
- Efficiency: Most guest OS instructions should be executed directly by the hardware without the involvement of the hypervisor.
The above three points can be summarized as the basic implementation principles of virtualization.
25.4 Introduction to Hypervisors
A hypervisor (also known as a Virtual Machine Monitor, VMM) is used to monitor and control virtual machines, performing virtualization management tasks such as providing virtual hardware, managing the lifecycle of virtual machines, migrating virtual machines, resource allocation, and defining policies for virtual machine management. The hypervisor is also responsible for controlling physical resources, such as memory translation and I/O mapping. One of the main advantages of virtualization is that it allows multiple guest OSs to run on the same physical system.
Guest OSs can be the same or different operating systems. For example, both Windows and Linux guest OSs can run simultaneously on the same physical machine. The hypervisor allocates the required resources (CPU, memory, etc.) to the guest OS based on configuration information. Therefore, the hypervisor is a crucial component of the virtualization environment.
25.5 Ways to Implement Virtualization
The x86 architecture did not initially consider virtualization, but after more than a decade of development, open-source virtualization solutions based on the x86 architecture have become mainstream. During this process, different types of virtualization implementations have emerged: full virtualization, paravirtualization, and hardware-assisted virtualization. All these implementations face an important issue: how to handle CPU instruction privilege escalation.
25.5.1 CPU Instruction Privilege Escalation
In computer science, there are different levels of protection rings to protect the security of computer systems. These protection rings can be imagined as instruction zones, as shown in Figure 25-2:
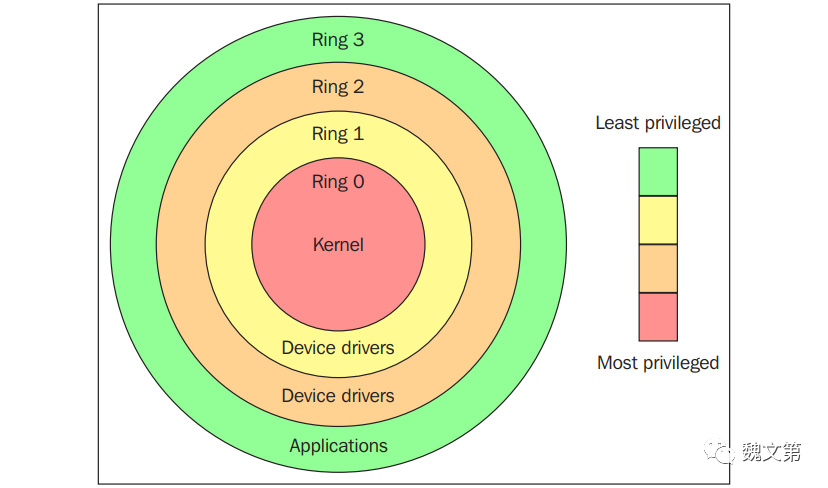
The protection rings are numbered from 0 to 3, with permissions ranging from highest to lowest. Ring 0 has the highest privilege and directly interacts with physical hardware (such as the CPU); Rings 1 and 2 are mostly unused. Mainstream operating systems only use two rings (Ring 0 and Ring 3), corresponding to the two main modes of the CPU: kernel mode and user mode. From the operating system’s perspective, Ring 0 is kernel mode, and Ring 3 is user mode. Applications run in Ring 3.
Operating systems like Linux and Windows use kernel and user modes (Ring 0 and Ring 3). The kernel runs in privileged mode, which is Ring 0. Applications running in Ring 3 must perform system calls to access hardware resources, and the trusted code in the operating system will execute this task and return the result to user space. In short, in a normal environment, the operating system runs in Ring 0, requiring the highest privilege level to manage resources and provide access to hardware.
Rings above Ring 0 operate instructions in unprotected processor mode. The hypervisor needs access to the host’s memory, CPU, and I/O devices. Since only code running in Ring 0 can perform these operations, the hypervisor must run in Ring 0 and must be next to the kernel. If there is no specific hardware virtualization support, the hypervisor running in Ring 0 fundamentally prevents the virtual machine operating system from running in Ring 0. Therefore, the virtual machine operating system must reside in Ring 1. However, the virtual machine operating system should also access all resources, and it does not know about the existence of the virtualization layer; to achieve this, the Guest OS must run in Ring 0, similar to the hypervisor. Only one kernel can run in Ring 0 at a time, so the guest OS must run with lower privileges in another ring or must be modified to run in user mode.
This leads to different implementations of virtualization, namely “full virtualization” and “paravirtualization”.
25.5.2 Full Virtualization
Full virtualization relies on privilege level compression and binary translation techniques to overcome the limitations of running the guest OS in Ring 1 and the hypervisor in Ring 0. Privilege level compression means running the guest OS, which should run in Ring 0, in Ring 1; binary translation is used to interpret and dynamically rewrite some system calls.
Using this method, critical instructions will be translated and simulated through the hypervisor. Compared to virtual machines running on native virtualization architectures, binary translation incurs greater performance overhead.
With full virtualization, there is no need to modify the guest OS running in the virtual machine. This means there is no need to modify the guest kernel to run on the hypervisor. When the guest kernel performs privileged operations, the hypervisor provides CPU emulation to handle and modify protected CPU operations. Compared to paravirtualization, full virtualization has greater performance overhead (due to privilege instruction translation).
25.5.3 Paravirtualization
In paravirtualization, the guest OS needs to be modified to allow these instructions to access Ring 0. In other words, the operating system needs to be modified to communicate between the hypervisor and the guest through a backend (hypercall) path.
In paravirtualization technology, the hypervisor provides an API for the guest OS to call, which requires modifications to the host operating system. Privileged instruction calls are exchanged with the API functions provided by the hypervisor. In this case, the modified guest OS can run in Ring 0.
In paravirtualization, the guest kernel is modified to run on the hypervisor. This means the guest kernel is aware that it is being virtualized. Privileged instructions (operations) that should run in Ring 0 have been replaced with hypercalls that communicate with the hypervisor. Hypercalls call the hypervisor to perform tasks on behalf of the guest kernel. Since the guest kernel can directly communicate with the hypervisor through hypercalls, this technique can achieve higher performance compared to full virtualization. However, this requires a specially designed guest kernel that can perceive paravirtualization and provide the necessary software support.
The concepts of paravirtualization and full virtualization were once common methods for implementing virtualization, but they are not the best or most manageable ways, as hardware-assisted virtualization is simpler and more efficient.
25.5.4 Hardware-Assisted Virtualization
Full and paravirtualization pose significant challenges in terms of performance overhead and complexity for x86 architecture virtualization. Recognizing this, Intel and AMD created new x86 architecture processor extensions: Intel VT-x and AMD-V, which modified CPU instructions to fundamentally support virtualization. Hardware-assisted virtualization aims to efficiently use full virtualization through hardware capabilities.
Hardware-assisted virtualization not only provides new instructions but also introduces a new privilege access level: Ring 1. In the new Ring 1, the hypervisor can run. Thus, the guest OS can run in Ring 0. Through hardware-assisted virtualization, the OS can directly access resources without any emulation or kernel modification. The hypervisor can now run at the newly introduced privilege level (Ring 1), while the guest OS runs in Ring 0. Moreover, with hardware-assisted virtualization, the workload of the hypervisor is also reduced, requiring less work compared to other techniques mentioned earlier, thus lowering performance overhead, as shown in Figure 25-3:
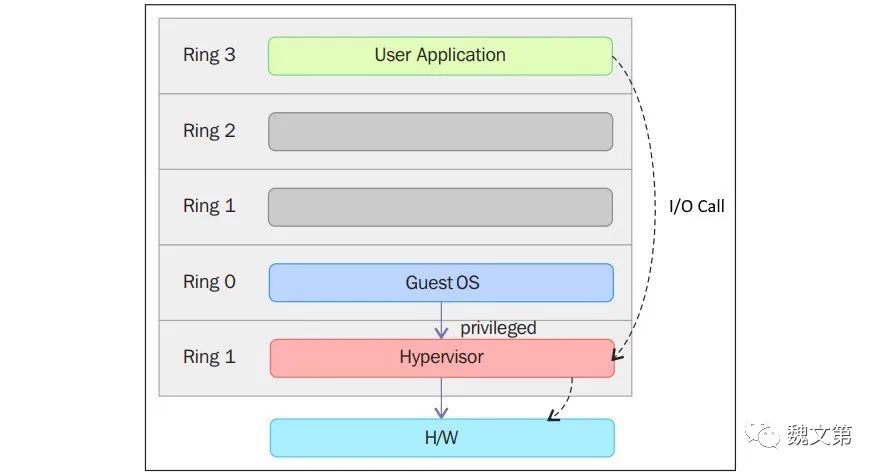
In simple terms, hardware that supports virtualization assists in building the hypervisor, ensuring the isolation of guest OSs, helping to achieve better performance and reduce the complexity of virtualization solutions. Modern virtualization technology utilizes this functionality to provide virtualization. KVM is an example that works well with hardware-assisted virtualization, meeting the “three sufficient conditions for virtualization,” making it a mainstream open-source virtualization solution.
25.6 Installing Libvirt, QEMU, and KVM
The combination of Libvirt, qemu, and kvm provides complete virtualization functionality and is an important part of Linux virtualization solutions.
Libvirt is an open-source project that runs as a daemon to manage virtualization platforms (kvm, qemu, Xen, lxc, …). Typically, the virt-manager graphical tool calls libvirt to manage remote or local hypervisors; the virsh command-line tool provided by libvirt is the mainstream command-line management tool for hypervisors.
QEMU is a universal and open-source machine emulator and virtualizer. When acting as a virtualizer, it runs KVM and Xen virtual machines with nearly native performance.
KVM (Kernel-based Virtual Machine) is an open-source full virtualization solution based on hardware assistance. It includes a general kernel module named kvm.ko and kernel modules based on hardware (such as Intel’s kvm-intel.ko or AMD’s kvm-amd.ko). KVM loads these modules, turning the Linux kernel into a hypervisor to achieve virtualization.
In addition to the kernel modules, KVM also includes qemu-kvm. QEMU-KVM is a tool developed by the KVM team for managing and creating virtual machines.
Through the /dev/kvm device file of KVM, applications can perform system calls of the ioctl() function. QEMU-KVM uses the /dev/kvm device file to communicate with KVM and create, initialize, and manage the kernel-mode context of virtual machines.
25.6.1 Checking CPU Support for Virtualization
KVM requires CPU virtualization capabilities and can only run on CPUs that support virtualization, specifically Intel CPUs with VT capabilities or AMD CPUs with AMD-V capabilities.
Execute the following command to check if the CPU supports virtualization:
# Intel vmx# AMD svm[root@rocky08-host ~]# grep -E '(vmx|svm)' /proc/cpuinfoflags: fpu vme de pse tsc msr pae mce cx8 apic sep mtrr pge mca cmov pat pse36 clflush mmx fxsr sse sse2 ss syscall nx pdpe1gb rdtscp lm constant_tsc arch_perfmon nopl xtopology tsc_reliable nonstop_tsc cpuid pni pclmulqdq vmx ssse3 fma cx16 pcid sse4_1 sse4_2 x2apic movbe popcnt tsc_deadline_timer xsave avx f16c rdrand hypervisor lahf_lm abm 3dnowprefetch cpuid_fault invpcid_single pti ssbd ibrs ibpb stibp tpr_shadow vnmi ept vpid ept_ad fsgsbase tsc_adjust bmi1 avx2 smep bmi2 invpcid rdseed adx smap clflushopt xsaveopt xsavec xgetbv1 xsaves arat md_clear flush_l1d arch_capabilities...If the output is empty, it indicates that the CPU does not support virtualization or that the feature is not enabled.
To enable CPU virtualization capabilities on a physical machine, enter the BIOS on boot, find advanced settings in the CPU section, enable it, and save and exit. If in a virtual environment like VMware Workstations for learning, this feature needs to be enabled while the virtual machine is powered off, typically found under “Settings” -> “Hardware” -> “Processor”, checking the virtualization engine option.
25.6.2 Installing qemu-kvm and libvirt Using Package Groups
Rocky Linux provides the “Virtualization Hypervisor” package group for installing KVM virtualization tools. You can view the software packages provided in the package group with the dnf group info command:
[root@rocky08-host ~]# dnf group info "Virtualization Hypervisor"Last metadata expiration check: 1:46:22 ago on Sun 04 Sep 2022 11:26:58 AM CST.Group: Virtualization Hypervisor Description: Smallest possible virtualization host installation. Mandatory Packages: libvirt qemu-kvmIt includes the libvirt and qemu-kvm packages.
To install the “Virtualization Hypervisor” package group:
[root@rocky08-host ~]# dnf group install -y "Virtualization Hypervisor"Install virt-install, virt-viewer, and virt-manager commands. The virt-install command is used to create virtual machines, while virt-viewer and virt-manager provide graphical consoles:
# virt-install, installs virtual machines via CLI;# virt-viewer, after executing the virt-install command in GUI mode, will automatically pop up the virt-viewer window for guided installation;# virt-manager, manages virtual machines in GUI mode.[root@rocky08-host ~]# dnf install -y virt-install virt-viewer virt-managerInstall the GNOME desktop package group on the KVM host to obtain a graphical interface (optional operation)
[root@rocky08-host ~]# dnf group install -y "Server with GUI"Installing a graphical interface is to execute the virt-viewer and virt-manager commands/applications to start the graphical virtual machine management window.
If managing KVM virtual machines remotely via a VNC client, the desktop package does not need to be installed.
25.6.3 Starting Libvirt
Start the libvirtd service and set it to start on boot:
[root@rocky08-host ~]# systemctl enable libvirtd --now[root@rocky08-host ~]# systemctl status libvirtd● libvirtd.service - Virtualization daemon Loaded: loaded (/usr/lib/systemd/system/libvirtd.service; enabled; vendor preset: enabled) Active: active (running) since Sun 2022-09-04 13:27:45 CST; 12s ago...Once libvirtd starts successfully, it will create a virtual network card named “virbr0”:
[root@rocky08-host ~]# ifconfig virbr0virbr0: flags=4099<UP,BROADCAST,MULTICAST> mtu 1500 inet 192.168.122.1 netmask 255.255.255.0 broadcast 192.168.122.255 ether 52:54:00:9a:d6:94 txqueuelen 1000 (Ethernet) RX packets 0 bytes 0 (0.0 B) RX errors 0 dropped 0 overruns 0 frame 0 TX packets 0 bytes 0 (0.0 B) TX errors 0 dropped 0 overruns 0 carrier 0 collisions 025.6.4 Enabling IOMMU
Set the kernel to enable IOMMU (Input/Output Memory Management Unit). Edit the /etc/default/grub file and add the following content to the end of the “GRUB_CMDLINE_LINUX” line:
intel_iommu=onDon’t forget to add a space before this content.
Restart the operating system to make the configuration take effect:
[root@rocky08-host ~]# systemctl rebootAfter completing the above operations, you can verify the host’s compatibility with KVM using the virt-host-validate command.
25.6.5 Verifying Installation Results
Verify whether the KVM virtualization environment is correctly deployed using the virsh net-list and virsh list commands:
[root@rocky08-host ~]# virsh net-list Name State Autostart Persistent-------------------------------------------- default active yes yes[root@rocky08-host ~]# virsh list Id Name State--------------------The output above indicates that the KVM virtualization environment has been successfully deployed. Next, start the virtual machine.
25.7 Starting Virtual Machines
The true purpose of deploying a KVM environment is to run virtual machines. Prepare the ISO image file of Rocky Linux 8.6, which can be downloaded from the official Rocky Linux website and saved in the /var/lib/libvirt/images/ directory.
25.7.1 Configuring Virtual Display Tools
The article “Installing Rocky Linux 8” describes that during the installation of the operating system, there is a 60-second countdown on the boot interface, and you need to select the installation option before it ends. After executing the virt-install command, the boot countdown will start, so you need to quickly connect via the display tool and select the installation option.
There are different virtual display tools, such as VNC. VNC is suitable for internal network environments, managing KVM running on host machines without a GUI installed. You can access virtual machines from any operating system using VNC. My VNC client is “TightVNC” running on Windows.
If the host machine has a GUI installed, you can switch to the desktop environment using the init 5 command. When executing the virt-install command to install the virtual machine in the desktop environment, the virt-viewer graphical interface will automatically start for guided installation of the Linux system.
In the desktop environment, you can also execute the virt-manager command to start the Virtual Machine Manager for installing and managing virtual machines.
25.7.2 Manual Installation of Virtual Machines
To install a virtual machine, you need a system image file and a disk. The image file has been downloaded from the website. The disk can be created manually or automatically via virt-install. When automatically created via virt-install, the default format is qcow2.
The qemu-img command is used to manually create disks, with common formats being raw and qcow2. In terms of disk usage, the raw format disk file size is the size specified at creation, while the qcow2 format disk file size is the actual size used. Therefore, it is recommended to use the qcow2 format.
[root@rocky08-host ~]# qemu-img create -f qcow2 /var/lib/libvirt/images/rocky-kvm01.qcow2 20GFormatting '/var/lib/libvirt/images/rocky-kvm01.qcow2', fmt=qcow2 cluster_size=65536 extended_l2=off compression_type=zlib size=21474836480 lazy_refcounts=off refcount_bits=16[root@rocky08-host ~]# ls -lh /var/lib/libvirt/images/total 11G-rw-r--r--. 1 qemu qemu 11G Sep 5 03:10 Rocky-8.6-x86_64-dvd1.iso-rw-r--r--. 1 root root 193K Sep 21 05:29 rocky-kvm01.qcow2Execute the following command to install the virtual machine:
# virt-install \ --virt-type kvm \ --name rocky-kvm01 \ --vcpus 1 \ --disk /var/lib/libvirt/images/rocky-kvm01.qcow2 \ --memory 2048 \ --os-variant rocky8.6 \ --graphics vnc,listen=0.0.0.0 \ --cdrom /var/lib/libvirt/images/Rocky-8.6-x86_64-dvd1.isoThe –os-variant parameter supports guest OS types that can be viewed using the osinfo-query os command:
[root@rocky08-host ~]# osinfo-query os | grep rocky rocky-unknown | Rocky Linux Unknown | unknown | http://rockylinux.org/rocky/unknown rocky8-unknown | Rocky Linux 8 Unknown | 8-unknown | http://rockylinux.org/rocky/8-unknown rocky8.4 | Rocky Linux 8.4 | 8.4 | http://rockylinux.org/rocky/8.4 rocky8.5 | Rocky Linux 8.5 | 8.5 | http://rockylinux.org/rocky/8.5 rocky8.6 | Rocky Linux 8.6 | 8.6 | http://rockylinux.org/rocky/8.6 rocky9-unknown | Rocky Linux 9 Unknown | 9-unknown | http://rockylinux.org/rocky/9-unknown rocky9.0 | Rocky Linux 9.0 | 9.0 | http://rockylinux.org/rocky/9.0Connect to the console via VNC by entering the host’s IP in the VNC client, with the default starting port being TCP 5900. Each time a KVM virtual machine is started, the VNC port will +1. After successfully connecting to VNC, you can refer to the first article in this series “Installing Rocky Linux 8” to execute the installation process.
25.7.3 Automated Installation of Virtual Machines
You can use a kickstart file to install virtual machines in a more automated and simpler way. A kickstart file is a text configuration file. You can use the kickstart file from the virtual machine just installed. For configuring the kickstart for automated installation of virtual machines, please refer to “Advanced Installation Options for Rocky Linux”.
Once the kickstart environment is prepared, execute the following command to automate the installation of the virtual machine:
# virt-install \ --virt-type kvm \ --name rocky-kvm02 \ --vcpus 1 \ --disk size=20 \ --memory 2048 \ --os-variant rocky8.6 \ --graphics vnc,listen=0.0.0.0 \ --location /var/lib/libvirt/images/Rocky-8.6-x86_64-dvd1.iso \ -x "ks=http://192.168.254.128/anaconda-ks.cfg"Since the kickstart configuration needs to be injected into the boot process, replace –cdrom with –location. The root password for the newly created “rocky-kvm02” virtual machine is the same as that of “rocky-kvm01” (which provides the anaconda-ks.cfg file).
At this point, starting the virt-manager console or connecting to the “rocky-kvm02” virtual machine via VNC will show the operating system being installed automatically.
If you need to create multiple virtual machines at once, you can write a script to achieve this using a for loop. The content is as follows:
[root@rocky08-host ~]# cat loop-install-kvm.sh #!/bin/bashfor counter in {1..3}do echo "installing VM ${counter}" virt-install --virt-type kvm \ --name kvm${counter} \ --vcpus 1 \ --disk size=20 \ --memory 2048 \ --os-variant rocky8.6 \ --graphics vnc,listen=0.0.0.0 \ --location /var/lib/libvirt/images/Rocky-8.6-x86_64-dvd1.iso \ -x "ks=http://192.168.254.128/anaconda-ks.cfg"doneAdd execution permissions to loop-install-kvm.sh and execute this script:
[root@rocky08-host ~]# chmod +x loop-install-kvm.sh[root@rocky08-host ~]# sh loop-install-kvm.sh installing VM 1Starting install...Retrieving file vmlinuz... | 10 MB 00:00:00 Retrieving file initrd.img... | 79 MB 00:00:00 Allocating 'kvm1.qcow2' | 20 GB 00:00:00 Running graphical console command: virt-viewer --connect qemu:///system --wait kvm1...When the script execution is complete, you can check the running virtual machines with the virsh list command:
[root@rocky08-host ~]# virsh list Id Name State----------------------------- 1 rocky-kvm01 running 3 rocky-kvm02 running 4 kvm1 running 5 kvm2 running 6 kvm3 runningCheck the IP of the virtual machine:
[root@rocky08-host ~]# virsh domifaddr kvm1 Name MAC address Protocol Address------------------------------------------------------------------------------- vnet3 52:54:00:d8:9b:a3 ipv4 192.168.122.144/24You can connect to the virtual machine remotely using the IP:
[root@rocky08-host ~]# ssh 192.168.122.14425.8 Deleting Virtual Machines
To delete a running virtual machine, it must be shut down first and then deleted; for already shut down virtual machines, they can be deleted directly:
[root@rocky08-host ~]# virsh destroy kvm3Domain 'kvm3' destroyed[root@rocky08-host ~]# virsh list --all Id Name State------------------------------ 1 rocky-kvm01 running 3 rocky-kvm02 running 4 kvm1 running 5 kvm2 running - kvm3 shut off[root@rocky08-host ~]# virsh undefine kvm3Domain 'kvm3' has been undefined[root@rocky08-host ~]# virsh list --all Id Name State----------------------------- 1 rocky-kvm01 running 3 rocky-kvm02 running 4 kvm1 running 5 kvm2 runningFinally, delete the disk file:
[root@rocky08-host ~]# rm -f /var/lib/libvirt/images/kvm3.qcow2