Guide to Installing OECT and Deploying OpenWrt in LXC
1️⃣ Main System Selection
OECT has recently gained popularity, and after acquiring it, I considered flashing the firmware. The K2P + N1 has met most of my home network needs, and with OECT’s 4GB of RAM, running OpenWrt separately would be too extravagant, so I decided on the Main System: Armbian.
Let the professionals handle professional tasks:
- Armbian as the main system
- Deploying OpenWrt through LXC containers, sharing the kernel with Armbian, without interfering with the main system
2️⃣ Flashing Considerations
- Use the top Type-C interface for flashing, do not connect the power cable
- Do not unplug the SATA cable forcefully
- Short the GND and 1V8 (it is recommended to use the DEBUG point for GND)
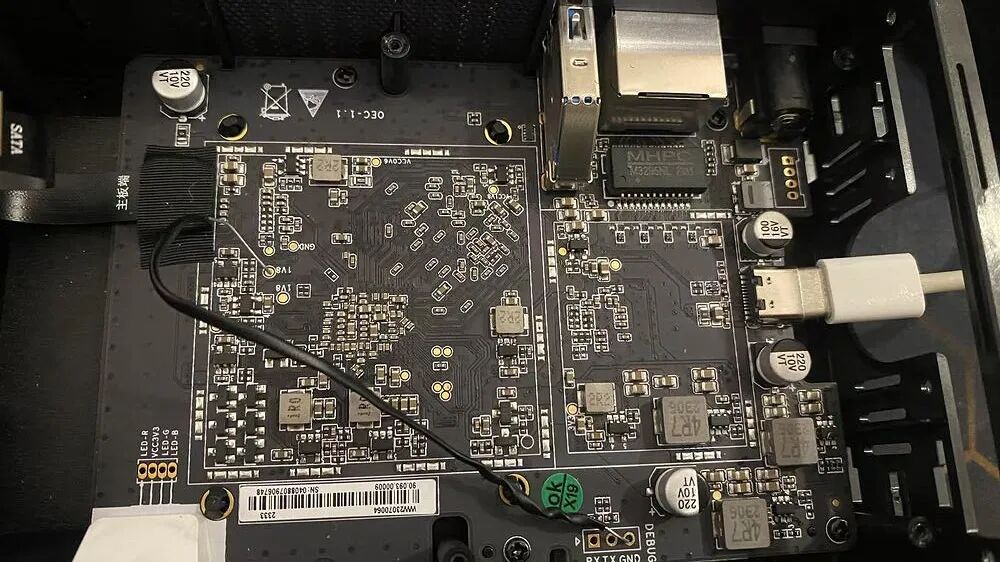
- Flashing tool configuration:
- Address 0xCCCCCCCC Name LoaderToDDR
- Address 0x00000000 Name system
3️⃣ Creating br0 Bridge (Armbian)
Armbian creates a br0 bridge, bridging the host’s physical network card and the LXC/OpenWrt container network, allowing the container to behave like a real independent device on the local network.
Edit the Netplan configuration:
network:
version:2
renderer: networkd
ethernets:
eth0:{}
bridges:
br0:
interfaces:[eth0]
addresses:[192.168.1.10/24]# Change to your internal IP
routes:
-to: default
via: 192.168.1.1 # Main router IP
nameservers:
addresses:[8.8.8.8, 1.1.1.1]YAML
Apply configuration:
sudo netplan apply
ip addr showBash
4️⃣ Change to Tsinghua Source
vi /etc/apt/sources.list.d/ubuntu.sources
# Comment out the original source, add:
URIs: https://mirrors.tuna.tsinghua.edu.cn/ubuntu/LXCBash
5️⃣ Install LXC
sudo apt update
sudo apt install lxc bridge-utilsBash
Why Choose LXC Instead of LXD
- LXC is like Docker without a GUI
- LXD simplifies LXC commands but requires Snap, which takes up more space and has poor interoperability between containers and the main system
- OECT has limited space, so I decisively run LXC bare-metal
6️⃣ Configure OpenWrt Container
sudo mkdir -p /var/lib/lxc/openwrt
sudo mkdir -p /var/lib/lxc/openwrt/rootfs
vi /var/lib/lxc/openwrt/configExample content:
# Container configuration
lxc.include = /usr/share/lxc/config/common.conf
lxc.arch = aarch64
# Container specific configuration
lxc.apparmor.profile = unconfined
lxc.apparmor.allow_nesting = 1
lxc.rootfs.path = dir:/var/lib/lxc/openwrt/rootfs
lxc.uts.name = openwrt
lxc.start.auto = 1
lxc.start.delay = 20
# Network
lxc.net.0.type = veth
lxc.net.0.link = br0
lxc.net.0.flags = up
# TUN/TAP
lxc.cgroup2.devices.allow = c 10:200 rwm
lxc.mount.entry = /dev/net/tun dev/net/tun none bind,create=fileIni
7️⃣ Download and Install OpenWrt Image
There are two types of images: original OpenWrt images and domestic OpenWrt branch images.
Original Image
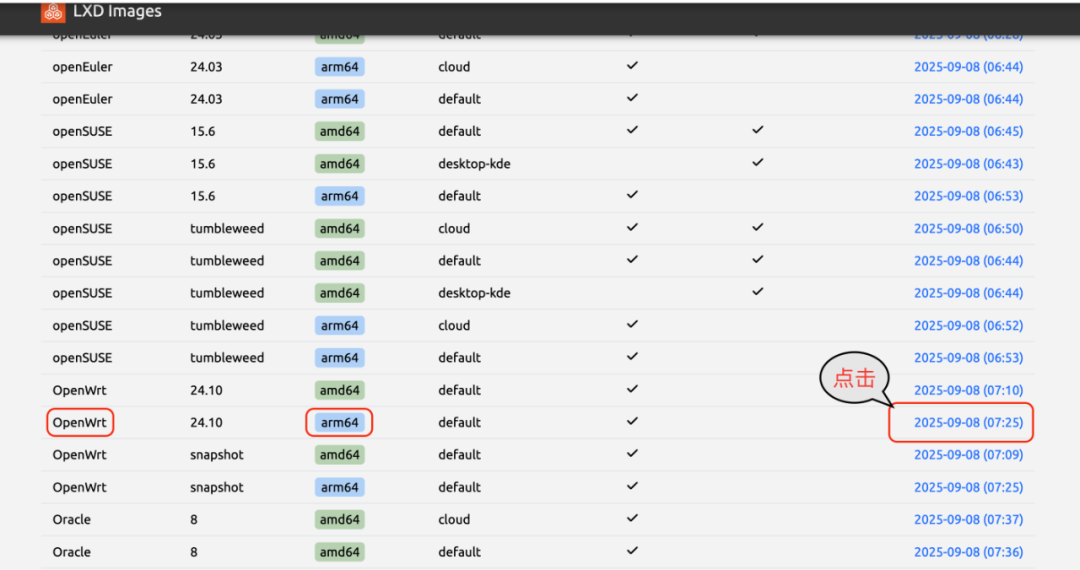
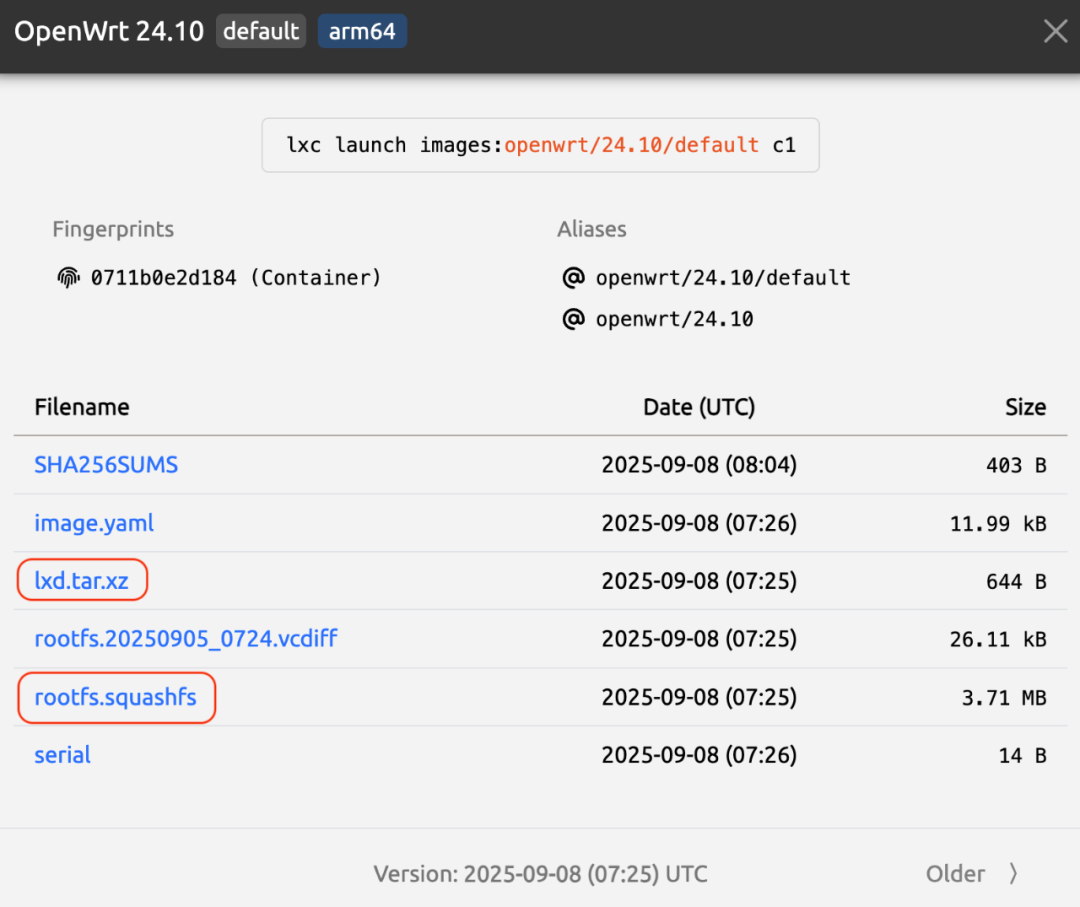
1. The method to install OpenWrt from the original image can be found at: https://images.lxd.canonical.com/. Enter the webpage, select the appropriate version of OpenWrt, click the date to download the two files in the red box, and upload them to the root folder.
# Download rootfs and extract
sudo apt install squashfs-tools
unsquashfs rootfs.squashfs
cp -a squashfs-root/* /var/lib/lxc/openwrt/rootfs/
tar -xJf lxd.tar.xz -C /var/lib/lxc/openwrt/rootfs/Bash
Domestic Branch Images (immortalwrt/istoreOS)
2. The method to install OpenWrt from domestic branch images is numerous, with immortalwrt and istoreOS being the most popular. Both of these firmware formats are img.gz, rename using mv to openwrt.img.gz and then enter the following commands.
gzip -d openwrt.img.gz
fdisk -l openwrt.img
Bash
The screen will show loop1 and loop2, calculate the offset, offset=$((START_SECTOR * 512)), multiply the start value of the large partition by 512 to get the offset value. Substitute this value into the following offset.
mkdir /mnt/openwrt
mount -o loop,offset=$offset openwrt.img /mnt/openwrt
cp -a /mnt/openwrt/* /var/lib/lxc/openwrt/rootfs/
Bash
8️⃣ Start OpenWrt Container
lxc-start openwrt
Bash
9️⃣ Common LXC Commands
# Create and configure
lxc-create # Create container
lxc-config # Display/modify LXC configuration
lxc-update-config # Update old version configuration files
# Start and run
lxc-start # Start container
lxc-execute # Start container and execute command
lxc-attach # Attach to running container
lxc-console # Open container console
lxc-autostart # Start all containers set to autostart
lxc-usernsexec # Execute command in user namespace
lxc-unshare # Open new namespace to execute command
# Stop and destroy
lxc-stop # Stop container
lxc-destroy # Delete container
# Query and monitor
lxc-ls # List all containers
lxc-info # View container information
lxc-monitor # Monitor container events
lxc-top # Show container resource usage
lxc-wait # Wait for container to reach specified state
# Snapshot and copy
lxc-copy # Copy container
lxc-snapshot # Snapshot operations (create/list/recover)
# State management
lxc-freeze # Freeze container (pause processes)
lxc-unfreeze # Unfreeze container (resume processes)
# Device and resource
lxc-cgroup # Manage container's cgroup parameters
lxc-device # Manage container device mapping# Advanced features
lxc-checkconfig # Check kernel support for LXC
lxc-checkpoint # Container checkpoint/recovery (requires criu)Bash
References
- Little Rice Needs to Eat – Bilibili
- fitnessele – Enshan Forum
- hereyes – Enshan Forum