Software Download
| System Name:Ubuntu/CentOS Linux (Multiple Versions) | |
| System Language: Simplified Chinese | System Size: 1.82G |
| Installation Environment:Windows 7 or higher | |
|
Download Channel②Baidu Cloud Drive丨Download Link: File shared via cloud drive: Win installs Linux Link: https://pan.baidu.com/s/1KLBL4kQUFwpRoDPz0E8s6Q?pwd=p6n4 Extraction Code: p6n4 — Shared by Baidu Cloud Super Member v2 |
|
|
Download Help:▷Click to view “How to Download”? Encountering Issues:▷Click to enter “Help Center”! More Content:▷Click to search “Resource Directory”! |

Software Introduction

Introduction to CentOS
1. Basic Overview
-
Positioning
: An open-source free version based on Red Hat Enterprise Linux (RHEL), maintained by the community, emphasizing stability and long-term support, making it a classic choice for enterprise-level servers.
-
Origin
: Derived from the source code of RHEL (which is a paid system), the CentOS community recompiles it, removing closed-source components while retaining the core features of RHEL.
-
Current Status
: In 2020, Red Hat announced that CentOS 8 would stop maintenance by the end of 2021 and introduced a new rolling release version CentOS Stream (as an upstream testing version of RHEL). Currently, enterprises are more inclined to use AlmaLinux, Rocky Linux and other alternatives to CentOS (with high compatibility with CentOS).
2. Core Features
-
Stability First
-
- Software versions undergo rigorous testing, with long update cycles to avoid compatibility issues introduced by new software versions, suitable for services that require long-term stable operation (such as databases, financial systems).
-
YUM/DNF Package Management
-
- Uses
<span><span><span>yum</span></span></span>(CentOS 7 and earlier) or<span><span><span>dnf</span></span></span>(CentOS 8+) to manage packages, with reliable dependency handling, but software versions are relatively old (focusing on stability rather than the latest features).
- Uses
-
Long-Term Support
-
- Mainstream versions (such as CentOS 7) provide a 10-year lifecycle (after maintenance stops in 2020, extended support can be obtained through paid subscriptions).
-
Hardware Compatibility
-
- Friendly support for older hardware, but driver support for new hardware (such as new CPUs and GPUs) may lag behind.
3. Application Scenarios
-
Enterprise Servers
: Web servers, mail servers, ERP systems, etc., that require 24/7 stable operation.
-
Traditional Industries
: Fields such as finance, telecommunications, and manufacturing that have extremely high requirements for system stability.
-
Migration from RHEL Ecosystem
: As a free alternative to RHEL, it facilitates enterprises transitioning from paid systems to open-source solutions.
2. Introduction to Ubuntu
1. Basic Overview
-
Positioning
: An open-source Linux distribution based on Debian, led by Canonical, known for its ease of use and active community ecosystem, covering multiple scenarios including desktop, server, cloud, and IoT.
-
Features
: Balances stability and innovation, with LTS versions suitable for enterprise applications and non-LTS versions suitable for users seeking new features.
2. Core Features
-
User-Friendly and Flexible
-
- The desktop version defaults to using the GNOME desktop, with a simple and intuitive interface, supporting one-click installation and graphical management tools, suitable for beginners to get started quickly.
- The server version is lightweight and efficient, supporting rapid deployment on cloud platforms (such as AWS, Alibaba Cloud).
-
APT Package Management
-
- Uses
<span><span><span>apt</span></span></span>tool to manage packages, with frequently updated software repositories, allowing quick access to new software versions (especially in non-LTS versions).
- Uses
-
Long-Term Support and Rapid Iteration
-
- LTS versions (such as 22.04) provide 5 years of free updates, with the server version extendable to 10 years (Ubuntu Pro); non-LTS versions are released every 6 months, suitable for development and testing environments.
-
Hardware Compatibility
-
- Good support for new hardware (such as NVMe drives, new graphics cards), with timely driver adaptation.
3. Application Scenarios
-
Desktop and Development
: The preferred development environment for programmers (supports tools like Docker, Kubernetes), multimedia processing, and daily office tasks.
-
Cloud Computing and Containerization
: A mainstream operating system for cloud platforms like OpenStack and Kubernetes, suitable for building elastic cloud servers.
-
IoT and Embedded
: Compatible with devices like Raspberry Pi and NVIDIA Jetson, used for edge computing and AI development.
3. Comparison Table of CentOS and Ubuntu
| Dimension | CentOS (and Alternatives) | Ubuntu |
|---|---|---|
| Package Management Tool | <span><span><span>yum</span></span></span> (CentOS 7)/ <span><span><span>dnf</span></span></span> (CentOS 8+) |
<span><span><span>apt</span></span></span> |
| Software Update Policy | Conservative, focusing on stability, with older software versions | LTS versions are stable, non-LTS versions are aggressively updated |
| Support Cycle | 10 years (LTS version, such as CentOS 7) | Desktop LTS supports for 5 years, server version extendable to 10 years |
| Desktop Experience | Focus on servers, weaker desktop functionality (requires manual configuration) | Best Linux desktop experience, suitable for average users |
| Hardware Compatibility | Friendly to older hardware, but new hardware support lags | Timely driver adaptation for new hardware, more comprehensive compatibility |
| Community and Enterprise Support | Active community (but after CentOS stopped maintenance, shifted to AlmaLinux, etc.) | Official (Canonical) and community support run in parallel |
| Typical Application Scenarios | Enterprise-level servers, traditional industry systems | Desktop office, cloud computing, development testing, IoT |
| Security | System-level updates are slow, but vulnerability fixes are rigorous | Quick response to security updates, supports automatic patch installation |
| Learning Curve | Suitable for users with Linux experience (leaning towards operations) | More friendly to beginners, with rich documentation and tutorials |
4. How to Choose?
Choose CentOS (or alternatives) if:
- You need binary compatibility with RHEL (e.g., using RPM packages, Red Hat ecosystem tools).
- You pursue extreme stability and do not want service interruptions due to software updates (e.g., core banking systems).
- Your hardware is older and relies on mature driver support.
Choose Ubuntu if:
- You are a beginner entering Linux or need a friendly desktop environment.
- You need a development testing environment and require quick access to new software versions (e.g., Docker, Kubernetes).
- For cloud computing, containerization, or IoT projects, relying on Ubuntu’s comprehensive ecosystem support (e.g., official images for AWS EC2).

Installation Steps
Important Note
1. Installation Instructions:This tutorial is divided into 3 parts:1. Creating a USB boot disk;2. Disk partitioning;3. Installing the Linux system. If you do not make any mistakes, your data will not be lost after installing the system.
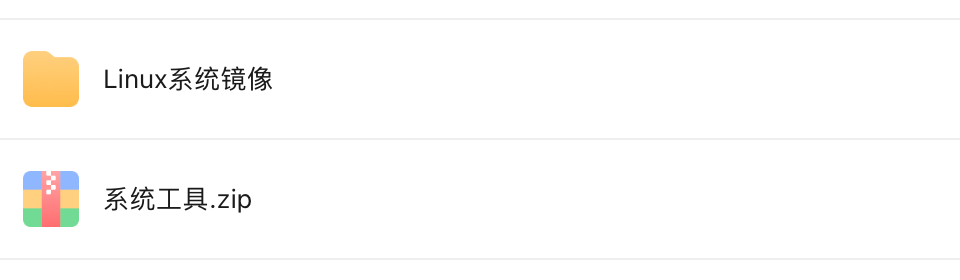
2. Required Files:① System Tools:Download all.
② System Images: The cloud drive link provides multiple versions of Ubuntu and CentOS images. Choose one version to download based on your needs. This tutorial is based on Ubuntu 22 demonstration; the installation methods for other versions can fully refer to this step.
3. Required Hardware:A Windows computer that can boot normally + a USB drive with 8G or more memory
01

Create USB Boot Disk
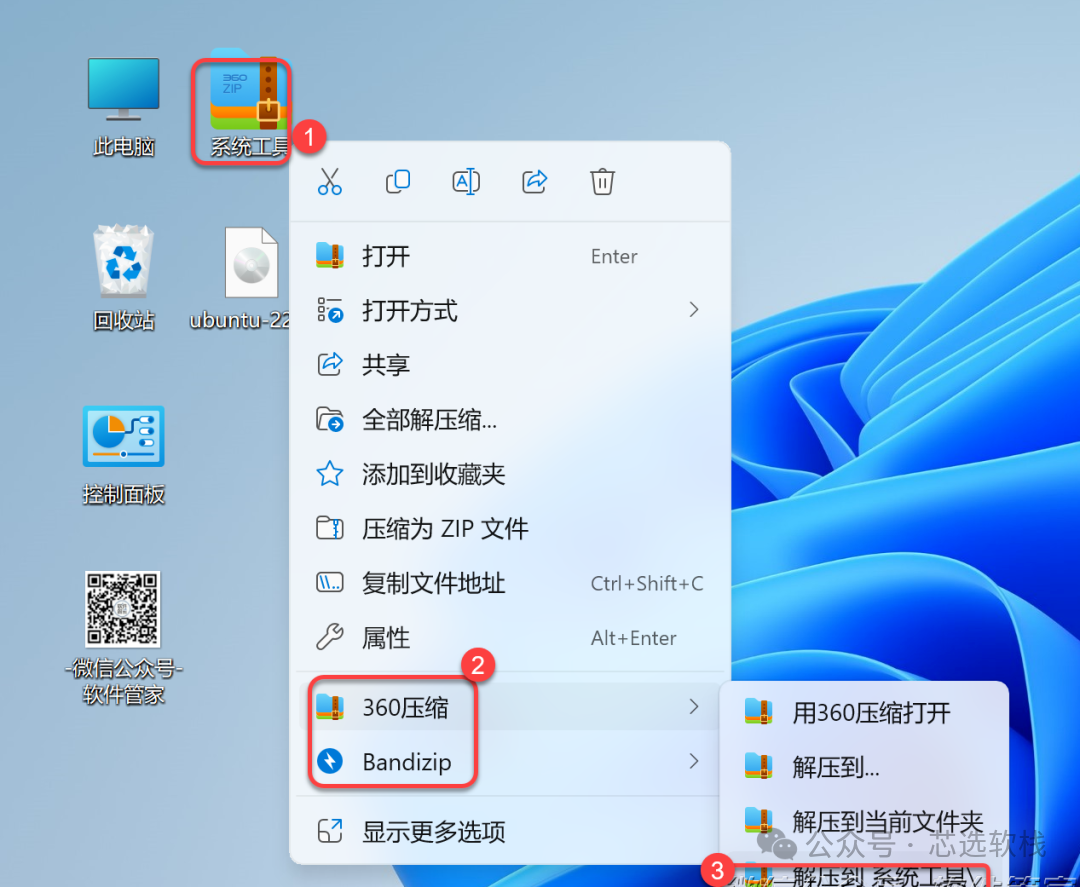
1. Insert the USB drive into the computer: ① Right-click the downloaded 【System Tools】 compressed package ② Select the decompression software installed on the computer (e.g., 360 Compression) ③ Click 【Extract to System Tools】.
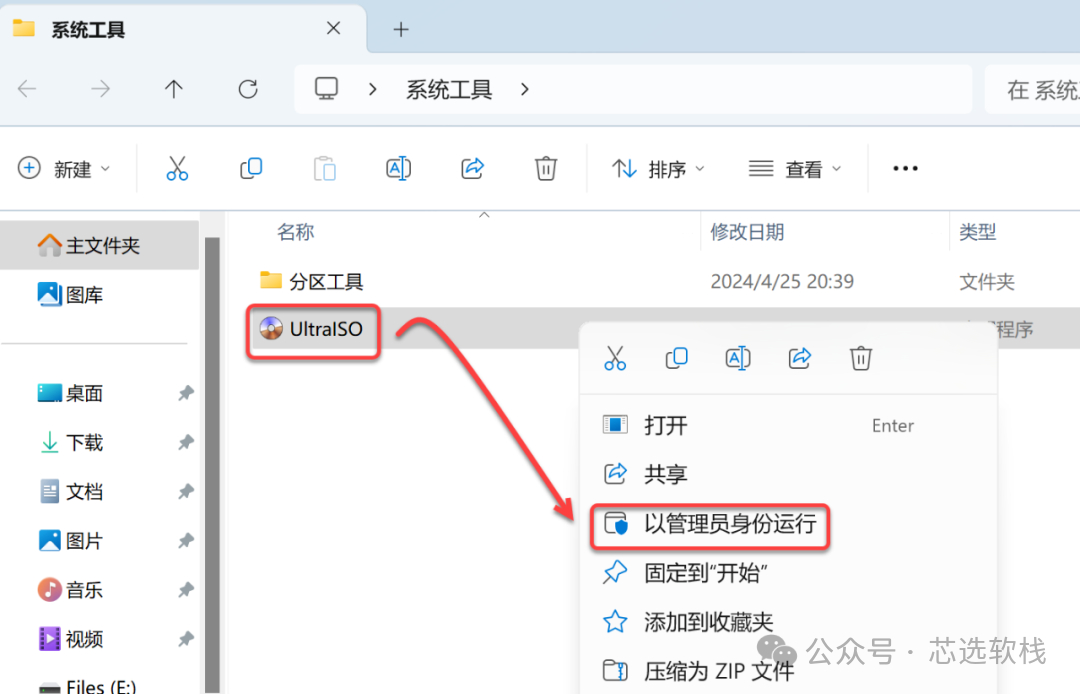
2. Open the extracted folder, right-click 【ULtraISO】 and select 【Run as Administrator】.
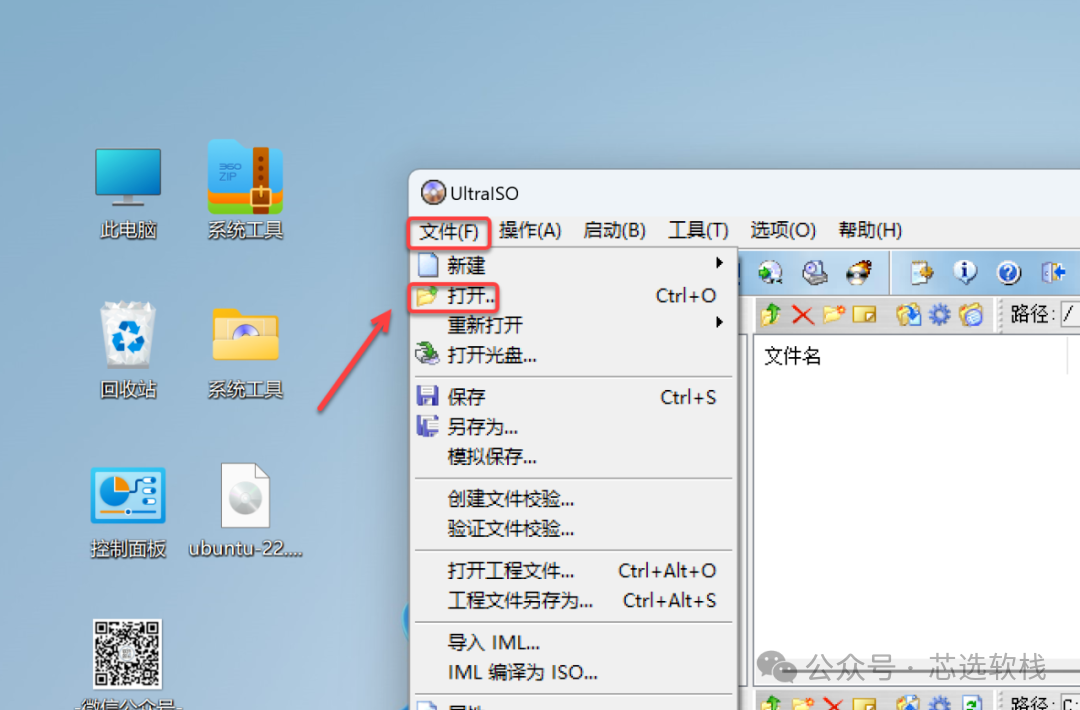
3. Click 【File】, then click 【Open】.
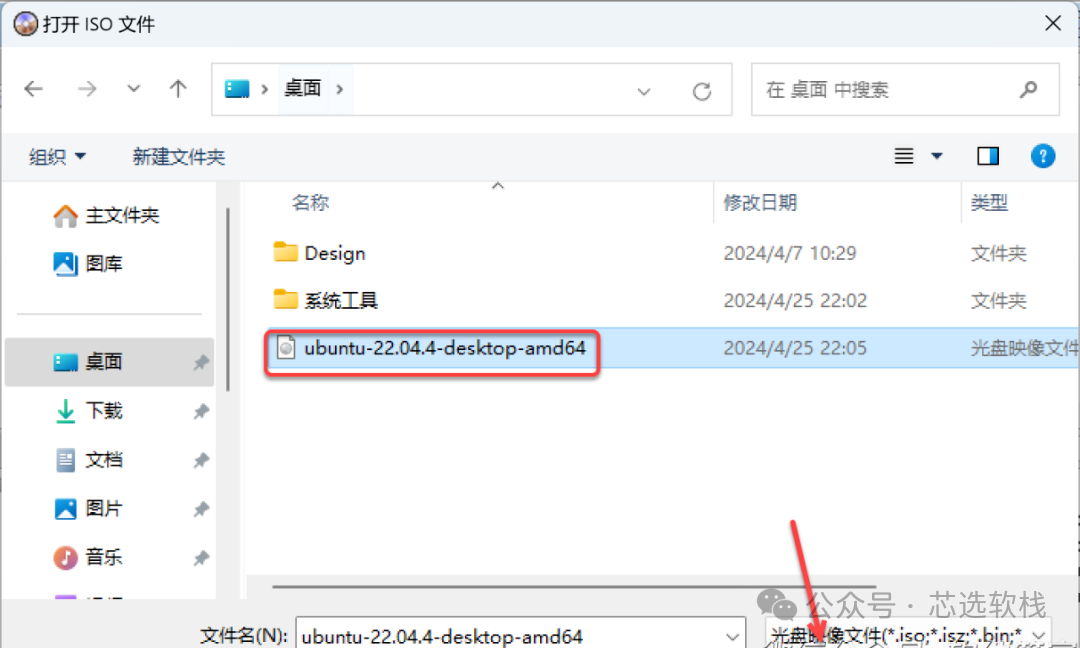
Select the downloaded Linux system image (e.g., ubuntu…….iso), and click 【Open】.
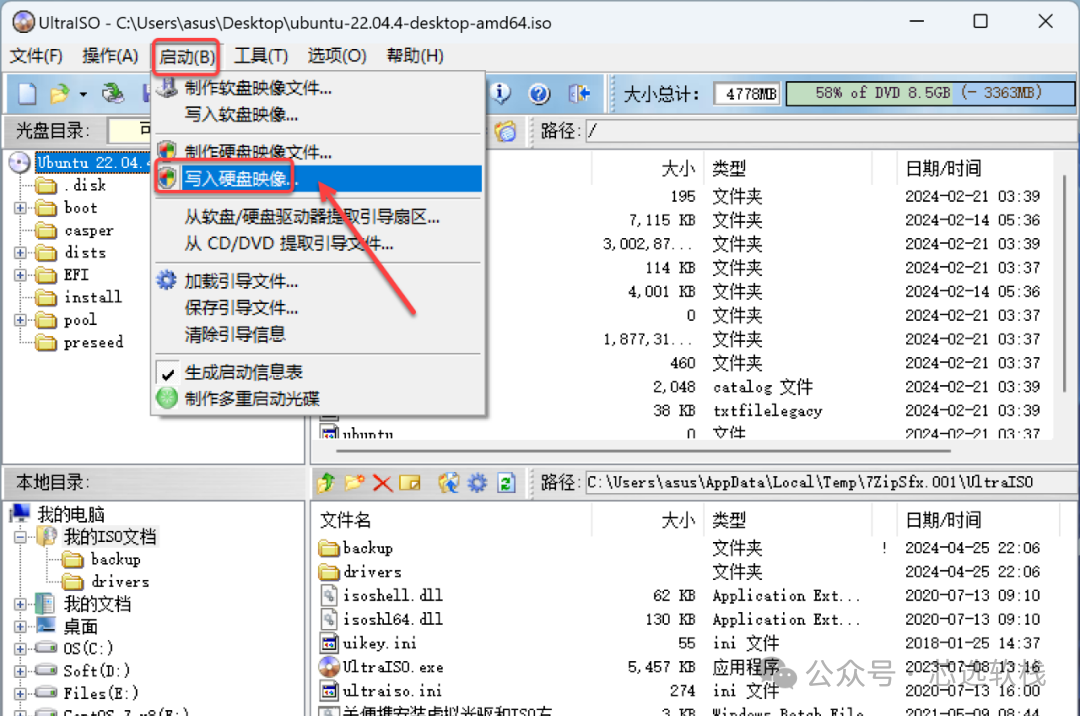
5. Click 【Start】, then click 【Write Disk Image】.
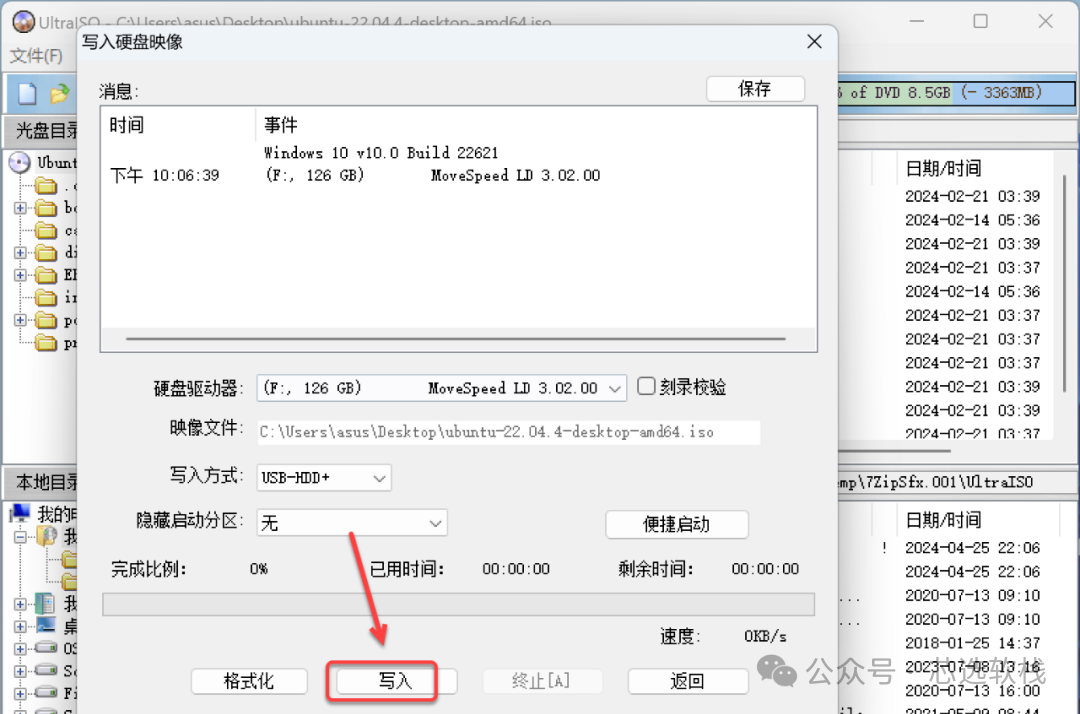
6. Click 【Write】.
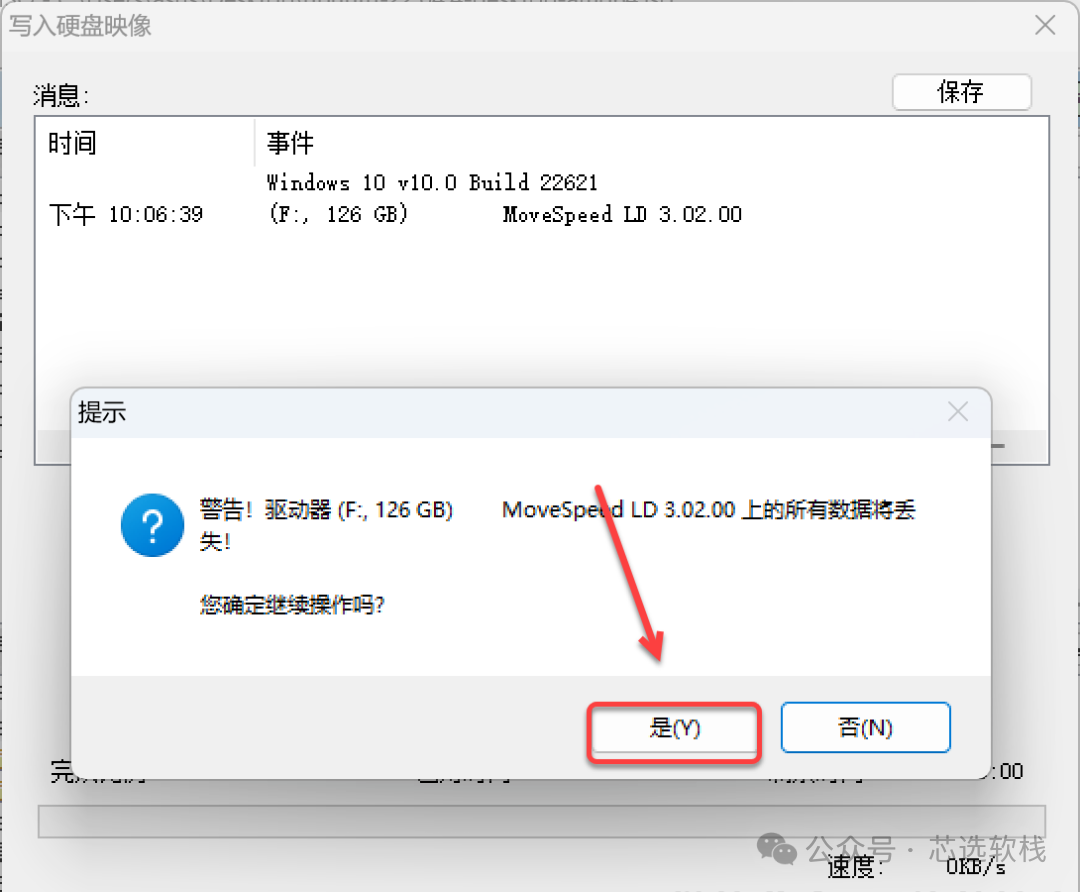
7. Click 【Yes】.
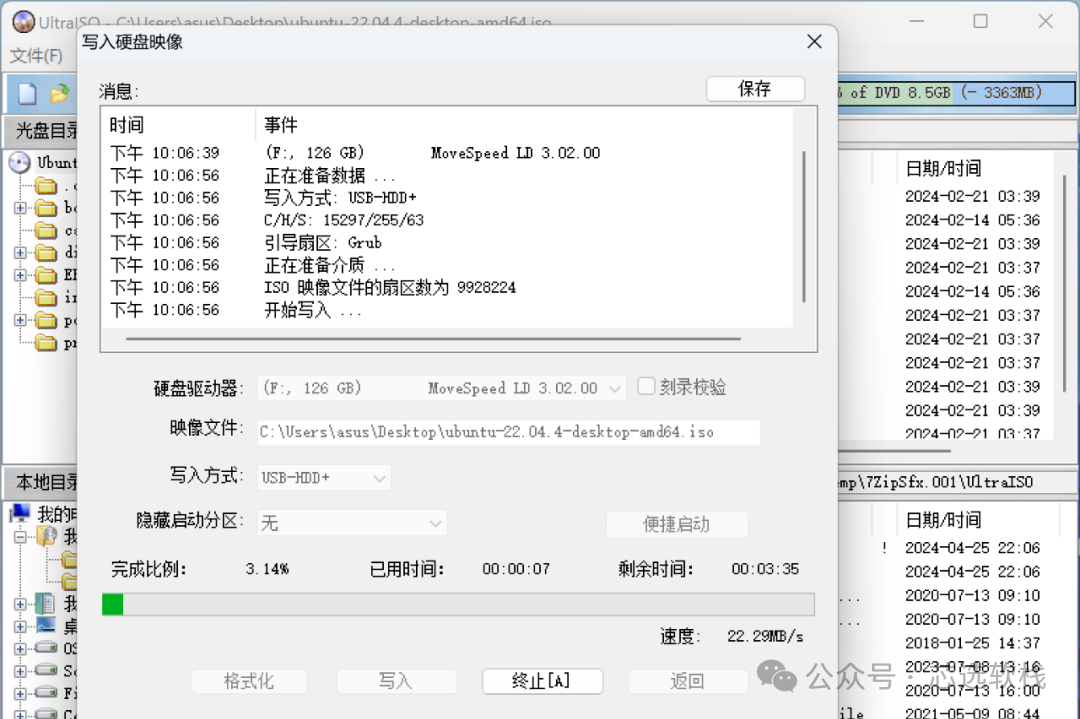
8. Writing in progress……
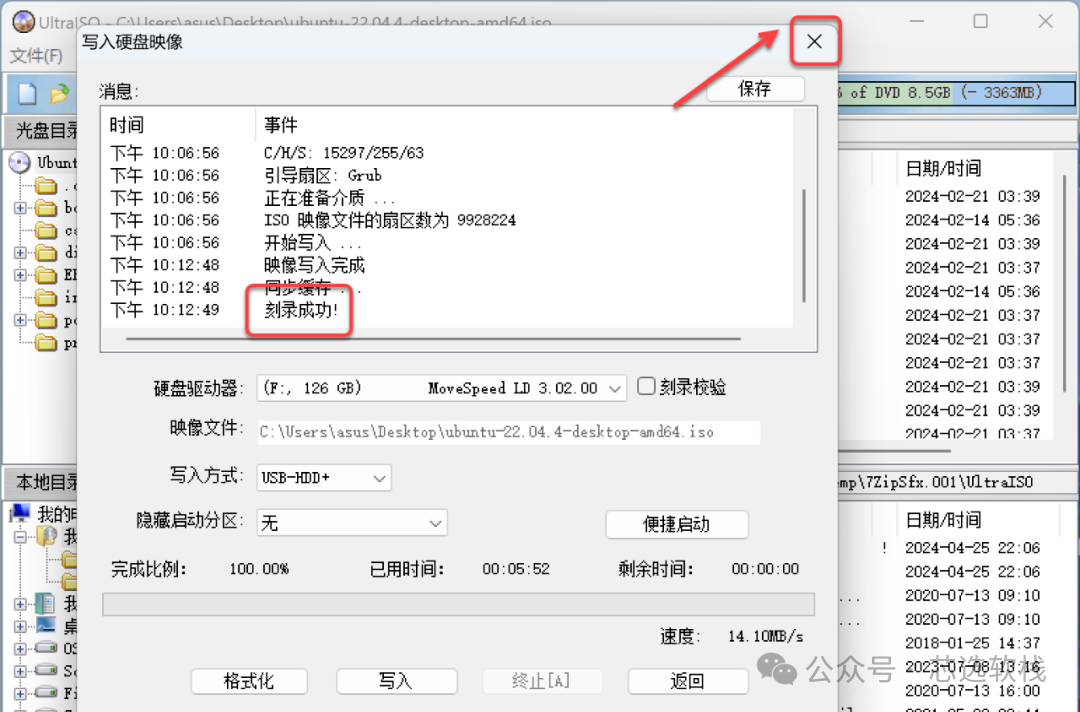
9. After the prompt “Burning Successful”, click the 【X】 in the upper right corner to exit.
02

Disk Partitioning
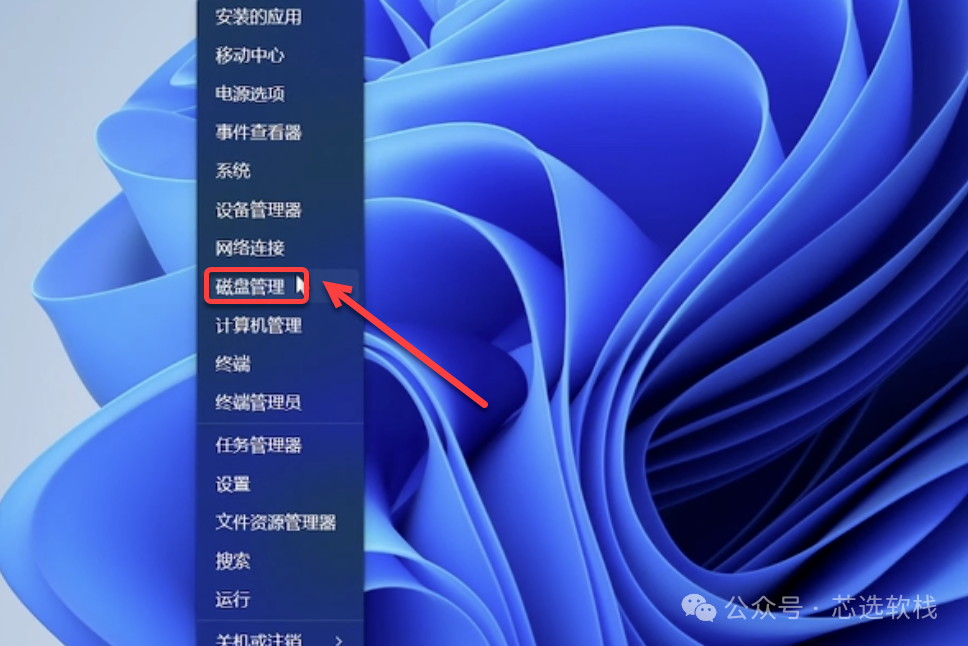
1. Right-click the 【Start Icon】 on the desktop and select 【Disk Management】.
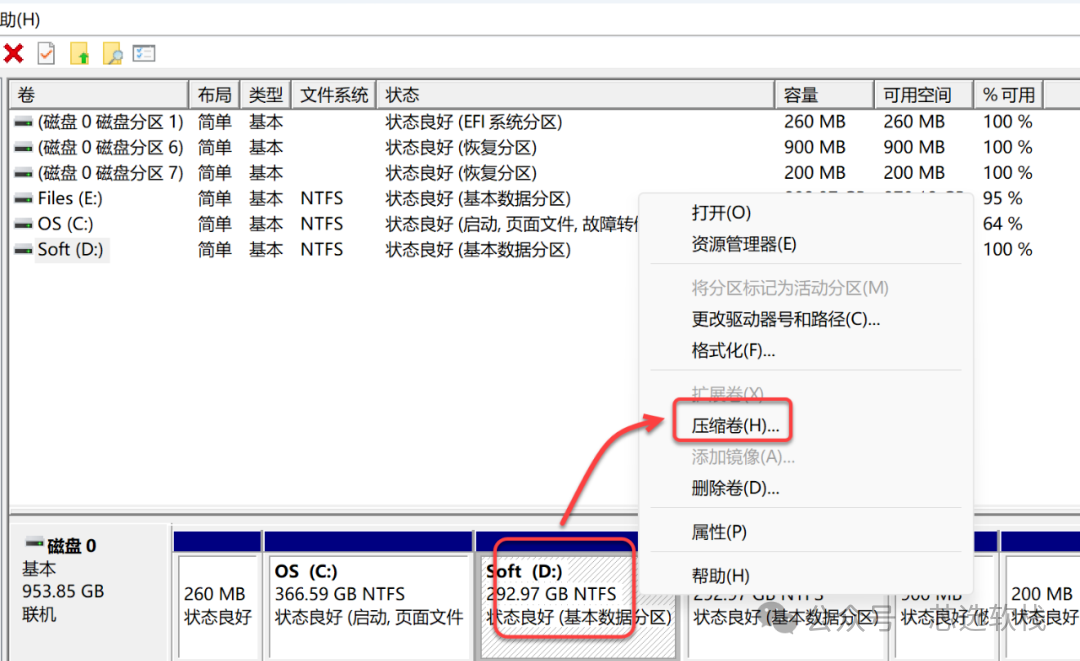
2. Right-click a disk (e.g., D drive, do not select C drive or any disk with important data) and select 【Shrink Volume】.
Important Note
If you do not want to keep the Windows system, you can directly format the C drive and shrink the space of the C drive to unallocated disk space.This operation is irreversible, please handle with caution.
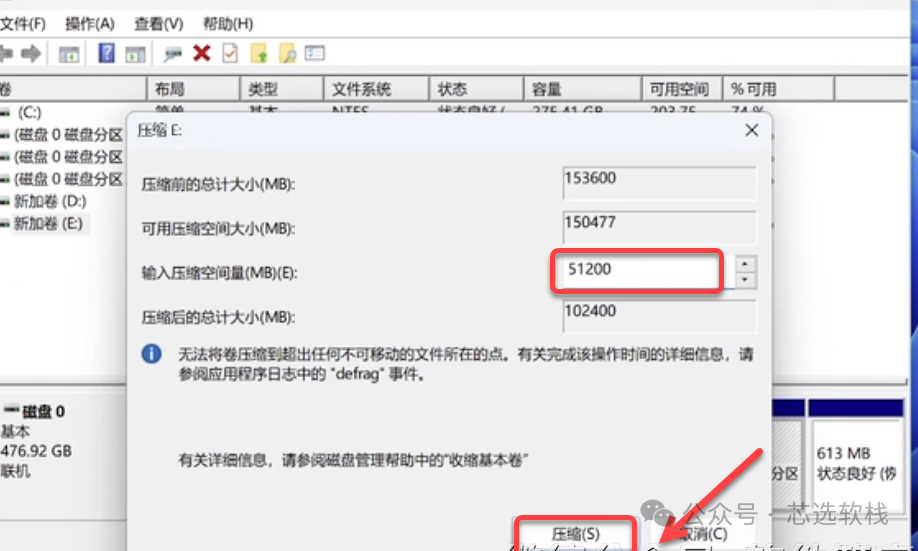
3. Enter the size of the disk (e.g., 51200 for 50G, 1024M=1G, recommend shrinking space to 70G or higher), click 【Shrink】.
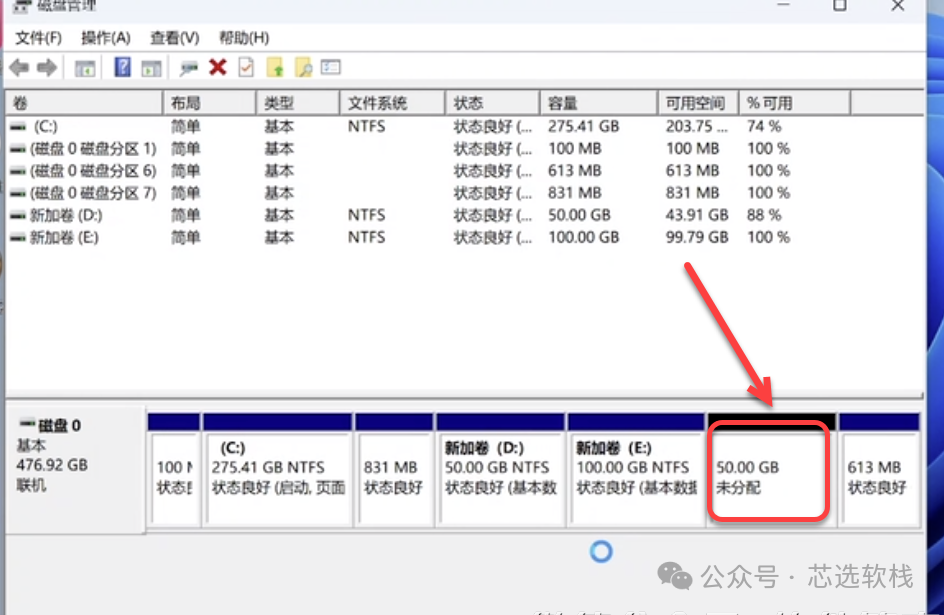
4. After successful shrinking, a new disk (unallocated) will appear, indicating successful partitioning.
03

System Installation
1. Insert the USB drive into the computer, restart the computer, and select to boot from the USB drive (Due to different computer models, the setup method varies. Here are two common methods).
Method 1: Select to boot from the USB drive using the boot shortcut key.
1) Find the corresponding boot shortcut key based on your computer model.
| Mainstream Model Shortcut Key Query Table | |||
| Brand Laptops | Assembled Desktop | ||
| Model | Shortcut Key | Model | Shortcut Key |
| Huawei Laptop | F12 | Asus Motherboard | F8 |
| Xiaomi Laptop | F12 | Gigabyte Motherboard | F12 |
| Asus Laptop | ESC | MSI Motherboard | F11 |
| Lenovo Laptop | F12 | Biostar Motherboard | F9 |
| Acer Laptop | F12 | Colorful Motherboard | F12 |
| HP Laptop | F9 | Shenzhen Motherboard | F11 |
| Lenovo Thinkpad | F12 | ASRock Motherboard | F11 |
| Dell Laptop | F12 | Spartan Motherboard | ESC |
| Shenzhou Laptop | F12 | Onda Motherboard | F11 |
| Toshiba Laptop | F12 | Double Sensitive Motherboard | ESC |
| Samsung Laptop | F12 | Rising Motherboard | F10 |
| IBM Laptop | F12 | Elite Motherboard | F11 |
| Fujitsu Laptop | F12 | Champion Motherboard | F11 |
| Haier Laptop | F12 | Foxconn Motherboard | F12 |
| Founder Laptop | F12 | Top Star Motherboard | F12 |
| MSI Laptop | F11 | Intel Motherboard | F12 |
| BenQ Laptop | F9 | Jie Wei Motherboard | F8 |
| Gigabyte Laptop | F12 | Guangming Motherboard | F9 |
| Sony Laptop | ESC | Panzheng Motherboard | ESC |
| Brand Desktops | |||
| Model | Shortcut Key | Model | Shortcut Key |
| Lenovo Desktop | F12 | Shenzhou Desktop | F12 |
| HP Desktop | F12 | Asus Desktop | F8 |
| Acer Desktop | F12 | Founder Desktop | F12 |
| Dell Desktop | ESC | Haier Desktop | F12 |
| Tsinghua Tongfang Desktop | F12 | BenQ Desktop | F8 |
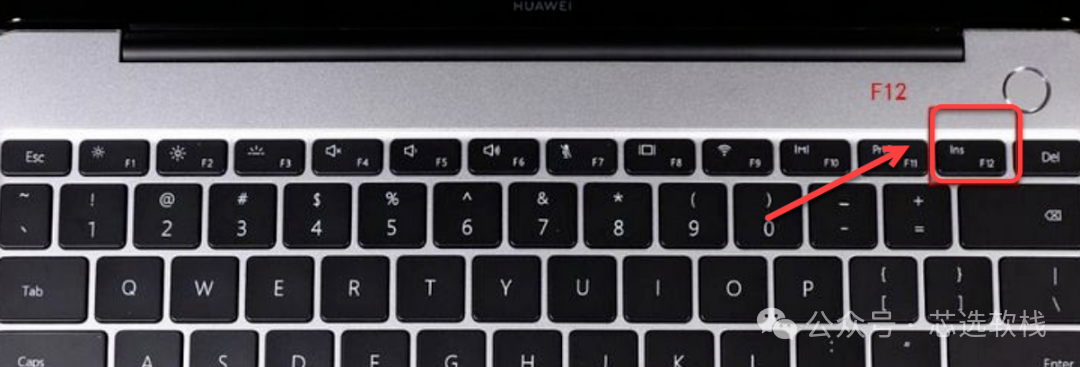
2) Restart the computer and continuously press the shortcut key (e.g., F12 for Huawei laptops).
3) Select the name of the USB drive (e.g., UEFI:……), press 【Enter】, and the computer will boot from the USB drive.
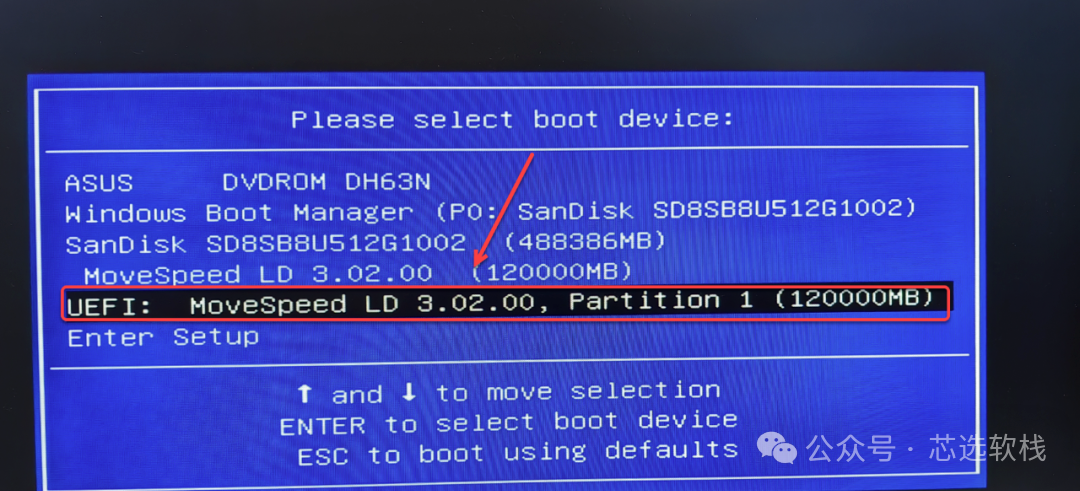
Method 2: Set the USB drive as the first boot option
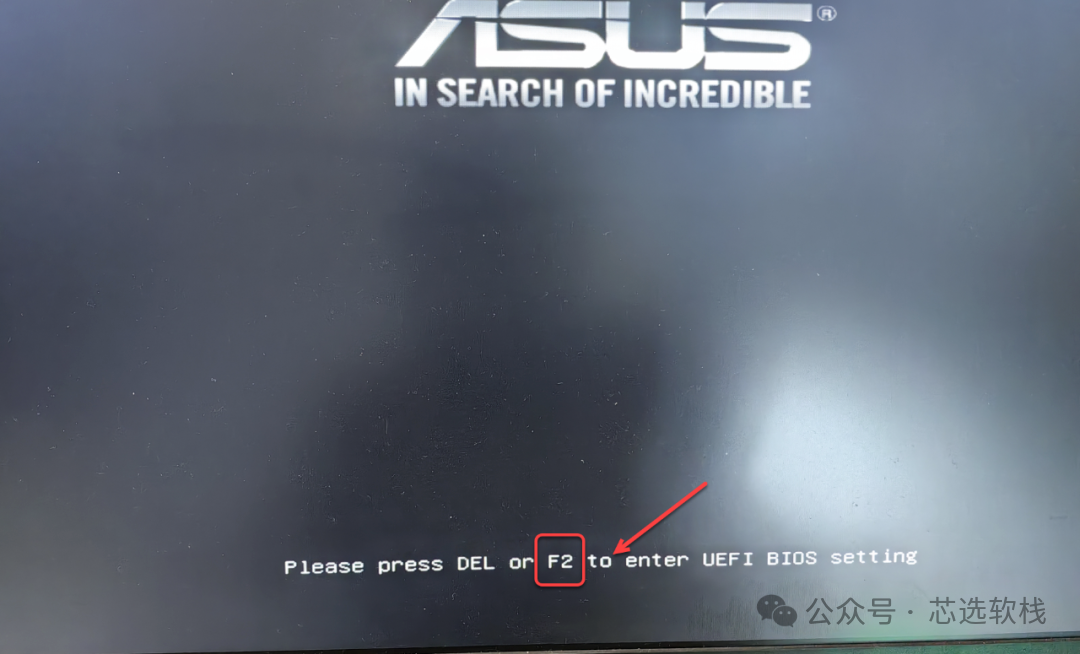
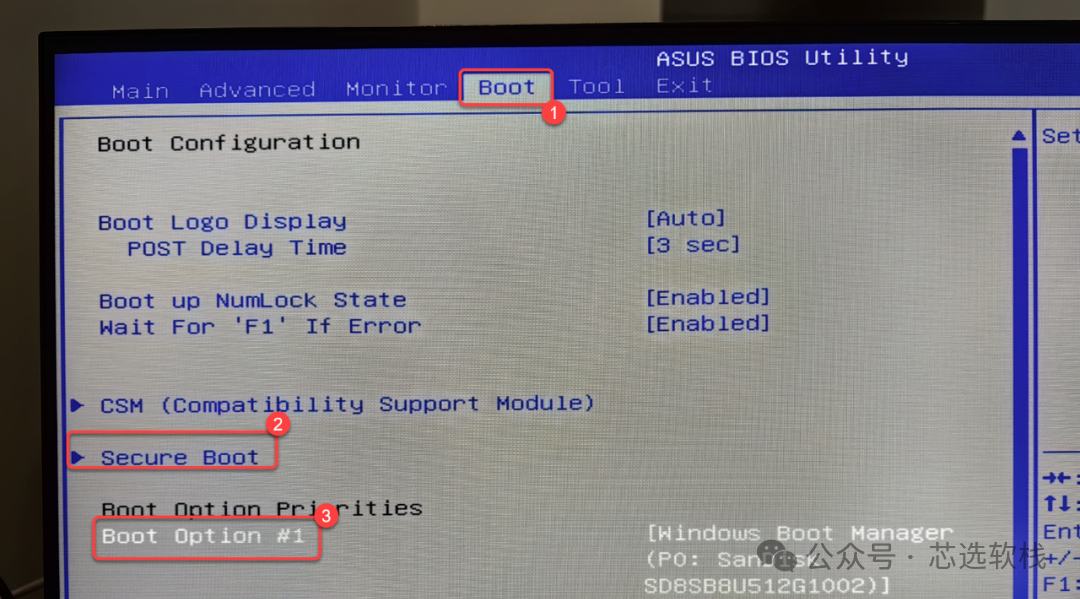
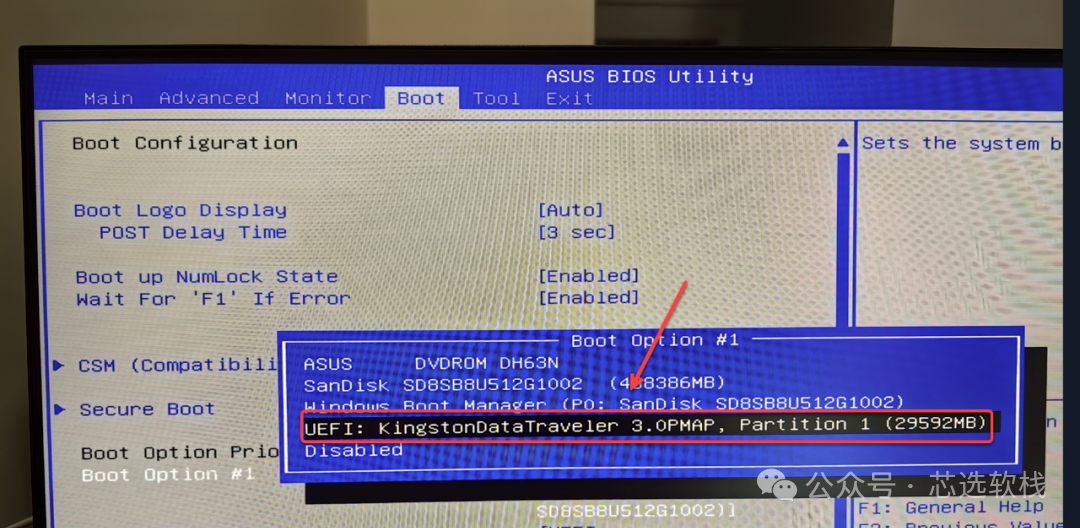
The setup interface varies for different computers, but the direction is clear: set the first boot option to your USB drive. Below is an example for Asus motherboard computers:
1) Restart the computer and press the shortcut key displayed on the computer screen to enter the “BIOS setting” (e.g., F2, different computers have different keys to enter BIOS, based on the installation computer’s boot screen).
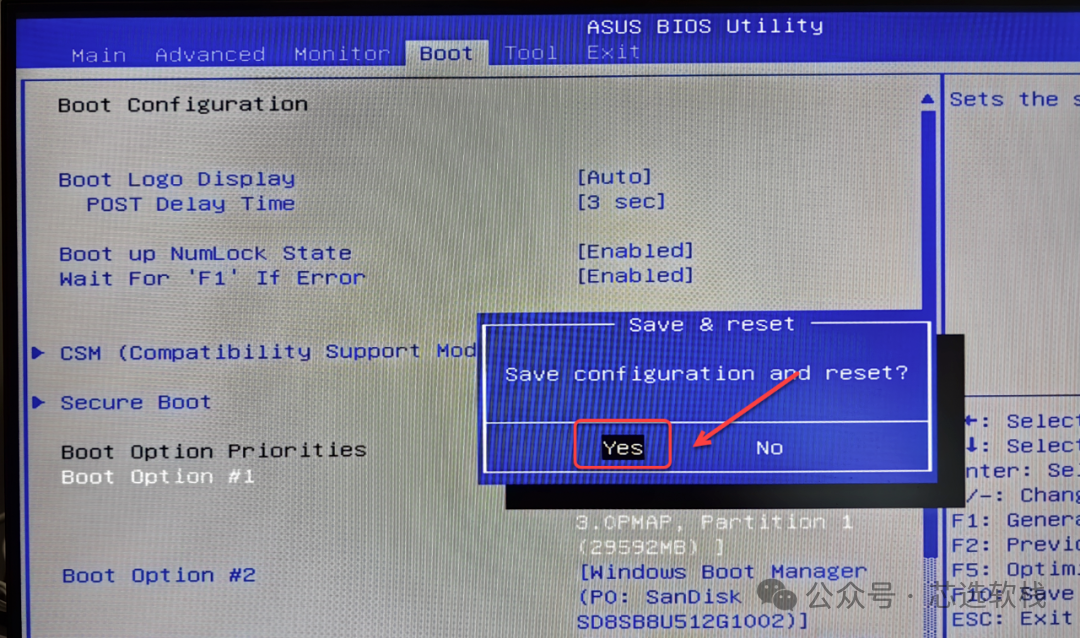
2) On the keyboard, press 【↑↓】 to select: choose ①【Boot】 ② select 【Secure Boot】 ③ select 【Boot Option #1】 and press 【Enter】.
3) Select the name of the USB drive (e.g., UEFI:……), press 【Enter】.
4) Then press 【F10】, select 【Yes】 (the system will automatically boot from the USB drive after restarting the computer).
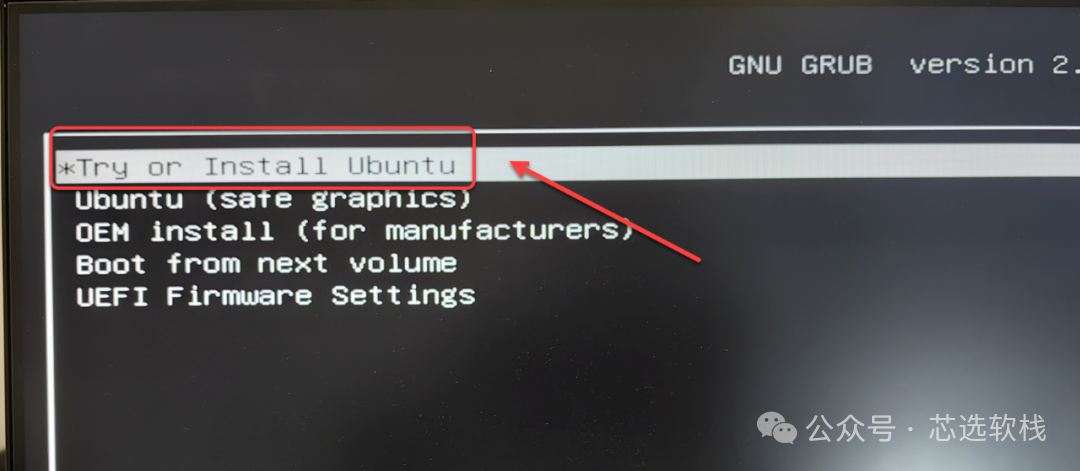
2. After the computer boots from the USB drive: Press 【↑↓】 on the keyboard to select 【Try or Install ……】 and press 【Enter】.
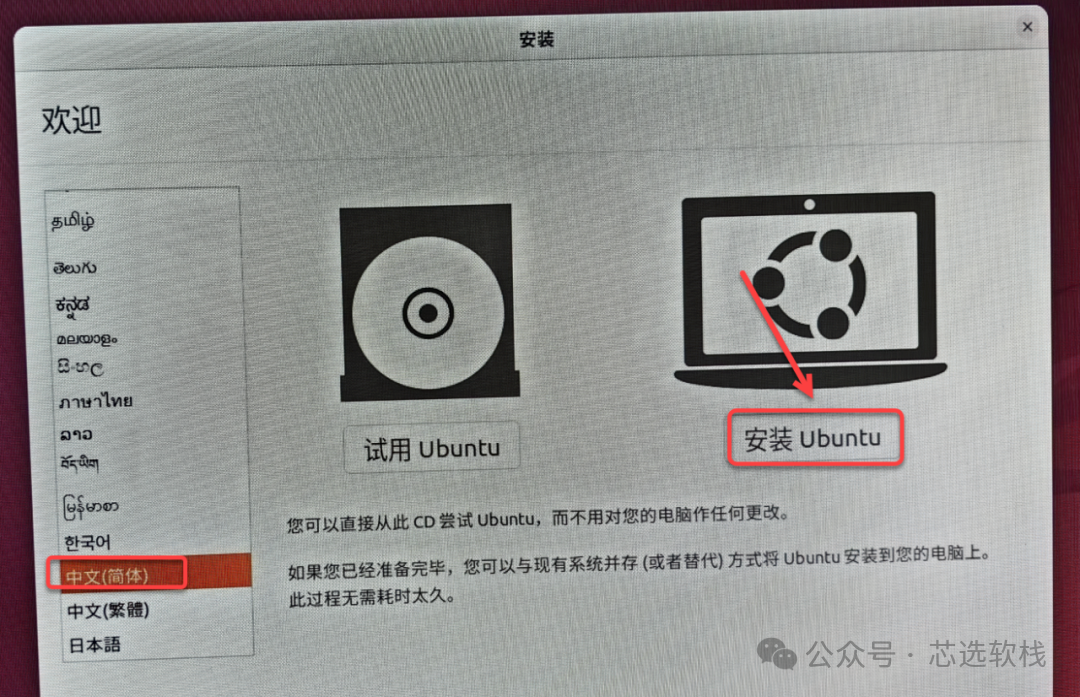
3. Select 【Chinese】, then click 【Install Ubuntu】.
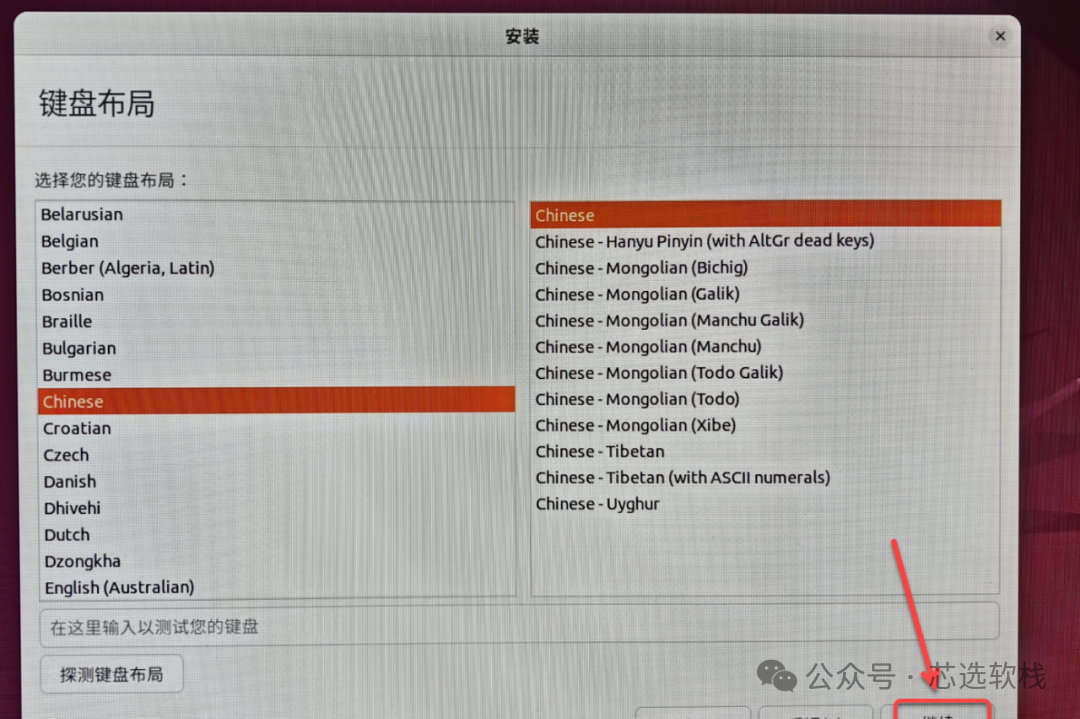
4. Click 【Continue】.
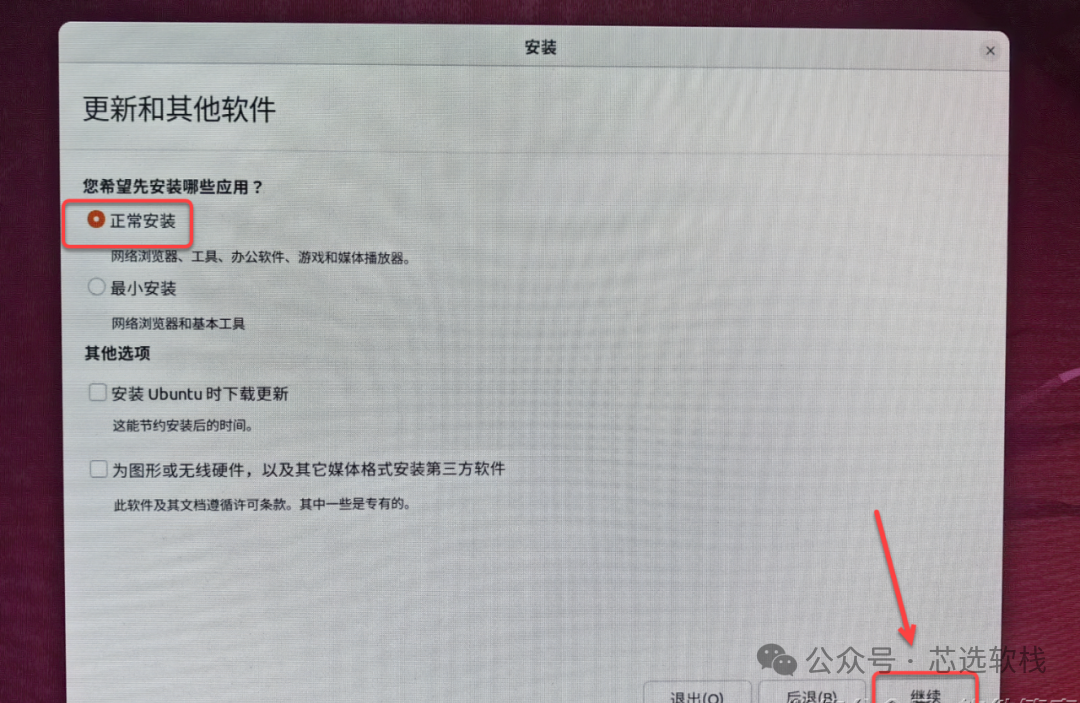
5. Select 【Normal Installation】, then click 【Continue】.
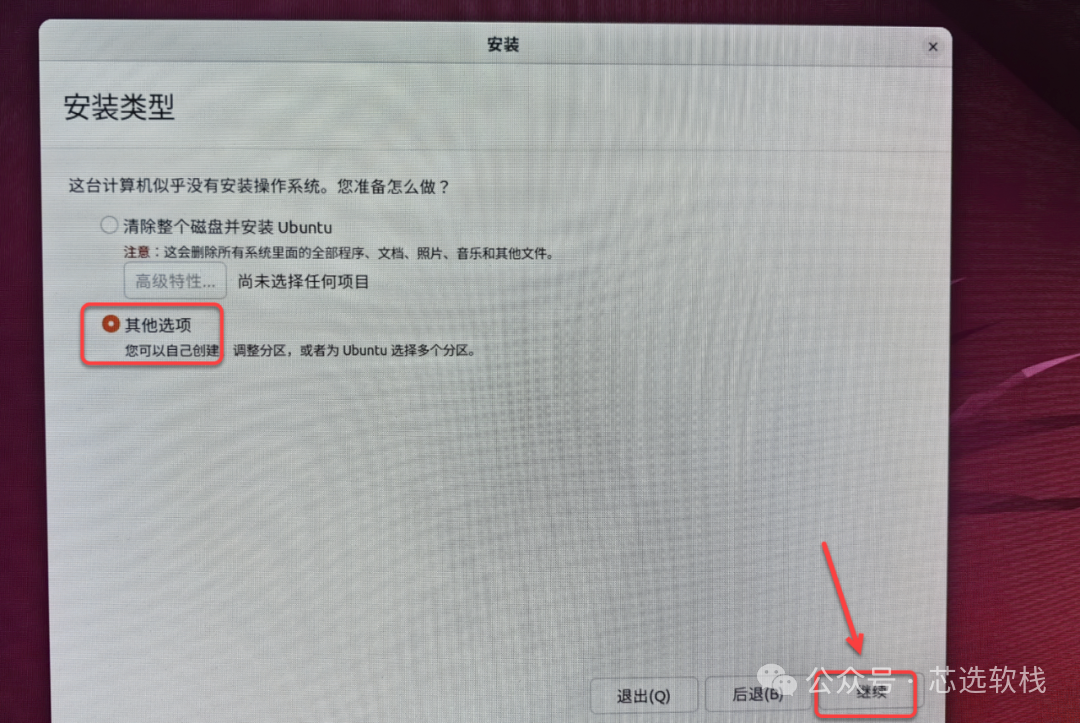
6. Select 【Other Options】, then click 【Continue】.
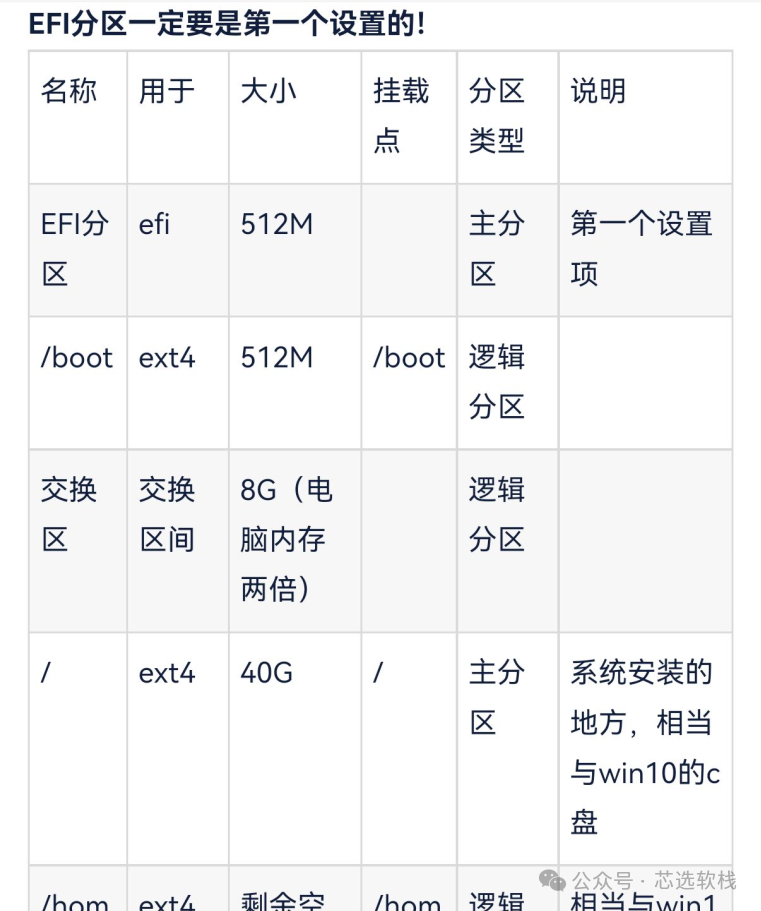
7. Disk partition settings:
7.1 The partition setting parameters and explanations are shown in the following figure, which can be created according to your needs.
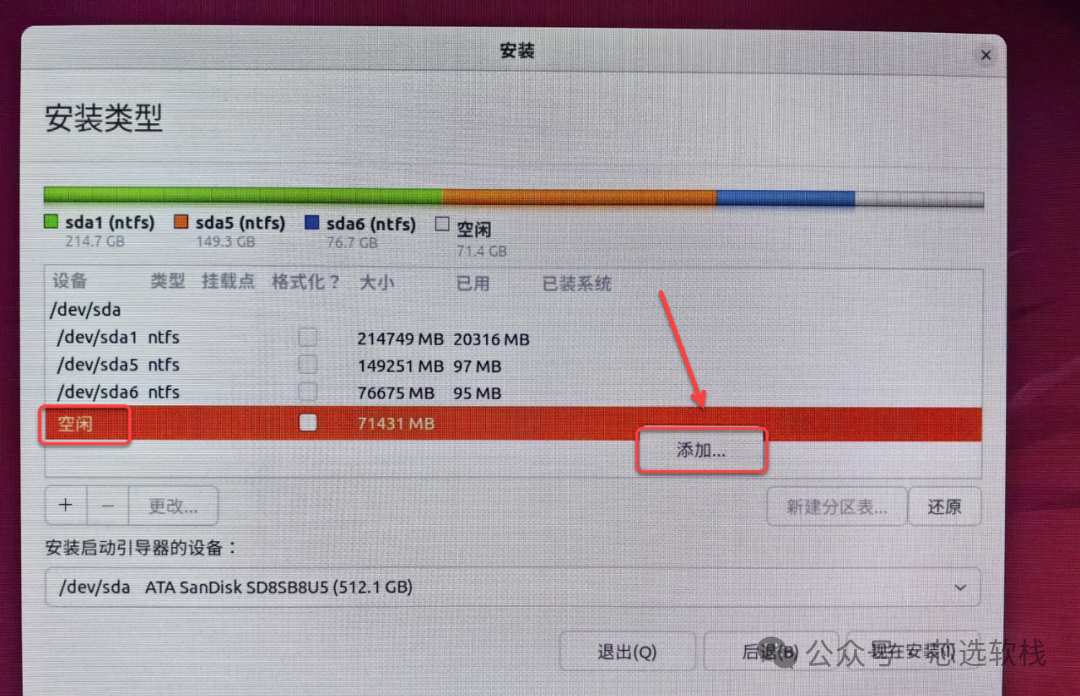
7.2 Here I demonstrate creating only the necessary partitions: EFI and main partition; other partitions can be created or not based on the explanations in the above table.
1) Right-click the 【Free】 disk and select 【Add】.
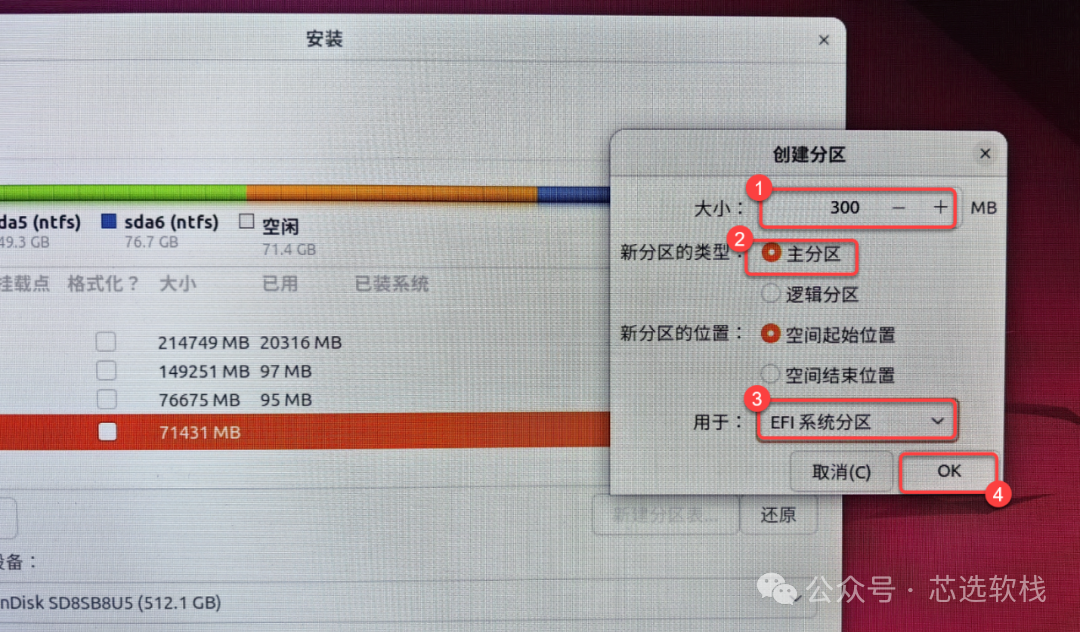
2) EFI partition settings: ① Enter size between 【300-500M】 ② Select 【Primary Partition】 ③ Select 【EFI System Partition】 ④ Click 【OK】.
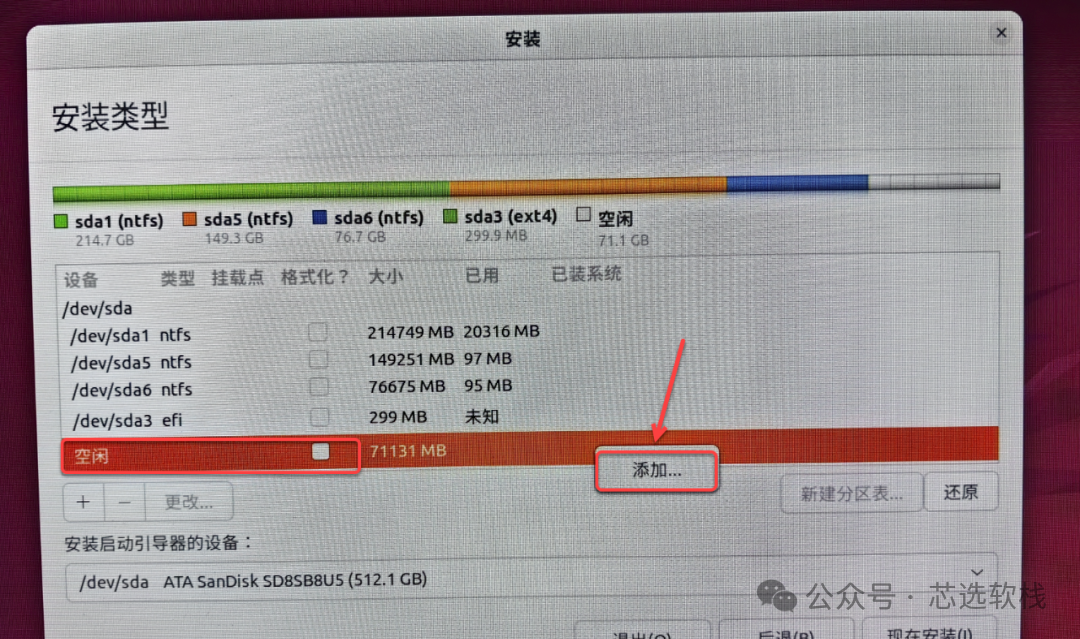
3) Continue to right-click the 【Free】 disk and select 【Add】.
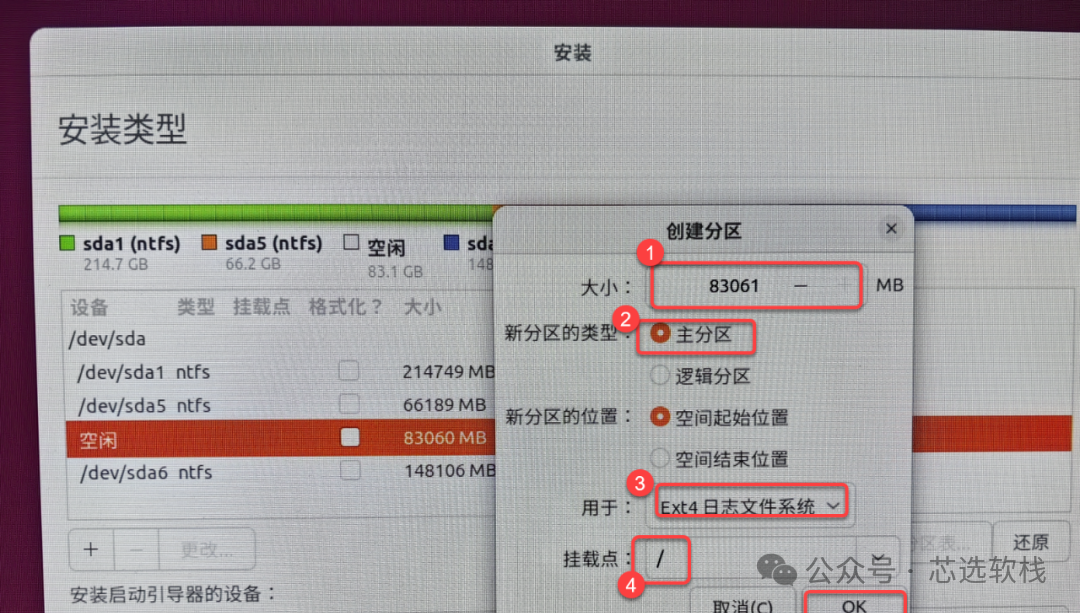
4) System disk partition settings: ① Set the system disk size or keep default (if you need to create other disks, you cannot keep default here, you need to set the remaining disk space for creating other disk allocations) ② Select 【Primary Partition】 ③ Select 【Ext4 Journal File System】 ④ Select mount point 【/】 ⑤ Click 【OK】.
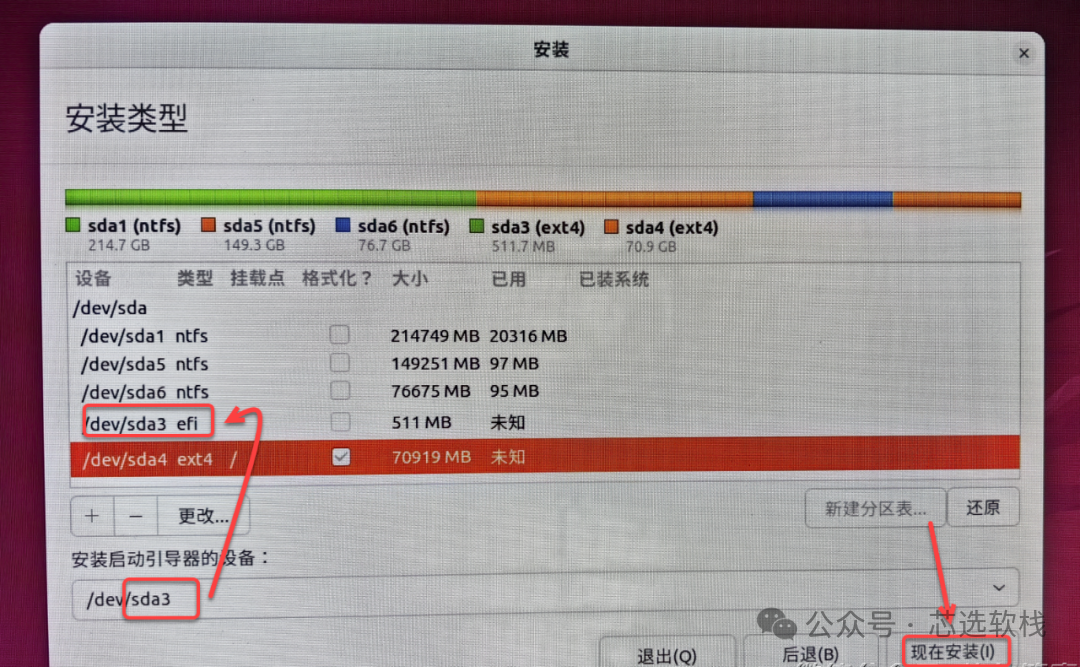
8. Select the bootloader device 【Step 7-7.2.2 created EFI disk (unknown), must correspond to /dev/sda3】, click 【Install Now】.
9. Click 【Continue】.
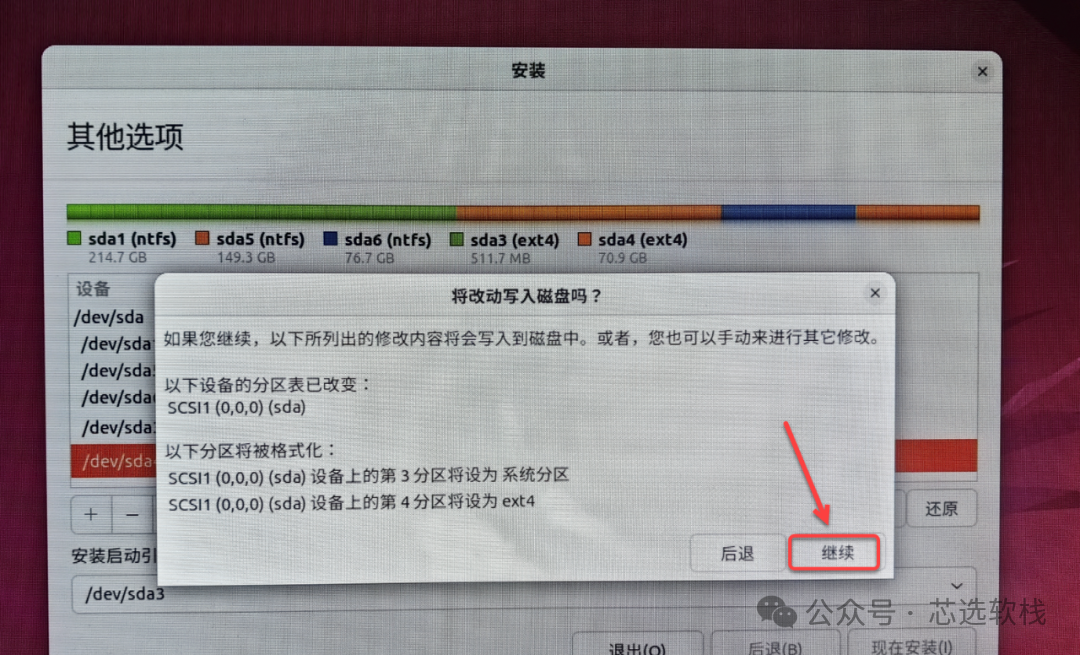
10. Click 【Continue】.
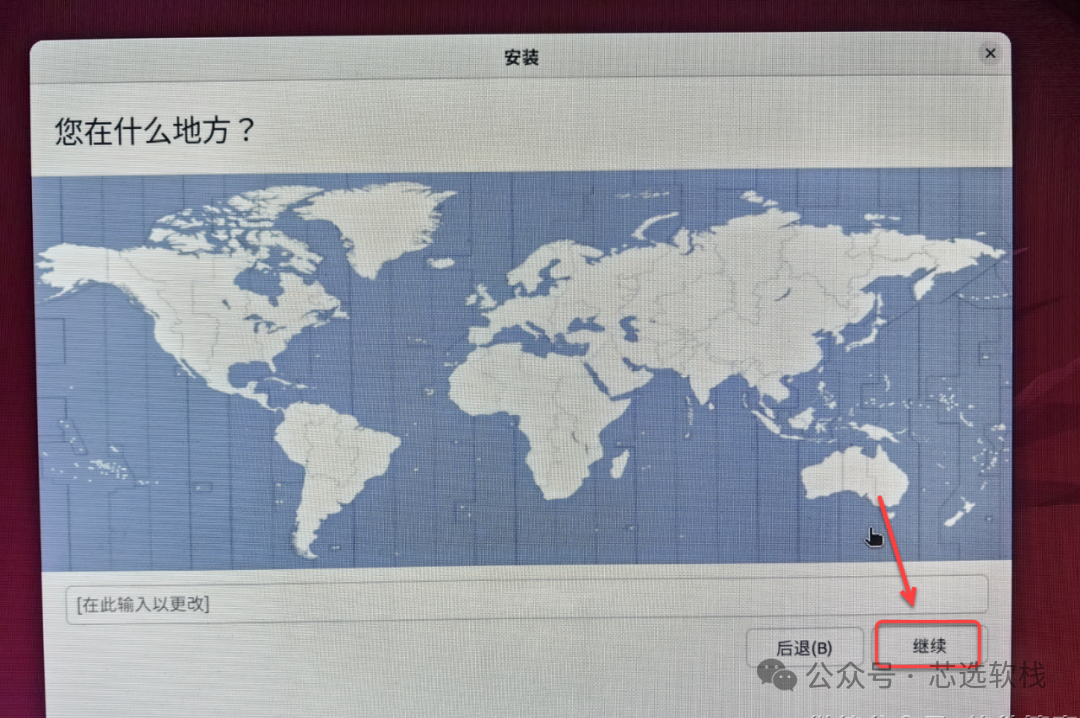
11. Fill in the computer information 【Name, Computer Name, and Password】 (the password is used to log into the system), click 【Continue】.
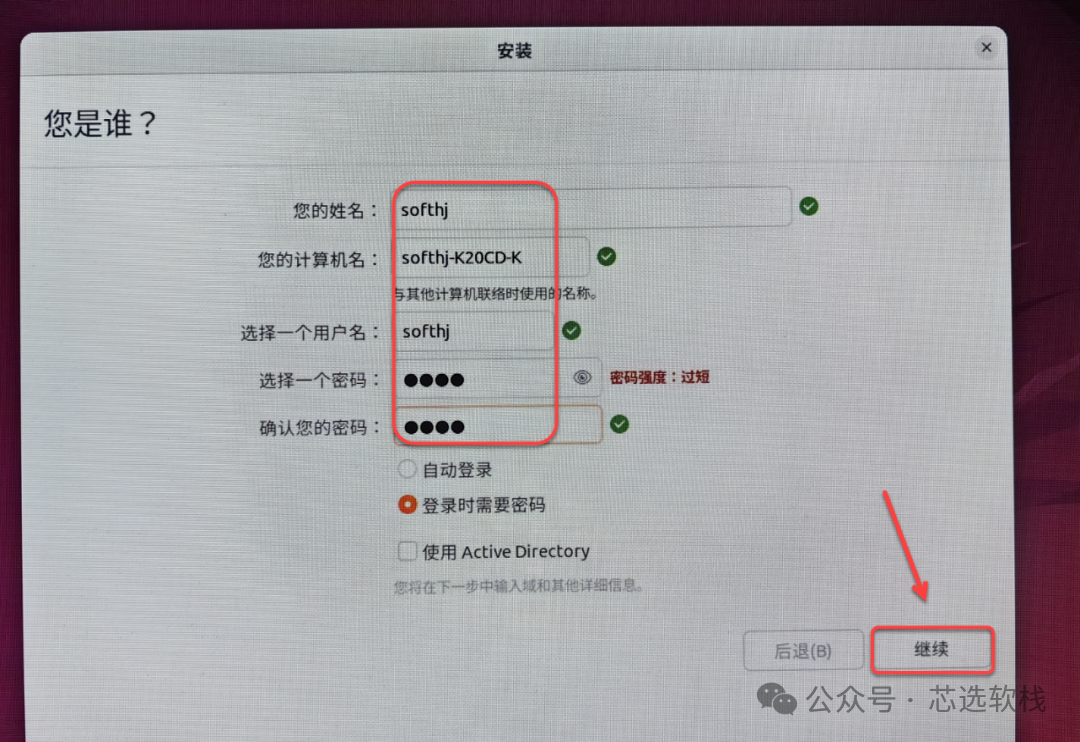
12. Installing……
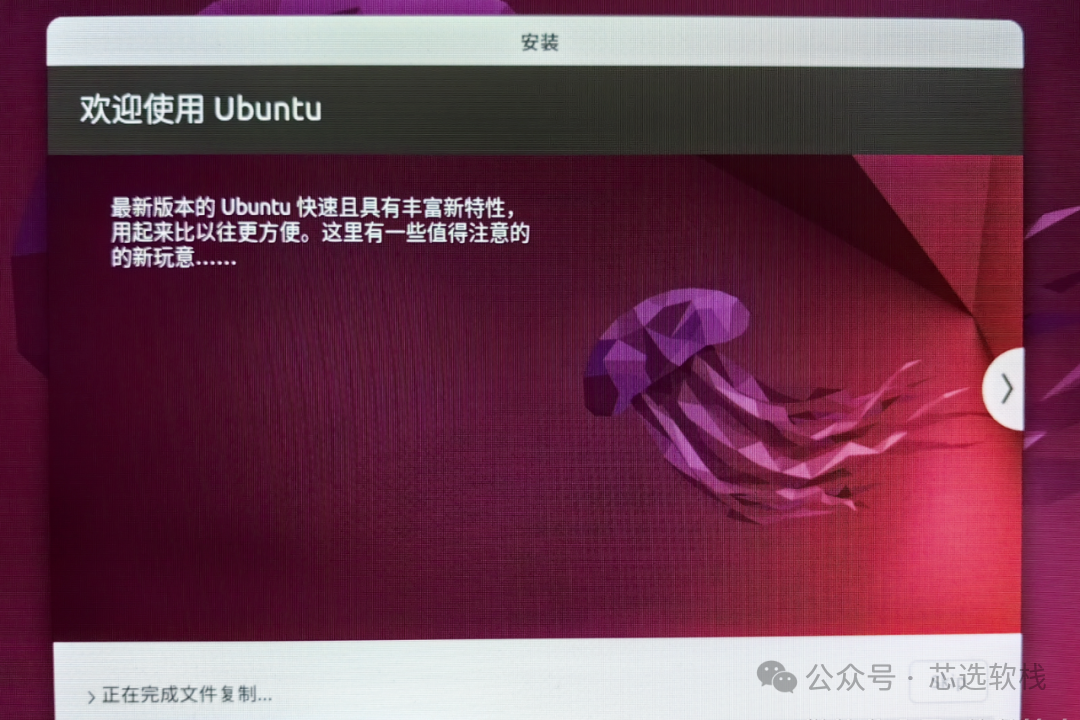
13. Click 【Restart Now】.
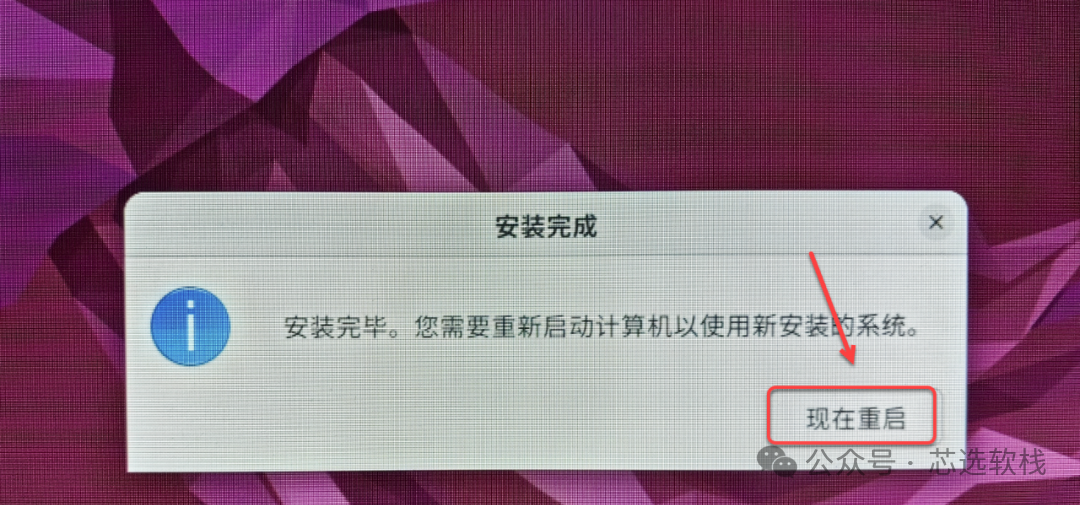
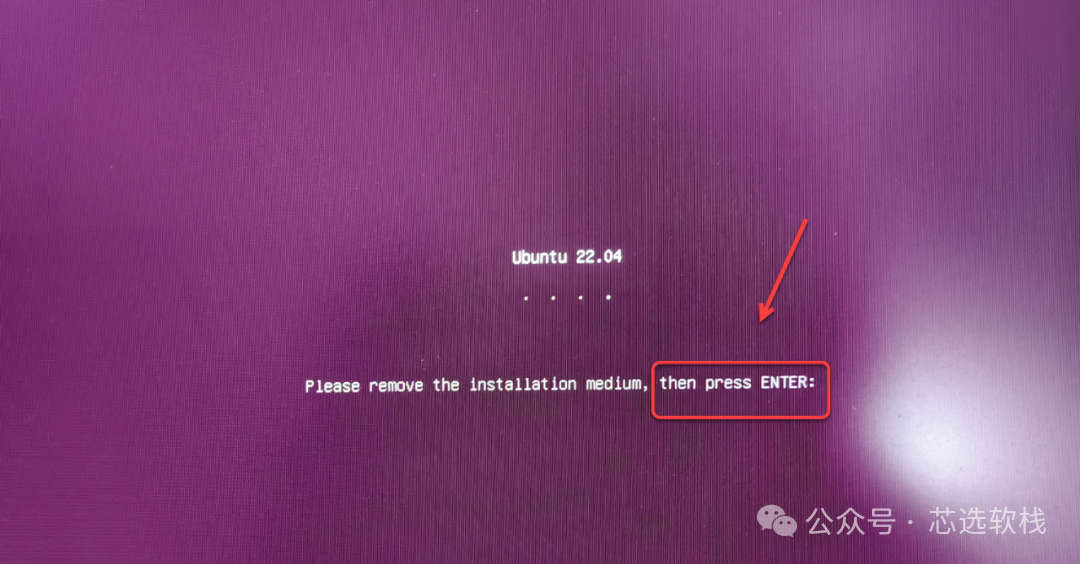
14. Press 【Enter】 on the keyboard.
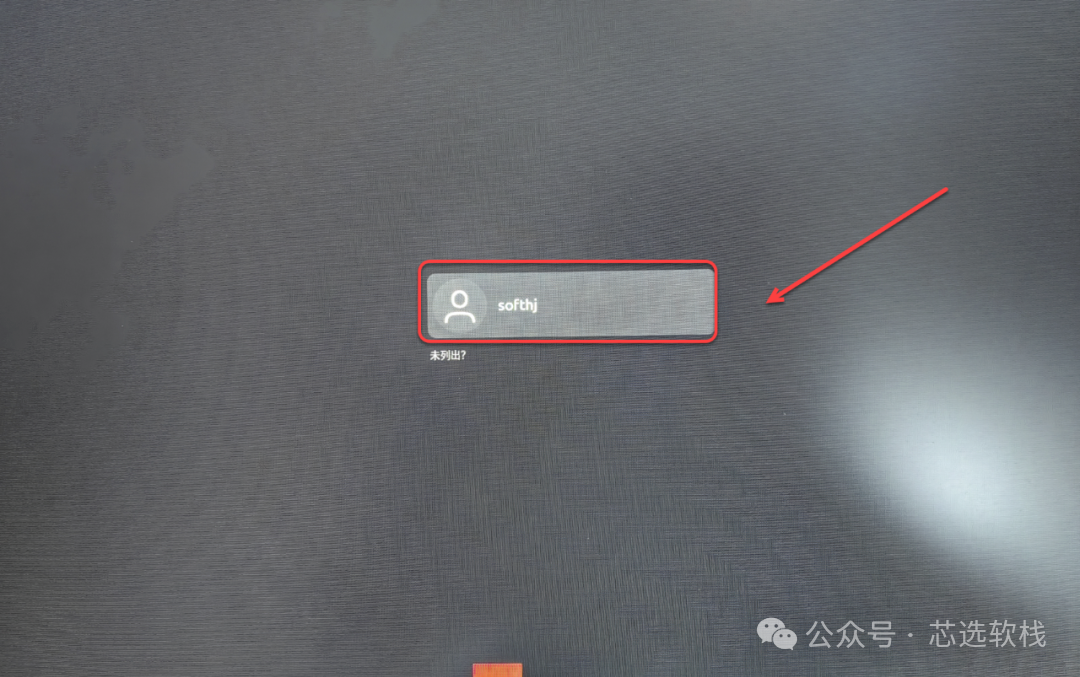
15. Click 【Computer Name】.
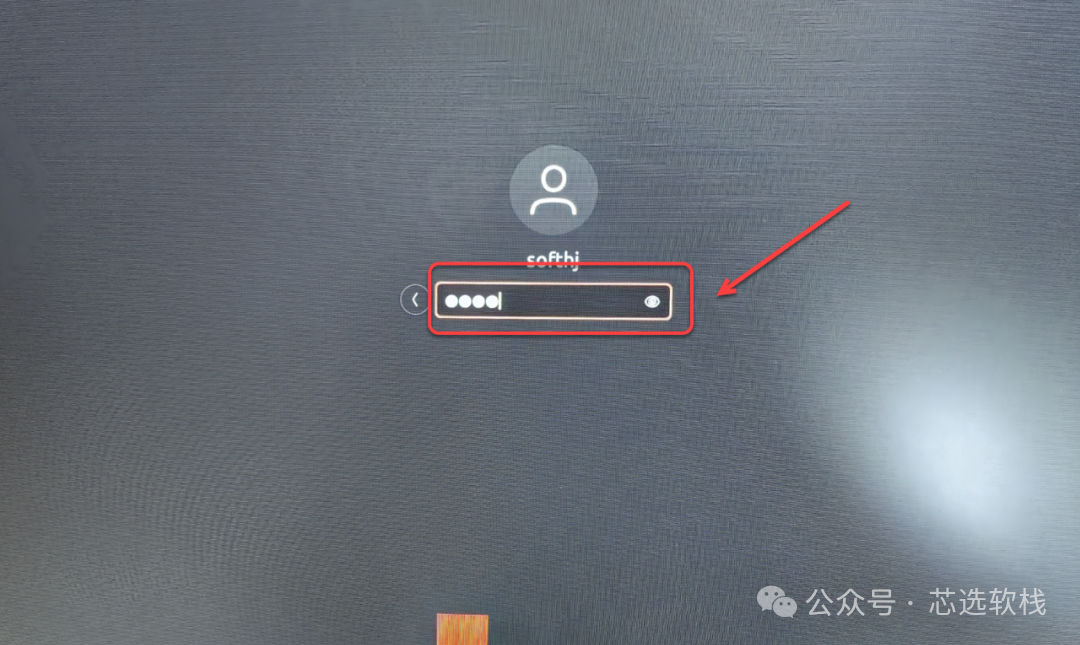
16. Enter the 【Password】 (set in step 13).
17. Installation Successful!
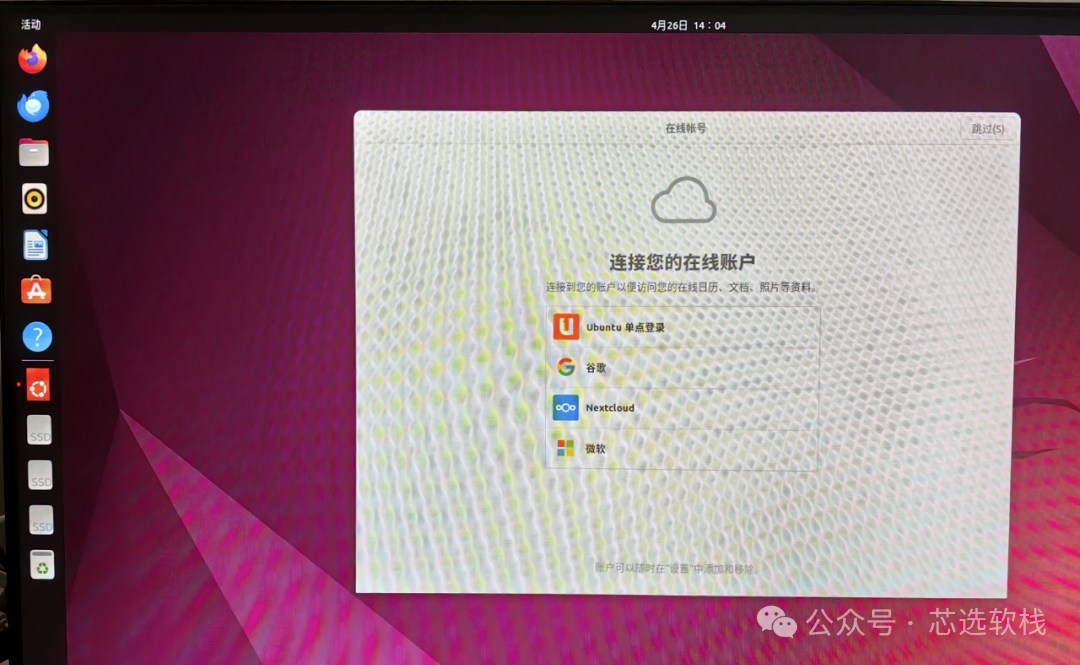
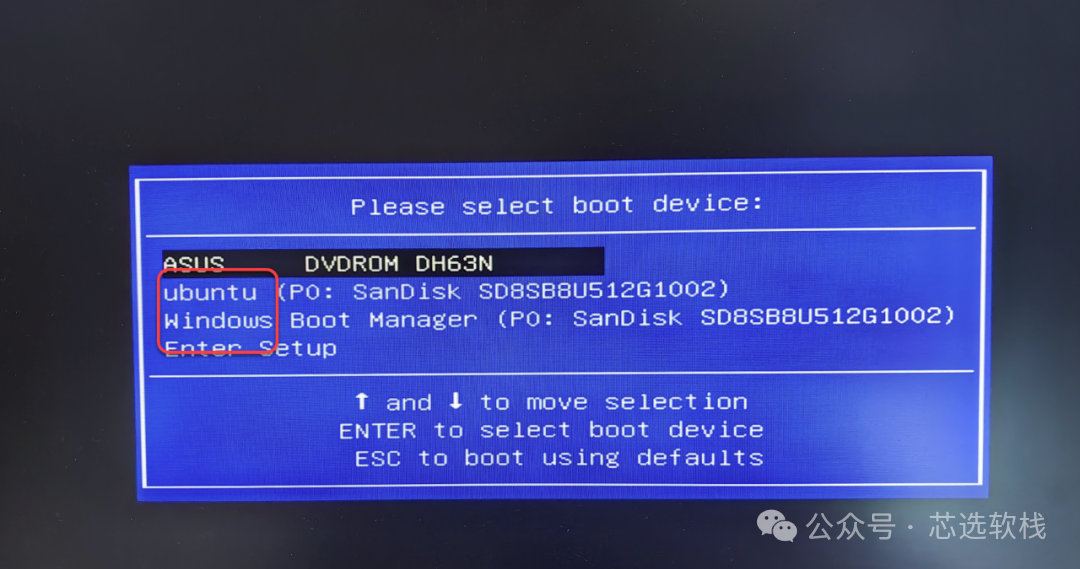
Attached Dual System Boot Method: Restart the computer, press the boot shortcut key (you can query the computer brand’s shortcut key in step 1), Press 【↑↓】 to select 【Ubuntu】 or 【Windows】 to boot the corresponding system.