Pipe Symbol
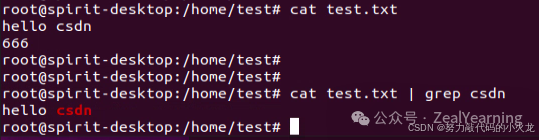
After learning the grep command, let’s learn a new special symbol, the pipe symbol: The meaning of the pipe symbol is: to take the result of the command on the left of the pipe symbol and use it as the input for the command on the right.
View file filtering on CSDN
echo Command
The echo command can be used to output specified content in the command line. Syntax: echo output_content No options are required, only one parameter, which indicates the content to be output. Complex content can be enclosed in “”.

Backtick `
Content surrounded by ` will be executed as a command, rather than treated as ordinary characters.
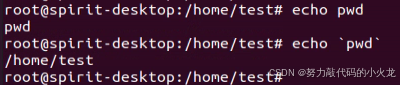
After adding the ` backtick, it is treated as a command.
Redirection Symbols
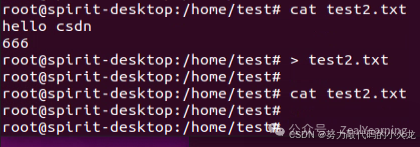
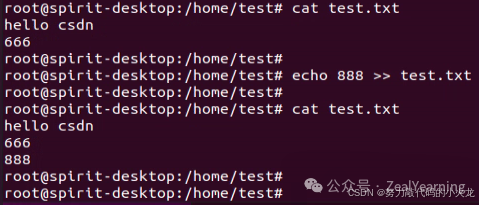
Next, let’s learn two special symbols, the redirection symbols: > and >>
- > will overwrite the result of the command on the left into the specified file on the right.
- >> will append the result of the command on the left into the specified file on the right.
tail Command
Using the tail command, you can view the content at the end of a file and track the latest changes to the file. The syntax is as follows: tail [-f -num] Linux_path
- Parameter, Linux_path, indicates the path of the file being tracked.
- Option, -f, indicates continuous tracking.
- Option, -num, indicates how many lines from the end to view; if not specified, the default is 10 lines.
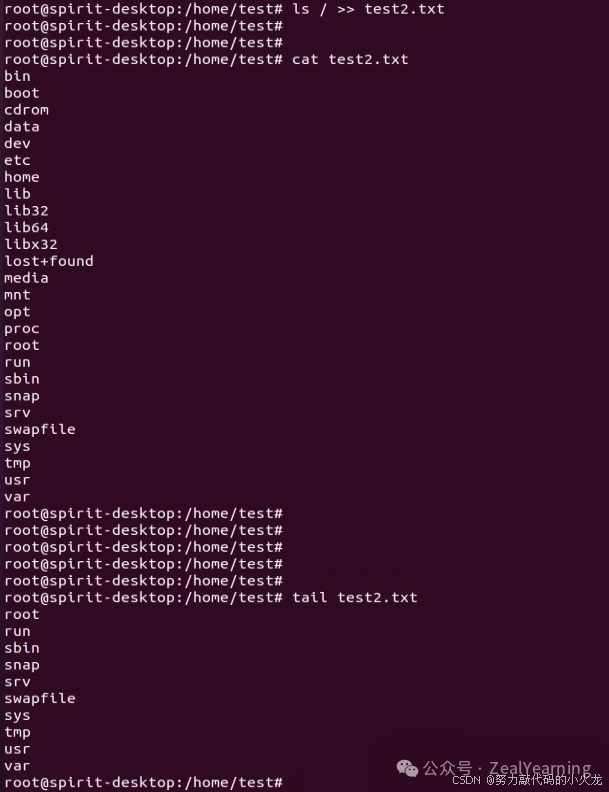
The input on the right will be updated in real-time on the left 👇

Three Modes of vi/vim Editor
- Command Mode
In command mode, the keys pressed are interpreted as commands by the editor, executing different functions driven by commands. In this mode, free text editing is not allowed.
- Insert Mode
This is also known as editing mode or insert mode. In this mode, you can freely edit the content of the file.
- Last Line Mode
Starts with :, usually used for saving and exiting the file.
If you need to edit a file using the vi/vim editor, please use the following commands:
- vi file_path
- vim file_path
vim is compatible with all vi functions, and subsequent commands will use vim.
- If the file path indicates a file that does not exist, this command will be used to edit a new file.
- If the file path indicates a file that exists, this command will be used to edit the existing file.
Quick Experience1. Use: vim hello.txt to edit a new file; after execution, you enter command mode.
2. In command mode, press the i key to enter insert mode.
3. In insert mode, type: csdn.
4. After typing, press esc to return to command mode.
5. In command mode, press the : key to enter last line mode.
6. In last line mode, type :wq to save the file and exit the vi editor.
:wq saves and exits.
:q exits only.
:q! forces exit.
:w saves only.
:set nu displays line numbers.
:set paste sets paste mode.
Open in WeChat client
sudo Command
When we know the root password, we can switch to root using the su command to gain maximum privileges, but we do not recommend using the root user for long periods to avoid system damage.We can use the sudo command to temporarily execute commands with root privileges.Syntax:sudo other_command
By prefixing other commands with sudo, you can temporarily grant root privileges to that command.
Users and User Groups
In Linux systems, you can:
- Configure multiple users.
- Configure multiple user groups.
- Users can join multiple user groups.
There are two levels of permission control in Linux:
- Permission control for users.
- Permission control for user groups.
For example, for a certain file, you can control permissions for users as well as for user groups.
User Group Management
The following commands must be executed by the root user.
- Create a user group.
groupadd group_name
- Delete a user group.
groupdel group_name
User Management
The following commands must be executed by the root user.
- Create a user.
useradd [-g -d] username
Options: -g specifies the user’s group; if not specified, -8 will create a group with the same name and automatically join it. If -g is specified, the group must already exist; if a group with the same name exists, -8 must be used.
Options: -d specifies the user’s HOME path; if not specified, the HOME directory defaults to: /home/username.
- Delete a user.
userdel [-r] username
Options: -r deletes the user’s HOME directory; if -r is not used, the HOME directory is retained when the user is deleted. To view the groups a user belongs to:
id [username]·Parameter: username, the user to be viewed; if not provided, it views itself.
- Modify the user’s group.
usermod -aG group username, adds the specified user to the specified group.
getent Command
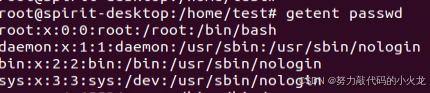
Using the getent command, you can view which users are currently in the system.
Syntax: getent passwd
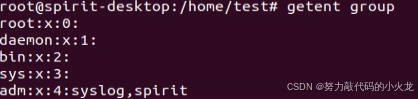
Using the getent command, you can also view which user groups are currently in the system.
Syntax: getent group
chmod Command
We can use the chmod command to modify the permission information of files and folders. Note that only the owner of the file or folder or the root user can modify it.
Syntax: chmod [-R] permissions file_or_folder
Options: -R applies the same operation to all contents within the folder.
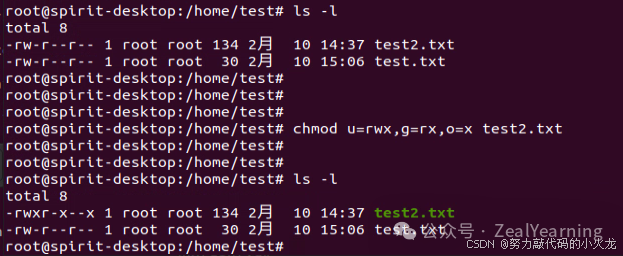
Where: u represents user permissions, g represents group permissions, o represents other users’ permissions.
Permissions can be represented by three digits; the first digit represents user permissions, the second represents group permissions, and the third represents other users’ permissions. The details of the digits are as follows: r is 4, w is 2, x is 1, which can be:
- 0: no permissions, i.e., —
- 1: only x permission, –x
- 2: only w permission, -w-
- 3: has w and x permissions, -wx
- 4: only r permission, r–
- 5: has r and x permissions, r-x
- 6: has r and w permissions, rw-
- 7: has all permissions, rwx
chown Command
Using the chown command, you can modify the owner and group of files and folders.
Ordinary users cannot modify the ownership of files or groups belonging to other users, so this command is only applicable for execution by the root user.
Syntax: chown [-R][user][:][group] file_or_folder
- Option, -R, applies the same rules to all contents within the folder, similar to chmod.
- Option, user, modifies the owner.
- Option, group, modifies the group.
- : used to separate user and group.
chown root hello.txt changes the owner of hello.txt to root.
chown :root hello.txt changes the group of hello.txt to root.
chown root:csdn hello.txt changes the owner of hello.txt to root and the group to csdn.
chown -R root test changes the owner of the folder test to root and applies the same rules to all contents within the folder.
Various Tips and Shortcuts
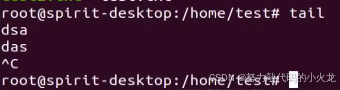
ctrl+c Force Stop
If you want to force stop the execution of certain programs in Linux, you can use the shortcut ctrl+c.
If you input a command incorrectly, you can also use the shortcut ctrl+c to exit the current input and re-enter.
ctrl+d Exit or Logout
You can use the shortcut: ctrl+d to log out of your account.
Or to exit certain specific program pages.
Cannot be used to exit vi/vim.
History Command Search
You can use the history command to view the commands that have been input in the past.

Cursor Movement Shortcuts
ctrl+a, jump to the beginning of the command.
ctrl+e, jump to the end of the command.
ctrl+left arrow, jump left by one word.
ctrl+right arrow, jump right by one word.
Clear Screen
You can clear the terminal content using the shortcut ctrl+l.
Or use the clear command to achieve the same effect.
yum Command
yum: RPM package manager, used for automating the installation and configuration of Linux software, and can automatically resolve dependency issues.
Syntax: yum [-y] [ install | remove | search ] software_name
- Option: -y, automatically confirm, no manual confirmation required during installation or uninstallation.
- install: install.
- remove: uninstall.
- search: search.
The yum command requires root privileges; you can switch to root using su or use sudo for elevation.The yum command requires an internet connection.
systemctl Command
Many software (built-in or third-party) in Linux systems support control using the systemctl command: start, stop, and enable on boot. Software that can be managed by systemctl is generally referred to as services.
Syntax: systemctl start | stop | status | enable | disable service_name
- start starts the service.
- stop stops the service.
- status checks the status.
- enable enables the service to start on boot.
- disable disables the service from starting on boot.
There are many built-in services in the system, such as:NetworkManager, main network servicenetwork, secondary network servicefirewalld, firewall servicesshd, ssh service (FinalShell remote login to Linux uses this service).
rz, sz Commands
Of course, in addition to transferring files through the lower form of FinalShell, you can also use the rz and sz commands for file transfer.The rz and sz commands need to be installed; you can install them using: yum -y install lrzsz.
- rz command for uploading, syntax: simply type rz.
- sz command for downloading, syntax: sz file_to_download.
tar Command
Linux and Mac systems commonly use two compression formats, with the following extensions:
- .tar, known as tarball, an archive file, which simply assembles files into a .tar file without much reduction in file size, just simple packaging.
- .gz, often seen as .tar.gz, gzip compressed file, which uses the gzip compression algorithm to compress files into one file, greatly reducing the size of the compressed file.
For these two formats, the tar command can be used for both compression and decompression operations. Syntax: tar [-c -v -x -f -z -C] parameter1 parameter2… parameterN
- -c creates a compressed file, used in compression mode.
- -v displays the compression and decompression process, used to view progress.
- -x is for decompression mode.
- -f specifies the file to create or decompress; the -f option must be the last in all options.
- -z is for gzip mode; not using -z means it’s a regular tarball format.
- -C specifies the destination for decompression, used in decompression mode.
tar Command Compression
Common combinations for tar are:
- tar -cvf test.tar 1.txt 2.txt 3.txt
This compresses 1.txt, 2.txt, and 3.txt into the test.tar file.
- tar -zcvf test.tar.gz 1.txt 2.txt 3.txt
This compresses 1.txt, 2.txt, and 3.txt into the test.tar.gz file using gzip mode.
Note:-z option, if used, is generally placed first among the options; -f option must be the last option.
tar Decompression
Common tar decompression combinations include:
- tar -xvf test.tar
This decompresses test.tar, extracting files to the current directory.
- tar -xvf test.tar -C /home/spirit
This decompresses test.tar, extracting files to the specified directory (/home/spirit).
- tar -zxvf test.tar.gz -C /home/spirit
This decompresses test.tar.gz in gzip mode, extracting files to the specified directory (/home/spirit).
Note:-f option must be the last in the option combination; -z option is recommended to be placed at the beginning; -C option should be used separately, apart from other parameters needed for decompression.
zip Command for Compressing Files
You can use the zip command to compress files into a zip archive.
Syntax: zip [-r] parameter1 parameter2 … parameterN
- -r, when compressing folders, the -r option is required, consistent with the -r effect of commands like rm and cp.
Example:
- zip test.zip a.txt b.txt c.txt
This compresses a.txt, b.txt, and c.txt into the test.zip file.
- zip -r test.zip test itheima a.txt
This compresses the test and itheima folders along with the a.txt file into the test.zip file.
unzip Command for Decompressing Files
Using the unzip command, you can easily decompress zip archives.
Syntax: unzip [-d] parameter
- -d specifies the location to decompress to, similar to the -C option in tar.
- parameter is the zip archive file to be decompressed.
Example:
- unzip test.zip, decompresses test.zip to the current directory.
- unzip test.zip -d /home/spirit, decompresses test.zip to the specified folder (/home/spirit).
Strive to meet a better self 💪!!!