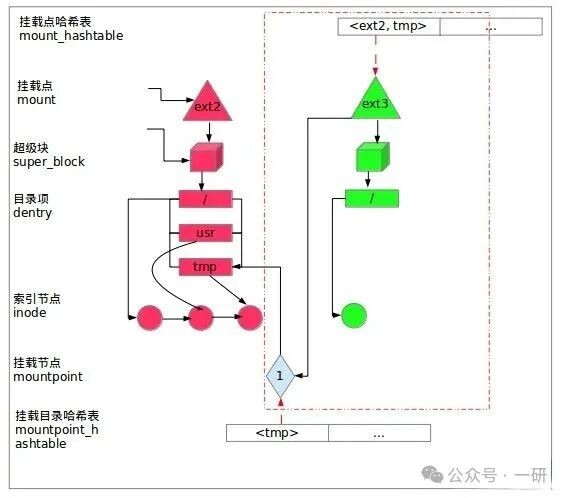
In the Linux system, file system mounting is a core concept that establishes a bridge between storage devices and the directory tree.
This article will delve into the mounting mechanism kernel implementation, best practices, and common pitfalls. The essence of mounting (mount): VFS and file system drivers In the Linux kernel, the VFS (Virtual File System) layer is responsible for abstracting the details of different file systems (for more details, see the previous article: In-Depth Understanding of the Linux Virtual File System VFS, Understanding the Core and Underlying of File Management).
When executing a mount operation, the kernel is actually creating a vfsmount structure that associates a specific file system instance with a directory tree node.“`c// Simplified kernel data structure relationshipstruct vfsmount { struct dentry *mnt_root; // Root dentry of the mount point struct super_block *mnt_sb; // Super block of the file system int mnt_flags; // Mount flags};“`In-depth analysis of the mount commandComplete command syntaxmount -t <fstype> -o <options> <device> <mountpoint>Automatic detection of file system typeModern Linux systems can usually automatically detect the file system type: # Let the kernel automatically detect the file systemsudo mount /dev/sdb1 /mnt/usb# Or specify explicitly (recommended for scripts)sudo mount -t auto /dev/sdb1 /mnt/usbAdvanced mount options explained# Security-related mount optionssudo mount -t ext4 -o nosuid,nodev,noexec /dev/sdb1 /mnt/secure# Performance optimization optionssudo mount -t ext4 -o noatime,nodiratime,data=writeback /dev/sdb1 /mnt/performance# Network file system retry optionssudo mount -t nfs -o soft,retrans=3,timeo=300 192.168.1.100:/export /mnt/nfsKey option explanations:•nosuid:Ignores the SUID bit to prevent privilege escalation attacks. •nodev:Does not interpret device files, enhancing security. •noexec:Prohibits the execution of binary files. •noatime:Does not update access time, improving I/O performance. •data=writeback:Aggressive write-back mode for ext4, offering the best performance but higher risk.Underlying mechanism of unmounting (umount)Unmounting is not just about disconnecting, but also involves complex cleanup work: Kernel operations during the unmount process1. Flush all dirty pages: Call sync() to ensure all data is written to disk. 2. Invalidate inode cache: Clear file system metadata in memory. 3. Release resources: Close all file descriptors and free kernel data structures.The dangers of forced unmounting# Extremely dangerous forced unmount – may lead to data corruptionsudo umount -f /mnt/corrupted# Relatively safe delayed unmountsudo umount -l /mnt/busy
Note: The -f (force) option may bypass the normal cleanup process and should only be used in extreme cases.
Complete analysis of /etc/fstabModern configuration of fstab# Device identifier Mount point File system Options dump fsckUUID=8f6e5d2a-1b3c-4d5e-6f7a-8b9c0d1e2f3 /mnt/data ext4 defaults,nofail 0 2LABEL=BackupDisk /backup xfs defaults,noatime 0 2/dev/mapper/vg0-lv_shared /shared ext4 rw,relatime 0 0//nas/company_files /mnt/nas cifs credentials=/etc/smbpass 0 0Key option explanations•nofail:Do not report errors when the device does not exist, suitable for removable devices •nofail,noauto:Do not automatically mount and do not report errors •_netdev:Network devices, wait for the network to be ready before mountingAdvanced mounting techniquesNamespaces and mount propagation
# Create shared mountsudo mount –make-shared /mnt/shared# Create slave mountsudo mount –make-slave /mnt/slave# Create private mount (default)sudo mount –make-private /mnt/private# Create unbindable mountsudo mount –make-unbindable /mnt/unbindableOverlay file system (OverlayFS)# Create OverlayFS mountsudo mount -t overlay overlay \ -o lowerdir=/lower,upperdir=/upper,workdir=/work \ /mergedFor more details, see the previous article: In-Depth Analysis of Linux File System Namespaces, Building the Core Isolation Mechanism for Secure Container Technology
Advanced usage of bind mounts# Recursive bind mountsudo mount –rbind /oldroot /newroot# Read-only bind mountsudo mount –bind -o ro /source /destinationFile system specific mount considerationsext4 file system
# Enable journaling (default)sudo mount -t ext4 -o journal=writeback /dev/sdb1 /mnt/ext4# Disable journaling (improves performance but risky)sudo mount -t ext4 -o journal=async /dev/sdb1 /mnt/ext4XFS file system# XFS delayed allocation optionssudo mount -t xfs -o allocsize=64m,largeio /dev/sdb1 /mnt/xfs# Force inode64 mode (large file systems)sudo mount -t xfs -o inode64 /dev/sdb1 /mnt/xfsBtrfs file system# Enable compressionsudo mount -t btrfs -o compress=zstd /dev/sdb1 /mnt/btrfs# Use subvolumessudo mount -t btrfs -o subvol=@home /dev/sdb1 /mnt/homePerformance optimization and monitoringMonitoring mount point performance# Monitor I/O statistics of the mount pointsudo iostat -x /dev/sdb1 1# View mount optionsmount -v | grep /mnt/data# Check file system featurestune2fs -l /dev/sdb1 # ext4xfs_info /dev/sdb1 # XFSOptimize mount parameters# Optimizations for SSDssudo mount -t ext4 -o noatime,nodiratime,discard /dev/ssd /mnt/ssd# Optimizations for HDDssudo mount -t ext4 -o relatime,commit=60 /dev/hdd /mnt/hddTroubleshooting and data recoveryDiagnostic steps for mount failures# 1. Check if the device existslsblk /dev/sdb1# 2. Check file system integritysudo fsck -y /dev/sdb1# 3. View kernel logsdmesg | tail -50# 4. Attempt manual repairsudo mount -o repair /dev/sdb1 /mnt/tempRecovering damaged mounts# When encountering “Structure needs cleaning” errorsudo fsck -y /dev/sdb1# For XFS file systemsudo xfs_repair /dev/sdb1# Emergency read-only mount to recover datasudo mount -o ro,remount /dev/sdb1 /mnt/corruptedSecurity best practicesSafe mounting strategies# Create secure mount point directoriessudo mkdir /mnt/securedsudo chmod 755 /mnt/securedsudo chown root:root /mnt/secured# Apply secure mount optionssudo mount -t ext4 -o nosuid,nodev,noexec /dev/sdb1 /mnt/securedAuditing and monitoring# Monitor changes to mount pointssudo auditctl -w /mnt/ -p wa# View mount historygrep mount /var/log/auth.logThoughts on mounting in the era of containersIn container environments, the mounting mechanism takes on new meanings: # Docker volume mountdocker run -v /host/path:/container/path image:tag# Kubernetes persistent volumeapiVersion: v1kind: PersistentVolumespec: capacity: storage: 10Gi accessModes: – ReadWriteOnce hostPath: path: /mnt/k8s-volumeKey takeaways•Always prefer using UUID or LABEL over device names. •Understand the optimal mount options for different file systems. •Use forced unmount options with caution. •Regularly verify the correctness of fstab configurations. •Monitor the performance and health of mount points.
File system mounting is the cornerstone of Linux storage management. From simple USB drive mounts to complex distributed file systems, understanding the mounting mechanism and its underlying principles is crucial for system administrators and developers alike.
Every mount operation interacts with the VFS layer of the kernel, and the correct mount options and unmount process are guarantees of data safety (data consistency).
By deeply understanding these concepts, we can build more stable and efficient Linux storage solutions.

Every view or like is a great encouragement, let’s grow together.