In-Depth Analysis of Linux SMP Technology: From Principles to Practice
1 Basic Concepts of SMP
Symmetric Multiprocessing (SMP) is a computer architecture technology that integrates multiple processors into a single system. Its core feature is that all processors work together in a peer-to-peer manner within a single operating system, sharing a unified memory space and I/O devices. In an SMP system, any processor can access memory, peripherals, and operating system services equally, which greatly simplifies system management and improves resource utilization. From a technological development perspective, the emergence of the SMP architecture marks a significant shift from single-core serial processing to multi-core parallel processing, laying a solid foundation for modern computer architectures.
In modern computing, the system’s topology has a decisive impact on performance. In addition to SMP topology, NUMA (Non-Uniform Memory Access) topology is another important system architecture. The table below shows the key differences between the two topologies:
Table: Comparison of SMP and NUMA Architectures
| Feature | SMP Architecture | NUMA Architecture |
|---|---|---|
| Memory Access | Uniform memory access, all processors have the same memory access latency | Non-uniform memory access, local memory access is fast, remote memory access is slow |
| Scalability | Limited scalability, typically supports 2-16 processors | Good scalability, can support hundreds of processors |
| Hardware Cost | Relatively simple structure, lower cost | Complex structure, higher cost |
| Applicable Scenarios | Small to medium-sized servers, workstations, embedded systems | Large database servers, high-performance computing clusters |
| Software Optimization | Relatively simple, operating system transparently manages | Requires targeted optimization to reduce remote memory access |
It is worth noting that all modern server systems adopt NUMA machines. SMP topology allows all processors to access memory at the same time, but because shared and identical memory access essentially prevents all CPUs from performing serialized memory access, the scalability limitations of SMP systems are often considered unacceptable. In NUMA systems, multiple processors are physically grouped by sockets, each socket has a dedicated memory and processor area, which they access locally, collectively referred to as nodes.
2 Detailed Explanation of Linux SMP Boot Mechanism
The SMP boot process of the Linux kernel is a carefully designed serialized process, with the core idea being “first single, then multiple”—first allowing a single master processor to complete the core initialization of the operating system, and then waking up the slave processors according to a specific protocol and incorporating them into the system’s scheduling and management scope. This process involves multiple complex aspects such as processor state management, inter-core synchronization, and memory consistency guarantees, requiring close cooperation between hardware firmware and the operating system kernel.
2.1 Master-Slave Processor Boot Process
In the cold boot phase of the SMP architecture, the system presents a special “single-core working state“—only the bootstrap processor (BP) is in execution state, while the other application processors (AP) are in power-off or reset state. This design stems from the initialization sequence requirements of hardware resources: the BP must first complete critical operations such as memory controller initialization and device tree parsing to establish a foundational environment for subsequent multi-core collaboration. Imagine a construction site where if all workers start at the same time without coordination, it would lead to chaos and resource conflicts. Similarly, if multiple processor cores attempt to access an uninitialized DRAM controller simultaneously, it could lead to bus deadlock.
The boot path of the master processor (CPU0) begins at the traditional Bootloader stage, transitioning from assembly to C language, ultimately reaching the entry function of the Linux kernel<span>start_kernel()</span>. This function is the core of kernel initialization, completing the setup of key subsystems such as memory management, interrupt controllers, and scheduling systems. As single-core initialization approaches its end, the system initiates the multi-core preparation process by calling the<span>smp_prepare_cpus()</span> function.
Why can’t all processors be started directly upon power-up? This involves the issue of hardware resource contention. In the early stages of system power-up, shared resources such as memory controllers and bus arbiters have not yet been initialized. If multiple cores attempt to access these resources simultaneously, it can lead to unpredictable behavior. Additionally, the core data structures of the operating system (such as task queues, schedulers, and memory mapping tables) need to be constructed in a controlled environment to provide a safe foundation for multi-core parallel execution.
2.2 Inter-Core Wake-Up Protocols: Spin-Table and PSCI
The Linux kernel supports various inter-core wake-up protocols, mainly divided into traditional spin-table and modern PSCI types, reflecting the evolution of SMP boot technology under the ARM architecture.
2.2.1 Spin-Table Mechanism
Spin-table is a simple boot scheme adopted in early ARM multi-core processors, with the core idea being polling synchronization through shared memory. Specifically, the Bootloader reserves a specific storage area in system memory for each slave processor to store the processor’s boot status and entry address. After completing its own initialization, the master processor writes the boot information of the slave processors into the corresponding spin-table entries and then triggers the release of the slave processors from reset. Meanwhile, the slave processors continuously poll their corresponding memory locations after power-up, and once they detect a valid boot address, they jump to that address to start executing instructions.
// Basic data structure of spin-table (simplified version)
struct spin_table {
    unsigned long cpu_status;    // CPU status flag
    unsigned long cpu_release_addr; // CPU release address
    unsigned long reserved;      // Reserved field
};

// Polling loop of the slave processor (assembly implementation)
secondary_holding_pen:
    ldr x0, =spin_table_addr    // Load spin-table address
    ldr x1, [x0, #CPU_STATUS]   // Read CPU status
    cmp x1, #CPU_RELEASED       // Check if released
    bne secondary_holding_pen   // If not released, continue polling
    ldr x2, [x0, #CPU_RELEASE_ADDR] // Load boot address
    br x2                       // Jump to boot address
The spin-table mechanism is like a simple “ready-wait” protocol: imagine students (slave processors) in a classroom waiting for the teacher (master processor) to distribute the exam papers (boot instructions). The students quietly sit at their desks, continuously observing their desks until they find the teacher has placed the exam papers, and then they start answering questions. This process is simple and direct, but the students consume energy (power) while waiting.
2.2.2 PSCI Mechanism
With the increasing demands for power management and security, the limitations of spin-table have become increasingly apparent, leading to the emergence of the more advanced PSCI (Power State Coordination Interface) standard. PSCI encapsulates inter-core wake-up, power state management, and other operations into standard SMC (Secure Monitor Call) instructions through a firmware abstraction layer in the TrustZone secure environment.
The operation mechanism of PSCI is similar to a company’s “administrative management department“: the department manager (master processor) does not need to directly notify each employee (slave processor) to start working, but instead issues instructions through the company’s administrative system (PSCI firmware). Employees stay at home on standby (low power state), and only when the administrative system sends a work notification through the company communication platform (inter-core interrupt) do the employees go to the office to start working. This method is more efficient and allows employees to rest during the waiting period to save energy.
The PSCI interface mainly includes the following core functions:
- •
<span>PSCI_CPU_ON</span>– Start the specified slave processor - •
<span>PSCI_CPU_OFF</span>– Turn off the current processor - •
<span>PSCI_AFFINITY_INFO</span>– Query processor affinity information
// Example of PSCI call (ARM64)
int psci_cpu_on(unsigned long target_cpu, unsigned long entry_point)
{
    struct arm_smccc_res res;

    arm_smccc_smc(ARM_SMCCC_STD_CALL,
                  PSCI_0_2_FN_CPU_ON,
                  target_cpu, entry_point, 0, 0, 0, 0, &res);

    return res.a0;
}
2.3 Analysis of SMP Boot Timing
The Linux SMP boot process follows strict timing control to ensure that each processor joins the system at the correct time and in the correct state. The following Mermaid timing diagram illustrates the overall flow of this complex process:
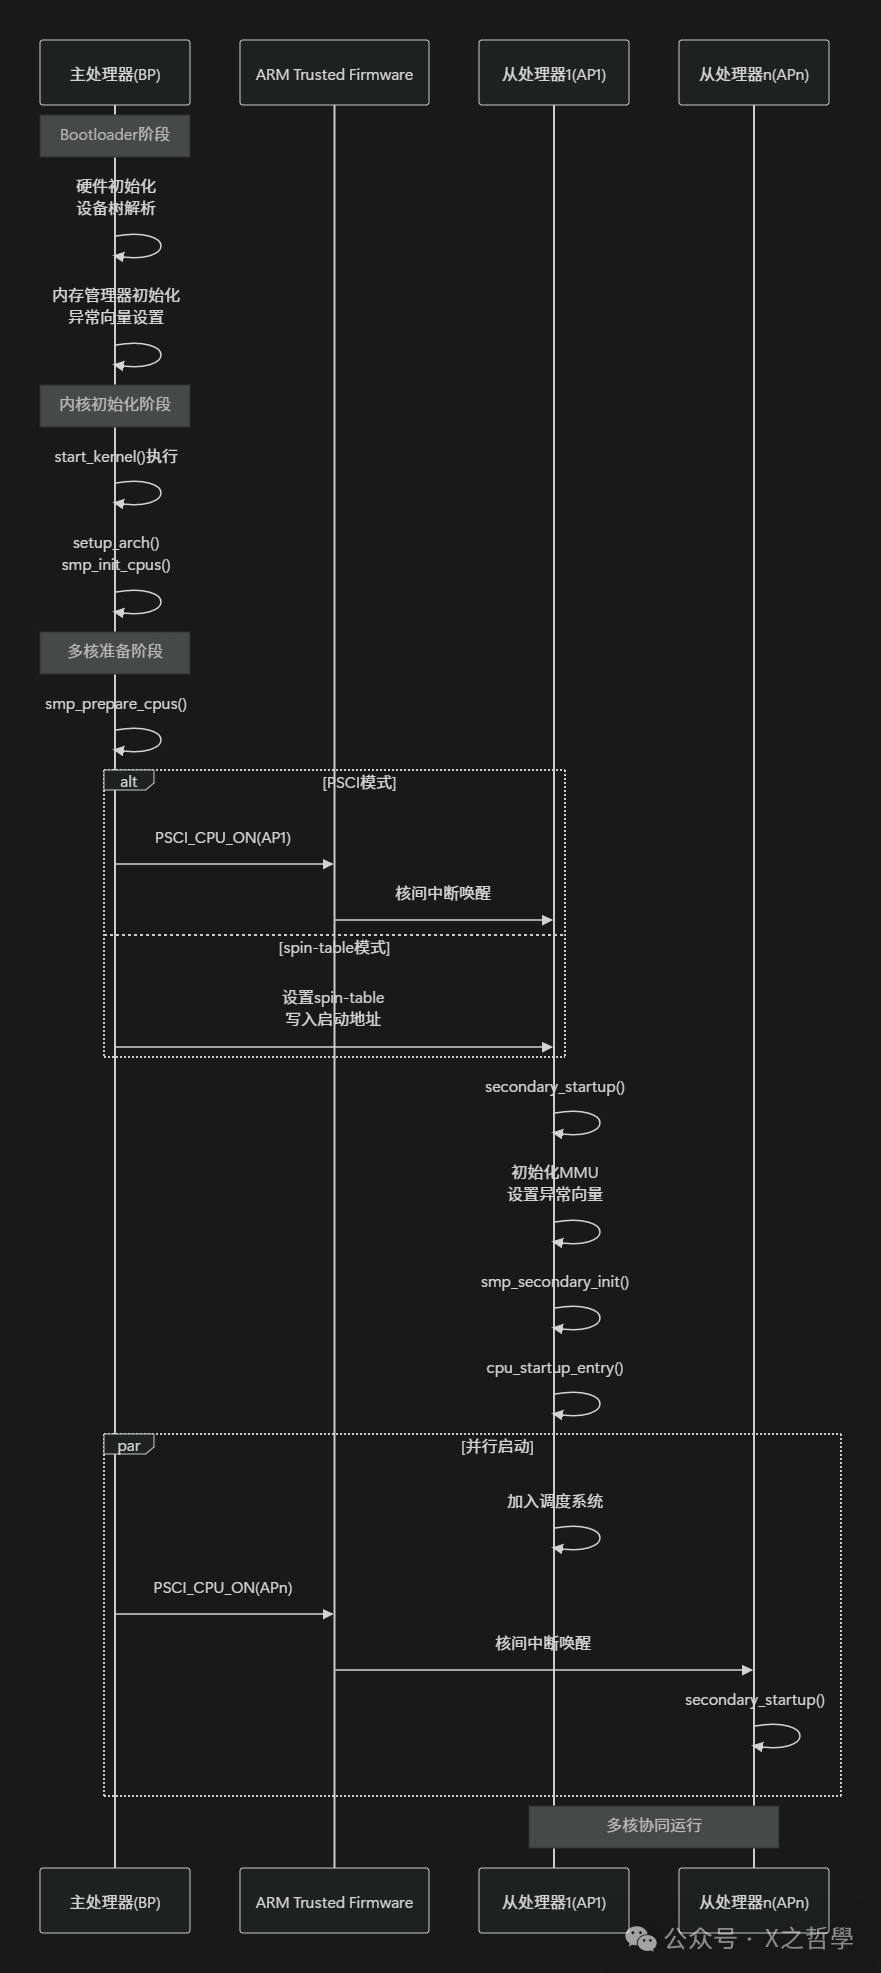
From the timing diagram, it can be seen that the SMP boot process is divided into several key stages:
- 1. Bootloader Stage: The master processor completes the most basic hardware initialization, including memory controllers, clock systems, etc.
- 2. Kernel Initialization Stage: The master processor executes
<span>start_kernel()</span>, gradually initializing the core subsystems of the kernel. - 3. Multi-Core Preparation Stage: Through
<span>smp_prepare_cpus()</span>, it detects processor topology and initializes inter-core communication mechanisms. - 4. Slave Processor Boot Stage: Starts the slave processors according to the selected wake-up protocol (PSCI or spin-table).
- 5. Multi-Core Parallel Stage: All processors enter the scheduling system and begin true symmetric multiprocessing.
It is worth noting that in modern systems that support CPU hot-plugging, the booting and shutting down of processors is no longer a one-time process but can be dynamically adjusted based on load, further increasing the system’s flexibility and energy efficiency.
3 Core Data Structures and Code Framework
The SMP implementation of the Linux kernel relies on a series of carefully designed data structures and interface abstractions, which together form the skeleton of a multi-core operating system. Understanding the relationships and responsibilities of these core data structures is key to mastering Linux SMP technology.
3.1 CPU Operation Structure and State Masks
In the Linux SMP architecture, <span>struct cpu_operations</span> is an abstract interface for processor operations, defining a set of operation callback functions for specific processors, forming a hardware-independent CPU management framework. This structure is like a processor driver collection, providing the kernel with the ability to uniformly manage processors of different architectures.
// Definition of CPU operation structure (ARM64)
struct cpu_operations {
    const char *name;
    int (*cpu_init)(unsigned int cpu);
    int (*cpu_prepare)(unsigned int cpu);
    int (*cpu_boot)(unsigned int cpu);
    void (*cpu_postboot)(void);
#ifdef CONFIG_HOTPLUG_CPU
    int (*cpu_disable)(unsigned int cpu);
    void (*cpu_die)(unsigned int cpu);
    int (*cpu_kill)(unsigned int cpu);
#endif
};
Different SMP boot methods provide services by implementing their own <span>cpu_operations</span>. For example, spin-table and PSCI implement their own sets of operations:
// Example of spin-table operation set
static const struct cpu_operations spin_table_ops = {
    .name = "spin-table",
    .cpu_init = smp_spin_table_cpu_init,
    .cpu_prepare = smp_spin_table_cpu_prepare,
    .cpu_boot = smp_spin_table_cpu_boot,
};

// Example of PSCI operation set
static const struct cpu_operations psci_ops = {
    .name = "psci",
    .cpu_init = smp_psci_cpu_init,
    .cpu_prepare = smp_psci_cpu_prepare,
    .cpu_boot = smp_psci_cpu_boot,
};
Processor state management is another core concern of the SMP system. The kernel outlines the lifecycle of processors through five core state masks (<span>cpu_*_mask</span>), which play the role of state routers during the multi-core boot process. This is similar to a company’s human resources management system, tracking the current status of each employee:
- •
<span>cpu_possible_mask</span>– Identifies the set of physically present CPUs, established during device tree parsing. - •
<span>cpu_present_mask</span>– Reflects the set of CPUs currently recognizable by the operating system. - •
<span>cpu_online_mask</span>– Marks the set of active CPUs that have completed kernel initialization. - •
<span>cpu_active_mask</span>– Indicates the set of CPUs that can participate in task scheduling. - •
<span>cpu_dying_mask</span>– Records the set of CPUs that are going offline.
3.2 Analysis of SMP Initialization Functions
SMP initialization is a gradual process, accomplished through the collaboration of multiple key functions. <span>smp_prepare_cpus()</span> serves as the “hardware adaptation layer” for SMP boot, undertaking three key missions:
- 1. Initialize CPU topology information, constructing a graph of processor affinities.
- 2. Prepare for the boot of slave processors through
<span>cpu_operations->cpu_prepare</span>. - 3. Set up inter-core communication and synchronization mechanisms.
// Core logic of smp_prepare_cpus function
void __init smp_prepare_cpus(unsigned int max_cpus)
{
    int cpu, err;
    unsigned int this_cpu = smp_processor_id();

    // Initialize CPU topology structure
    init_cpu_topology();
    store_cpu_topology(this_cpu);

    // Handle nosmp boot mode
    if (max_cpus == 0)
        return;

    // Iterate through all possible CPUs, preparing to boot
    for_each_possible_cpu(cpu) {
        per_cpu(cpu_number, cpu) = cpu;

        if (cpu == this_cpu)
            continue;

        const struct cpu_operations *ops = get_cpu_ops(cpu);
        if (!ops)
            continue;

        err = ops->cpu_prepare(cpu);
        if (err)
            continue;

        set_cpu_present(cpu, true);
    }
}
<span>smp_secondary_init()</span> is the only code executed by the slave processor during the SMP system initialization process. Its execution time point is after the slave processor is released from reset, called by<span>secondary_start_kernel()</span><code><span>, and typically configures the power mode of the slave processor, similar to the onboarding training of a new employee, ensuring they master the necessary work procedures.</span>
<span>smp_boot_secondary()</span> is the “key function” for starting the SMP system, called by<span>__cpu_up</span>, setting the address of the first instruction to be executed after the slave processor is released from reset. For each multi-core ARM SoC, this function must be implemented, and its implementation varies by hardware platform.
3.3 Relationships of Core Data Structures
The following Mermaid class diagram illustrates the relationships between the core data structures of Linux SMP:
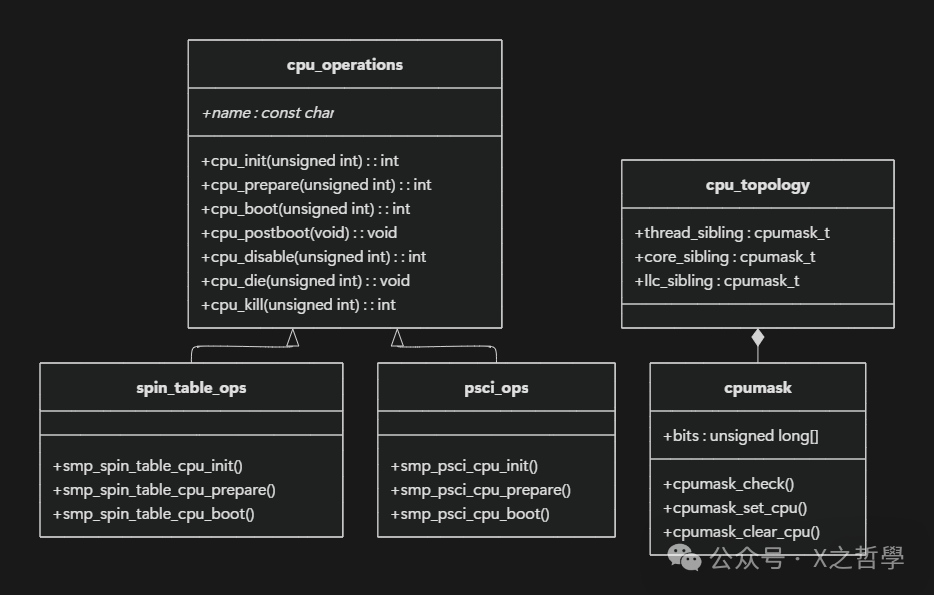
From the class diagram, it can be seen that <span>cpu_operations</span> is the core abstract interface for SMP operations, and specific boot mechanisms (such as spin-table and PSCI) provide services by implementing this interface. The CPU topology structure <span>cpu_topology</span> uses <span>cpumask</span> to manage the affinities between processors, which are crucial for task scheduling and load balancing.
4 CPU State Management and Scheduling Process
In the Linux SMP system, processor state management and scheduling processes are the core mechanisms to ensure efficient collaboration among multiple cores. This mechanism involves not only tracking processor states but also the rules for state transitions and the execution of scheduling strategies.
4.1 CPU State Transition Mechanism
The kernel defines the lifecycle of processors through five core state masks (<span>cpu_*_mask</span>), which play the role of state routers during the multi-core boot process. The state changes of each processor in the system can be likened to the career development path of an employee:
- • Possible CPU: Like candidates in a pool of applicants, they are qualified to join the company but have not yet been hired.
- • Present CPU: Like employees who have signed contracts but have not yet officially reported for duty, the system knows of their existence but has not activated them.
- • Online CPU: Like employees who are on duty, formally participating in work task scheduling.
- • Active CPU: Like employees executing specific tasks, they are in a working state.
- • Dying CPU: Like employees who are processing their resignation, they are about to leave the company.
The following diagram shows the complete transition process of CPU states:
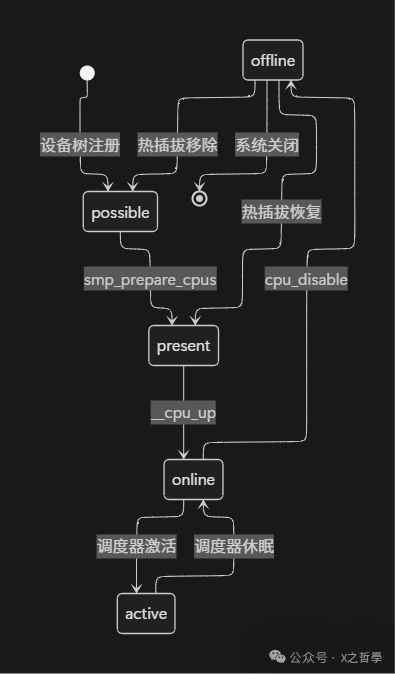
The specific code for state transitions is implemented in the kernel’s <span>cpu.c</span>, primarily managed through the following functions:
// Example of CPU state management function
int cpu_up(unsigned int cpu)
{
    int err = 0;

    // Check if the CPU exists in the system
    if (!cpu_present(cpu))
        return -EINVAL;

    // Set the CPU to online state
    err = _cpu_up(cpu, 0);
    if (err == 0)
        set_cpu_online(cpu, true);

    return err;
}
4.2 CPU Topology and Scheduling Domains
Modern processor architectures often include complex topological relationships, such as multi-core, multi-threading, and NUMA nodes. The Linux kernel needs to understand these topological relationships to achieve efficient load balancing. The <span>init_cpu_topology()</span> function is responsible for initializing this information.
The CPU topology structure mainly includes:
- • Thread-Level Affinity (thread_sibling): Hyper-threads within the same physical core.
- • Core-Level Affinity (core_sibling): Different cores within the same CPU socket.
- • LLC-Level Affinity (llc_sibling): Cores sharing the last level cache.
// Storage of CPU topology information
struct cpu_topology {
    int thread_id;
    int core_id;
    int package_id;
    cpumask_t thread_sibling;
    cpumask_t core_sibling;
};
The scheduler uses topology information to construct Scheduling Domains (sched_domain), which is a hierarchical structure reflecting the physical architecture of the system. Scheduling domains allow load balancing to occur at the most appropriate level, avoiding unnecessary task migrations.
4.3 Task Scheduling and Load Balancing
In an SMP system, the scheduler’s goal is not only to select suitable tasks to run but also to ensure that the load across all processor cores is as balanced as possible. Linux uses CFS (Completely Fair Scheduler) as its main scheduler, in conjunction with periodically executed load balancing algorithms.
The load balancing process is similar to the human resource allocation in a large company: the HR department (scheduler) monitors the workloads of various departments (processor cores), and when it finds that some departments are overloaded while others are idle, it reallocates employees (tasks) between departments to optimize overall efficiency.
The core steps of load balancing include:
- 1. Load Statistics: Periodically calculate the load metrics of each scheduling domain.
- 2. Imbalance Detection: Compare the load differences among processors within the domain.
- 3. Task Migration: Migrate tasks from overloaded processors to idle processors.
- 4. Cache Affinity: Consider the data cache locality of tasks to avoid frequent migrations.
// Core logic of load balancing (simplified)
static void run_rebalance_domains(struct softirq_action *h)
{
    for_each_domain(this_cpu, sd) {
        // Check if load balancing is needed
        if (time_after_eq(now, sd->last_balance + interval)) {
            if (load_balance(this_cpu, sd)) {
                // Load balancing was successful
                rebalanced = 1;
            }
        }
    }
}
5 Concurrency Synchronization and Performance Optimization
In an SMP environment, multiple processors executing code simultaneously access shared data, making concurrency control a key factor for system stability and performance. The Linux kernel provides a rich set of synchronization mechanisms to address different concurrency scenarios, each with its specific applicable conditions and performance characteristics.
5.1 Synchronization Primitives and Usage Scenarios
Spinlock is the most basic synchronization primitive in SMP systems, characterized by the fact that when the lock is occupied, the processor attempting to acquire the lock will spin wait until the lock becomes available. This is suitable for scenarios where the critical section execution time is very short.
// Basic usage of spinlock
DEFINE_SPINLOCK(my_lock);

void critical_section(void)
{
    spin_lock(&my_lock);
    // Critical section code
    spin_unlock(&my_lock);
}
The working principle of spinlock is like a shared apartment with only one bathroom: when one person enters the bathroom, others must wait at the door (spin) until the person inside comes out. If the waiting time is short, this method is very efficient; however, if the waiting time is long, it can waste a lot of resources.
Mutex is another commonly used synchronization mechanism. Unlike spinlock, when a mutex is occupied, the thread attempting to acquire the mutex will enter a sleep state, yielding processor resources. This is suitable for scenarios where the critical section execution time is longer.
// Basic usage of mutex
static DEFINE_MUTEX(my_mutex);

void longer_critical_section(void)
{
    mutex_lock(&my_mutex);
    // Code for longer critical section
    mutex_unlock(&my_mutex);
}
Mutex is like making an appointment with a specialist doctor: if the doctor is busy, the patient does not wait in place but goes home (sleeps) and is notified to come back when the doctor is available.
5.2 Read-Copy-Update (RCU) Mechanism
For read-heavy and write-light concurrency scenarios, Linux provides the RCU (Read-Copy-Update) mechanism, which is a lock-free synchronization method. The basic idea of RCU is that readers can access data without any locks, while writers first create a copy of the data, modify the copy, and then atomically replace the pointer to the original data with the new version.
// Example of RCU usage
struct my_data {
    int value;
    struct rcu_head rcu;
};

// Reader side
void reader_function(void)
{
    rcu_read_lock();
    struct my_data *data = rcu_dereference(global_ptr);
    // Read data
    rcu_read_unlock();
}

// Writer side
void writer_function(int new_value)
{
    struct my_data *new_data = kmalloc(sizeof(*new_data), GFP_KERNEL);
    new_data->value = new_value;

    struct my_data *old_data = rcu_dereference_protected(global_ptr, 1);
    rcu_assign_pointer(global_ptr, new_data);
    synchronize_rcu();  // Wait for all readers to exit
    kfree_old_data(old_data);
}
The working principle of RCU is similar to a museum changing exhibits: visitors (readers) can view the exhibits at any time, while the museum administrator (writer) changes the exhibits after closing hours. New visitors see the new exhibits, while those already viewing can continue to see the old exhibits until they leave.
5.3 Memory Barriers and Cache Consistency
In SMP systems, each processor has its own cache, which introduces the cache consistency problem. Memory barriers are used to ensure the order of memory accesses, preventing processor and compiler optimizations from leading to unexpected execution results.
// Example of memory barrier usage
void producer_function(void)
{
    data->value = 123;
    // Write barrier, ensure that the write to value is completed before setting the flag
    smp_wmb();
    data->flag = 1;
}

void consumer_function(void)
{
    // Read barrier, ensure that the read of flag occurs before reading value
    smp_rmb();
    if (data->flag) {
        int local_value = data->value;
    }
}
Memory barriers are like quality control points on a factory assembly line: ensuring that the previous process is completed before starting the next process, avoiding product quality issues caused by process disorder.
5.4 Performance Optimization Strategies
Performance optimization in SMP systems needs to consider the cooperation efficiency among multiple cores. Here are some key optimization strategies:
- 1. Data Locality: Keep data on the same NUMA node as the processor accessing it to reduce remote memory access.
- 2. Lock Decomposition: Break large locks into multiple smaller locks to reduce lock contention.
- 3. Lock-Free Algorithms: Use RCU or atomic operations instead of locking mechanisms.
- 4. Cache-Friendly: Arrange data structures reasonably to improve cache hit rates.
Table: Comparison of SMP Synchronization Mechanisms
| Synchronization Mechanism | Applicable Scenarios | Advantages | Disadvantages |
|---|---|---|---|
| Spinlock | Short critical sections, multi-processor | No context switch overhead | Busy waiting wastes CPU cycles |
| Mutex | Long critical sections, may sleep | No CPU consumption while waiting | High context switch overhead |
| Semaphore | Resource counting, controlling concurrency | Flexible control of concurrency | Relatively high overhead |
| RCU | Read-heavy, write-light, large data structures | Lock-free reading, extremely high read performance | High write overhead, complex implementation |
| Atomic | Simple arithmetic, bit operations | Lock-free, high performance | Only applicable to simple operations |
6 Simple Examples and Debugging Tools
The best way to deeply understand Linux SMP technology is to combine theory with practice. This section will provide a simple SMP module example demonstrating how to operate multi-core resources in practice, along with common debugging tools and methods.
6.1 SMP Module Example Code
The following is a simple kernel module that demonstrates how to operate multiple processor cores in an SMP environment:
#include <linux/module.h>
#include <linux/kernel.h>
#include <linux/cpu.h>
#include <linux/smp.h>
#include <linux/delay.h>

static DEFINE_PER_CPU(long, cpu_usage) = {0};

// Function executed on each CPU
static void smp_demo_function(void *info)
{
    int cpu = smp_processor_id();
    int i;

    // Simulate some workload
    for (i = 0; i < 1000000; i++) {
        per_cpu(cpu_usage, cpu)++;
    }

    pr_info("CPU%d: Work completed, total count = %ld\n",
            cpu, per_cpu(cpu_usage, cpu));
}

// Module initialization function
static int __init smp_demo_init(void)
{
    int cpu;
    cpumask_t mask;

    pr_info("SMP demonstration module loaded\n");

    // Print system CPU information
    pr_info("Number of CPUs in the system: %d\n", num_online_cpus());
    pr_info("Possible CPU mask: %*pb\n", cpumask_pr_args(cpu_possible_mask));
    pr_info("Online CPU mask: %*pb\n", cpumask_pr_args(cpu_online_mask));

    // Method 1: Execute function on each online CPU
    pr_info("=== Method 1: Execute on all online CPUs ===\n");
    on_each_cpu(smp_demo_function, NULL, 1);

    // Method 2: Execute function on specific CPUs
    pr_info("=== Method 2: Execute on specific CPUs ===\n");
    cpumask_clear(&mask);
    cpumask_set_cpu(0, &mask);  // Execute only on CPU0
    cpumask_set_cpu(1, &mask);  // And on CPU1

    for_each_cpu(cpu, &mask) {
        smp_call_function_single(cpu, smp_demo_function, NULL, 1);
    }

    // Method 3: Use work queue to execute on all CPUs
    pr_info("=== Method 3: Use work queue ===\n");
    schedule_on_each_cpu(smp_demo_function, NULL);

    return 0;
}

// Module exit function
static void __exit smp_demo_exit(void)
{
    int cpu;

    pr_info("Final statistics for each CPU:\n");
    for_each_online_cpu(cpu) {
        pr_info("CPU%d: Total count = %ld\n", cpu, per_cpu(cpu_usage, cpu));
    }

    pr_info("SMP demonstration module unloaded\n");
}

module_init(smp_demo_init);
module_exit(smp_demo_exit);
MODULE_LICENSE("GPL");
MODULE_AUTHOR("Your Name");
MODULE_DESCRIPTION("Linux SMP demonstration module");
This example module demonstrates three methods for executing code on different CPUs:
- 1.
<span>on_each_cpu()</span>– Execute the specified function on all online CPUs. - 2.
<span>smp_call_function_single()</span>– Execute the function on a specific single CPU. - 3.
<span>schedule_on_each_cpu()</span>– Execute the function on all CPUs through the work queue mechanism.
6.2 Compilation and Testing
Compiling this module requires Linux kernel header files. An example Makefile is as follows:
obj-m += smp_demo.o
KDIR := /lib/modules/$(shell uname -r)/build

all:
    $(MAKE) -C $(KDIR) M=$(PWD) modules

clean:
    $(MAKE) -C $(KDIR) M=$(PWD) clean
Compile and load the module:
make
insmod smp_demo.ko
dmesg | tail -20
The expected output is similar to:
[ 1234.567890] SMP demonstration module loaded
[ 1234.567891] Number of CPUs in the system: 8
[ 1234.567892] Possible CPU mask: 0-7
[ 1234.567893] Online CPU mask: 0-7
[ 1234.567894] === Method 1: Execute on all online CPUs ===
[ 1234.567895] CPU0: Work completed, total count = 1000000
[ 1234.567896] CPU1: Work completed, total count = 1000000
...
[ 1234.567901] === Method 2: Execute on specific CPUs ===
[ 1234.567902] CPU0: Work completed, total count = 2000000
[ 1234.567903] CPU1: Work completed, total count = 2000000
...
6.3 Debugging Tools and Techniques
Debugging SMP-related issues is more complex than in single-processor environments, as it involves timing, race conditions, and cache consistency issues. Here are some commonly used debugging tools and techniques:
6.3.1 System Information Queries
# View CPU topology information
lscpu
cat /proc/cpuinfo

# View system interrupt statistics, including inter-core interrupts
cat /proc/interrupts | grep -i ipi

# View CPU load distribution
mpstat -P ALL 1

# View NUMA topology
numactl --hardware
6.3.2 Dynamic Debugging and Tracing
# Use ftrace to trace function calls
echo function > /sys/kernel/debug/tracing/current_tracer
echo smp_call_function_single >> /sys/kernel/debug/tracing/set_ftrace_filter
cat /sys/kernel/debug/tracing/trace_pipe

# Use perf to analyze CPU performance
perf record -g -a -- sleep 10
perf report

# Detect lock contention
echo 1 > /proc/sys/kernel/lock_stat
# ...run workload...
cat /proc/lock_stat
6.3.3 Kernel Debugging Options
Enabling the following debugging options when compiling the kernel can help identify SMP issues:
- •
<span>CONFIG_DEBUG_SPINLOCK</span>– Detect errors in spinlock usage. - •
<span>CONFIG_DEBUG_MUTEX_FASTPATH</span>– Debug SMP contention in the fast path of mutex. - •
<span>CONFIG_LOCK_STAT</span>– Lock statistics. - •
<span>CONFIG_DETECT_HUNG_TASK</span>– Detect hung tasks. - •
<span>CONFIG_DEBUG_PREEMPT</span>– Debug preemption issues.
The following diagram illustrates a systematic debugging approach for SMP issues:
7 Conclusion
The implementation of Linux SMP is built on several core pillars:
- 1. Symmetric Design: All processors are equal in the system, sharing resources, managed by a unified kernel.
- 2. Progressive Boot: Adopts a master-slave processor model, where the master processor completes system initialization before starting the slave processors according to a specific protocol.
- 3. Abstract Interfaces: Abstracts the implementation details of different hardware platforms through interfaces like
<span>cpu_operations</span>. - 4. Layered Synchronization: Provides various synchronization mechanisms to adapt to different scenarios, from low-level spinlocks to high-level RCU.
These design principles enable Linux to adapt to a variety of hardware environments, from embedded devices to supercomputers, providing reliable multi-core support for various workloads.