Click the card below to follow “Computer Vision Home“
Visual/Image processing insights delivered promptly!
In this article, we will explore how to set up a pose detection AI system using the Raspberry Pi 4 and Coral USB Accelerator.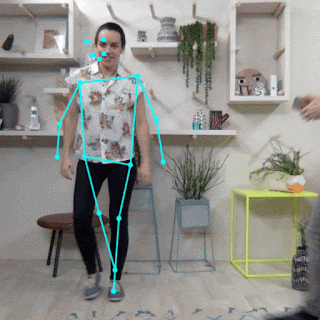 Pose detection AI is an engaging application that allows computers to recognize and analyze human poses in real-time, opening up a wide range of possibilities for applications in fitness, gaming, security, and more. By combining the powerful capabilities of the Raspberry Pi 4 with the Coral USB Accelerator, you can build an economical pose detection system. Let’s get started!Hardware and Software Requirements
- Raspberry Pi 4 (2GB or higher recommended)
- Coral USB Accelerator
- Compatible USB-C power supply for Raspberry Pi
- microSD card (16GB or higher)
- Raspberry Pi Operating System (Raspbian version: 11 (bullseye) — 64)
- Raspberry Pi Camera Module v3
Step 1: Set Up Raspberry Pi
- Download and install Raspberry Pi Imager on your computer.
- Insert the microSD card into the reader and open Raspberry Pi Imager.
- Select Raspberry Pi 4 as the device and choose Raspberry Pi OS (Bullseye) as the base image.
Selecting Bullseye is recommended as it comes with Python 3.9, which is the version currently supported by the PyCoral library.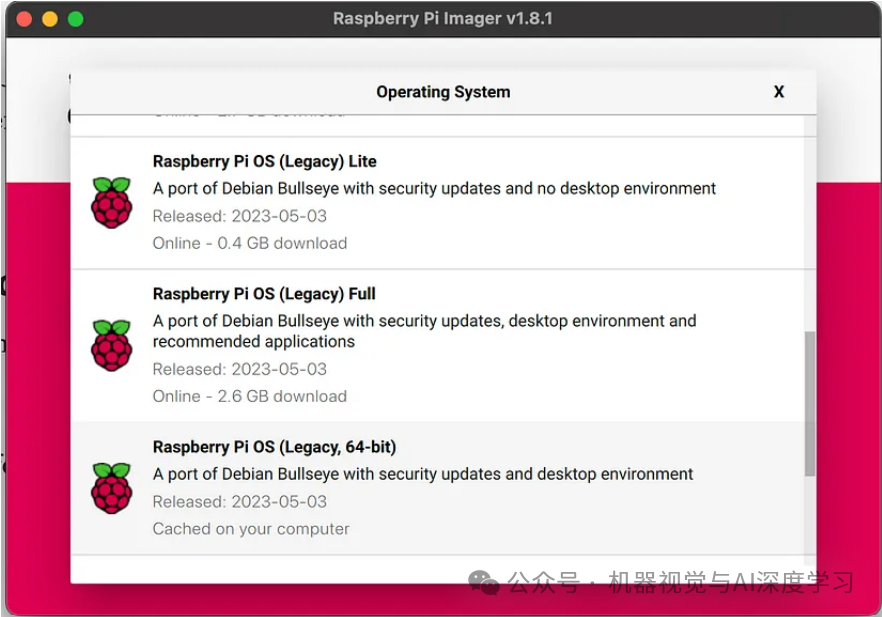
Select storage and proceed to the next step.
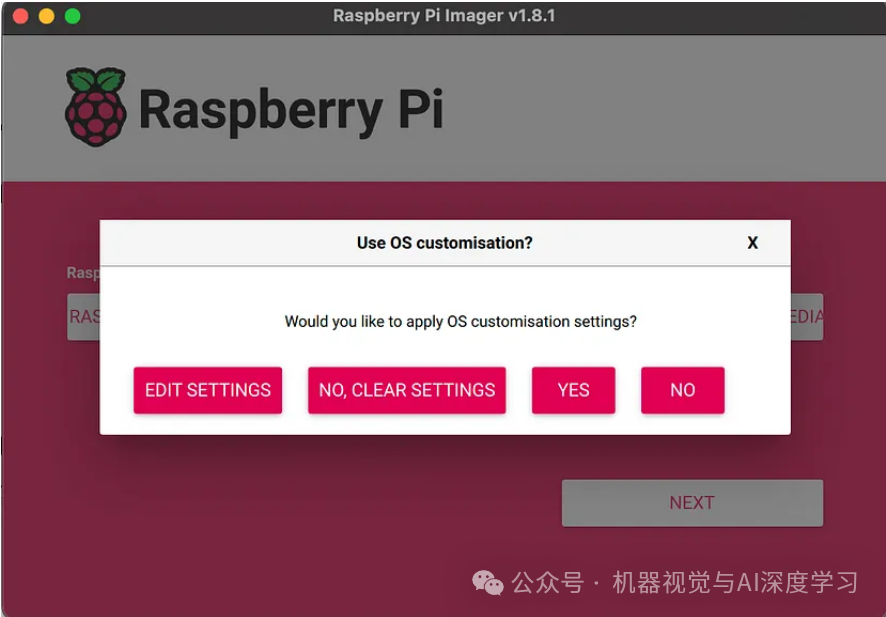
Click on Edit Settings. Enter the username and password you want to set for your operating system.
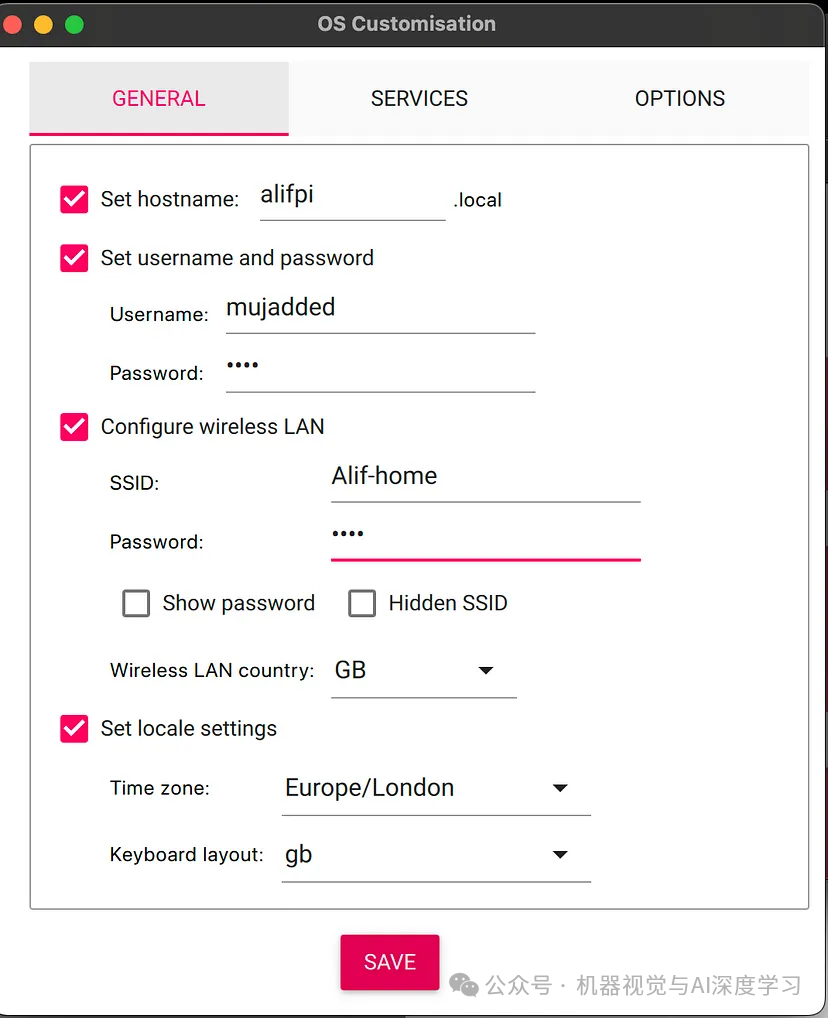
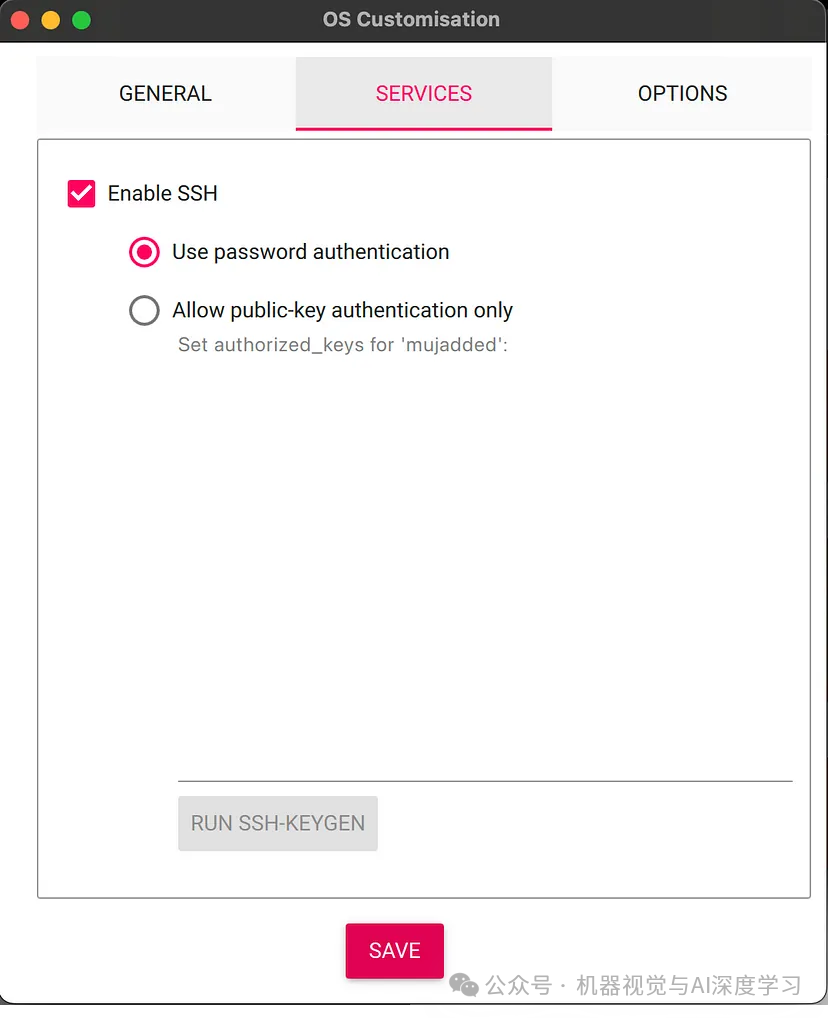
Also, enable SSH in the services and set password authentication.
 Now click “Save” and complete the remaining steps (click “Next” and write).After writing the image to the microSD card, insert the card into the Raspberry Pi.Power the Raspberry Pi using the USB-C power supply.Step 2: Install Required LibrariesWe need to install OpenCV, TensorFlow Lite, and Coral USB Accelerator libraries first. Run all the following commands one by one to install all the required libraries.
sudo apt-get update
sudo apt-get -y upgrade
sudo apt-get -y install libjpeg-dev libtiff5-dev libjasper-dev libpng12-dev
sudo apt-get -y install libavcodec-dev libavformat-dev libswscale-dev libv4l-dev
sudo apt-get -y install libxvidcore-dev libx264-dev
sudo apt-get -y install qt4-dev-tools
sudo apt-get -y install libatlas-base-dev
Now let’s install OpenCV (this may take some time).
pip install opencv-pythonThen we install TensorFlow Lite.
pip install tflite-runtimeNow we will install the Coral Accelerator. Remember to unplug it from the Raspberry Pi before installation.
echo "deb https://packages.cloud.google.com/apt coral-edgetpu-stable main" | sudo tee /etc/apt/sources.list.d/coral-edgetpu.list
curl https://packages.cloud.google.com/apt/doc/apt-key.gpg | sudo apt-key add -
sudo apt-get update
Install the libedgetpu library by issuing:
Install the libedgetpu library by issuing the following command:
sudo apt-get install libedgetpu1-stdNow connect the accelerator via the USB 3 port, and we can start writing code.Step 3: Test Raspberry Pi Camera ModuleThe Raspberry Pi has created a tutorial on how to set up the module. If you need any help, please refer to this link. What we want to do is ensure we can capture images. Unfortunately, OpenCV does not support the v3 module camera for Raspberry Pi. For this, we will use the picamera2 library (which is pre-installed in the Raspberry Pi operating system).
from picamera2 import Picamera2
camera = Picamera2()
camera.configure(picam2.create_preview_configuration(main={"format": 'XRGB8888', "size": (640, 480)}))
camera.start()
image = camera.capture_array()
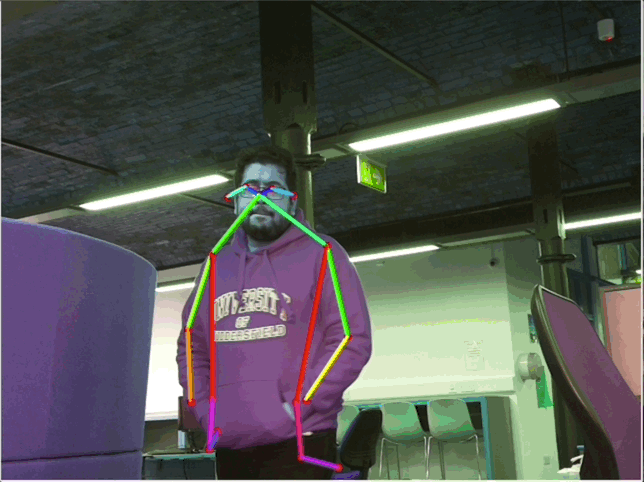
cv2.imwrite('test.jpg', image)If everything is set up correctly, you should be able to see your camera capturing an image and saving it as “test.jpg”.Step 4: Set Up Pose Detection ModelWe can obtain ML models for edge devices in various ways, such as:Downloading a pre-trained pose detection model compatible with the Coral USB Accelerator. There are various models available for download online.If the model is not in TensorFlow Lite format, convert it to TensorFlow Lite format.Transfer the converted model to the Raspberry Pi using SCP, SFTP, or a USB drive.For our work, since our focus is on deploying the model in Raspberry Pi, I have downloaded the appropriate model from the internet and saved it in my repository here.Step 5: Python Code for Pose DetectionUnlike modern frameworks like PyTorch, the TensorFlow interface in Raspberry Pi can be a bit challenging. The pycoral documentation is helpful but not easy to understand. For this reason, I tried to write my own engine code to have a higher-level understanding when using the model. The code for Raspberry Pi is as follows:pose.py This is the outer layer that uses the model to predict poses.
import cv2
import PoseNet.engine.utils as utils
from PoseNet.engine.pose_engine import PoseEngine
from datetime import datetime

# Model Path
_MODEL_PATH = "PoseNet/model/posenet_resnet_50_416_288_16_quant_edgetpu_decoder.tflite"

# Frame shape
_FRAME_WEIGHT, _FRAME_HEIGHT = 1024, 768

# Threshold of the accuracy
_THRESHOLD = 0.50

def detect_pose(callback_function, quit_on_key=True):
    # Initiating Interpreter
    engine = PoseEngine(_MODEL_PATH)
    # Initiating camera instance
    camera = utils.init_camera(_FRAME_WEIGHT, _FRAME_HEIGHT)
    # Initialize frame rate calculation
    frame_rate_calc = 1
    freq = cv2.getTickFrequency()
    # Define the codec and create VideoWriter object
    fourcc = cv2.VideoWriter_fourcc('F','M','P','4')
    video_name= f"./PoseNet/captured_video/{datetime.today().strftime('%Y%m%d%H%M%S')}.avi"
    # FPS for recording video. Setting 6 as the real fps is 6 to 7
    fps = 6.0
    # Video Recorder instance
    out = cv2.VideoWriter(video_name,fourcc, fps, (_FRAME_WEIGHT, _FRAME_HEIGHT))
    while True:
        # Grab frame from video stream
        image = camera.capture_array()
        # Start timer (for calculating frame rate)
        t1 = cv2.getTickCount()
        # Getting the input details the model expect
        _, src_height, src_width, _ = engine.get_input_tensor_shape()
        # The main Magic is happening here
        poses, _ = engine.DetectPosesInImage(image)
        # Draw the lines in the keypoints
        output_image = utils.draw_keypoints_from_keypoints(poses, image, _THRESHOLD, src_width, src_height)
        # Converting the image from 640x480x4 to 640x480x3
        output_image=cv2.cvtColor(output_image, cv2.COLOR_BGRA2BGR)
        out.write(output_image)
        # flipping the image for display
        output_image = cv2.flip(output_image, 1)
        # Draw framerate in corner of frame
        # Calculate framerate
        t2 = cv2.getTickCount()
        time1 = (t2-t1)/freq
        frame_rate_calc= 1/time1
        # Adding the FPS Text to the output
        cv2.putText(
            output_image,
            'FPS: {0:.2f}'.format(frame_rate_calc),
            (30,50),
            cv2.FONT_HERSHEY_SIMPLEX,
            1,
            (255,255,0),
            2,
            cv2.LINE_AA
        )
        # Call back function calling here with the image
        callback_function(output_image)
        # Key to quit display
        if cv2.waitKey(1) == ord('q') and quit_on_key:
            break
    # Clean up
    out.release()
    cv2.destroyAllWindows()
All code can be found in this repository here.ResultsAs you can see, the Raspberry Pi successfully detected real poses.