The Basic Principle of a Multimeter
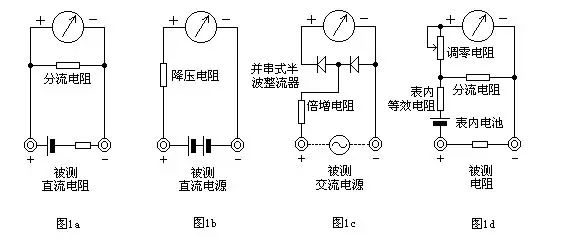
The basic principle of a multimeter is to use a sensitive magnetic electric direct current ammeter (microammeter) as the meter head. When a small current passes through the meter head, it will indicate the current. However, the meter head cannot handle large currents, so it is necessary to connect some resistors in parallel and series with the meter head to shunt or reduce the voltage to measure the current, voltage, and resistance in the circuit. Below is a separate introduction.
· Principle of measuring direct current.
As shown in Figure 1a, by connecting an appropriate resistor (called a shunt resistor) in parallel with the meter head for shunting, the current range can be expanded. By changing the resistance value of the shunt resistor, the current measurement range can be altered.
· Principle of measuring direct voltage.
As shown in Figure 1b, by connecting an appropriate resistor (called a multiplier resistor) in series with the meter head to reduce the voltage, the voltage range can be expanded. By changing the resistance value of the multiplier resistor, the voltage measurement range can be altered.
· Principle of measuring alternating voltage.
As shown in Figure 1c, since the meter head is a direct current meter, when measuring alternating current, a half-wave rectifier circuit must be added in parallel and series to convert the alternating current into direct current before passing through the meter head. This way, the alternating voltage can be measured based on the size of the direct current. The method for expanding the alternating voltage range is similar to that for direct voltage.
· Principle of measuring resistance.
As shown in Figure 1d, appropriate resistors are connected in parallel and series with the meter head, and a battery is connected in series, allowing current to pass through the measured resistance. Based on the size of the current, the resistance value can be measured. By changing the resistance value of the shunt resistor, the resistance range can be altered.
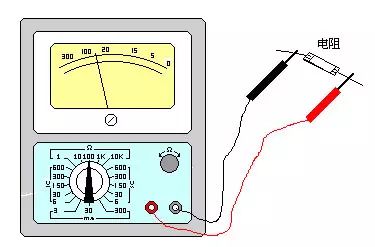
Measuring resistance: — First, short-circuit the meter probes together, causing the pointer to deflect to the right, then adjust the “Ω” zero adjustment knob until the pointer points precisely to 0. Then connect the two probes to both ends of the resistance (or circuit) being measured, read the pointer on the ohm scale (the first line), and multiply by the number indicated on that range to get the measured resistance value. For example, if measuring resistance with the R*100 range, and the pointer points at 80, the measured resistance value is 80*100=8K. Since the left part of the “Ω” scale has dense readings, it’s difficult to read accurately, so choose an appropriate ohm range to ensure the pointer is in the middle or right part of the scale for clearer and more accurate readings. Each time the range is changed, both probes should be shorted again, and the pointer should be adjusted to zero to ensure accurate measurement.
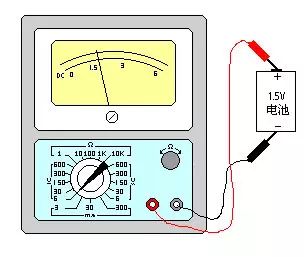
Measuring direct voltage: — First, estimate the size of the voltage to be measured, then turn the switch to the appropriate V range, connect the positive probe to the positive terminal of the voltage being measured, and the negative probe to the negative terminal. Then, based on the range number and the pointer reading on the direct current symbol “DC-” scale (the second line), read the size of the measured voltage. For example, when measuring with the V300 volt range, the indicated value can be read directly from 0-300. When using the V30 volt range, just remove one “0” from the number 300 on the scale, making it 30, and see 200, 100 as 20, 10 respectively to read the pointer’s indicated value directly. For example, when measuring direct voltage with the V6 volt range, if the pointer points at 15, the measured voltage is 1.5 volts.
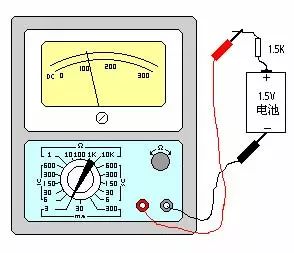
Measuring direct current: — First, estimate the size of the current to be measured, then turn the switch to the appropriate mA range, and connect the multimeter in series in the circuit, as shown in the figure. At the same time, observe the scale marked with the direct current symbol “DC”. If the current range is selected at the 3mA range, then the number 300 on the surface scale should be reduced by two “0s” to make it 3, and similarly, 200, 100 should be seen as 2, 1, allowing the measured current value to be read. For example, when measuring direct current with the direct current 3mA range, if the pointer is at 100, the current is 1mA.
Measuring alternating voltage: — The method for measuring alternating voltage is similar to that for measuring direct voltage, except that since alternating current has no positive or negative distinction, the probes do not need to be distinguished between positive and negative. The reading method is the same as that for measuring direct voltage, except that the numbers should be read from the scale marked with the alternating current symbol “AC”.
Precautions for Using a Multimeter
A multimeter is a relatively precise instrument. If used improperly, it can cause inaccurate measurements and is easily damaged. However, as long as we master the usage methods and precautions of the multimeter and act cautiously, the multimeter can last for a long time. When using a multimeter, the following precautions should be noted:
· Do not switch the range incorrectly when measuring current and voltage. If the resistance range or current range is mistakenly used to measure voltage, it can easily burn out the meter. When not in use, it is best to set the range to the highest alternating voltage to avoid damage due to improper use.
· When measuring direct voltage and direct current, pay attention to the polarities “+” and “-“. Do not connect them incorrectly. If the pointer reverses, the probes should be swapped immediately to avoid damaging the pointer and the meter head.
· If the size of the voltage or current to be measured is unknown, start with the highest range, then select the appropriate range for testing to avoid excessive deflection of the pointer that may damage the meter head. The closer the selected range is to the measured value, the more accurate the measurement will be.
· When measuring resistance, do not touch the naked ends of the components (or the metal parts of the two probes) with your hands, as this may cause the human body resistance to be in parallel with the measured resistance, resulting in inaccurate measurement results.
· When measuring resistance, if both probes are shorted and the “zero ohm” knob is adjusted to maximum, and the pointer still does not reach 0, this phenomenon is usually caused by insufficient battery voltage inside the meter, and a new battery should be replaced for accurate measurement.
· When not in use, do not leave the multimeter set to the resistance range, as there is a battery inside. If the two probes accidentally touch, it may short-circuit, not only wasting the battery but also potentially damaging the meter head.