Common Applications of EtherCAT FOE:
-
Firmware Updates: With EtherCAT FOE, devices can easily perform firmware updates. The host can send firmware files to the device via the EtherCAT network, and after receiving the file, the device can perform the firmware update operation, simplifying the maintenance and upgrade process of devices.
-
Configuration File Downloads: Devices need to load configuration files during startup or reconfiguration. EtherCAT FOE can be used to transfer configuration files from the host to the device, enabling the device to initialize and operate correctly based on the configuration file.
-
Data Logging and Monitoring: EtherCAT FOE can be used to transmit various data logs and monitoring information. For example, the host can periodically send the device’s operational data and status information to the upper computer for logging and analysis via the EtherCAT network.
-
Remote Control and Diagnosis: Through EtherCAT FOE, the host can send control commands or diagnostic requests to the device. After receiving the command or request, the device performs the corresponding operation and returns the results to the host, achieving remote control and diagnostic functions for the device.
-
Distributed File System: EtherCAT FOE can be used to build a distributed file system, allowing multiple devices to share the same set of files, providing a flexible file management and sharing mechanism for industrial automation systems.
-
Efficient and Reliable: EtherCAT FOE uses the EtherCAT data link layer to process Data Link Protocol Data Units (DLPDU) as the transmission mechanism, ensuring high reliability and low latency. It guarantees the integrity and accuracy of file transfers, suitable for scenarios in industrial automation applications that require high reliability.
-
Flexible File Transfer: EtherCAT FOE supports various file transfer modes, such as point-to-point, broadcast, and multicast, providing great flexibility in transferring files between different devices.
-
Support for Various File Formats: EtherCAT FOE supports multiple file formats, such as binary files, text files, XML files, etc., making file transfers between different types of devices very versatile.
-
Easy Integration: The EtherCAT protocol is a standard Ethernet protocol that is easy to integrate with existing Ethernet devices and systems. This greatly simplifies the integration and deployment process of EtherCAT FOE.
EtherCAT FOE adopts a client-server model. In the EtherCAT network, there is one FOE client and one or more FOE servers. The FOE client is responsible for initiating file transfer requests, while the FOE server is responsible for processing client requests and performing corresponding file transfer operations. The general working principle is as follows:
-
FOE client sends a file transfer request to the FOE server, specifying the file to be read or written and the corresponding operation (such as read, write, delete, etc.).
-
FOE server receives and parses the client’s request, then processes it according to the specified file and operation in the request.
-
If it is a read operation, the FOE server reads the content of the specified file into an internal buffer and returns the buffer’s content to the FOE client.
-
If it is a write operation, the FOE server writes the data provided by the FOE client into the specified file.
-
During the file transfer process, necessary handshakes and error checks are conducted between the FOE client and server to ensure the reliability and integrity of the transfer.
After the transfer is complete, the FOE client receives confirmation information of the transfer results and processes further as needed.
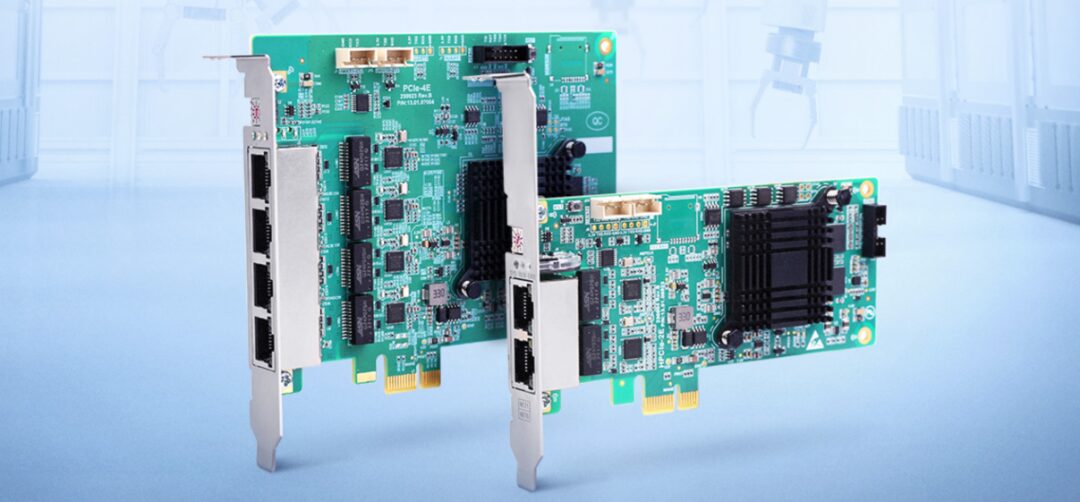
Guangzhou Zhiyuan Electronics, guided by the EtherCAT industrial Ethernet protocol, has developed a series of EtherCAT master controllers and communication cards, including the EtherCAT FOE (File Over EtherCAT) function. These EtherCAT master controllers and PCIe EtherCAT communication cards can quickly, effectively, and conveniently build CNC intelligent devices. By supporting firmware updates, configuration file downloads, data logging and monitoring, remote control and diagnosis, distributed file systems, and other functions, they can better meet the needs of intelligent and information-based industries in factories.
Table 1 EtherCAT Master Controller
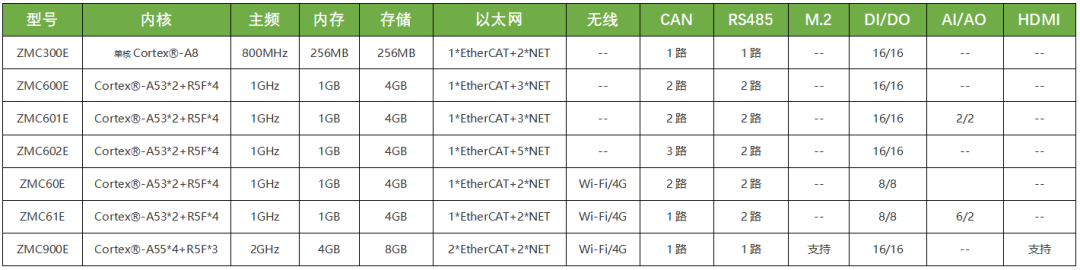

Figure 1 EtherCAT Master Controller System Block Diagram
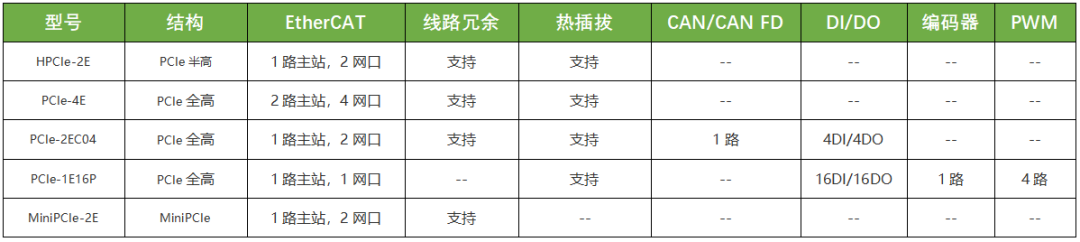
Table 2 PCIe EtherCAT Master Communication Card
 AWStudio Motion Control Version
 Usage of FOE Function in AWStudio (Motion Control Version)
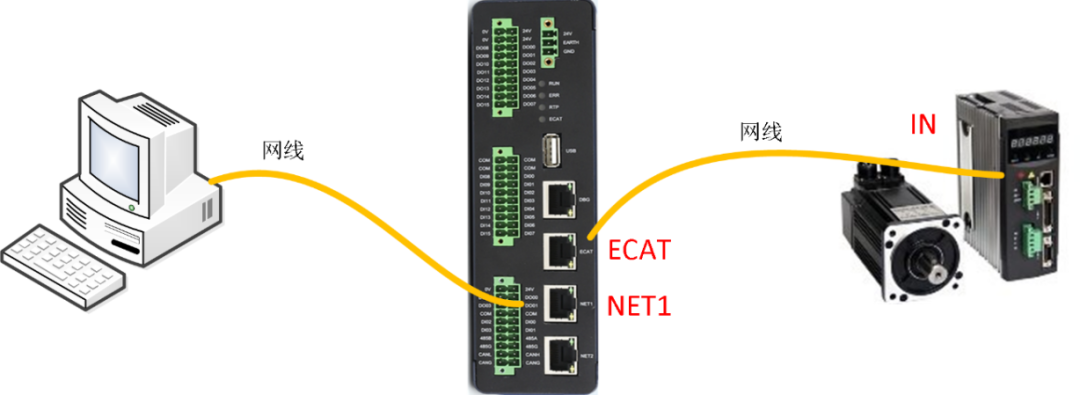
1.1 Hardware Connection
Please prepare a computer, an EtherCAT master controller or master communication card, one or more EtherCAT slaves (recommended to use servo drives for testing or IO), and several network cables (both straight and crossover cables are acceptable, at least two). Then connect the devices according to the schematic diagram below using network cables. If there are multiple slaves, connect the OUT of the previous slave to the IN of the current slave.
1.2 Software Installation
Install AWStudio-for-Motion-Control (if not available, you can consult our after-sales service).
After launching AWStudio, there is no solution by default, so you need to create or open a solution first.
2.1 Create Solution
Click the “New” button in the interface or the “New” button on the toolbar to pop up the “Create Solution” dialog box.
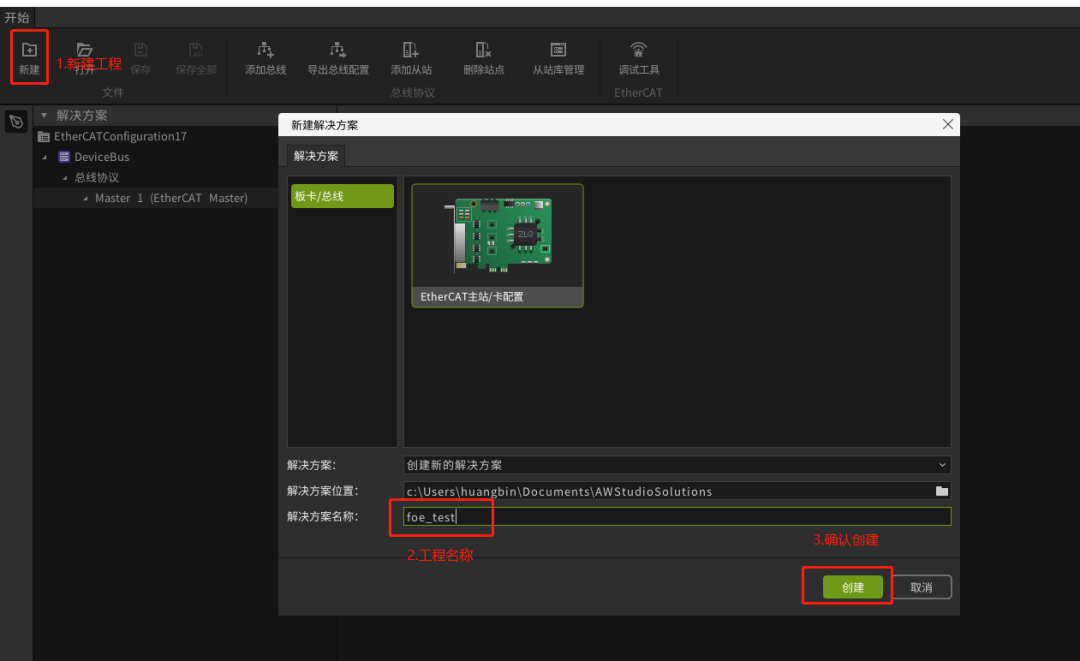
Select “Master Controller/Card Configuration” as the solution type, modify the solution name and path as needed, and click the “Create” button to create a new solution.
2.2 Open Solution
Click the “Open” button in the interface or the “Open” button on the toolbar to pop up the “Open Solution” dialog box. Select the solution file (.solution) and click the “Open” button to open the solution.

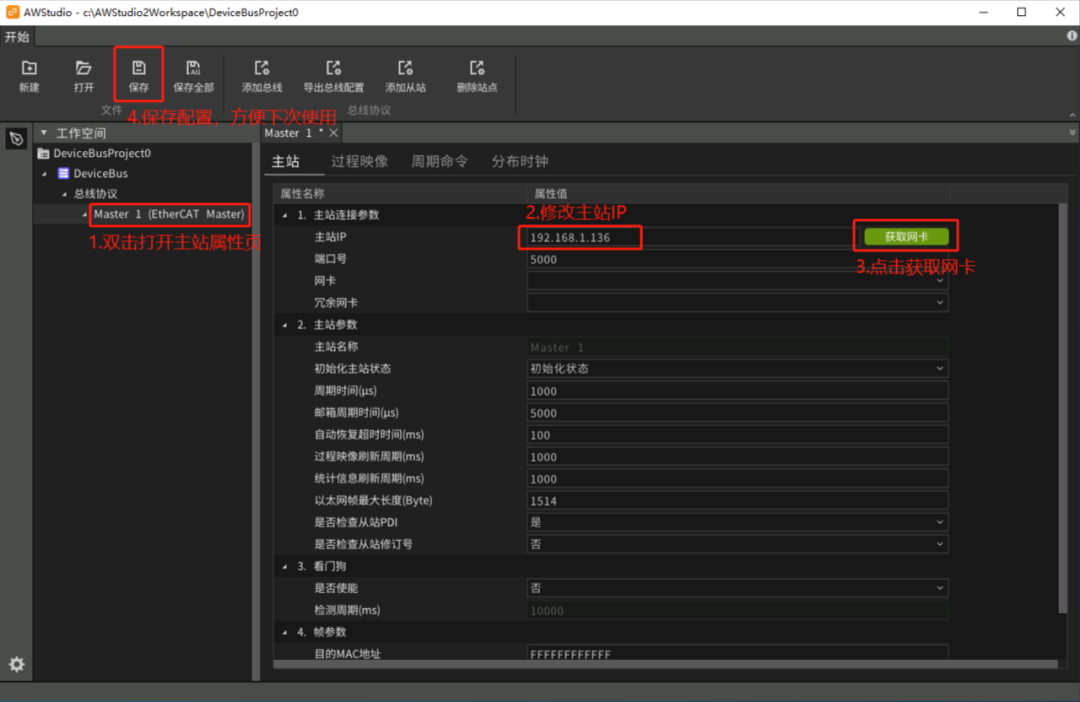
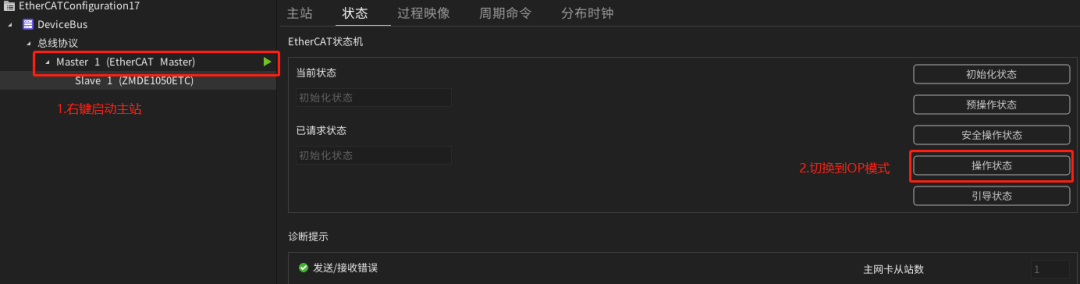
After creating or opening a solution, the software will enter the main interface.
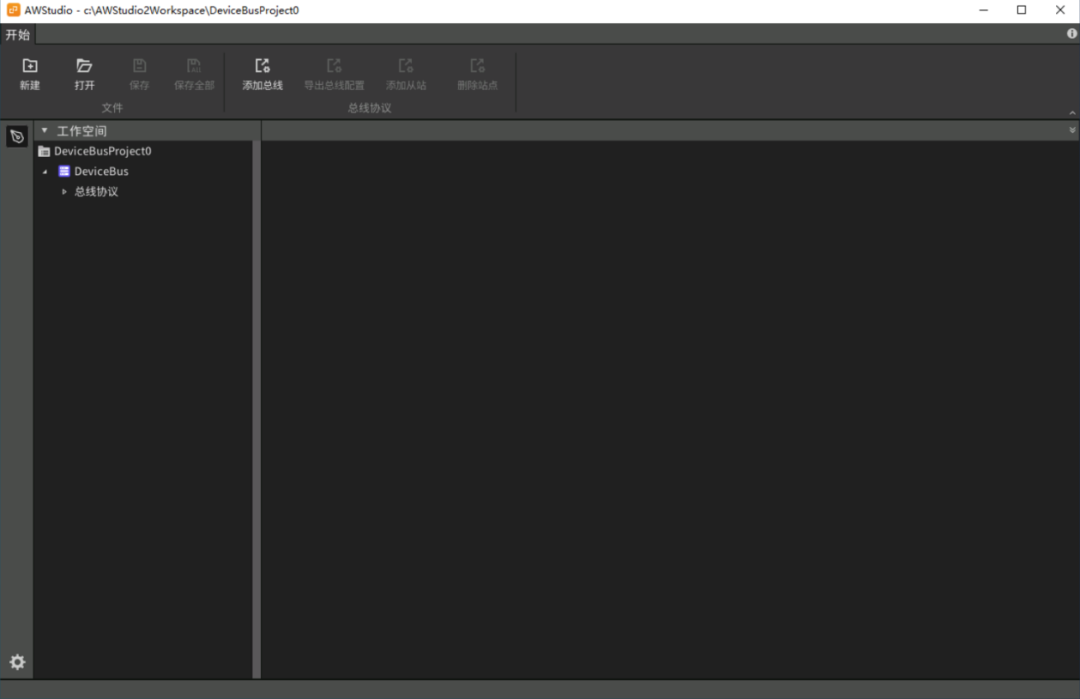
The default factory IP for NET1 of the motion controller is 192.168.1.136, and for NET2 it is 192.168.2.136, and so on. The following process needs to connect the device through the computer, so the computer’s IP needs to be set to the same IP segment as the motion controller, for example, set to 192.168.1.200. After successful setting, try to ping 192.168.1.136 to ensure the connection is successful (specific settings can refer to the quick start section).

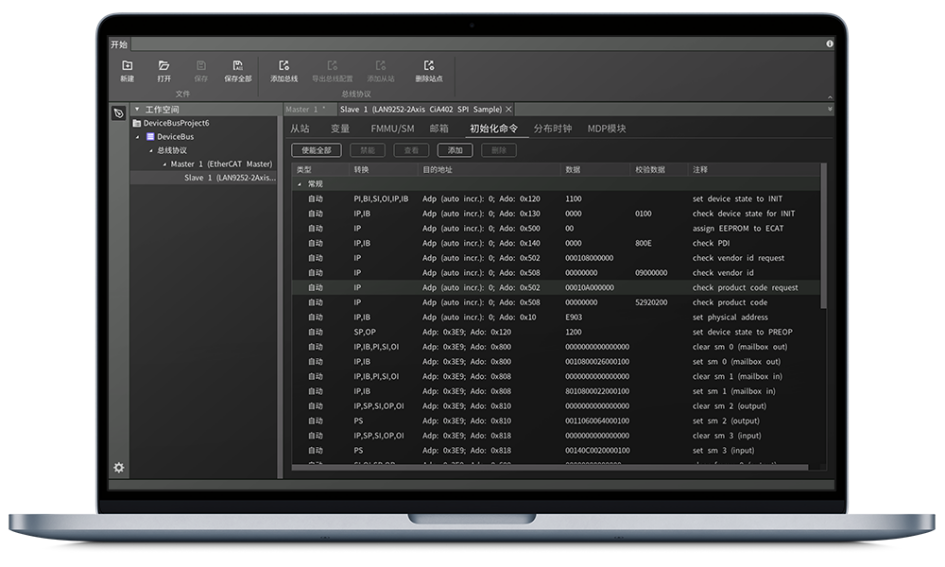
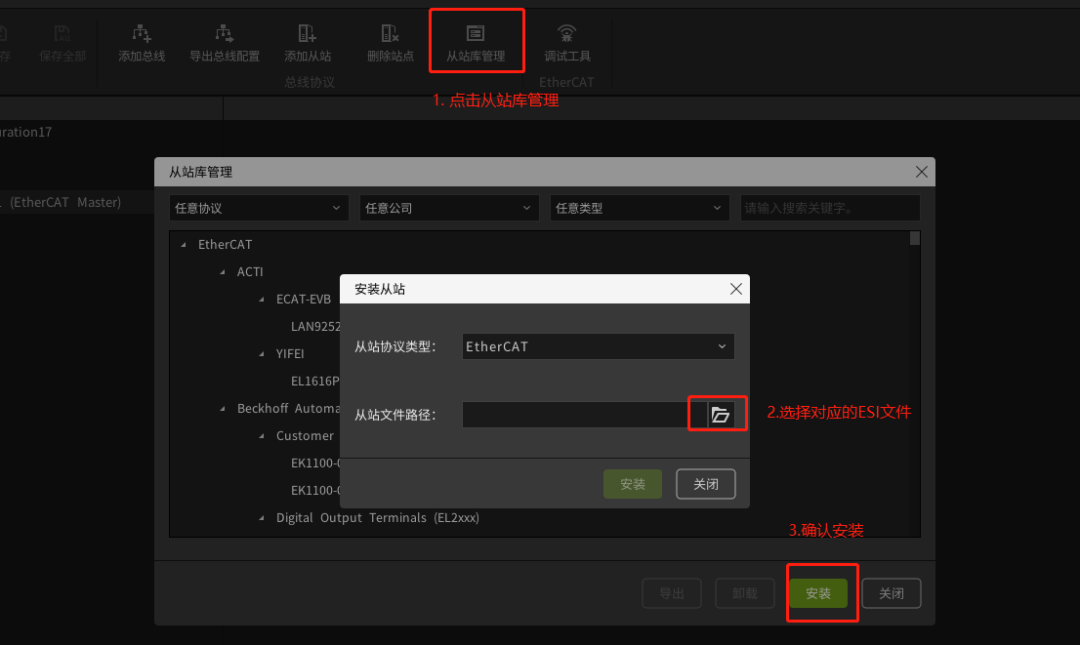
In the menu bar, click on the slave library management and install the corresponding ESI files as shown below.
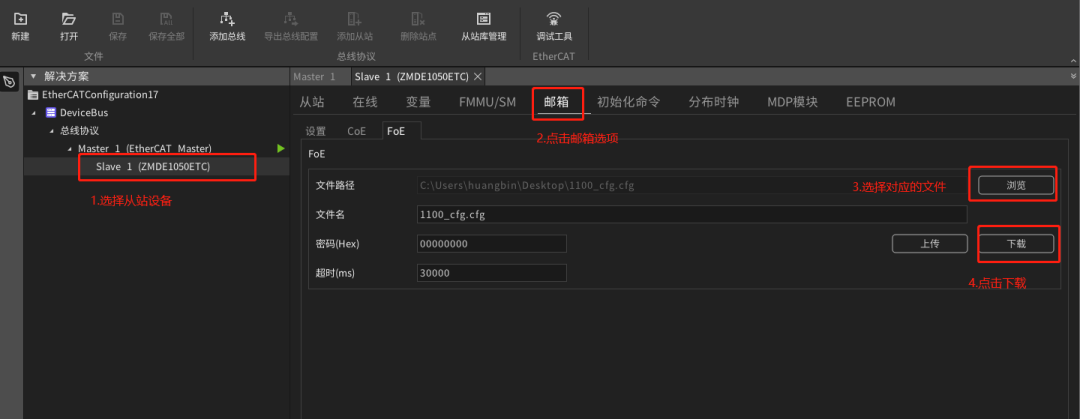
 FOE Example for EtherCAT Master Station
/** @brief Write file from local file system to slave @param hHandle ECAT control handle @param u16SlaveId Slave position index, range: 0~SlaveCount-1 @param pszFileLocalName Local file system filename @param pszFileSlaveName Slave file system filename @return Returns ECAT_S_OK(0) for success, non-0 for failure**/int32_t EcatFoEWrite( IN ECAT_HANDLE hHandle, IN uint16_t u16SlaveId, IN const char *pszFileLocalName, IN const char *pszFileSlaveName);/** @brief Read file from slave to local file system @param hHandle ECAT control handle @param u16SlaveId Slave position index, range: 0~SlaveCount-1 @param pszFileLocalName Local file system filename @param pszFileSlaveName Slave file system filename @return Returns ECAT_S_OK(0) for success, non-0 for failure*/int32_t EcatFoERead( IN ECAT_HANDLE hHandle, IN uint16_t u16SlaveId, IN const char *pszFileLocalName, IN const char *pszFileSlaveName);int32_t ecat_foe_test(ECAT_HANDLE hHandle){int ret;//Operation handle if (hHandle) return -1;//Transfer the local file foe_test.txt, naming it foe_test.txt on the slave device. ret = EcatFoEWrite(hHandle, 0, "foe_test.txt", "foe_test.txt");if(ret) return -2;//Read the slave device file foe_test.txt and save it as foe_test_back.txt locally. ret = EcatFoERead(hHandle, 0, "foe_test_back.txt", "foe_test.txt");if(ret) return -3; return 0;}
For more past articles, please click “ Read Original ”.