This article summarizes:
This article mainly introduces the process of using Makefile to compile code into executable binary files for microcontrollers and discusses commonly used Makefile syntax. It narrates the transformation from a straightforward Makefile to a more universal Makefile.
Introduction to Makefile
The most common function of a Makefile is to inform the make program how to compile and link the program to ultimately generate executable binary files.
The basic rule format of a Makefile is as follows:
Target … :Prerequisites…
Recipe
…
…
The Process of Generating the Target HEX File
The most widespread application of Makefile is to compile a bunch of code files into a binary executable file, such as a hex file.
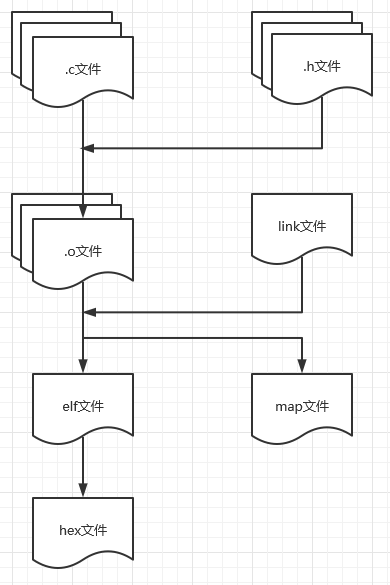
First, compile all .c files and their included .h files into .o files separately.
Then, link all generated .o files with the link files to generate .elf files and .map files.
Finally, generate .hex files from the .elf files.
Step-by-Step Example
1. First, Prepare the Compiler and Demo Code
You can download the evaluation version software from the HighTec official website.
https://hightec-rt.com/en/downloads/evaluation-version.html
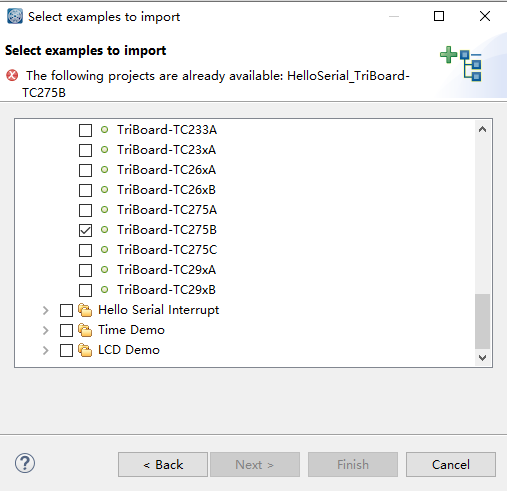
Then create a HelloSerial demo example in HighTec.
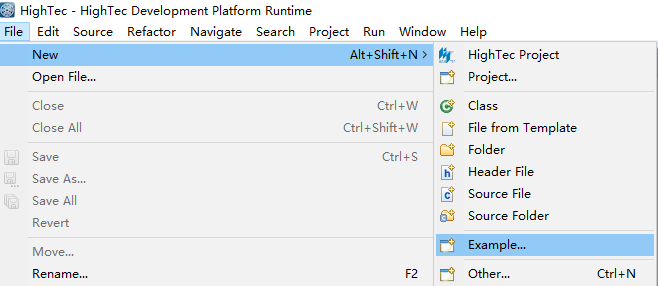
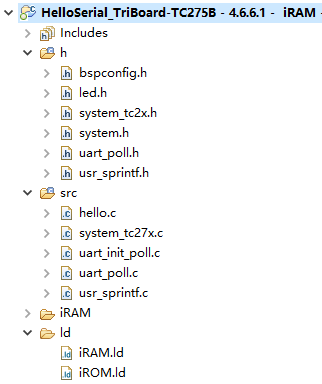
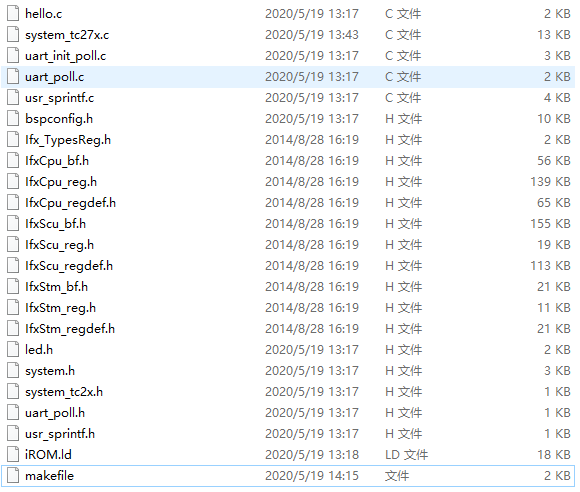
After creation, the following .c and .h files will be automatically generated, which can be compiled directly in HighTec.
2. The Simplest Makefile
To illustrate how Makefile works, let’s start with the simplest case.
First, to eliminate the impact of paths, place all .c and .h files, along with the link files (the .ld files), into the same folder, and then create a file named makefile.
Now let’s take a look at what the simplest Makefile looks like; it is believed that no one would write a Makefile like this in any project, let’s call it version 0.
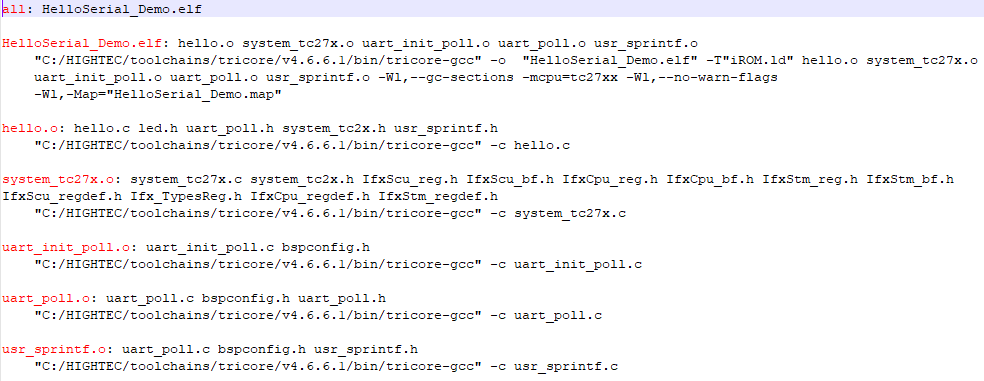
The red part is the Target, which is the target file. For example, when we enter MakeAll in the command window under the folder path.

This tells the make command that we want to generate the target called all, which depends on the HelloSerial_Demo.elf, a prerequisite.
So we need to generate HelloSerial_Demo.elf, which then becomes the target file.
To generate the HelloSerial_Demo.elf target file, we need the prerequisite files: hello.o, system_tc27x.o, uart_init_poll.o, uart_poll.o, usr_sprintf.o.
Thus, these .o files become target files, needing corresponding .c files and the included .h files to generate them.
For example, to generate hello.o, we need the files hello.c, led.h, uart_poll.h, system_tc2x.h, usr_sprintf.h. Since these files are already in the directory, they can be used directly.
We also need a Recipe, i.e., execution commands to generate the target file; the execution command here is “C:/HIGHTEC/toolchains/tricore/v4.6.6.1/bin/tricore-gcc” -c hello.c.
Here, “C:/HIGHTEC/toolchains/tricore/v4.6.6.1/bin/tricore-gcc” calls the compiler installed by HighTec, tricore-gcc.exe.

This is not fixed; we need to use whichever compiler to compile the .c files, so we call the corresponding .exe file here.
-c indicates compiling the source file without linking. This command tells tricore-gcc.exe to compile the hello.c file into hello.o.
Similarly, after compiling all .c files into .o files, a linking operation will be performed to generate the HelloSerial_Demo.elf file. The specific execution command is as follows:
“C:/HIGHTEC/toolchains/tricore/v4.6.6.1/bin/tricore-gcc” \
-o “HelloSerial_Demo.elf” \
-T”iROM.ld” \
hello.o system_tc27x.o uart_init_poll.o uart_poll.o usr_sprintf.o \
-Wl,–gc-sections -mcpu=tc27xx \
-Wl,–no-warn-flags \
-Wl,-Map=”HelloSerial_Demo.map”
Where:
“C:/HIGHTEC/toolchains/tricore/v4.6.6.1/bin/tricore-gcc” is the compiler call.
-o “HelloSerial_Demo.elf” specifies the output file name as “HelloSerial_Demo.elf”.
-T”iROM.ld” specifies the link file.
hello.o system_tc27x.o uart_init_poll.o uart_poll.o usr_sprintf.o are the .o files to be linked.
-Wl indicates that the linking instructions need to be prefixed with ‘-Wl’ since the linking is driven by the tricore-gcc compiler.
–gc-sections -mcpu=tc27xx indicates that the section allocation is executed according to the tc27xx series CPU.
–no-warn-flags indicates that no warning messages will be generated.
-Map=”HelloSerial_Demo.map” indicates that a map file will be generated.
“\” is a line break character.
3. Variables in Makefile
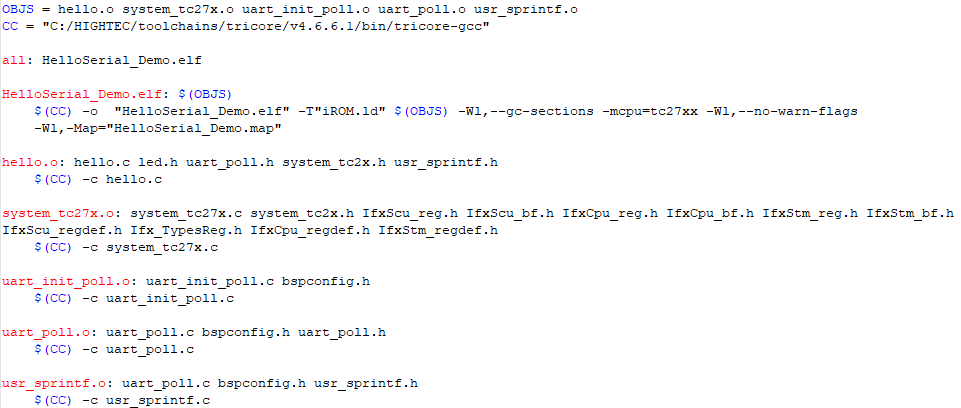
In version 0 of the Makefile, only the most basic rules of Makefile were used. While it is quite clear what this Makefile does, it is tedious to write.
Variables can be used in Makefile, which makes it look simpler.
For example, in version 0 of the Makefile, the .o files needed were defined multiple times, and the compiler path was also defined multiple times, so we can make these into a variable and use them directly when needed.
The method to define a variable is:<variable_name> = <content>
The method to use a variable is:$(variable_name)
We define all .o file objects and the compiler path as variables, leading to the following version 1 of the Makefile.
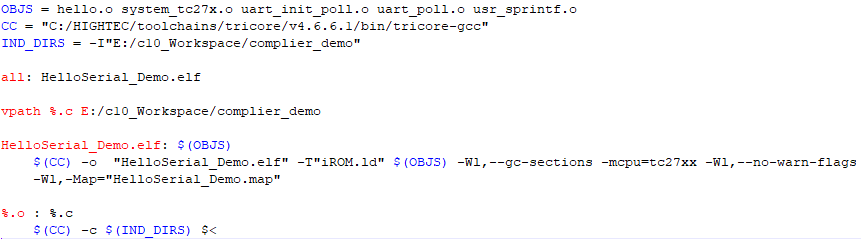
4. <-I “dir”> Directive
In version 1 of the Makefile, there is another problem: every time we compile .c files into .o files, we need to list all .h files used by these .c files, as well as the .h files used within those .h files.
This approach has its benefits, as any changes in a .h file will cause the corresponding .c file to recompile a new .o file.
However, if there are hundreds or thousands of .c files, finding all the .h files used by each .c file becomes a massive workload.
Therefore, a compromise method can be used: regardless of which .c file is being compiled, include all .h files, so there’s no need to worry about which .h files are used by that .c file.
To achieve this, we can add the <-I “dir”> directive when compiling .c files.
Thus, we can obtain version 2 of the Makefile, which looks simpler. However, this method has a problem: changes in .h files will not cause the corresponding .c files to recompile.
This issue can actually be resolved later by introducing dependency files.

Compared to the previous Makefile, the prerequisites for generating .o files no longer include .h files, but instead, the command now includes parameters to include the .h folder.
5. vpath Directive
As you may have noticed, the compilation commands for each .c file are now identical, with only the file names differing. Can this be optimized? Of course, it can.
The vpath directive can be used to look for specific files in designated directories. For example, if I want to find all .c files in a certain folder, the directive is as follows:
vpath %.c
E:/c10_Workspace/complier_demo
This means that when needed, make will look in E:/c10_Workspace/complier_demo to see if there are any .c files required by make, where %.c indicates all files with the .c suffix.
Using the vpath directive, we can continue to simplify the Makefile, leading to version 2 of the Makefile.
Here, the commands for compiling .c files into .o files have been merged into a single command. All required .o files can be found in the path specified by vpath (this is a default rule of make, where the names of .o and .c files are consistent), and then the compilation proceeds.
6. Generating Dependency Files (.d)
We can have the compiler generate a .d dependency file while compiling .c files. This .d file will list all .h files included by this .c file.
The generated .d file will serve as a target, with its corresponding .c file and all .h files it references as prerequisites.
This associates the .d file generated by this .c file with all .h files referenced by it.
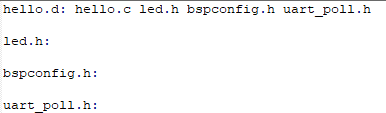
When a .h file is modified, the .d file generated by the corresponding .c file will be flagged for regeneration. Coupled with the corresponding generation rules, this ensures that when a .h file is modified, all .c files that include this .h will be recompiled.
Thus, we obtain version 3 of the Makefile.
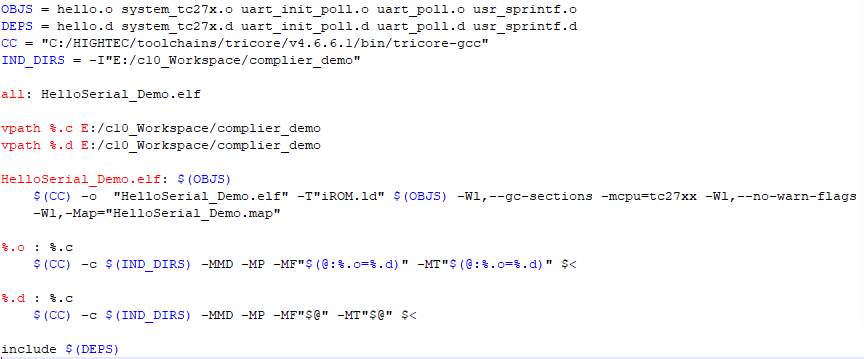
First, we add the variable definition for the dependency files (DEPS), which includes all dependency files.
Secondly, when compiling .c files into .o files, we add the directives -MMD -MP -MF, as well as -MT. The purpose of these directives is to generate the .d dependency files, and “$(@:%.o=%.d)” is the filename for the dependency files. Since the dependency files and the target .o files have the same name, only differing by the suffix, this “$(@:%.o=%.d)” effectively changes the suffix of the target .o files to .d for naming the generated dependency files.
We also add rules for the .d files against .c files, indicating that if the .d files need to be regenerated, they will follow this rule to recompile the .c files into new .o files. Since the target files are the .d files, we directly use “$@” to specify the name of the generated .d files.
Finally, we add the include directive to include all generated dependency files. The purpose of include is to directly add the contents of the included files to the current Makefile. This adds the rules for the .d files along with their corresponding .c and .h files, ensuring that when a .h file is modified, the corresponding .d file will need to be regenerated, thus prompting the recompilation of the corresponding .c files to generate new .o files.
7. Automatically Inferring Required Files by Defining Code Folders
With the steps taken, a relatively complete Makefile has been written. However, there is still one issue: currently, all .c and .h files are in one folder, and the generated .o and .d files are also in the same folder, which is not conducive to management.
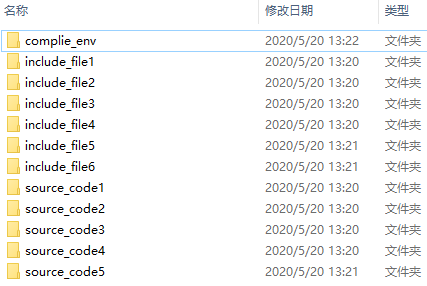
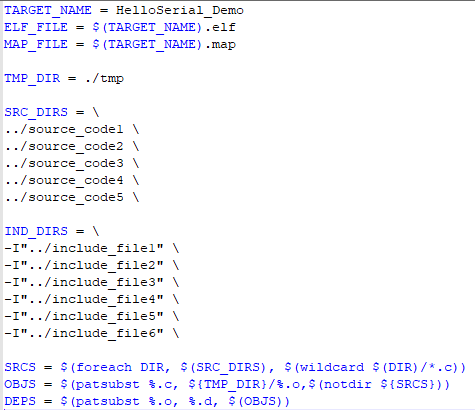
We can adjust the folder paths to be more realistic, as shown in the following image, where .c files are in five different source_code folders, .h files are in six different include_file folders, the Makefile and link files are in compile_env, and the generated map and elf files are also in compile_env. Additionally, during compilation, a temporary folder named tmp will be created to store .o and .d files.
Simultaneously, manually defining .o and .d files is cumbersome; we can also directly search for all .c files from the given folders and infer the .o and .d files based on the relative paths.
Thus, we arrive at version 4 of the Makefile.
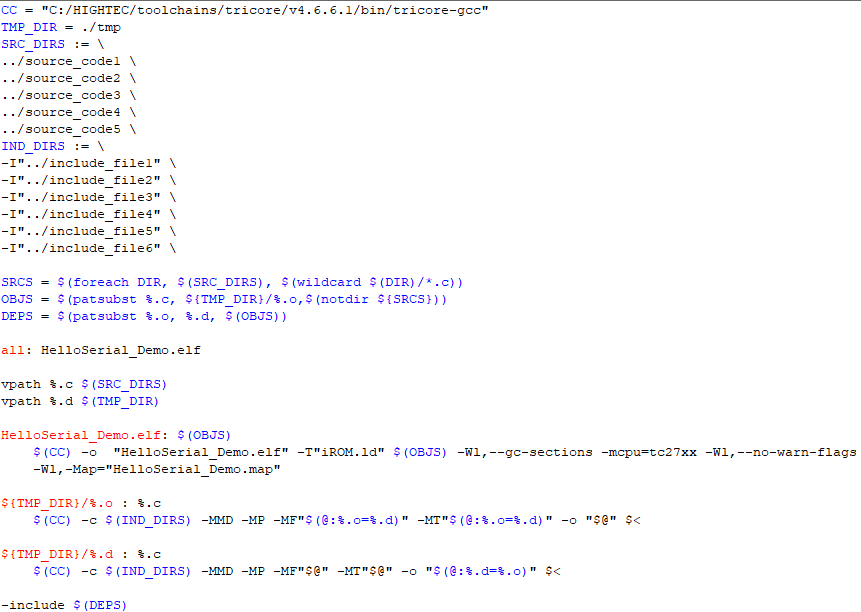
First, define the folder for temporary files (both .d and .o files). It is recommended to use relative paths in the Makefile so that no matter where the project is located, as long as the folder structure remains the same, it can run normally. “./” indicates the path of the current Makefile folder.
Next, define the folder containing all the .c files that need to be compiled; all .c files in these folders will participate in the compilation, where “../” indicates the path of the parent folder of the current Makefile.
Then define the folder containing all the referenced .h files.
Next, based on the defined folder of .c files, find all .c files in these folders. There are two directives to explain here: one is foreach, “foreach DIR, $(SRC_DIRS), $(wildcard $(DIR)/*.c)” indicates doing a for loop for all folders defined in SRC_DIRS, where the current loop folder name is DIR. The other is wildcard, “$(wildcard $(DIR)/*.c)” indicates finding all .c files in the DIR folder. This way, all .c files in the folders defined in SRC_DIRS will be found and assigned to the SRCS variable.
With all .c files identified, we can infer all .o files. Since the locations of .o files differ from .c files, the specific steps to infer .o files involve removing the folder paths from the .c files, retaining only the .c file names, then adding the path where .o files will be stored, and changing the suffix of .c to .o. All these actions can be implemented using the command “OBJS = $(patsubst %.c, ${TMP_DIR}/%.o,$(notdir ${SRCS}))”. “notdir” removes the folder paths, and “patsubst” is the replacement directive, here replacing all .c files with .o files and adding paths.
Finally, define the .d dependency files based on the .o files. Since both .d and .o files will be placed in the temporary folder, we can simply change the suffix of .o files to .d.
Since the positions of .o and .d files have changed, the execution command must also be modified; the target files for both .o and .d now include paths, and the command explicitly specifies the storage location of the compiled .o files using -o.
8. Categorizing Makefiles by Function
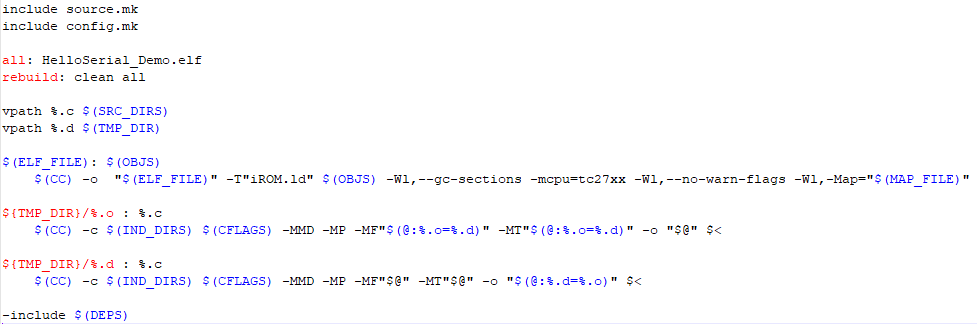
Now it can be seen that, due to the addition of definitions for code folders and header file folders, the Makefile has become significantly longer. In large projects, the number of code and header file folders will be even greater. To better maintain the Makefile, we can define several Makefiles according to their functions and then include these Makefiles in the main Makefile, making the structure clearer and easier to maintain.
For example, a new file named source.mk can be created, which defines the names of the binary files to be generated, the c code folders, the header file folders, the temporary folders, and infers all .c, .o, and .d files.
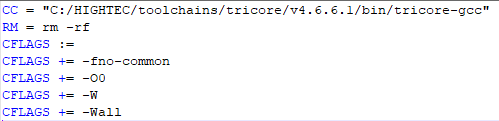
We can also create another file named config.mk, which defines some settings related to the compiler, such as the compiler path, the definition of the delete command, and parameters for compilation.
Thus, our main Makefile has become concise again, and this file can basically remain unchanged. If compilation settings need to be modified, just change config.mk; if the content of the compiled code needs to be modified, just edit source.mk. This makes maintenance clear and easy, which is delightful~
9. Deleting Compiled Files
Sometimes we need not only to compile files but also to delete previously compiled files; this can also be accomplished in the Makefile.
We can add a clean function that, when the target is clean, executes the delete command to remove .o, .d, elf, and map files.
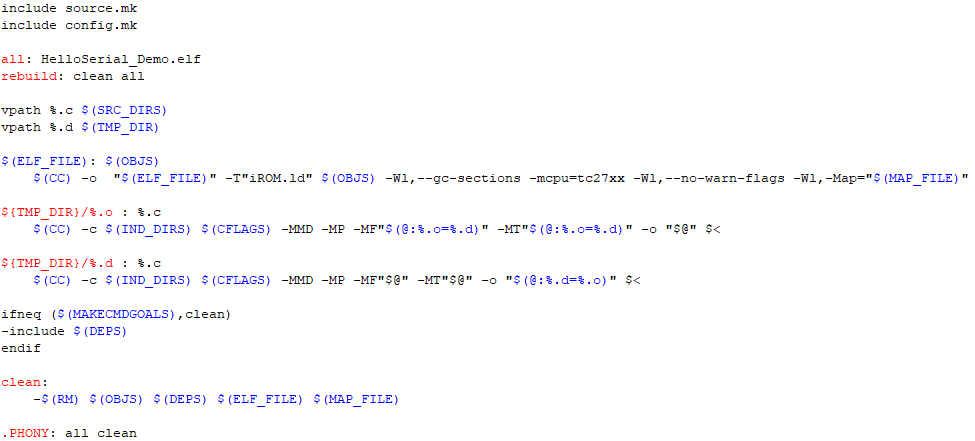
This introduces the PHONY functionality. Since all and clean are targets, these two commands are not actual file names, meaning they are not intended to generate files named all or clean. However, if there happens to be a file named all or clean, it could create ambiguity. In this case, we can use .PHONY to define all and clean, telling make that these are commands, not files, preventing unexpected issues.
Additionally, since the clean command is merely meant to delete files and does not require dependency files to be derived, we use ifneq to check if the command is clean, in which case, dependency files are not included.
Moreover, we have added a rebuild functionality; if make rebuild is executed, it will first clean, delete previous files, and then generate the target files.
10. Calling the Makefile
If the Makefile is named makefile or Makefile, then in the command prompt, switch the path to where the Makefile is located, and directly enter make all to compile, or make clean to delete previously compiled files.
However, the Makefile does not necessarily have to be named this way; we can name it whatever we want, and when calling it, just add the “-f” parameter followed by the filename. For example:
make -f makefile_ver5 all, or make -f makefile_ver5 clean
Another commonly used parameter is “-j” followed by a number, such as:
make all -j8
The number can be adjusted according to the thread count of your computer’s CPU, indicating that multiple threads can process commands in parallel, which means multiple .c files can be compiled simultaneously, thereby improving compilation speed.
If you find it cumbersome to open the command prompt every time, you can also create a build.bat batch file, so you can simply double-click this file to compile.
The command Cmd /k keeps the command prompt window open after executing, so if there are any errors, you can see them.
The content of the build.bat file is as follows:

Afterword
This article mainly introduces the rules of Makefile and its general operating principles. With this knowledge, you can write your own Makefile based on actual needs or optimize the Makefiles from previous projects according to your understanding.
For detailed instructions on the parameters of make, refer to “make.pdf”; for detailed explanations of compiler parameters, refer to “tricore-gcc.pdf”; for detailed explanations of linking parameters, refer to “tricore-ld.pdf”. All these are available on Baidu Cloud, along with the code and Makefile. If you’re interested, you can download and take a look. Alternatively, consult the corresponding documentation for make, compilation, and linking based on the actual situation of your project. Feel free to leave comments and exchange ideas.
Link: https://pan.baidu.com/s/1JtR2N56Bhest9swBr7ro1g Extraction Code: 24ss