In this article, you learned what the Raspberry Pi is, why it exists, how to purchase a Raspberry Pi, and what peripherals you need to get it started and running. You learned about the operating systems available for Raspberry Pi and how to obtain a copy of Raspbian. You also learned how to get your Raspberry Pi up and running so you can start learning Python. This article summarizes some tips for troubleshooting Raspberry Pi boot issues.
1.1 What is Raspberry Pi
The Raspberry Pi is an incredibly cheap, fully programmable computer the size of a palm (see Figure 1.1). Although the Raspberry Pi is small, its potential is limitless. You can create very cool projects on the Raspberry Pi just like you would on a regular desktop computer. For example, you can set up your own home cloud storage server using Raspberry Pi.
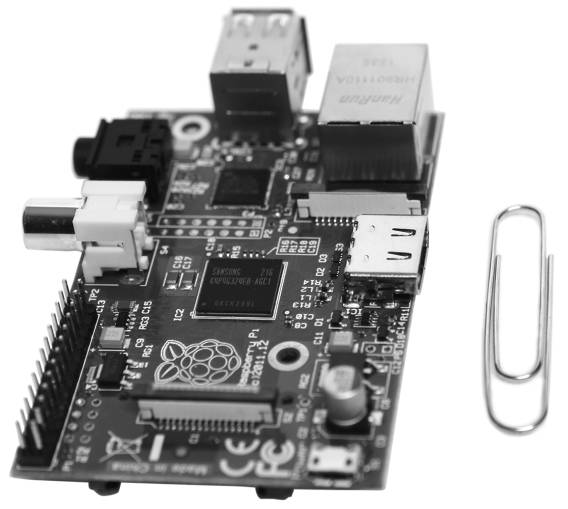
Figure 1.1 Raspberry Pi Model B, note its size compared to a paperclip
1.1.1 History of Raspberry Pi
The Raspberry Pi is still a relatively young device. It was invented by Eben Upton and several colleagues in the UK. Its first commercial version (Model A) was officially released at a low price of $25 in early 2012.
Tip:
Different Abbreviations for Raspberry Pi
People often use different names to refer to the Raspberry Pi. You will see it called RPi or simply Pi.
Upton invented the Raspberry Pi to address a problem he and some others discovered in their field: too few young people were entering the field of computer science. Thus, providing a cheap, flexible small computing device might inspire more interest in computer science.
Upton founded the Raspberry Pi Foundation, hoping to sell 10,000 units. When Model A was released in 2012, it sold out almost immediately. The upgraded Model B went on sale in late summer 2012 and continued to sell well. Although the Raspberry Pi was originally invented to spark young people’s interest in computing, it also attracted the attention of hobbyists, entrepreneurs, and educators worldwide. In just one year, the Raspberry Pi Foundation sold about one million Raspberry Pis!
Tip:
Support the Raspberry Pi Foundation
The Raspberry Pi Foundation is a charity. It needs your help to support its mission of inspiring young people in computing. Support it by purchasing a Raspberry Pi! www.raspberrypi.org.
Raspberry Pi owners use their devices in many creative projects. People around the world have created interesting projects with Raspberry Pi, such as voice-controlled garage doors, weather stations, and pinball machines. Additionally, there are enterprise projects, such as using Raspberry Pi to demonstrate potential security threats in computing.
1.1.2 Why Learn Programming with Python on Raspberry Pi
One of the core ideas of Raspberry Pi projects is the use of the Python programming language. Python allows Raspberry Pi owners to scale their projects to incredible levels.
Python is an interpreted, object-oriented, cross-platform programming language. Its good reliability, clear syntax, and ease of use make it one of the most popular programming languages. Python is an elegant, powerful language.
The Raspberry Pi provides an incredibly cheap development platform for Python programming. Python is considered a “teaching” language because it is easy to learn, but that does not mean Python is weak.
With Raspberry Pi and Python, the only limit is your imagination. You can write games in Python and run them on a Raspberry Pi-controlled game console. You can write programs to control robots connected to the Raspberry Pi. Or you can send your Raspberry Pi to 39,000 kilometers above the Earth to take incredible photos, like Dave Akerman did (see www.daveakerman.com/?p=592).
Tip:
Is Your Raspberry Pi Up and Running?
If you already have your Raspberry Pi and it is up and running, you can skip the rest of this chapter.
1.2 Getting Raspberry Pi
Before you purchase a Raspberry Pi, there are a few things you need to know.
-
What will you get when you buy a Raspberry Pi?
-
Different models of Raspberry Pi.
-
Where to buy a Raspberry Pi.
-
What peripherals you need.
When you purchase a Raspberry Pi, you will receive a palm-sized circuit board equipped with a System on Chip (SoC), memory, and various interfaces. Figure 1.2 shows what the Model B Raspberry Pi looks like when you receive it. It does not come with internal storage, a keyboard, or any peripherals. Therefore, you will need some additional peripherals to get the Raspberry Pi running.
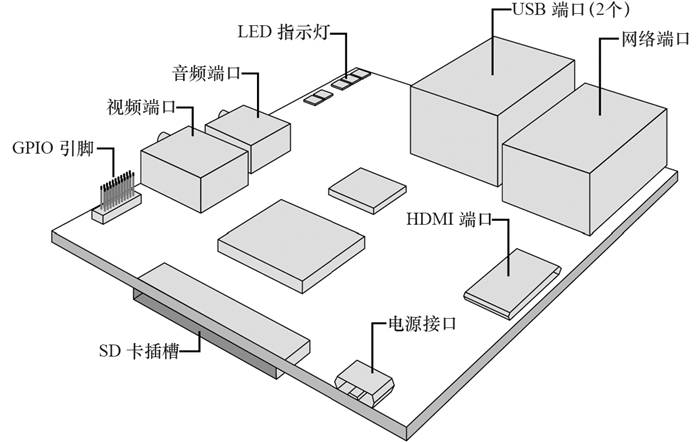
Figure 1.2 Image of Raspberry Pi Model B
Tip:
What is a System on Chip
A System on Chip (SoC) is a single chip or integrated circuit (IC) that integrates all components required in a system. SoCs are common in mobile phones and embedded devices. For Raspberry Pi, the SoC contains an ARM processor and a Graphics Processing Unit (GPU) for video processing.
Currently, there are two models of Raspberry Pi available. They differ slightly, and the main specifications are shown in Table 1.1. You can choose one based on their different characteristics.
Table 1.1 Raspberry Pi Model A and B
|
256MB RAM |
512MB RAM |
|
One USB port |
Two USB ports |
|
No Ethernet port |
One Ethernet port |
Model B has more features and only costs $10 more than Model A. This book focuses primarily on Model B. However, either model is suitable for learning Python programming.
Tip:
Delivery Delays
The demand for Raspberry Pi is high, and your Raspberry Pi may arrive late. Don’t be surprised if you have to wait two weeks or even two months after purchasing!
Where can you buy a Raspberry Pi? When the Raspberry Pi was first released, there were only a few places to purchase it. The following is just a few e-commerce sites that sell Raspberry Pi.
-
Farnell element14—www.farnell.com
-
RS Components—uk.rs-online.com
-
Allied Electronics, Inc.—www.alliedelec.com
-
Amazon—www.amazon.com
1.3 Essential Raspberry Pi Peripherals
At this point, you need to make a decision. You can purchase a pre-packaged kit that includes the Raspberry Pi and all necessary peripherals, or you can buy the Raspberry Pi and its necessary peripherals separately. The pre-packaged kit will save you time but will cost more money. Buying everything separately will save you money but will take some time. Therefore, you should consider both options before making a purchase.
Warning:
About Buying Peripherals
Before you purchase the Raspberry Pi and peripherals, please read the rest of this chapter. You need to know some important things to avoid wasting time and money.
The following sections describe the basic peripherals required to start and run the Raspberry Pi.
-
SD card.
-
Power supply.
-
TV or computer monitor with HDMI input.
-
USB keyboard.
The next few sections will detail these necessary peripherals. At the end of this chapter, you will also learn about some nice additional external devices.
1.3.1 SD Card
The Raspberry Pi does not have internal storage, so it does not come with a pre-installed operating system. An SD card is used to store the operating system that runs on the Raspberry Pi. You must use an SD card to boot your Raspberry Pi.
Most pre-packaged Raspberry Pi kits come with an SD card that has the operating system pre-installed. If you do not buy a pre-packaged kit, you have two options.
-
Buy an SD card supported by Raspberry Pi and deploy the operating system yourself (you will learn about this at the end of this chapter).
-
Buy an SD card that already has the operating system pre-installed. You can find a list of companies selling these SD cards at elinux.org/RPi_Easy_SD_Card_Setup.
Warning:
Use the Correct SD Card
Take some time to ensure you purchase the correct SD card for the Raspberry Pi, which will be discussed below. The right SD card will allow your Raspberry Pi to perform better. The wrong SD card will cause a lot of trouble.
If you decide to buy the SD card yourself and deploy the operating system, you cannot just buy any old SD card. You must buy an SD card that is compatible with Raspberry Pi. So how do you find out which SD card to buy? Fortunately, contributors to the Embedded Linux Wiki are helpful. They have listed various SD cards that are compatible with Raspberry Pi on their Raspberry Pi SD card page (elinux.org/RPi_SD_cards). Generally, you need a standard size SDHC card with at least 4G of space (8G is better).
Tip:
SD Card Capacity
You don’t have to use the space on the SD card to store files and programs. You can also connect storage devices through the Raspberry Pi’s USB port. However, you still need the SD card to boot the Raspberry Pi.
1.3.2 Power Supply
The Raspberry Pi does not come with a power cord that can be plugged directly into a wall outlet. It uses a Micro USB Type B port for power input. Below are the basic power requirements for the Raspberry Pi.
-
5 volts.
-
700 milliamps.
The current can exceed 700 milliamps slightly. In fact, it is better to provide slightly more current because the more peripherals (like USB mice) you add, the more current the system requires.
You have various options, from super cheap to flexible but expensive. More information will be provided below.
1. Cheap Power Supply
If you have a phone charger with a Micro USB Type B connector, you are in luck. Check the output, and look at the voltage and current indicated on it. If your phone charger provides 5 volts and 700 milliamps of output, you can use it to power your Raspberry Pi. Some people find that using some other chargers, such as those for e-readers, also works fine with Raspberry Pi.
Tip:
Longer Power Cables
Remember that when you choose a power cable for the Raspberry Pi, the longer the cable, the more freedom you will have. If you connect the Raspberry Pi with a short power cable, then the movement and placement of your Raspberry Pi will be significantly limited. Generally, a longer cable equals greater freedom.
If you live in a very modern apartment or house, and your wall outlets have Type A USB ports, you can power the Raspberry Pi using these ports. You need to buy a cable that has a Type A USB connector on one end and a Micro USB Type B connector on the other. If you do not have such wall outlets, you can ask an electrician to replace traditional wall outlets, or you can use traditional adapters.
2. Traditional Power Supply
If you do not want to share a charger with your phone or e-reader, you can purchase a separate power supply for the Raspberry Pi. In this case, you need a USB power plug that can be plugged into a wall outlet and has a Type A USB port. You will also need a USB cable with a Type A USB connector on one end and a Micro USB Type B connector on the other. Figure 1.3 shows an example of such a setup.

Figure 1.3 Raspberry Pi power input and USB power plug
The power plug allows you to plug into any wall outlet for power. Additionally, you can use the USB power plug to power other USB-compatible devices. If you plan to carry the Raspberry Pi in a backpack or for travel, you should consider choosing a USB power plug that can store the cable, turning the power plug into a nice little cube for easy carrying.
3. Portable Power Supply
A portable power supply is a pretty good choice, as it can power your Raspberry Pi anywhere. However, it is not cheap. A portable power supply contains a lithium-ion battery pack that can be charged via a wall outlet or by connecting it to a computer using a USB cable. You can charge the portable power supply and carry it with you to power the Raspberry Pi when other power sources are unavailable. To power the Raspberry Pi, the portable power supply should provide at least 5 volts and 700 milliamps of current. More expensive portable power supplies can offer multiple charging methods, such as a 12-volt power outlet in a car and wall outlets.
You will still need to purchase a USB cable with a Type A USB connector on one end and a Micro USB Type B connector on the other to connect the Raspberry Pi to the portable power supply. The benefit of doing this is that you can power the Raspberry Pi while charging the portable power supply. Just remember to unplug your portable power supply charger when adding or removing Raspberry Pi peripherals.
1.3.3 Display Output
For such a small device as the Raspberry Pi, it still has incredible image display capabilities. Its HDMI port boasts Blu-ray quality playback. The Raspberry Pi also provides composite output, increasing flexibility when using older devices as display outputs. Again, you need to decide on the functionality of your Raspberry Pi.
1. Using Older Display Devices
If you have an old analog TV, you can also use it to display the Raspberry Pi output. All you need is a composite video connector, which is usually yellow. The composite output port on the Raspberry Pi is also colored yellow.
The composite output port only outputs video. If you want sound, you need an audio cable plugged into the audio output port of the Raspberry Pi. The other end of the audio cable connects to the sound output device you are using (like external speakers).
Warning:
No VGA Support
The Raspberry Pi does not provide support for VGA. You can use a DVI to VGA adapter, which will be described below. However, this may add an extra point of failure to your Raspberry Pi setup.
You can connect to a computer monitor via the DVI port. In this case, you will need an adapter to convert HDMI to DVI output. Again, like the composite video cable, DVI does not carry audio signals. Therefore, you will also need an audio cable to provide sound output for your Raspberry Pi.
2. Using Modern Display Devices
Using modern devices is the simplest way to get video and audio from Raspberry Pi. To use this method, you need to purchase an HDMI male-to-male cable. As shown in Figure 1.4, plug one end of the HDMI cable into the HDMI port of the Raspberry Pi and the other end into your computer monitor or TV. Of course, you should ensure that the length of the HDMI cable you purchase meets your needs. The HDMI cable transmits both video and audio signals, so you only need one cable.
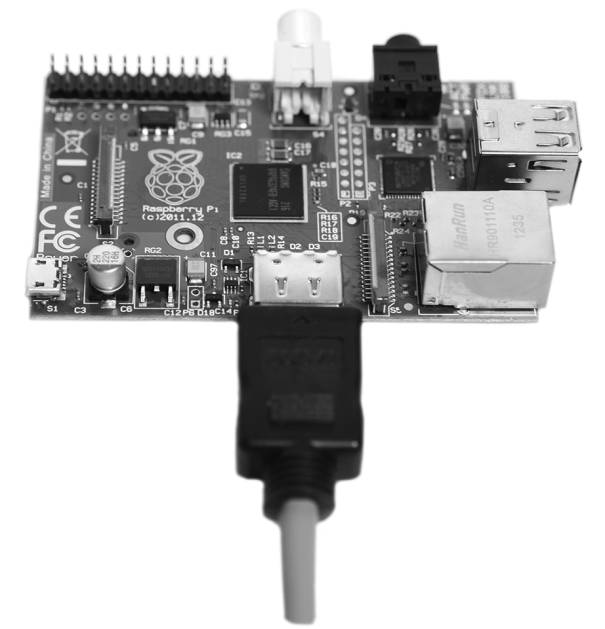
Figure 1.4 Raspberry Pi HDMI port and HDMI cable
1.3.4 Keyboard
Deciding what kind of keyboard to use is the easiest decision. To input your Python programs and try various Python commands, you need a keyboard. The Raspberry Pi Model B has two USB ports (Model A only has one USB port), and you can use one of them to connect any USB keyboard. Note that most pre-packaged Raspberry Pi kits do not include a USB keyboard, but you may already have one or two keyboards.
1.4 Other Nice Peripherals
Now that you know which peripherals are necessary to run the Raspberry Pi, you may be wondering what peripherals can enhance your Raspberry Pi experience. While not essential, these peripherals can be very helpful.
-
Raspberry Pi case.
-
USB mouse.
-
Self-powered USB hub.
-
Network peripherals.
1.4.1 Choosing a Case
The Raspberry Pi you receive will be a circuit board packed in an anti-static bag. Of course, you do not necessarily need a case to protect your Raspberry Pi, but it is always a good idea to have one. Raspberry Pi cases come in various shapes, sizes, and colors. Figure 1.5 shows a very professional-looking Raspberry Pi case with all ports labeled on top.

Figure 1.5 A professional Raspberry Pi case
Many Raspberry Pi enthusiasts prefer to use clear cases, which protect the Raspberry Pi while also showcasing it. You need to determine which case meets your needs. Of course, if you change your mind later, you can easily switch to a different case.
Warning:
Static Electricity
The circuit board should not come into contact with static electricity! A small spark from your hand can permanently damage the Raspberry Pi. This is a sufficient reason to put the Raspberry Pi in a case.
1.4.2 Using a USB Mouse
If you plan to use the graphical user interface of the Raspberry Pi, having a mouse will be very convenient. However, note that a USB mouse and USB keyboard will consume 50-100mA of current and will occupy two USB ports on the Model B Raspberry Pi.
1.4.3 Self-Powered USB Hub
If you want to connect a USB keyboard and USB mouse, how do you connect other USB devices simultaneously? What if you want to connect an external USB storage device to the Raspberry Pi? Don’t worry, just purchase a self-powered USB hub that gets power from a separate adapter plugged into the wall outlet.
Warning:
Bus-Powered USB Hubs
Make sure you are not using a bus-powered USB hub. A bus-powered USB hub draws power from the USB port it is connected to on the computer. Therefore, it will consume power from the Raspberry Pi.
Typically, a self-powered USB hub can provide up to 500mA of current for each connected device. It has a USB Type A connection that can connect to the Raspberry Pi via USB. Thus, you can turn one USB port into multiple!
1.4.4 Using Ethernet or Wireless Adapter
Connecting your Raspberry Pi to the internet or local network will provide significant convenience. The Raspberry Pi is equipped with an RJ45 port for connecting wired Ethernet. Depending on how your local network is configured, connecting to the network may be as simple as plugging an Ethernet cable into the Raspberry Pi and the other end into the back of the router. In this case, you will need to purchase an Ethernet cable along with two RJ45 connectors.
You can also connect the Raspberry Pi to a wireless network. In this case, you will need a USB wireless network adapter. You can buy a small, inexpensive one. The downside of this method is that it will occupy one USB port on the Raspberry Pi. Additionally, configuring a wireless network is not straightforward. However, once the wireless network is configured, the Raspberry Pi will have greater flexibility.
1.5 Deciding How to Purchase Peripherals
Now that you know which peripherals the Raspberry Pi needs, you can decide which are the best fit for you. You can purchase a pre-packaged kit that includes the Raspberry Pi and essential accessories or buy the Raspberry Pi and necessary peripherals separately.
If you decide to buy a pre-packaged kit, keep the following points in mind.
-
This option will cost you more money than buying separately.
-
There are many types of kits, so be sure to confirm that the kit you buy includes the peripherals you want, or be prepared to buy separately for any peripherals not included in the kit.
-
Many kits come with an SD card pre-installed with the operating system. If you purchase such a kit, you can skip the steps of downloading the operating system and deploying it to the SD card, as well as the next section.
1.6 Getting Your Raspberry Pi Up and Running
Once you decide to buy and have received the Raspberry Pi and necessary peripherals, you can start doing the really interesting things. When the Raspberry Pi boots for the first time, you will realize how powerful this little machine is, and you will be amazed. The following chapters will introduce the preparations you need to make for booting up.
1.6.1 Do Some Research
Like many other things in life, if you take the time to research ahead of time, booting up your Raspberry Pi and getting it running will go smoothly and quickly. Spending this upfront time and effort is well worth it. There are many excellent resources available to help. For example, Hacking Raspberry Pi will truly help you have an enjoyable Raspberry Pi experience. Many books, like this one, can help you get your Raspberry Pi running and troubleshoot it.
Additionally, there are many resources on the internet to assist you in your Raspberry Pi research. Among the best websites is the Raspberry Pi Foundation’s site. This site (www.raspberrypi.org) is filled with great content, including FAQs, help forums, and a quick start guide. On this site, you can find software downloads and the latest news about Raspberry Pi and the foundation. This is your first step into Raspberry Pi.
1.6.2 Choosing an Operating System
Once you complete the initial onboarding, the next step is to choose and download an operating system. The Raspberry Pi Foundation’s website (www.raspberrypi.org) offers several operating systems to choose from.
Tip:
SD Card with Pre-Installed Operating System
If you bought a pre-packaged kit, it may already include an SD card with the operating system. If so, you can skip to the next chapter, “Connecting Peripherals.”
This book is based on the Raspbian operating system, which is highly recommended for learning Python and for Raspberry Pi beginners. You can use a browser, such as Mozilla Firefox, to open www.raspberrypi.org/downloads/ to download the operating system, as shown in Figure 1.6.
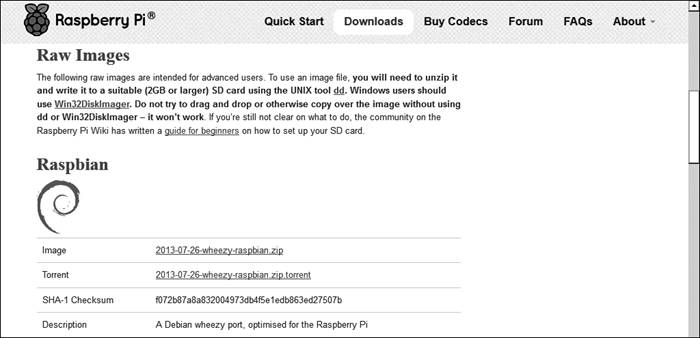
Figure 1.6 Raspberry Pi Operating System Download Page
1.6.3 Downloading the Operating System
The machine you use to download the operating system needs to have an SD card reader. If you have different computers available (such as a Windows machine and a Linux machine), choose the one you are most comfortable with.
Once you have chosen a machine, download the operating system from www.raspberrypi.org/downloads/. Click on the Raspberry Pi image file ending with “.zip” or the file ending with “.torrent”; both downloads are the same, but usually, the “.torrent” downloads faster. Of course, the download time still depends on your internet speed.
Tip:
Need Help?
If you feel overwhelmed, check out elinux.org/RPi_Easy_SD_Card_Setup, which provides a lot of advice to help you, including the entire process from downloading the operating system to deploying it onto the SD card. And don’t forget, you can buy an SD card with the operating system pre-installed. Refer to the “Safe and Simple Methods” section on the elinux/RPi_Easy_SD_Card_Setup page for a list of companies selling these cards.
1.6.4 Deploying the Operating System to the SD Card
Once you have downloaded the operating system to your local machine, the next step is to deploy the operating system from the computer to the SD card. You cannot just copy the operating system files over. Instead, you need an imaging program to deploy it.
If you have experience with this, you can use an imaging program to write the operating system files to the SD card. If you lack experience in this area, don’t worry. The appendix of this book describes all the steps to write the Raspbian operating system to the SD card.
1.6.5 Connecting Peripherals
Now that your Raspberry Pi, all necessary external devices, and the SD card with the Raspbian operating system are ready, it is time to reap the rewards of all your preparation work. Follow the steps below to ensure everything works properly.
1. Insert the SD card into the Raspberry Pi’s card reader port, as shown in Figure 1.7.
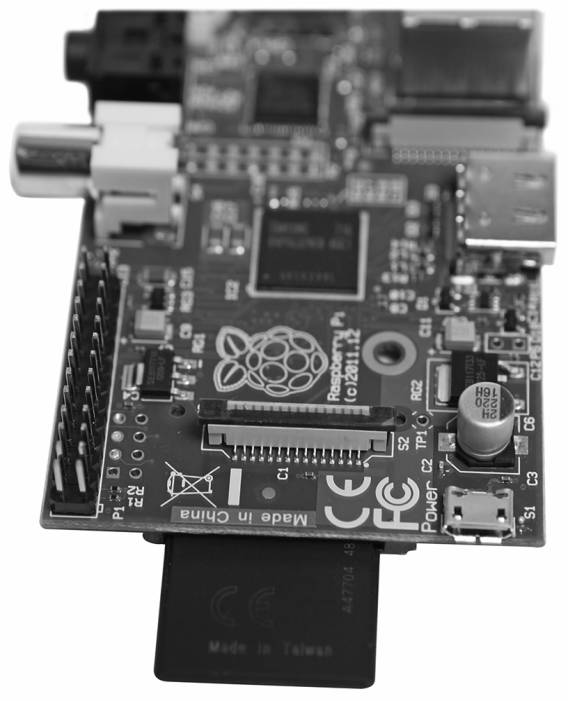
Figure 1.7 A correctly installed SD card
2. Plug the power cable into the Raspberry Pi. Do not turn on the power yet.
Tip:
Missing Power Button
The Raspberry Pi does not have a power button. Therefore, when you turn on the power, it automatically starts.
3. Connect the USB keyboard.
4. If you are using HDMI, plug the HDMI cable into the HDMI port of the Raspberry Pi. With the display or TV turned off, plug the other end of the cable in. Then turn on the display or TV. If you are using a TV, you may need to adjust it to use the correct input source, so do this now.
If you are using a display output other than HDMI, such as composite video or DVI, you will need to connect your Raspberry Pi and display in a similar manner.
5. Now you can perform the initial test. Sit in front of your display or TV and turn on the power.
If nothing happens, jump straight to the last section of this chapter, “Troubleshooting Raspberry Pi Issues.”
If a lot of text scrolls across the screen, and you can see a menu like the one below, congratulations! Your Raspberry Pi has booted!
Rasp-config
		info			Information about this tool
		expand_rootfs		Expand root partition to fill SD card
		Overscan		Change overscan
		configure_keyboard	Set keyboard layout
		change_pass		Change password for 'pi' user
		change_locale		Set locale
		change_timezone		Set timezone
		memory_split		Change memory split
		overclock		Configure overclocking
		ssh			Enable or disable ssh server
		boot_behaviour		Start desktop on boot?		Update			Try to upgrade raspi-config

		<Select>				 <Finish>
Keep pressing the Tab key until you navigate to the
pi@raspberrypi ~ $
All your efforts have paid off, and your Raspberry Pi is up and running.
To shut down the Raspberry Pi, type sudo poweroff in the command line and press Enter.
Tip:
Where Did the Menu Go?
On the next boot, if you do not see the menu, do not worry. It is set to display only on the first boot. In Chapter 2, “Getting to Know the Raspbian Linux Distribution,” you will learn how to bring it back.
Whether your Raspberry Pi has booted or not, you need to read the following sections before safely proceeding to Chapter 2.
1.7 Troubleshooting Raspberry Pi Issues
The following sections discuss some of the most common things to check when you encounter boot issues with the Raspberry Pi.
1.7.1 Check Peripheral Connections
One of the plugs on the Raspberry Pi may not be fully seated. “Fully seated” means the connector is completely inserted into the port. A connector that is not fully seated can cause peripherals to work intermittently or not at all. You can check the peripheral connections by following these steps.
1. Unplug the power cable from the Raspberry Pi.
2. Turn off the display or TV.
3. Disconnect and reconnect each connector attached to the Raspberry Pi. Ensure the connectors are fully seated.
4. Disconnect and reconnect each connector from the Raspberry Pi to other devices. Ensure the connectors are fully seated.
5. Turn on the display or TV.
6. Plug the power cable back into the Raspberry Pi.
1.7.2 Check the SD Card
If your Raspberry Pi does not boot, it could be that your SD card is not working properly. To ensure you are using a valid SD card, you can check the Raspberry Pi compatibility with your SD card at elinux.org/RPi_SD_Cards.
Tip:
Use LED Lights for Troubleshooting
The Raspberry Pi does not have a BIOS. Therefore, when it is powered on, it can only boot from the SD card. The LED lights on the Raspberry Pi can help you diagnose boot issues. If you see a red LED light on and the green one is off, and nothing is displayed on the screen, then your SD card or the operating system on the SD card may be corrupted. If you want to learn more about using LEDs for troubleshooting, refer to elinux.org/RPi_Troubleshooting#Normal_LED_status.
1.7.3 Check Your Operating System Image
If you are using a verified SD card but the Raspberry Pi still does not boot, it may be that the operating system image on the SD card is corrupted. The image may have been corrupted during the download process or when being written to the SD card. You can use the tips provided on elinux.org/RPi_Easy_SD_Card_Setup to verify whether the image is corrupted.
1.7.4 Check Your Peripherals
If you have checked all the items listed above, you need to verify that all peripherals are compatible with the Raspberry Pi. You can find this information at elinux.org/RPi_VerifiedPeripherals.

“Beginning Raspberry Pi Python Programming” is divided into seven parts. The first six parts cover the Raspberry Pi programming environment, basic Python knowledge, advanced Python, graphical programming, business programming, and Raspberry Pi Python projects; the seventh part includes an appendix on how to load the Raspberry Pi operating system onto the Raspbian card.

Long press the QR code to follow the IT Bookstore.