
Introduction
The Zephyr Project Real-Time Operating System (https://zephyrproject.org/) or simply “Zephyr” is an increasingly popular real-time operating system as it natively supports over 450 boards and countless peripherals. When starting any embedded software project, the first priority is to begin from a known baseline. This may include cloning a repository from source control (embedded Linux may fall into this category) or downloading a zip file that represents a specific version of the source code (other real-time operating systems typically fall into this category). This blog post will introduce a personal best practice to ensure that Zephyr development starts from a known baseline. This way, when handing over Zephyr-based project development work to clients or colleagues, there will be no unexpected situations.
What makes Zephyr unique is that it uses a “meta-tool” called West to retrieve all Zephyr components from various locations, which may use different mechanisms. Unlike a typical software development workflow, Zephyr uses only one repository to retrieve the source code. How West retrieves different components is described in a “manifest” file. The manifest file is usually checked into source control, providing a snapshot of the entire Zephyr codebase.
Strategy
There are two aspects to the strategy. First, we can create forks for repositories that we anticipate will require customization. While our goal is to create pull requests for relevant customizations, having a reliable location as a sandbox is still crucial. For example, a previous blog post demonstrated adding a buttonless DFU in MCUBoot (https://zephyrproject.org/supporting-firmware-updates-with-zephyr-nrf/), which required creating a fork of MCUBoot. Additionally, we may need to modify a subsystem in Zephyr because we discovered a bug or want to add a feature. Before doing this, we can create a fork of the Zephyr repository and then submit a pull request (PR) according to their guidelines (https://docs.zephyrproject.org/latest/contribute/guidelines.html).
Once the forks are created, we can create a custom West manifest file to describe our entire codebase. We can start by leveraging the extensive work done by Nordic Semiconductor, using Zephyr to create a complete, stable baseline firmware; Nordic includes a West manifest file to help their customers get started (https://github.com/nrfconnect/sdk-nrf/blob/main/west.yml). We can modify Nordic’s manifest file as necessary and use it as our own manifest file. First, we can add a “remote” that contains a descriptive name and the base URL of the repository:
remotes:... - name: <a descriptive name> url-base: <base repository URL>Secondly, we need to instruct West to use our Zephyr and MCUBoot branches. In Nordic Semiconductor’s manifest file, their repository is used as the “default” repository (the default repository is used if no remote repository is specified for a particular codebase):
defaults: remote: ncsWe need to add our remote in the entries for Zephyr and MCUBoot (instructing West not to use Nordic’s software sources):
... - name: <zephyr repository name> path: zephyr revision: <git commit/branch> remote: <a descriptive name>... - name: <mcuboot repository name> path: bootloader/mcuboot revision: <git commit/branch> remote: <a descriptive name>Integrating Everything
After making the modifications above and pushing the modified West manifest file, we can execute the following command to use the modified West manifest file, which will pull in the forks of MCUBoot and Zephyr:
$> west init -m <West manifest repo> --mr <commit/branch>The –mr option can be used to specify a specific commit or branch; this may be useful if the default branch is not the master branch (as GitHub uses “main” as the default branch).
In summary, this article demonstrates the mechanism for creating a custom West manifest file, which is the first step in starting Zephyr firmware development. A custom West manifest file ensures that there are no surprises during development (as third-party repositories may have changed). Once the Zephyr firmware is feature-complete and stable, a conscious decision can be made to update to a newer version of Zephyr.
West Init & Update
When retrieving and updating Zephyr code, West can be seen as a simple Git tool.
The west init command is used to retrieve the code from the remote repository, and it provides a parameter -m to specify the address of the remote repository. For example, the command we used to retrieve the ncs repository earlier, –mr specifies the version number (branch).
west init -m https://github.com/nrfconnect/sdk-nrf --mr v1.5.0If no repository address is specified, it defaults to retrieving the Zephyr source code repository, as the command we used earlier <span>west init zephyrproject</span> will fetch the code under that repository into the <span>zephyrproject</span> folder, which is equivalent to:
west init -m https://github.com/zephyrproject-rtos/zephyrThe complete Zephyr project actually contains more than 30 sub-repositories, and each sub-repository requires a version number (branch). The west init only retrieves the code for the Zephyr part, while the west update command is used to fetch the code for these associated sub-repositories and place it in the specified directory.
That is: the west update command is used to retrieve and update the source code of the Zephyr repository and its associated more than 30 sub-repositories.
So how does west update retrieve these sub-repositories?
The Zephyr team has written a script to associate these sub-repositories, and this script is called west.yml, located in the Zephyr source code repository.
The west update command will read the zephyr/west.yml file, sequentially downloading the repositories listed within it to the specified directory; if the west.yml file cannot be found, an error will be reported.
Some of the contents of west.yml are as follows:
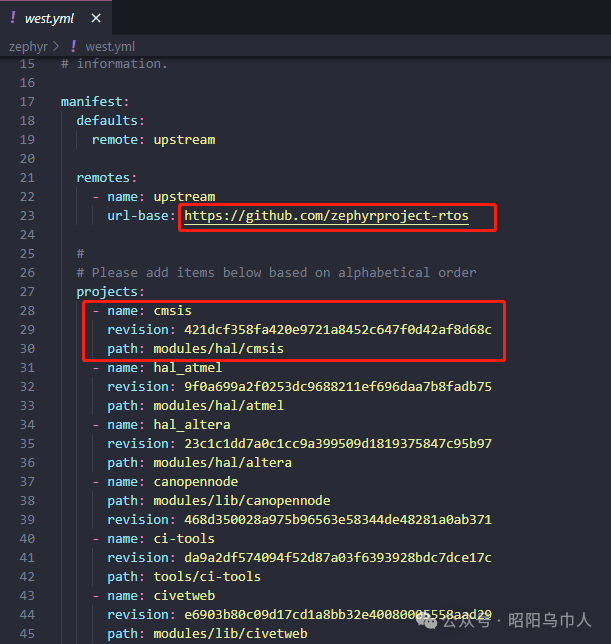
Basically, it can be seen what this script means:
Retrieve the repository code from https://github.com/zephyrproject-rtos, download the cmsis repository branch 421dcf358fa420e9721a8452c647f0d42af8d68c to the modules/hal/cmsis directory; execute sequentially until all sub-repository codes are retrieved, and the work of west update is complete.
Based on this, we can also create our own local west.yml file to retrieve our repository code.
Therefore, after each new version is released, we need to use git checkout to switch branches to retrieve the new west.yml script in order to update the entire repository.