
Overview
In the previous article, “Getting Started with Zephyr: Devicetrees”, we learned how the devicetree describes the hardware on the device in embedded software applications based on the Zephyr project. We illustrated how to describe four LEDs on the nRF52840 development kit (https://www.nordicsemi.com/Products/Development-hardware/nrf52840-dk) in a devicetree. We also learned how to combine multiple devicetree files into a complete development board. Finally, we looked at some source code to understand how to reference elements in the devicetree. In this article, we will learn how to use the devicetree in a Zephyr project.
Zephyr is Not Linux!
One key point mentioned in the previous article is that while the concept of devicetree is borrowed from Linux, the way it is used in Zephyr is fundamentally different. In Linux, as part of the boot sequence, the kernel reads a binary form of the devicetree located somewhere in RAM and calls the corresponding driver functions based on the devices that are present and enabled. However, in Zephyr, the devicetree is used to generate header files that are used alongside the source code, forming the final application with the Zephyr kernel and drivers. Therefore, the Linux kernel uses the devicetree at runtime, while Zephyr uses it at compile time. Due to this distinction, Zephyr’s build infrastructure adds specific mechanisms to interface with the devicetree.
Devicetree Bindings
“Devicetree Bindings” is the mechanism that allows the C part of the Zephyr applications to reference devicetree source files. The following diagram in the Zephyr project documentation (https://docs.zephyrproject.org/latest/build/dts/intro-scope-purpose.html) illustrates this mechanism:
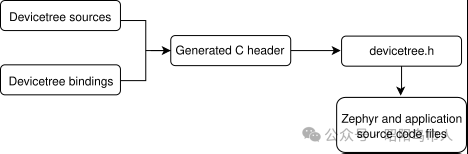
“Devicetree sources” are the traditional devicetree files discussed in the previous article. “Devicetree Bindings” describe the contents of the devicetree, including the data types of nodes. Ultimately, the Zephyr build infrastructure combines the source files and bindings into a C header file. The generated header file content is abstracted as the “devicetree.h” header file, which is used by source files and applications in Zephyr.
Diving Deeper
The “custom_dts_binding” under samples/basic is a great example that helps us understand how devicetree bindings work in Zephyr. Interestingly, we only need to focus on the following three lines in the main.c of the example to navigate through devicetree bindings:
#if !DT_NODE_EXISTS(DT_NODELABEL(load_switch))#error "Overlay for power output node not properly defined."#endifFirst, we need to use the following command to build the application (assuming “zephyr_main” is the directory location of the cloned latest west manifest):
$> west build -p always -b nucleo_l073rz zephyr_main/zephyr/samples/basic/custom_dts_bindingAs shown in the figure above, devicetree.h is ultimately used by the C source files and applications in Zephyr. If we open devicetree.h located in zephyr_main/zephyr/include/zephyr/, we will see the generated header file includes something near the top:
#ifndef DEVICETREE_H#define DEVICETREE_H#include <devicetree_generated.h>...#endif /* DEVICETREE_H */Where is “devicetree_generated.h”? It is not in the Zephyr repository, but in the build directory! If we return to the relevant lines in main.c and search for “DT_NODELABEL” in devicetree.h, we will find the following definition:
#define DT_NODELABEL(label) DT_CAT(DT_N_NODELABEL_, label)If we further search for DT_CAT, we will find the following definition:
#define DT_CAT(a1, a2) a1 ## a2These two macros will convert “DT_NODELABEL(load_switch)” in main.c to “DT_N_NODELABEL_load_switch”. If we search for DT_NODE_EXISTS, we will find the following definition:
#define DT_NODE_EXISTS(node_id) IS_ENABLED(DT_CAT(node_id, _EXISTS))The IS_ENABLED macro is cleverly defined by the following macros in util_macro.h and util_internal.h headers under zephyr_main/zephyr/include/zephyr/sys:
#define IS_ENABLED(config_macro) Z_IS_ENABLED1(config_macro)#define Z_IS_ENABLED1(config_macro) Z_IS_ENABLED2(_XXXX##config_macro)#define _XXXX1 _YYYY,#define Z_IS_ENABLED2(one_or_two_args) Z_IS_ENABLED3(one_or_two_args 1, 0)#define Z_IS_ENABLED3(ignore_this, val, ...) valIf we use “DT_N_NODELABEL_load_switch” to process these macros, the first macro will expand to:
IS_ENABLED(DT_N_NODELABEL_load_switch) --> IS_ENABLED(DT_N_S_load_switch_EXISTS)Where is “DT_N_NODELABEL_load_switch_EXISTS” defined? Ultimately in devicetree_generated.h!
#define DT_N_S_load_switch_EXISTS 1...#define DT_N_NODELABEL_load_switch DT_N_S_load_switchThe second macro will convert “DT_N_NODELABEL_load_switch” to “DT_N_S_load_switch”. The first macro will then transform it to “DT_N_S_load_switch_EXISTS”. If we track the expansion of these macros step by step, starting from the “IS_ENABLED” macro, we can see the following expansion. Remember, “DT_N_S_load_switch_EXISTS” will ultimately expand to “1”.
IS_ENABLED(DT_N_S_load_switch_EXISTS) --> Z_IS_ENABLED1(1)Z_IS_ENABLED1(1) --> Z_IS_ENABLED2(_XXXX1)Now, since “_XXX1” expands to “_YYY” (note the comma), Z_IS_ENABLED2 expands to “Z_IS_ENABLED3(_YYY, 1, 0)”. Finally, the last macro expands to:
Z_IS_ENABLED3(_YYY, 1, 0, ...) --> 1That’s it! Suppose the DT_N_S_load_switch_EXISTS macro is set to “0”. In that case, we will not be able to use the macro that expands “_XXX1” to “_YYYY”, and instead, we will have the following macro chain:
IS_ENABLED(DT_N_S_load_switch_EXISTS) --> Z_IS_ENABLED1(0)Z_IS_ENABLED1(0) --> Z_IS_ENABLED2(_XXX0)Z_IS_ENABLED2(_XXX0) --> Z_IS_ENABLED3(_XXX0 1, 0)Where Z_IS_ENABLED3 missing the comma will cause this macro to expand to 0 (because the macro extracts the value after the first comma):
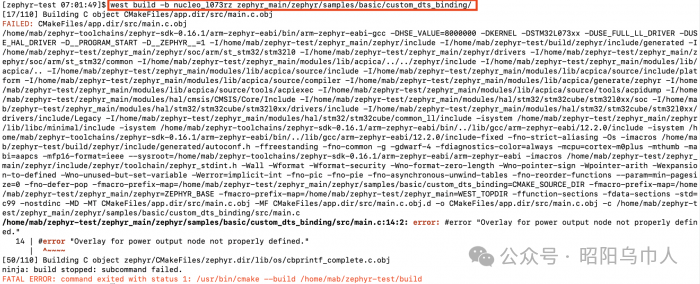
Z_IS_ENABLED3(_XXX0 1, 0, ...) --> 0Ultimately, the original macro in main.c will lead to a compilation error. You can try it yourself. Change the DT_N_S_load_switch_EXISTS macro in devicetree_generated.h from “1” to “0”, and then rebuild the application using the following command (note that we are not executing the original compile, as that would regenerate the header files):
Conclusion
In this article, we learned how to combine the generated devicetree header files with some header files from the core resources of the Zephyr project, utilizing them in the application source code to determine the existence of specific nodes during the compilation process. We saw how this differs from the Linux kernel, which uses this information at runtime. We tracked the expansion of specific clever macros using an example from the Zephyr repository to gain a deeper understanding of this process. Then, we disabled the existence of the node in the generated devicetree header file to confirm the expected result. In the next article, we will detail how the Zephyr build infrastructure combines devicetree bindings and source code to generate the devicetree header files.