 In a previous article, I introduced how to set up a Zephyr project using the West tool (Getting Started with Zephyr: Customizing the West Manifest), and demonstrated how to customize the operating system using Kconfig (Getting Started with Zephyr: Kconfig), as well as how to customize hardware using Devicetrees (Getting Started with Zephyr: Devicetrees). In the next two articles, I will focus on Zephyr-based applications related to embedded systems.
In this article, I will show how to create an application in Zephyr that stores data on a microSD card. While most embedded systems today have internet connectivity to upload sensor data, the connection can be unstable. The presence of a microSD card offers two advantages. First, it is expandable. Unlike fixed onboard RAM and Flash storage, a microSD card of any size can be replaced with a larger capacity card. Second, the data on the microSD card can be easily transferred to a desktop PC for retrieval.
Hardware
This article will use Nordic’s nRF52840 development board
(https://www.nordicsemi.com/Products/Development-hardware/nrf52840-dk).
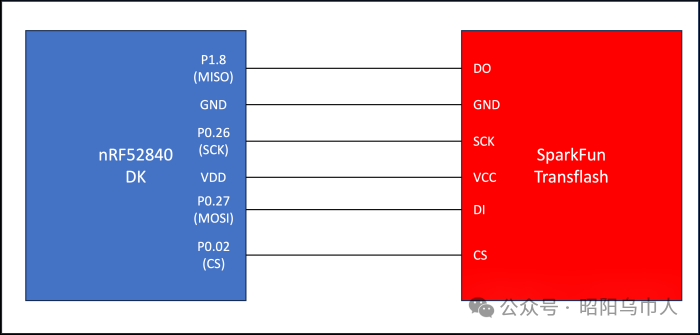
We will connect the nRF52840 development board to SparkFun’s microSD Transflash Breakout board (https://www.sparkfun.com/products/544). Any brand of microSD card from a reputable supplier can be used.
The following illustration shows how to connect the SparkFun microSD module to the nRF52840 development board:
Embedded Software
In this section, we will discuss the embedded software related to connecting to the SD card. First, we can extract Zephyr v4.0 by executing the following commands:
$> west init -m <a href="https://github.com/zephyrproject-rtos/zephyr">https://github.com/zephyrproject-rtos/zephyr</a> --mr v4.0.0 zephyrproject$> cd zephyrproject$> west updateSecondly, we can clone the repository containing the test application:
$> git clone https://github.com/mabembedded/zephyr-sd-spi.gitThirdly, we must ensure that our SD card is formatted using exFAT (the default setting in Windows). Finally, we can connect the nRF52840 development kit to our PC via USB and open a terminal interface. We can build and flash the application by executing the following commands:
$> cd zephyr-sd-spi$> cmake –preset build$> west build && west flashWe should see the following output in the terminal interface:
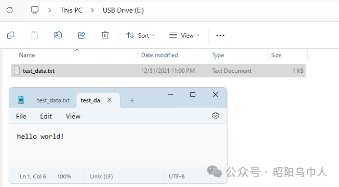
*** Booting Zephyr OS build zephyr-v4.0.0 ***[00:00:00.402,770] <inf> sd: Maximum SD clock is under 25MHz, using clock of 24000000Hz[00:00:00.414,215] <inf> main: Block count 384503808Sector size 512Memory Size(MB) 187746Disk mounted.Listing dir /SD: ...[DIR ] System Volume Information[FILE] test_data.txt (size = 13)Successfully mounted SD cardmain - successfully created fileIf we insert the SD card into the computer and open it in the file explorer, we will see “test_data.txt”, with the first line being the string “hello world!”, as shown in the figure below:
 KCONFIGIn the “prj.conf” file, the following related Kconfig options are enabled, with a description for each option:
- CONFIG_DISK_ACCESS: Enables the disk access subsystem.
- CONFIG_FILE_SYSTEM: Enables the file system subsystem.
- CONFIG_FAT_FILESYSTEM_ELM: Indicates that Zephyr uses the “ELM” FAT file system implementation, which can be found athttp://elm-chan.org/.
- CONFIG_FS_FATFS_MOUNT_MKFS: Indicates that Zephyr creates a disk and uses the FAT file system when the FAT file system is not found.
- CONFIG_FS_FATFS_EXFAT: Enables the exFAT partition scheme.
- CONFIG_DISK_DRIVER_SDMMC: Enables the SD/EMMC driver.
- CONFIG_SPI: Enables the SPI subsystem.
- CONFIG_GPIO: Enables the GPIO subsystem.
Devicetree Overlay
We also need to create a device tree overlay for two reasons. First, we need to update the SPI pin configuration between the nRF52840 development board and the SparkFun Transflash breakout board. Secondly, we must inform the application firmware that we have connected an SD card.
To update the SPI pins, we first need to add a new entry in the pinctrl block, as shown below:
&pinctrl { custom_spi: custom_spi { group1 { psels = <NRF_PSEL(SPIM_SCK, 0, 26)>, <NRF_PSEL(SPIM_MOSI, 0, 27)>, <NRF_PSEL(SPIM_MISO, 1, 8)>; }; };};Next, we need to use the custom pinctrl to update the SPI block in the overlay (adding GPIO for the CS line):
&spi1 { status = "okay"; pinctrl-0 = <&custom_spi>; pinctrl-1 = <&custom_spi>; pinctrl-names = "default", "sleep"; cs-gpios = <&gpio0 2 GPIO_ACTIVE_LOW>;...The following content needs to be added to the “spi1” node to inform the application of the presence of the SD card:
... sdhc0: sdhc@0 { compatible = "zephyr,sdhc-spi-slot"; reg = <0>; status = "okay"; label = "SDHC_0"; mmc { compatible = "zephyr,sdmmc-disk"; status = "okay"; }; spi-max-frequency = <24000000>; };};Application Source Code
With Kconfig and Devicetree Overlay configured, we can gradually implement this application. I created two helper functions to confirm that our application can correctly read files from the SD card. The first function is “lsdir”, which has the following prototype:
static int lsdir(const char *path);This function takes a path as input and prints all directories and files under that path. The second function is “mount_sd_card”, which uses the “lsdir” function to perform the following operations:
-
Initialize the underlying disk with “disk_access_init”.
- Use “disk_access_ioctl” with the “DISK_IOCTL_GET_SECTOR_COUNT” parameter to get the number of sectors on the disk.
- Use “disk_access_ioctl” with the “DISK_IOCTL_GET_SECTOR_SIZE” parameter to get the sector size of the disk.
- Print the total space of the SD card using the above information.
- Mount the SD card. If the SD card is successfully mounted, the function will list the files and directories in the root directory of the SD card. If the mount fails, the function will attempt to mount again.
“mount_sd_card” is used as the first function in “main”. Upon success, it initializes a “fs_file_t” data structure as follows. This data structure will be used in subsequent file operations.
struct fs_file_t data_filp;fs_file_t_init(&data_filp);Then, the “fs_unlink” function is used to delete “test_data.txt” in the root directory of the SD card (if it exists). A new file named “test_data.txt” is created, and the following line is opened for writing:
fs_open(&data_filp, "/SD:/test_data.txt", FS_O_WRITE | FS_O_CREATE);Finally, the following lines are used to write “hello world!” to the created file:
sprintf(file_data_buffer, "hello world!\n");ret = fs_write(&data_filp, file_data_buffer, strlen(file_data_buffer));fs_close(&data_filp);ConclusionIn this article, I demonstrated how to implement a Zephyr application that mounts a microSD card, creates a new file on the microSD card, and writes data. The experience gained from this application is particularly helpful for devices that need to regularly write data to external storage, especially in situations where network connectivity may be unstable. In the next article, I will discuss how to write a custom BLE application running on Zephyr!