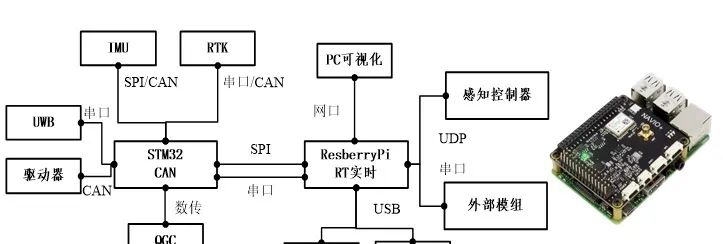
Previously, the development of four-legged robots was mainly based on microcontrollers. Currently, the overall price of STM32 has risen, making it very difficult to select the main controller chip. Additionally, the computing power of microcontrollers is still insufficient for four-legged robots.
Currently, the control frequency of the entire robot’s code execution has significantly decreased compared to the simulation, where all modules can run within 5ms in the Webots simulation from state estimation to low-level force control. However, in the microcontroller, the system hierarchy has to be split up, only ensuring that low-level force control and CAN communication can achieve 2-5ms, with fluctuating control cycles.
This leads to a decrease in the control bandwidth of the entire robot, and it is also impossible to run previously mentioned high-performance algorithms such as QP optimization, trajectory optimization, or dynamics libraries. Currently, the operating system thread runtime of the entire robot on the microcontroller is as follows:

To achieve high computing power, the MIT solution uses an Upboard (X86 1.4GHz) with an external CAN board. However, due to the commonality of the MIT solution, its price on Taobao is quite high.
Currently, there are many similar single-board embedded processors, the most familiar being the Raspberry Pi. The Raspberry Pi has released many different versions, and in addition to standalone boards, there are also integrated onboard modules. Its performance has improved significantly, and the community support is particularly good. Of course, the ultimate goal is low cost and stable supply, so I adopted a similar solution to build a high-performance, low-cost processor using it:
To implement motion control calculations on a Linux system, it is necessary to install the corresponding real-time patches to ensure real-time scheduling of the Linux operating system. Since many applications of Raspberry Pi in China are low-cost vision applications, there are relatively few tutorials on installing real-time patches. Referring to the relevant tutorials of the Stanford Puppy Robot, I found a workable configuration tutorial:
1. Compile from Source
This method requires completing the compilation of the Raspberry Pi real-time system on a computer with Ubuntu installed and then copying it to the Raspberry Pi for flashing. The specific steps are as follows:
mkdir ~/rpi-kernelcd ~/rpi-kernelmkdir rt-kernelAfter creating the folder, download the real-time patch for Raspberry Pi:
git clone https://github.com/raspberrypi/linux.git -b rpi-4.19.y-rtgit clone https://github.com/raspberrypi/tools.gitThe above patch requires about 2G of space. After that, start configuring the linker:
export ARCH=armexport CROSS_COMPILE=~/rpi-kernel/tools/arm-bcm2708/gcc-linaro-arm-linux-gnueabihf-raspbian-x64/bin/arm-linux-gnueabihf-export INSTALL_MOD_PATH=~/rpi-kernel/rt-kernelexport INSTALL_DTBS_PATH=~/rpi-kernel/rt-kernelThen, perform special configurations for the Raspberry Pi platform you are using:
A. For Raspberry Pi 1/1.2 B(+), A(+), Zero (W):
export KERNEL=kernelcd ~/rpi-kernel/linux/make bcmrpi_defconfigB. For Raspberry Pi 2, 3 B(+):
export KERNEL=kernel7cd ~/rpi-kernel/linux/make bcm2709_defconfigC. For Raspberry Pi 4B:
export KERNEL=kernel7lcd ~/rpi-kernel/linux/make bcm2711_defconfigAfter configuration, start compiling the kernel:
make -j4 zImagemake -j4 modulesmake -j4 dtbsmake -j4 modules_installmake -j4 dtbs_installAfter the compilation is complete, the last command will display DEPMOD 4.19.59-rt23-v7l+. After that:
mkdir $INSTALL_MOD_PATH/boot./scripts/mkknlimg ./arch/arm/boot/zImage $INSTALL_MOD_PATH/boot/$KERNEL.img’cd $INSTALL_MOD_PATH/bootmv $KERNEL.img kernel7_rt.imgAt this point, the system has been compiled and can be packaged:
cd $INSTALL_MOD_PATHtar czf ../rt-kernel.tgz *Then you can copy rt-kernel.tgz to the Raspberry Pi for flashing, using WinSCP software to copy it to the Raspberry Pi:
First, create a tmp folder in the root directory to copy the patch into:
tar xzf rt-kernel.tgzcd bootsudo cp -rd * /boot/cd ../libsudo cp -dr * /lib/cd ../overlayssudo cp -d * /boot/overlayscd ..sudo cp -d bcm* /boot/Then edit the config file, sudo nano boot/config.txt, add kernel=kernel7_rt.img at the end, save it, and after rebooting, enter uname -r. If it shows 4.19.59-rt23-v7l+, the patch installation is successful.
2. Download Compiled Patches
If you do not want to compile it yourself, you can also download pre-compiled versions. Various versions can be downloaded from the following link:
https://link.zhihu.com/?target=https%3A//github.com/lemariva/RT-Tools-RPi
For the Raspberry Pi 4B patch, I have already compiled and uploaded it to:
Link:
https://pan.baidu.com/s/1qWtbvqMqbEVk1leqjlLpAA
Extraction code: fsy6
After downloading, use the same method as compiling from source to copy it to the Raspberry Pi for corresponding operations. After applying the patch, you can test the changes in real-time performance:
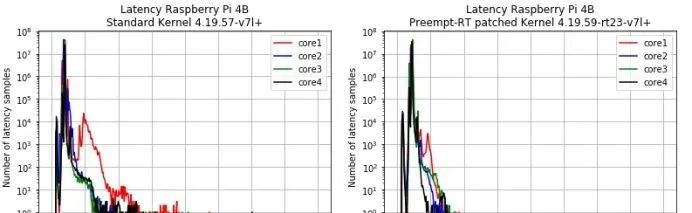
As can be seen from the figure, compared to the system without the patch, the maximum delay is only 93us!

《PID Parameter Tuning and Fuzzy Adaptive PID》
This course introduces the working principle of PID and the parameter tuning principles, and builds a hardware platform to explain parameter identification of the system, PID parameter self-tuning, online parameter fine-tuning, and fuzzy adaptive PID, aiming to help everyone comprehensively understand PID and quickly adjust suitable PID parameters.

(Scan the QR code to view course details)