0x00 Introduction
When a company experiences a hacker intrusion, system crash, or other security incidents that affect normal business operations, it is crucial to respond immediately to restore the company’s network information system to normal operation in the shortest time possible. Furthermore, it is necessary to investigate the source of the intrusion, reconstruct the incident process, and provide solutions and preventive measures to mitigate or recover economic losses for the company.
This article summarizes some strategies for investigating Linux server intrusions based on common attack incidents, combined with methods for emergency response analysis and resolution encountered in work.
0x01 Intrusion Investigation Strategies
1. Account Security
Basic Usage:
1. User information file /etc/passwd
root:x:0:0:root:/root:/bin/bash
account:password:UID:GID:GECOS:directory:shell
Username:Password:UserID:GroupID:UserDescription:HomeDirectory:LoginShell
Note: No password allows local login only, remote login is not allowed.

2. Shadow file /etc/shadow
root:$6$oGs1PqhL2p3ZetrE$X7o7bzoouHQVSEmSgsYN5UD4.kMHx6qgbTqwNVC5oOAouXvcjQSt.Ft7ql1WpkopY0UV9ajBwUt1DpYxTCVvI/:16809:0:99999:7:::
Username:EncryptedPassword:LastPasswordChangeDate:MinimumPasswordChangeInterval:PasswordValidityPeriod:WarningDaysBeforeExpiration:GraceDaysAfterExpiration:AccountExpirationDate:Reserved
who View currently logged-in users (tty for local login, pts for remote login)
w View system information, to know user behavior at a certain moment
uptime View how long the system has been running, number of users, loadIntrusion Investigation:
1. Query privileged users (uid = 0)
[root@localhost ~]# awk -F: '$3==0{print $1}' /etc/passwd

2. Query accounts that can log in remotely
[root@localhost ~]# awk '/\$1|\$6/{print $1}' /etc/shadow

3. Check if other accounts besides root have sudo privileges. If not needed for management, ordinary accounts should have sudo privileges removed.
[root@localhost ~]# more /etc/sudoers | grep -v "^#\|^$" | grep "ALL=(ALL)"

4. Disable or delete unnecessary and suspicious accounts
    usermod -L user    Disable account, account cannot log in, /etc/shadow second column starts with !
    userdel user       Delete user
    userdel -r user    Delete user and also remove the user directory under /home
2. Command History
Basic Usage:
View the system commands executed by the account through .bash_history
1. Root's command history
histroy

2. Open .bash_history in each user's home directory to view ordinary account command history
Add login IP address, execution command time, and other information to historical commands:

1) Save 10,000 commands
sed -i 's/^HISTSIZE=1000/HISTSIZE=10000/g' /etc/profile

2) Add the following configuration lines at the end of /etc/profile:
######jiagu history xianshi#########
USER_IP=`who -u am i 2>/dev/null | awk '{print $NF}' | sed -e 's/[()]//g'`
if [ "$USER_IP" = "" ]
then
USER_IP=`hostname`
fi
export HISTTIMEFORMAT="%F %T $USER_IP `whoami` "
shopt -s histappend
export PROMPT_COMMAND="history -a"
######### jiagu history xianshi ##########

3) source /etc/profile to make the configuration effective

Generated effect: 1  2018-07-10 19:45:39 192.168.204.1 root source /etc/profile

3. Clear historical operation commands: history -c
However, this command will not clear records saved in files, so it is necessary to manually delete records in the .bash_profile file.
Intrusion Investigation:
Enter the user directory
cat .bash_history >> history.txt
3. Ports
Use the netstat command to analyze suspicious ports, IPs, and PIDs
netstat -antlp|more

View the process file path corresponding to the pid,
run ls -l /proc/$PID/exe or file /proc/$PID/exe (where $PID is the corresponding pid number)
4. Processes
Use the ps command to analyze processes
ps aux | grep pid 5. Boot Startup Items
Basic Usage:
System run level diagram:
| Run Level | Meaning |
|---|---|
| 0 | Shutdown |
| 1 | Single-user mode, similar to Windows safe mode, mainly used for system repair |
| 2 | Incomplete command line mode, does not include NFS services |
| 3 | Full command line mode, standard character interface |
| 4 | System reserved |
| 5 | Graphical mode |
| 6 | Reboot |
View run level command runlevel
System default allowed level
vi  /etc/inittab
id=3:initdefault  Which run level the system directly enters after booting
Boot startup configuration files
/etc/rc.local
/etc/rc.d/rc[0~6].d
Example: When we need to start our script at boot, we just need to place the executable script in the /etc/init.d directory, and then create a soft link in /etc/rc.d/rc*.d
root@localhost ~]# ln -s /etc/init.d/sshd /etc/rc.d/rc3.d/S100sshHere, sshd is the specific service script file, S100ssh is its soft link, and the S prefix indicates it starts automatically at boot; if it starts with K, it indicates it needs to be stopped during the run level loading.
Intrusion Investigation:
Startup item files: more /etc/rc.local /etc/rc.d/rc[0~6].d ls -l /etc/rc.d/rc3.d/
6. Scheduled Tasks
Basic Usage
1. Use crontab to create scheduled tasks
-
Basic command
crontab -l List detailed contents of a user’s cron service
Tips: The crontab file created by default will be saved in (/var/spool/cron/username, e.g., /var/spool/cron/root
crontab -r Delete each user’s cron task (caution: deletes all scheduled tasks)
crontab -e Edit the current crontab file using an editor
For example: */1 * * * * echo “hello world” >> /tmp/test.txt Write to file every minute
2. Use anacron to implement asynchronous scheduled task scheduling
-
Usage example
Run /home/backup.sh script daily: vi /etc/anacrontab @daily 10 example.daily /bin/bash /home/backup.sh
If the machine is off when backup.sh is expected to run, anacron will run it ten minutes after the machine is powered on, without waiting for 7 days.
Intrusion Investigation
Focus on whether malicious scripts exist in the following directories
/var/spool/cron/*
/etc/crontab
/etc/cron.d/*
/etc/cron.daily/*
/etc/cron.hourly/*
/etc/cron.monthly/*
/etc/cron.weekly/
/etc/anacrontab
/var/spool/anacron/*
Tip:
more /etc/cron.daily/* View all files in the directory7. Services
Service Autostart
First method of modification:
chkconfig [--level runlevel] [service name] [on|off]
chkconfig –level  2345 httpd on  Enable autostart
chkconfig httpd on (default level is 2345)
Second method of modification:
Modify /etc/re.d/rc.local file
Add /etc/init.d/httpd start
Third method of modification:
Use the ntsysv command to manage autostart, which can manage independent services and xinetd services.
Intrusion Investigation
1. Query installed services:
Services installed via RPM packages
chkconfig  --list  View service autostart status, can see all RPM package installed services
ps aux | grep crond View current services

System startup items under levels 3 and 5
Chinese environment
chkconfig --list | grep "3:启用\|5:启用"
English environment
chkconfig --list | grep "3:on\|5:on"
Services installed from source packages
View service installation location, generally in /user/local/
service httpd start
Search /etc/rc.d/init.d/ to see if it exists
8. System Logs
Logs are stored by default in: /var/log/
View log configuration: more /etc/rsyslog.conf
| Log File | Description |
|---|---|
| /var/log/cron | Records logs related to system scheduled tasks |
| /var/log/cups | Records logs of printing information |
| /var/log/dmesg | Records information from the kernel self-check during system boot, can also use the dmesg command to directly view kernel self-check information |
| /var/log/mailog | Records email information |
| /var/log/message | Records important system information logs. This log file records most of the important information of the Linux system, and if there is a problem with the system, this log file should be the first to check |
| /var/log/btmp | Records failed login logs, this file is a binary file and cannot be viewed directly with vi, but should be viewed using the lastb command |
| /var/log/lastlog | Records the last login time of all users in the system, this file is a binary file and cannot be viewed directly with vi, but should be viewed using the lastlog command |
| /var/log/wtmp | Permanently records all users’ login and logout information, as well as system startup, reboot, and shutdown events. This file is also a binary file and cannot be viewed directly with vi, but needs to be viewed using the last command |
| /var/log/utmp | Records information about currently logged-in users, this file changes continuously with user logins and logouts, only records information about currently logged-in users. This file also cannot be viewed directly with vi, but needs to be queried using commands like w, who, users, etc. |
| /var/log/secure | Records information related to authentication and authorization, any program involving accounts and passwords will log here, such as SSH login, su user switching, sudo authorization, and even adding users and changing user passwords will be recorded in this log file |
Log Analysis Techniques:
1. Identify how many IPs are brute-forcing the root account on the host:
grep "Failed password for root" /var/log/secure | awk '{print $11}' | sort | uniq -c | sort -nr | more

Identify which IPs are brute-forcing:
grep "Failed password" /var/log/secure|grep -E -o "(25[0-5]|2[0-4][0-9]|[01]?[0-9][0-9]?)\.(25[0-5]|2[0-4][0-9]|[01]?[0-9][0-9]?)\.(25[0-5]|2[0-4][0-9]|[01]?[0-9][0-9]?)\.(25[0-5]|2[0-4][0-9]|[01]?[0-9][0-9]?)"|uniq -c

What is the dictionary of brute-forcing usernames?
grep "Failed password" /var/log/secure|perl -e 'while($_=<>){ /for(.*?) from/; print "$1\n";}'|uniq -c|sort -nr

2. Which IPs successfully logged in:
grep "Accepted " /var/log/secure | awk '{print $11}' | sort | uniq -c | sort -nr | more

Successful login dates, usernames, IPs:
grep "Accepted " /var/log/secure | awk '{print $1,$2,$3,$9,$11}'

3. Add a user kali log:
Jul 10 00:12:15 localhost useradd[2382]: new group: name=kali, GID=1001
Jul 10 00:12:15 localhost useradd[2382]: new user: name=kali, UID=1001, GID=1001, home=/home/kali, shell=/bin/bash
Jul 10 00:12:58 localhost passwd: pam_unix(passwd:chauthtok): password changed for kali
#grep "useradd" /var/log/secure

4. Delete user kali log:
Jul 10 00:14:17 localhost userdel[2393]: delete user 'kali'
Jul 10 00:14:17 localhost userdel[2393]: removed group 'kali' owned by 'kali'
Jul 10 00:14:17 localhost userdel[2393]: removed shadow group 'kali' owned by 'kali'
# grep "userdel" /var/log/secure

5. su switch user:
Jul 10 00:38:13 localhost su: pam_unix(su-l:session): session opened for user good by root(uid=0)

sudo authorization execution:
sudo -l
Jul 10 00:43:09 localhost sudo:    good : TTY=pts/4 ; PWD=/home/good ; USER=root ; COMMAND=/sbin/shutdown -r now
0x03 Tools Section
1. Rootkit Removal
-
chkrootkit
Website:http://www.chkrootkit.org
Usage: wget ftp://ftp.pangeia.com.br/pub/seg/pac/chkrootkit.tar.gz tar zxvf chkrootkit.tar.gz cd chkrootkit-0.52 make sense # If compilation completes without errors, execute the check ./chkrootkit -
rkhunter
Website:http://rkhunter.sourceforge.net
Usage:
Wget https://nchc.dl.sourceforge.net/project/rkhunter/rkhunter/1.4.4/rkhunter-1.4.4.tar.gz
tar -zxvf rkhunter-1.4.4.tar.gz
cd rkhunter-1.4.4
./installer.sh --install
rkhunter -c
2. Virus Removal
-
Clamav
The official download address for ClamAV is:http://www.clamav.net/download.html
Installation Method 1:
1. Install zlib: wget http://nchc.dl.sourceforge.net/project/libpng/zlib/1.2.7/zlib-1.2.7.tar.gz tar -zxvf zlib-1.2.7.tar.gz cd zlib-1.2.7 # Install gcc compilation environment: yum install gcc CFLAGS="-O3 -fPIC" ./configure --prefix= /usr/local/zlib/ make && make install 2. Add user group clamav and group member clamav: groupadd clamav useradd -g clamav -s /bin/false -c "Clam AntiVirus" clamav 3. Install Clamav tar –zxvf clamav-0.97.6.tar.gz cd clamav-0.97.6 ./configure --prefix=/opt/clamav --disable-clamav -with-zlib=/usr/local/zlib make make install 4. Configure Clamav mkdir /opt/clamav/logs mkdir /opt/clamav/updata touch /opt/clamav/logs/freshclam.log touch /opt/clamav/logs/clamd.log cd /opt/clamav/logs chown clamav:clamav clamd.log chown clamav:clamav freshclam.log 5. ClamAV Usage: /opt/clamav/bin/freshclam Update virus database ./clamscan –h View corresponding help information ./clamscan -r /home Scan all users' home directories ./clamscan -r --bell -i /bin Scan bin directory and display scanning results of problematic files -
Installation Method 2:
# Installation
yum install -y clamav
# Update virus database
freshclam
# Scanning methods
clamscan -r /etc --max-dir-recursion=5 -l /root/etcclamav.log
clamscan -r /bin --max-dir-recursion=5 -l /root/binclamav.log
clamscan -r /usr --max-dir-recursion=5 -l /root/usrclamav.log
# Scan and remove viruses
clamscan -r  --remove  /usr/bin/bsd-port
clamscan -r  --remove  /usr/bin/
clamscan -r --remove  /usr/local/zabbix/sbin
# View log findings
cat /root/usrclamav.log |grep FOUND
3. Webshell Removal
Linux version:
Hippopotamus webshell removal: http://www.shellpub.com
Sangfor Webshell backdoor detection tool: http://edr.sangfor.com.cn/backdoor_detection.html
4. RPM Check
System integrity can be checked using the rpm built-in -Va to verify all rpm packages and see which commands have been replaced:
./rpm -Va > rpm.logIf everything is verified normally, there will be no output; if there are inconsistencies, they will be displayed, and the output format is an 8-character long string, with each character representing a comparison result of a file with a property in the RPM database. If it is . (dot), it indicates the test passed.
The specific content of the 8 pieces of information in the verification content is as follows:
        S         Whether the file size has changed
        M         Whether the file type or file permissions (rwx) have changed
        5         Whether the file MD5 checksum has changed (can be seen as whether the file content has changed)
        D         Whether the device has changed
        L         Whether the file path has changed
        U         Whether the file owner has changed
        G         Whether the file group has changed
        T         Whether the file modification time has changed
If a command has been replaced, how to restore it:
File extraction and restoration process:
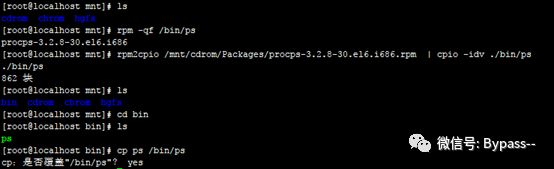
rpm -qf /bin/ls Query which software package the ls command belongs to
mv /bin/ls /tmp First move ls to the tmp directory, creating the illusion that the ls command is missing
rpm2cpio /mnt/cdrom/Packages/coreutils-8.4-19.el6.i686.rpm | cpio -idv ./bin/ls Extract the ls command from the rpm package to the current directory under /bin/ls
cp /root/bin/ls /bin/ Restore the ls command to the /bin/ directoryFile privilege restoration example:
 HW is still hiring
https://wj.qq.com/s2/18171749/8b35/