Xile Jun
Tableau Consultant, Agile BI Evangelist, Shandong UniversityAuthor of four books including “Data Visualization Analysis” and “Business Visualization Analysis”, serial entrepreneur,Tableau Visionary 2021-2025
External Mentor at the School of Management, China University of Geosciences (Wuhan)
Connecting with others through Tableau, dedicated to building a general framework for business analysis
XILEJUN.com Global, XILEJUN.cn China
In recent years, the functionality of #Tableau Server has been continuously expanded, integrating various features such as visualization, data management, and ETL, making it an increasingly popular choice for enterprises as a DW/BI integrated platform.Tableau Server 101: Enterprise-level DW/BI Agile Analytics Platformhttps://xilejun.com/tableau-server-101/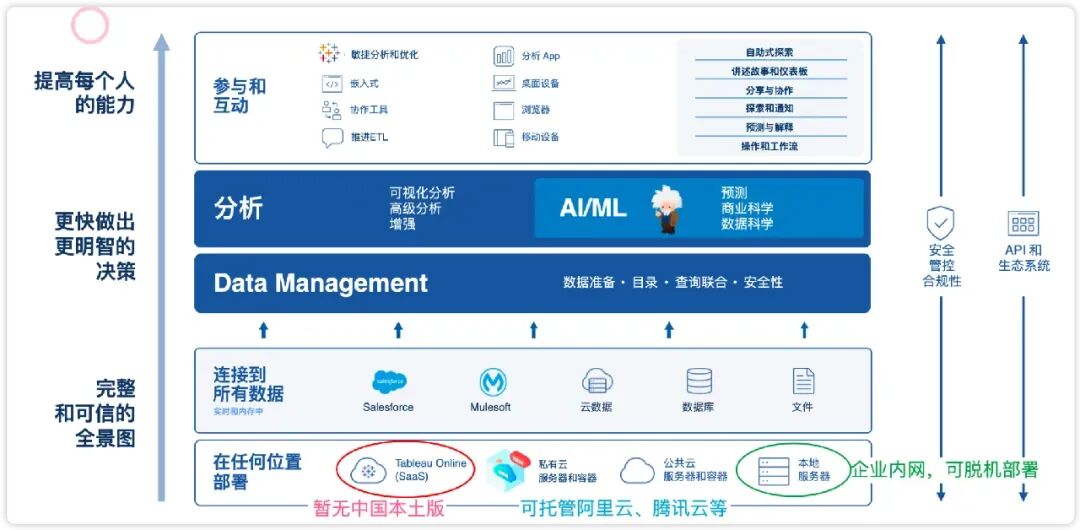 To help more enterprises utilize Tableau Server, #Xile Jun introduces how server administrators can complete the deployment of a single-node environment in a Linux setting.New Environment Installation and Deployment
- Before Installation: Environment Check and Preparation
- Installation Process: Program Deployment and Initialization
- Post-Installation: Drivers and Customization
1. Before Installation: Environment Check and Preparation1.1 Choose the Server Operating SystemThe choice between Windows/Linux may be influenced by database compatibility, for example, DB2, SAP BW, etc., which do not support Linux; under equivalent server conditions, Linux is preferred over Windows Server.1.2 Confirm that the Server System Meets Version Requirements1.2.1 Server Operating System Version, e.g., CentOS 7.9
[admin@iZbp135ksu6rjy9gz0m6p1Z tableau]$ cat /etc/redhat-release Rocky Linux release 9.5 (Blue Onyx)1.2.2 Server Hardware Information, including CPU core count, memory size, disk space, etc.The Tableau program is installed by default in the /opt path, with file directories in the /var/opt path; please ensure sufficient disk space.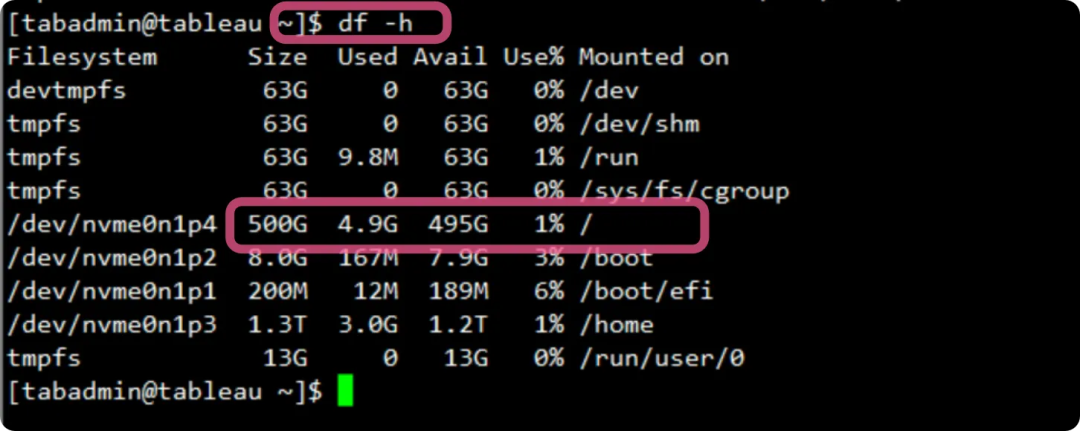 1.3 Network ConsiderationsThis part is crucial; after the installation program, the IP address and hostname cannot be modified, otherwise a reinstallation is required.!!! It is strongly recommended to change the hostname before installation on cloud servers, as using an operating system created from an image often results in multiple hosts in a local area network having the same name.1.3.1 Below is the default host information for an Alibaba Cloud server:
[admin@iZbp135ksu6rjy9gz0m6p1Z logs]$ hostnamectl Static hostname: iZbp135ksu6rjy9gz0m6p1Z Icon name: computer-vm Chassis: vm 🖴 Machine ID: 41dadc4b2515462f92f64f2a1c1a0861 Boot ID: 69cbf2296c614b71931b15f6859c0ac9 Virtualization: kvm Operating System: Rocky Linux 9.5 (Blue Onyx) CPE OS Name: cpe:/o:rocky:rocky:9::baseos Kernel: Linux 5.14.0-503.31.1.el9_5.x86_64 Architecture: x86-64 Hardware Vendor: Alibaba Cloud Hardware Model: Alibaba Cloud ECS Firmware Version: 0.0.0k1.3.2 Confirm the IP address in the local area network, and if necessary, verify the host information.
[admin@iZbp135ksu6rjy9gz0m6p1Z logs]$ ifconfigeth0: flags=4163<UP,BROADCAST,RUNNING,MULTICAST> mtu 1500 inet 172.19.124.36 netmask 255.255.240.0 broadcast 172.19.127.255 inet6 fe80::216:3eff:fe3a:a3ca prefixlen 64 scopeid 0x20<link> ether 00:16:3e:3a:a3:ca txqueuelen 1000 (Ethernet) RX packets 3669909 bytes 5468625584 (5.0 GiB) RX errors 0 dropped 0 overruns 0 frame 0 TX packets 863615 bytes 91518066 (87.2 MiB) TX errors 0 dropped 0 overruns 0 carrier 0 collisions 0For example, the hostname below has issues, as there is no mapping relationship established between the internal network address and the hostname.[admin@iZbp135ksu6rjy9gz0m6p1Z logs]$ tail /etc/hosts 127.0.0.1 localhost localhost.localdomain localhost4 localhost4.localdomain4 ::1 localhost localhost.localdomain localhost6 localhost6.localdomain6 [admin@iZbp135ksu6rjy9gz0m6p1Z logs]$ 1.3.3 It is recommended to disable IPV6, as Tableau Server only uses IPV4 addresses.If there are multiple network cards, it is advisable to keep one.1.3.4 FirewallCheck the firewall status: firewall –list-allIt is recommended to temporarily disable the firewall before installation: sudo systemctl stop firewalldTableau uses port 80 by default, and the management interface uses port 8850.1.4 User Preparation (Do not use root)For a new environment, it is recommended to create a new user for installation, do not use the root account!You can use the root account to add the new account to the wheel group:
[root@tableau data]# useradd tabadmin[root@tableau data]# gpasswd -a admin wheel Adding user admin to group wheel [root@tableau data]#【Confirmation】 Check the user group corresponding to admin:
[admin@tableau data]$ groups adminadmin : admin wheel[admin@tableau data]$ Modify the /etc/sudoers file to add sudo permissions.
[root@tableau data]# vi /etc/sudoersroot ALL=(ALL) ALL(add this line at the end) admin ALL=(ALL) ALL1.5 It is recommended to upgrade the environment before deployment
[admin@server home]$ sudo yum update [sudo] password for admin: Last metadata expiration check: 3:31:55 ago on Tue 22 Apr 2025 05:46:24 PM CST.Dependencies resolved.===========================================================================================================================Package Architecture Version Repository Size===========================================================================================================================Installing: kernel x86_64 5.14.0-503.38.1.el9_5 baseos 2.0 M kernel-core x86_64 5.14.0-503.38.1.el9_5 baseos 18 M kernel-devel x86_64 5.14.0-503.38.1.el9_5 appstream 18 M kernel-modules x86_64 5.14.0-503.38.1.el9_5 baseos 36 M kernel-modules-core x86_64 5.14.0-503.38.1.el9_5 baseos 30 MUpgrading: bpftool x86_64 7.4.0-503.38.1.el9_5 …… Upgraded: bpftool-7.4.0-503.38.1.el9_5.x86_64 expat-2.5.0-3.el9_5.3.x86_64 freetype-2.10.4-10.el9_5.x86_64 kernel-headers-5.14.0-503.38.1.el9_5.x86_64 kernel-tools-5.14.0-503.38.1.el9_5.x86_64 kernel-tools-libs-5.14.0-503.38.1.el9_5.x86_64 python3-jinja2-2.11.3-8.el9_5.noarch python3-perf-5.14.0-503.38.1.el9_5.x86_64 rocky-gpg-keys-9.5-1.3.el9.noarch rocky-release-9.5-1.3.el9.noarch rocky-repos-9.5-1.3.el9.noarch tzdata-2025b-1.el9.noarch webkit2gtk3-jsc-2.48.1-1.el9_5.x86_64 Installed: kernel-5.14.0-503.38.1.el9_5.x86_64 kernel-core-5.14.0-503.38.1.el9_5.x86_64 kernel-devel-5.14.0-503.38.1.el9_5.x86_64 kernel-modules-5.14.0-503.38.1.el9_5.x86_64 kernel-modules-core-5.14.0-503.38.1.el9_5.x86_64 Complete![admin@iZbp135ksu6rjy9gz0m6p1Z home]$ 2 Prepare Installation FilesUse wget to download, ensuring that admin has the necessary permissions.If using root to download, the file owner will be root, which may lead to access issues for admin later.3 Install the Main Program3.1 Install the Tableau Server Main ProgramUsing -y can avoid multiple confirmations.
[admin@iZbp135ksu6rjy9gz0m6p1Z home]$ lltotal 2734028drwx------ 2 admin admin 83 Apr 22 12:37 admin-rw-r--r-- 1 admin admin 2799643563 Apr 10 05:36 tableau-server-2023-3-16.x86_64.rpm[admin@iZbp135ksu6rjy9gz0m6p1Z home]$ sudo yum install tableau-server* Last metadata expiration check: 3:36:34 ago on Tue 22 Apr 2025 05:46:24 PM CST.Dependencies resolved.======================================================================================================== Package Architecture Version Repository Size========================================================================================================Installing: tableau-server-20233.25.0325.1434 x86_64 20233-25.0325.1434 @commandline 2.6 GInstalling dependencies: boost-regex x86_64 1.75.0-8.el9 appstream 277 k chrpath x86_64 0.16-17.el9 baseos 29 k fuse x86_64 2.9.9-16.el9 baseos 78 k fuse-common x86_64 ……………… Installing weak dependencies: mesa-dri-drivers x86_64 24.1.2-3.el9 appstream 8.8 MTransaction Summary========================================================================================================Install 36 PackagesTotal size: 2.6 GTotal download size: 42 MInstalled size: 4.8 GIs this ok [y/N]: yDownloading Packages:(1/35): fuse-2.9.9-16.el9.x86_64.rpm 963 kB/s | 78 kB 00:00 (2/35): libpciaccess-0.16-7.el9.x86_64.rpm 268 kB/s | 26 kB 00:00 (3/35): fuse-common-3.10.2-9.el9.x86_64.rpm 211 kB/s | 7.3 kB 00:00 (4/35): libxshmfence-1.3-10.el9.x86_64.rpm 422 kB/s | 12 kB 00:00……Installed: boost-regex-1.75.0-8.el9.x86_64 chrpath-0.16-17.el9.x86_64 fuse-2.9.9-16.el9.x86_64 fuse-common-3.10.2-9.el9.x86_64 gdb-14.2-3.el9.x86_64 gdb-headless-14.2-3.el9.x86_64 libICE-1.0.10-8.el9.x86_64 libX11-xcb-1.7.0-9.el9.x86_64 libXcomposite-0.4.5-7.el9.x86_64 libXcursor-1.2.0-7.el9.x86_64 libXdamage-1.1.5-7.el9.x86_64 libXfixes-5.0.3-16.el9.x86_64 libXi-1.7.10-8.el9.x86_64 libXrandr-1.5.2-8.el9.x86_64 libXtst-1.2.3-16.el9.x86_64 libXxf86vm-1.1.4-18.el9.x86_64 libbabeltrace-1.5.8-10.el9.x86_64 libdrm-2.4.121-1.el9.x86_64 libglvnd-1:1.3.4-1.el9.x86_64 libglvnd-egl-1:1.3.4-1.el9.x86_64 libglvnd-glx-1:1.3.4-1.el9.x86_64 libipt-2.0.4-5.el9.x86_64 libpciaccess-0.16-7.el9.x86_64 libwayland-client-1.21.0-1.el9.x86_64 libwayland-server-1.21.0-1.el9.x86_64 libxshmfence-1.3-10.el9.x86_64 libxslt-1.1.34-9.el9_5.2.x86_64 llvm-libs-18.1.8-3.el9.x86_64 mesa-dri-drivers-24.1.2-3.el9.x86_64 mesa-filesystem-24.1.2-3.el9.x86_64 mesa-libEGL-24.1.2-3.el9.x86_64 mesa-libGL-24.1.2-3.el9.x86_64 mesa-libgbm-24.1.2-3.el9.x86_64 mesa-libglapi-24.1.2-3.el9.x86_64 source-highlight-3.1.9-12.el9.x86_64 tableau-server-20233.25.0325.1434-20233-25.0325.1434.x86_64 Complete!(Some versions) After successful installation, the path and command to initialize tsm will be prompted.
If this is a single node or initial node installation, run:sudo /opt/tableau/tableau_server/packages/scripts.20242.24.1112.0335/initialize-tsm --accepteula3.2 Initialize TSM Management ServicesNote that initializing TSM and subsequent server initialization are two critical steps.Switch to the specified path and initializesudo ./initialize-tsm,When initializing TSM, the required parameter is –accepteula, and the default activation service is activated ( –activation-service).Since Tableau Server version 2021.4 and later,–activation-service is the default for Tableau Server on Microsoft Windows, Linux, and in containers.The server ATR is only for full installations and not applicable for upgrades. Choosing ATR for product activation is a permanent choice and cannot be undone later.
[admin@tabserver opt]$ sudo /opt/tableau/tableau_server/packages/scripts.20233.25.0325.1434/initialize-tsm --accepteula --activation-serviceCreating 'tsmadmin' group for TSM admin authorizationCreating 'tableau' unprivileged user accountCreating environment file...Creating directories and setting permissions...Using '/var/opt/tableau/tableau_server' as the data directory.Adding user 'admin' to group 'tableau'...Adding user 'admin' to group 'tsmadmin'...Added. Note: These group membership changes do not take effect in shells already open. For these to take effect, log out of the shell and log back in.Starting TSM services...Updating repository version in Tableau Server Coordination Service.TSM services started successfullyUse the 'tsm' command to continue setting up Tableau Server.>> Tableau binary directory will be added to PATH for new shells. To get the>> updated path, either start a new session, or for bash users run:>> source /etc/profile.d/tableau_server.shThe TSM administrative web interface (and REST API) is now available at<https: tabserver:8850="">You can continue the configuration and initialization of Tableau server using either the TSM command line interface, or the web interface.You will be prompted to authenticate, or can log in using the username 'admin', with the same password you used to log into this session. You could also use any username, with its password, from the administrative group in the domain.Done.[admin@tabserver opt]$ </https:>If installed in a specified path, use -d to specify the path. Note that the specified path must be completed at this stage, and cannot be modified after installation.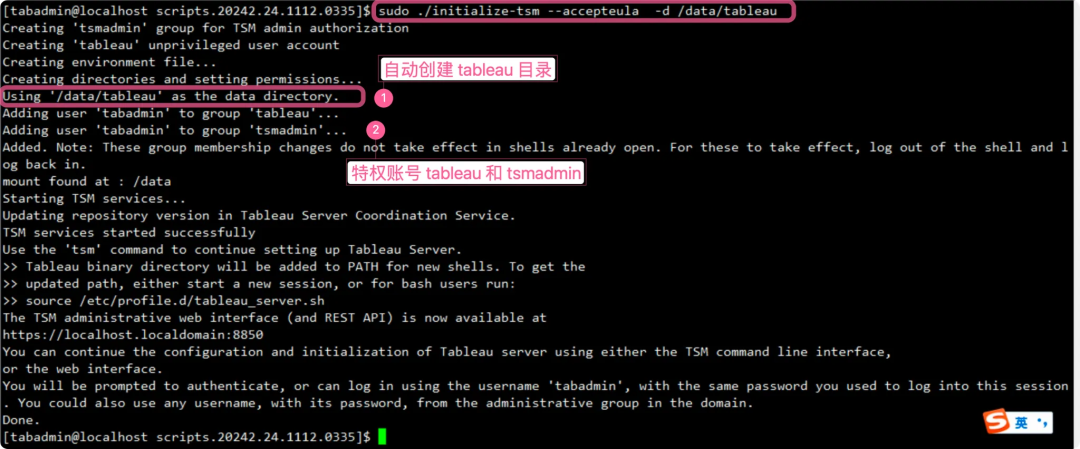 For more parameters, refer to https://help.tableau.com/current/server-linux/en-us/setup.htmPossible issues:Custom paths may lack permissions, for example, the /data/ path is created by root by default, but privileged accounts cannot access it. In this case, use chown to modify the folder permissions.4 Tableau Server Activation, Registration, and InitializationYou can continue using commands or access port 8850 via a browser to complete further activation, registration, and initialization processes.4.1 Log in to 8850If you cannot open 8850, note: you must access using https; ensure the firewall does not block it.
 Log in using the admin account and password created during installation.4.2 Activate LicenseYou can activate using the command tsm licenses activate -k KEY, or use the UI interface.
[admin@tabserver root]$ tsm licenses activate -k TS6O-BE0F-6EA0-AE72-F339License key activated.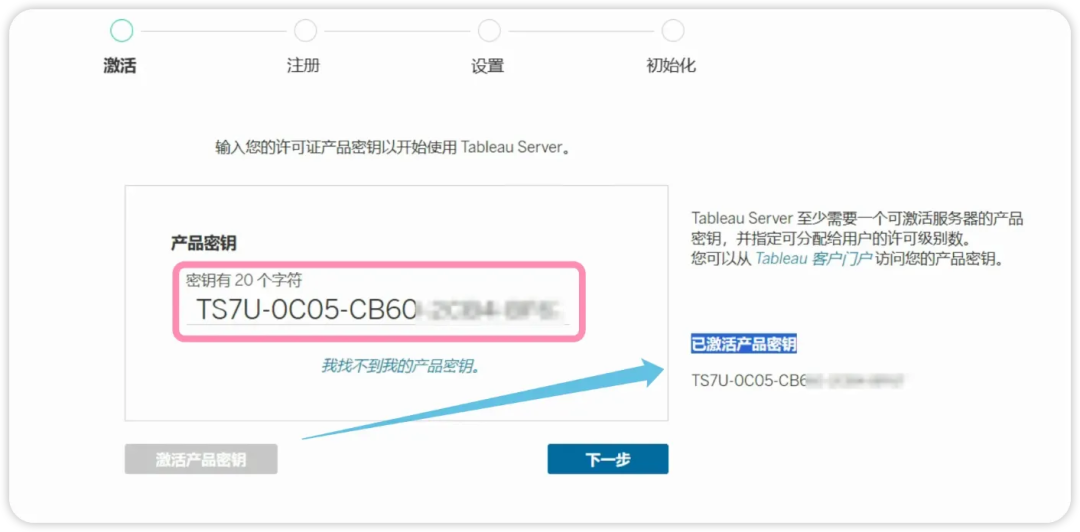 If necessary, deactivate to avoid exceeding the license limit tsm licenses deactivate4.3 Registration InformationContact person, company information, address, etc.
 If you cannot log in using the browser, you can import using tsm, but it is not recommended unless you are an expert.
[admin@tabserver root]$ cd /home/admin[admin@tabserver ~]$ ls[admin@tabserver ~]$ touch registration.json[admin@tabserver ~]$ vi registration.json [admin@tabserver ~]$ tsm register --file /home/admin/registration.json Registration complete.[admin@tabserver ~]$ 4.4 Configure UsersIdentity storage is either/or, and cannot be modified after installation.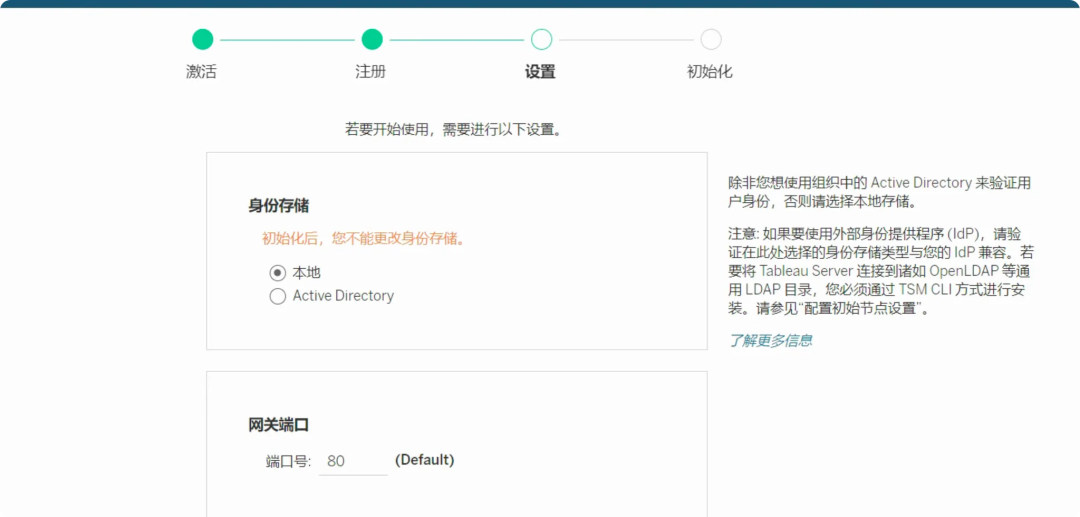 If you cannot use the UI, you will need to import using commands, which is very difficult; it is recommended to refer to the official documentation:Refer to the official documentation: https://help.tableau.com/current/server/en-us/entity_identity_store.htm4.5 InitializationInitialization is the easiest step to make mistakes; once completed, the installation is basically done.
 The corresponding command is tsm initialize –start-server –request-timeout 1800, which can be replaced by terminal, but usually not necessary.
[admin@tabserver ~]$ tsm initialize --start-server --request-timeout 1800Initializing the server...Job id is '1', timeout is 30 minutes.2% - Checking control plane services.4% - Validating that there are no pending changes.7% - Setting the default identity services tables. 9% - Generating new asset key.12% - Saving asset key. 14% - Generating passwords. 17% - Generating secret keys. 19% - Generating apigateway mutual SSL certificates. 21% - Generating Apache Gateway Internal mutual SSL certificates. 24% - Generating Unique Cluster Identifier.26% - Generating Index And Search Server SSL certificate. 29% - Generating ActiveMQ Server SSL certificate. 31% - Generating internal Metadata API mutual SSL certificates. 34% - Generating key store. 36% - Generating Hyper SSL certificate. 39% - Generating TSIG logs service SSL certificate. 41% - Promoting configuration.43% - Waiting for services to reconfigure. 46% - Initializing the topology. 48% - Waiting for the maintenance app to start. 51% - Initializing the temporary database instance. 53% - Starting the temporary database instance. 56% - Creating roles and databases.58% - Running migrations. 60% - Localizing the default projects.63% - Stopping the temporary database instance. 65% - Making the temporary database default. 68% - Initializing the next active repository. 70% - Enabling services needed for server initialization. 73% - Connecting to the Backup/Restore service.75% - Saving asset key metadata.78% - Connecting to the Backup/Restore service.Running - Initializing Index And Search Server.80% - Initializing Index And Search Server. Running - Finalizing the topology.82% - Finalizing the topology. 85% - Connecting to Vizportal Maintenance.87% - Rebuilding the search index. 100% - Finalizing the initialization.4.5 Create Server AdministratorThis step must be completed using commands.
[admin@tabserver ~]$ tabcmd initialuser --server <http://localhost> --username adminPassword: ===== redirecting to <http://localhost/auth>===== Signed out===== Creating new session===== Server: <http://localhost>===== Username: admin===== Connecting to the server...===== Signing in...===== Succeeded[admin@tabserver ~]$ 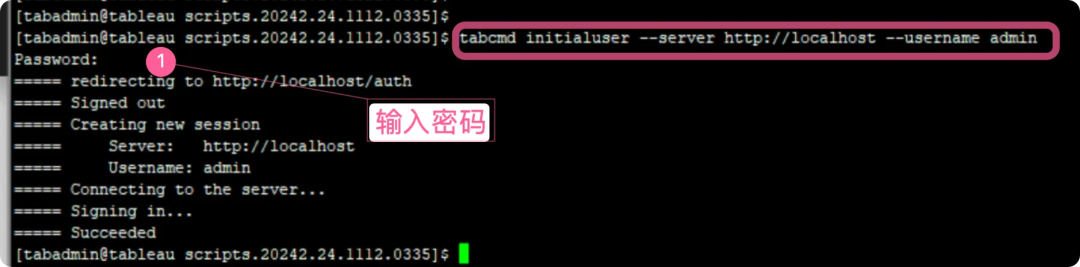 If running HTTP protocol on a port other than 80, specify the port after the hostname, e.g., –server http://localhost:8080.After running this command, the shell will prompt for the admin password.4.6 Start the Servertsm start5 Post-Deployment Server ConfigurationAfter deployment, it is usually necessary to modify the topology, configure SMTP, install drivers, etc.5.1 Modify Topology
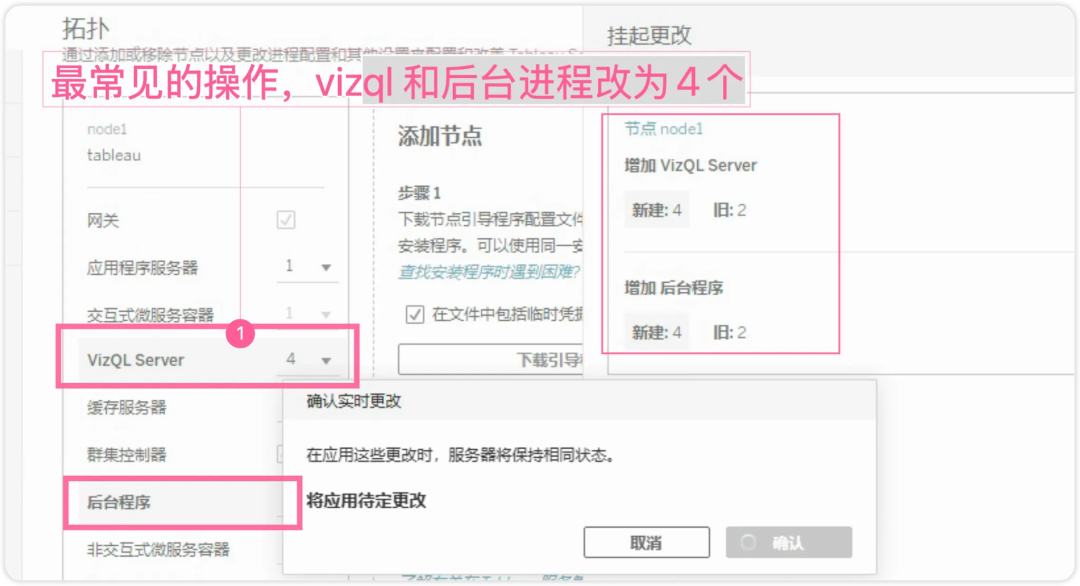 5.2 Improve Email and Notification Information (Optional)5.3 Configure Catalog for DM (Optional)If there is a license, the enterprise’s Catalog service. Enable Catalog service:Run tsm maintenance metadata-services command to enable the Tableau Metadata API. Running this command will start the initial indexing and open the Catalog.On the initial node in the cluster (the node where TSM is installed), open the command prompt as an administrator. Run the command: tsm maintenance metadata-services enable, as shown below:
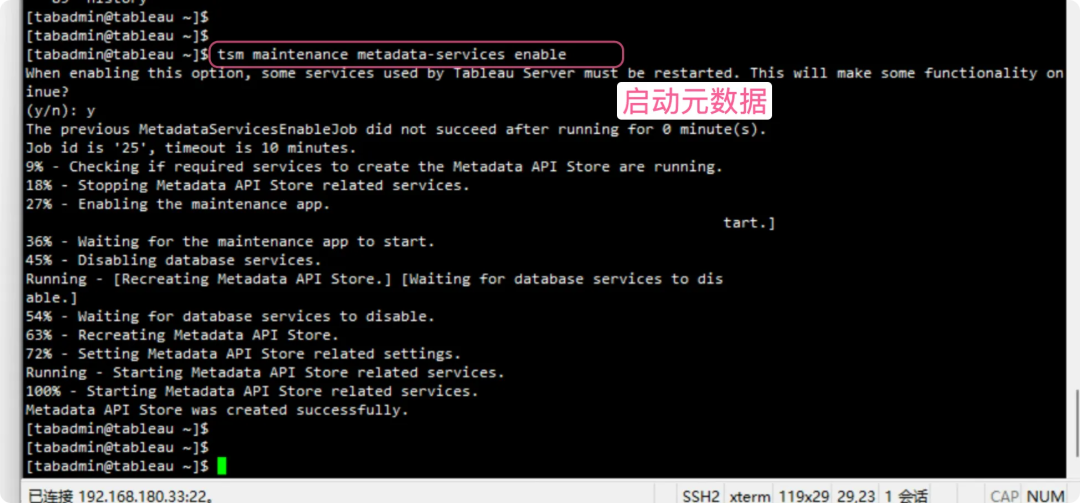 5.4 Driver Installation (Omitted)Note that a new Linux environment requires creating a tableau_driver path.The Tableau management view requires the PostgreSQL driver, and others should be configured as needed based on the environment.See tableau.com/support/drivers5.5 Server Customization: Modify the Website Logo and Name, etc.Refer to the blog https://xilejun.com/tableau/tableau-server101-tableau_server_customize-logo/
[admin@tabserver ~]$ tsm customize --header-logo wdbaby_logo.png Uploading file(s) [wdbaby_logo.png] to the controller. This may take a few seconds....Files uploaded successfully.Customization information set.[admin@tabserver ~]$ tsm customize --server-name Company BI PlatformCustomization information set.6 OthersUsers with AM licenses can install the tsig standalone gateway as needed.For example, Xile Jun typically deploys the standalone gateway and Tableau portal system separately, which can effectively enhance security, especially for cloud services.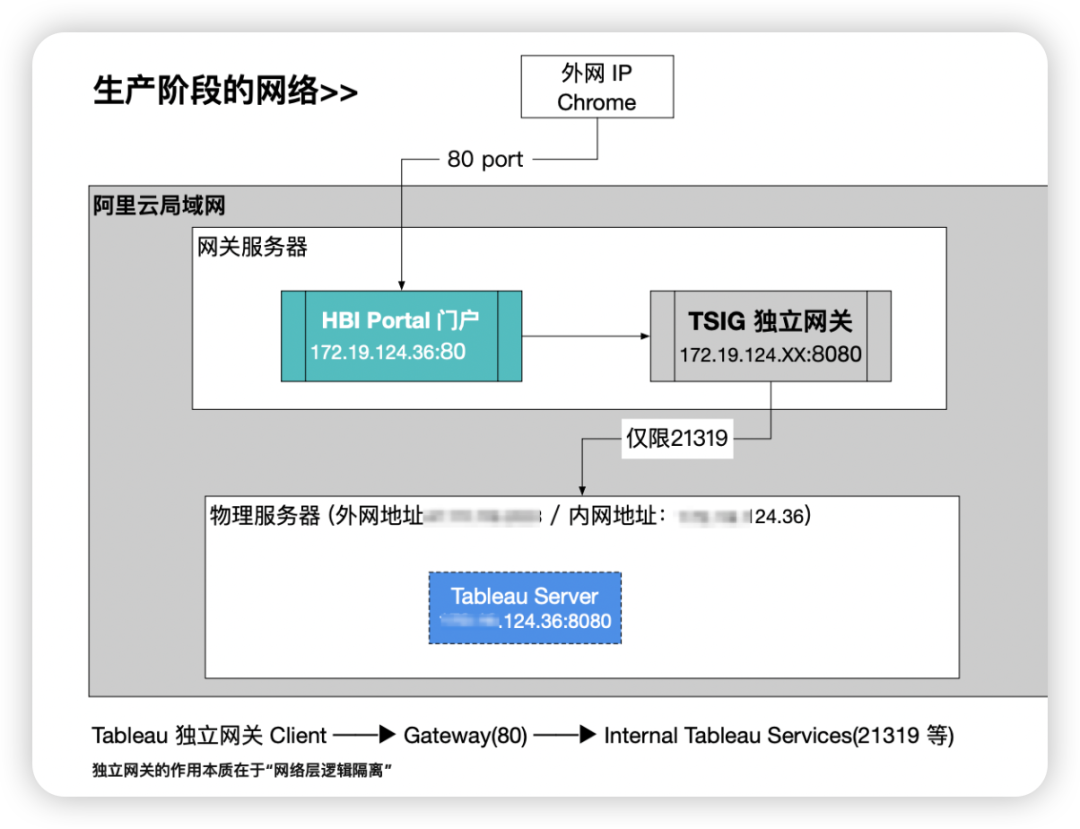 For more content, please refer to the xilejun.com blog.Welcome to watch my video channel: NetEase Smart * Xile Jun Dialogue“Business Data Analysis Series” Booksby Xile Jun · Sweeping Sir
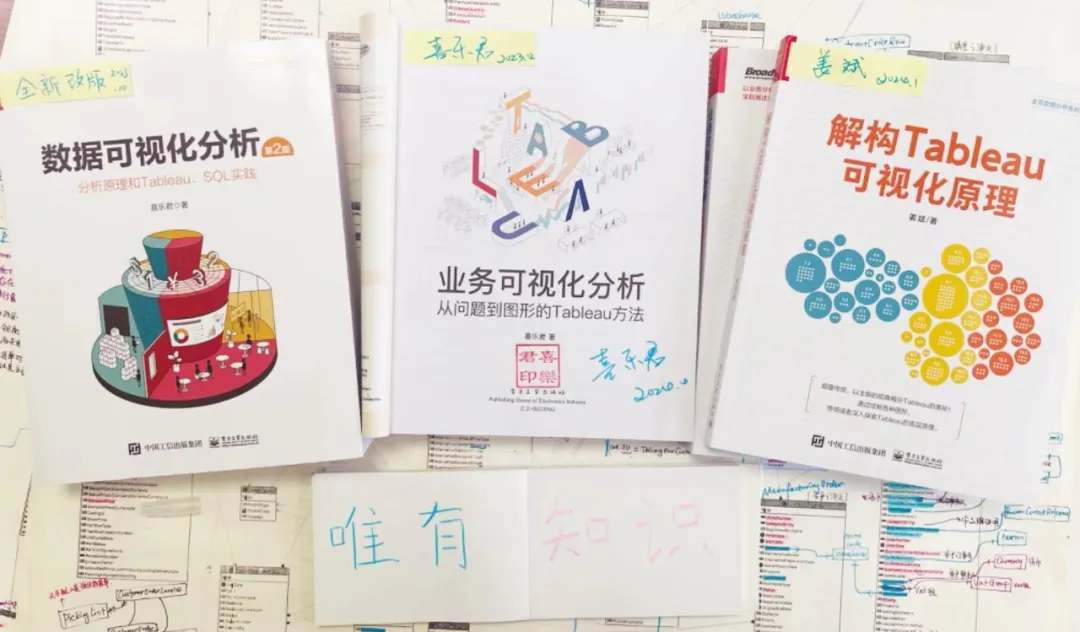
Public Long Video·Tableau in China
OnlyKnowledge Only Knowledge
“Only knowledge can save us from mediocrity”