In Python desktop development, the Button widget is a core component for user interaction. Whether you are developing data processing tools, device control software, or management systems, the Button widget is an essential interface element. This article will start from scratch and delve into the usage of the Tkinter Button widget, helping you quickly master the core skills of Python GUI development. Through practical examples and best practices, enhance your Python development skills and lay a solid foundation for subsequent upper computer development.
🎯 Core Concepts of Button Widget
What is a Button Widget
The Button widget is the most basic interactive component in Tkinter, allowing users to trigger specific functions by clicking. In actual Python development projects, buttons serve as an important bridge connecting user actions and program logic.
The Essence of Button Widget
From a technical perspective, a Button is a clickable rectangular area that can contain text, images, or a combination of both. When clicked, it triggers the bound callback function to execute the corresponding business logic.
🔧 Basic Syntax and Parameter Details
Standard Syntax for Creating a Button
import tkinter as tk

button = tk.Button(parent, option=value, ...)
Overview of Core Parameters
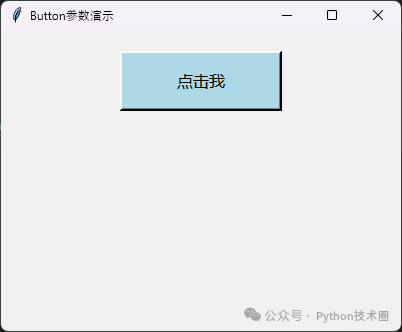
import tkinter as tk

root = tk.Tk()
root.title("Button Parameter Demonstration")
root.geometry("400x300")

# Basic Button
basic_button = tk.Button(
    root,
    text="Click Me",           # Button text
    command=lambda: print("Button Clicked!"),  # Click callback function
    width=15,               # Width (number of characters)
    height=2,               # Height (number of text lines)
    bg="lightblue",         # Background color
    fg="black",             # Foreground color (text color)
    font=("Microsoft YaHei", 12),   # Font settings
    relief="raised",        # Border style
    bd=3,                   # Border width
    state="normal"          # State: normal, disabled, active
)
basic_button.pack(pady=20)

root.mainloop()
💻 Practical Case 1: Calculator Button Layout
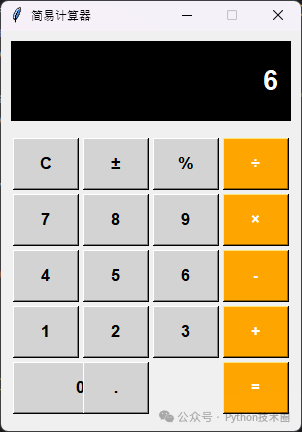
Let’s understand the layout application of Button through a practical calculator interface:
import tkinter as tk
from tkinter import messagebox

class SimpleCalculator:
    def __init__(self):
        self.root = tk.Tk()
        self.root.title("Simple Calculator")
        self.root.geometry("300x400")
        self.root.resizable(False, False)

        # Display
        self.display_var = tk.StringVar()
        self.display_var.set("0")

        # Create interface
        self.create_display()
        self.create_buttons()

    def create_display(self):
        """Create display"""
        display_frame = tk.Frame(self.root, bg="black", height=80)
        display_frame.pack(fill="x", padx=10, pady=10)
        display_frame.pack_propagate(False)

        display_label = tk.Label(
            display_frame,
            textvariable=self.display_var,
            font=("Arial", 20, "bold"),
            bg="black",
            fg="white",
            anchor="e"
        )
        display_label.pack(fill="both", expand=True, padx=10, pady=10)

    def create_buttons(self):
        """Create button layout"""
        # Button configuration
        button_config = {
            'font': ('Arial', 12, 'bold'),
            'width': 5,
            'height': 2
        }

        # Create button frame
        button_frame = tk.Frame(self.root)
        button_frame.pack(fill="both", expand=True, padx=10, pady=5)

        # Button layout definition
        buttons = [
            ['C', '±', '%', '÷'],
            ['7', '8', '9', '×'],
            ['4', '5', '6', '-'],
            ['1', '2', '3', '+'],
            ['0', '.', '=']
        ]

        # Create buttons
        for i, row in enumerate(buttons):
            for j, btn_text in enumerate(row):
                if btn_text == '0':
                    # Number 0 occupies two columns
                    btn = tk.Button(
                        button_frame,
                        text=btn_text,
                        command=lambda t=btn_text: self.button_click(t),
                        **button_config,
                        bg="lightgray"
                    )
                    btn.grid(row=i, column=j, columnspan=2,
                            sticky="ew", padx=2, pady=2)
                elif btn_text == '=':
                    # Equal button
                    btn = tk.Button(
                        button_frame,
                        text=btn_text,
                        command=lambda t=btn_text: self.button_click(t),
                        **button_config,
                        bg="orange",
                        fg="white"
                    )
                    btn.grid(row=i, column=j+1,
                            sticky="ew", padx=2, pady=2)
                else:
                    # Other buttons
                    color = "orange" if btn_text in ['÷', '×', '-', '+'] else "lightgray"
                    btn = tk.Button(
                        button_frame,
                        text=btn_text,
                        command=lambda t=btn_text: self.button_click(t),
                        **button_config,
                        bg=color,
                        fg="white" if color == "orange" else "black"
                    )
                    btn.grid(row=i, column=j,
                            sticky="ew", padx=2, pady=2)

        # Configure column weights
        for i in range(4):
            button_frame.columnconfigure(i, weight=1)

    def button_click(self, value):
        """Button click handling"""
        current = self.display_var.get()

        if value == 'C':
            self.display_var.set("0")
        elif value.isdigit() or value == '.':
            if current == "0":
                self.display_var.set(value)
            else:
                self.display_var.set(current + value)
        elif value == '=':
            try:
                # Simplified calculation logic
                expression = current.replace('×', '*').replace('÷', '/')
                result = eval(expression)
                self.display_var.set(str(result))
            except:
                messagebox.showerror("Error", "Calculation Error")
                self.display_var.set("0")
        else:
            # Operator handling
            self.display_var.set(current + value)

    def run(self):
        self.root.mainloop()

# Run calculator
if __name__ == "__main__":
    calc = SimpleCalculator()
    calc.run()
🎨 Practical Case 2: File Operation Tool
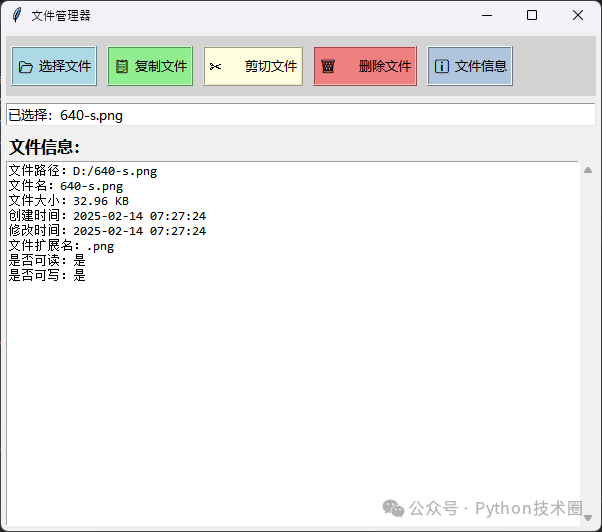
This case demonstrates the application of Button in actual file processing projects:
import time
import tkinter as tk
from tkinter import filedialog, messagebox, scrolledtext
import os
import shutil


class FileManager:
    def __init__(self):
        self.root = tk.Tk()
        self.root.title("File Manager")
        self.root.geometry("600x500")

        # Current selected file path
        self.current_file = None

        self.create_interface()

    def create_interface(self):
        """Create main interface"""
        # Top button area
        top_frame = tk.Frame(self.root, bg="lightgray", height=60)
        top_frame.pack(fill="x", padx=5, pady=5)
        top_frame.pack_propagate(False)

        # Button style configuration
        btn_style = {
            'font': ('Microsoft YaHei', 10),
            'height': 2,
            'relief': 'ridge',
            'bd': 2
        }

        # File operation buttons
        buttons = [
            ("📂 Select File", self.select_file, "lightblue"),
            ("📋 Copy File", self.copy_file, "lightgreen"),
            ("✂️ Cut File", self.cut_file, "lightyellow"),
            ("🗑️ Delete File", self.delete_file, "lightcoral"),
            ("ℹ️ File Info", self.show_file_info, "lightsteelblue")
        ]

        for i, (text, command, color) in enumerate(buttons):
            btn = tk.Button(
                top_frame,
                text=text,
                command=command,
                bg=color,
                **btn_style
            )
            btn.pack(side="left", padx=5, pady=10, fill="y")

        # Status display area
        self.status_label = tk.Label(
            self.root,
            text="Please select a file",
            bg="white",
            relief="sunken",
            bd=1,
            anchor="w",
            font=('Microsoft YaHei', 10)
        )
        self.status_label.pack(fill="x", padx=5, pady=2)

        # File info display area
        info_frame = tk.Frame(self.root)
        info_frame.pack(fill="both", expand=True, padx=5, pady=5)

        tk.Label(info_frame, text="File Info:", font=('Microsoft YaHei', 12, 'bold')).pack(anchor="w")

        self.info_text = scrolledtext.ScrolledText(
            info_frame,
            height=20,
            font=('Consolas', 10),
            wrap=tk.WORD
        )
        self.info_text.pack(fill="both", expand=True)

    def select_file(self):
        """Select file"""
        file_path = filedialog.askopenfilename(
            title="Select File",
            filetypes=[
                ("All Files", "*.*"),
                ("Text Files", "*.txt"),
                ("Python Files", "*.py"),
                ("Image Files", "*.jpg;*.png;*.gif")
            ]
        )

        if file_path:
            self.current_file = file_path
            self.status_label.config(text=f"Selected: {os.path.basename(file_path)}")
            self.update_file_info()

    def copy_file(self):
        """Copy file"""
        if not self.current_file:
            messagebox.showwarning("Warning", "Please select a file first")
            return

        save_path = filedialog.asksaveasfilename(
            title="Copy file to...",
            defaultextension=os.path.splitext(self.current_file)[1],
            initialfile=f"copy_{os.path.basename(self.current_file)}"
        )

        if save_path:
            try:
                shutil.copy2(self.current_file, save_path)
                messagebox.showinfo("Success", f"File copied to:
{save_path}")
            except Exception as e:
                messagebox.showerror("Error", f"Copy failed: {str(e)}")

    def cut_file(self):
        """Cut file"""
        if not self.current_file:
            messagebox.showwarning("Warning", "Please select a file first")
            return

        save_path = filedialog.asksaveasfilename(
            title="Move file to...",
            defaultextension=os.path.splitext(self.current_file)[1],
            initialfile=os.path.basename(self.current_file)
        )

        if save_path:
            try:
                shutil.move(self.current_file, save_path)
                messagebox.showinfo("Success", f"File moved to:
{save_path}")
                self.current_file = None
                self.status_label.config(text="Please select a file")
                self.info_text.delete(1.0, tk.END)
            except Exception as e:
                messagebox.showerror("Error", f"Move failed: {str(e)}")

    def delete_file(self):
        """Delete file"""
        if not self.current_file:
            messagebox.showwarning("Warning", "Please select a file first")
            return

        if messagebox.askyesno("Confirm", f"Are you sure you want to delete the file?
{self.current_file}"):
            try:
                os.remove(self.current_file)
                messagebox.showinfo("Success", "File deleted")
                self.current_file = None
                self.status_label.config(text="Please select a file")
                self.info_text.delete(1.0, tk.END)
            except Exception as e:
                messagebox.showerror("Error", f"Delete failed: {str(e)}")

    def show_file_info(self):
        """Show detailed file information"""
        if not self.current_file:
            messagebox.showwarning("Warning", "Please select a file first")
            return

        self.update_file_info()

    def update_file_info(self):
        """Update file information display"""
        if not self.current_file or not os.path.exists(self.current_file):
            return

        try:
            stat = os.stat(self.current_file)
            size = stat.st_size

            # Format file size
            if size < 1024:
                size_str = f"{size} B"
            elif size < 1024 * 1024:
                size_str = f"{size / 1024:.2f} KB"
            else:
                size_str = f"{size / (1024 * 1024):.2f} MB"

            info = f"""File Path: {self.current_file}\nFile Name: {os.path.basename(self.current_file)}\nFile Size: {size_str}\nCreation Time: {time.strftime('%Y-%m-%d %H:%M:%S', time.localtime(stat.st_ctime))}\nModification Time: {time.strftime('%Y-%m-%d %H:%M:%S', time.localtime(stat.st_mtime))}\nFile Extension: {os.path.splitext(self.current_file)[1]}\nReadable: {'Yes' if os.access(self.current_file, os.R_OK) else 'No'}\nWritable: {'Yes' if os.access(self.current_file, os.W_OK) else 'No'}\n"""

            self.info_text.delete(1.0, tk.END)
            self.info_text.insert(1.0, info)

        except Exception as e:
            messagebox.showerror("Error", f"Failed to get file information: {str(e)}")

    def run(self):
        self.root.mainloop()


# Run file manager
if __name__ == "__main__":
    app = FileManager()
    app.run()
🎯 Advanced Techniques and Best Practices
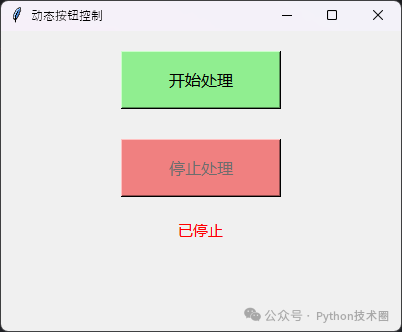
Dynamic Button State Control
import tkinter as tk
import threading
import time

class DynamicButtonDemo:
    def __init__(self):
        self.root = tk.Tk()
        self.root.title("Dynamic Button Control")
        self.root.geometry("400x300")

        # Button state flag
        self.is_processing = False

        self.create_buttons()

    def create_buttons(self):
        """Create dynamic control buttons"""
        # Process button
        self.process_btn = tk.Button(
            self.root,
            text="Start Processing",
            command=self.start_process,
            font=('Microsoft YaHei', 12),
            bg="lightgreen",
            width=15,
            height=2
        )
        self.process_btn.pack(pady=20)

        # Stop button (initially disabled)
        self.stop_btn = tk.Button(
            self.root,
            text="Stop Processing",
            command=self.stop_process,
            font=('Microsoft YaHei', 12),
            bg="lightcoral",
            width=15,
            height=2,
            state="disabled"  # Initially disabled
        )
        self.stop_btn.pack(pady=10)

        # Status label
        self.status_label = tk.Label(
            self.root,
            text="Ready",
            font=('Microsoft YaHei', 11),
            fg="green"
        )
        self.status_label.pack(pady=10)

    def start_process(self):
        """Start processing"""
        if self.is_processing:
            return

        self.is_processing = True

        # Update button state
        self.process_btn.config(state="disabled", text="Processing...")
        self.stop_btn.config(state="normal")

        # Update status
        self.status_label.config(text="Processing...", fg="orange")

        # Execute time-consuming operation in a new thread
        thread = threading.Thread(target=self.simulate_process)
        thread.daemon = True
        thread.start()

    def simulate_process(self):
        """Simulate processing"""
        for i in range(10):
            if not self.is_processing:
                break

            # Update progress
            self.root.after(0, lambda i=i: self.status_label.config(
                text=f"Processing... {(i+1)*10}%"
            ))

            time.sleep(1)  # Simulate processing time

        # Processing completed
        if self.is_processing:
            self.root.after(0, self.process_completed)

    def stop_process(self):
        """Stop processing"""
        self.is_processing = False

        # Reset button state
        self.process_btn.config(state="normal", text="Start Processing")
        self.stop_btn.config(state="disabled")

        # Update status
        self.status_label.config(text="Stopped", fg="red")

    def process_completed(self):
        """Processing completed"""
        self.is_processing = False

        # Reset button state
        self.process_btn.config(state="normal", text="Start Processing")
        self.stop_btn.config(state="disabled")

        # Update status
        self.status_label.config(text="Processing Completed", fg="green")

    def run(self):
        self.root.mainloop()

# Run demo
if __name__ == "__main__":
    demo = DynamicButtonDemo()
    demo.run()
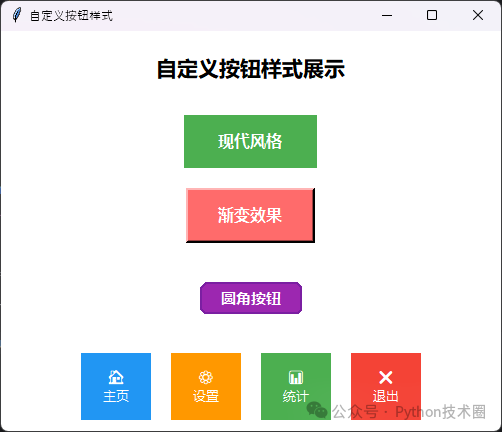
Custom Button Styles
import tkinter as tk

class CustomButtonStyles:
    def __init__(self):
        self.root = tk.Tk()
        self.root.title("Custom Button Styles")
        self.root.geometry("500x400")
        self.root.config(bg="white")

        self.create_styled_buttons()

    def create_styled_buttons(self):
        """Create various styled buttons"""

        # Title
        title_label = tk.Label(
            self.root,
            text="Custom Button Style Showcase",
            font=('Microsoft YaHei', 16, 'bold'),
            bg="white"
        )
        title_label.pack(pady=20)

        # Modern style button
        modern_btn = tk.Button(
            self.root,
            text="Modern Style",
            font=('Microsoft YaHei', 12, 'bold'),
            bg="#4CAF50",
            fg="white",
            relief="flat",
            bd=0,
            padx=30,
            pady=10,
            cursor="hand2"
        )
        modern_btn.pack(pady=10)

        # Bind hover effect
        def on_enter(e):
            modern_btn.config(bg="#45a049")
        def on_leave(e):
            modern_btn.config(bg="#4CAF50")

        modern_btn.bind("", on_enter)
        modern_btn.bind("", on_leave)

        # Gradient effect button (simulated)
        gradient_frame = tk.Frame(self.root, bg="white")
        gradient_frame.pack(pady=10)

        gradient_btn = tk.Button(
            gradient_frame,
            text="Gradient Effect",
            font=('Microsoft YaHei', 12, 'bold'),
            bg="#FF6B6B",
            fg="white",
            relief="raised",
            bd=3,
            padx=25,
            pady=8
        )
        gradient_btn.pack()

        # Rounded button (simulated using Canvas)
        canvas = tk.Canvas(self.root, width=200, height=60, bg="white", highlightthickness=0)
        canvas.pack(pady=15)

        # Draw rounded rectangle
        def create_rounded_button(canvas, x1, y1, x2, y2, r=10, **kwargs):
            points = []
            for x, y in [(x1, y1 + r), (x1, y1), (x1 + r, y1),
                        (x2 - r, y1), (x2, y1), (x2, y1 + r),
                        (x2, y2 - r), (x2, y2), (x2 - r, y2),
                        (x1 + r, y2), (x1, y2), (x1, y2 - r)]:
                points.extend([x, y])
            return canvas.create_polygon(points, smooth=True, **kwargs)

        # Create rounded button background
        rounded_bg = create_rounded_button(
            canvas, 50, 15, 150, 45, r=15,
            fill="#9C27B0", outline="#7B1FA2", width=2
        )

        # Add text
        canvas.create_text(100, 30, text="Rounded Button",
                          fill="white", font=('Microsoft YaHei', 11, 'bold'))

        # Icon buttons
        icon_frame = tk.Frame(self.root, bg="white")
        icon_frame.pack(pady=10)

        # Simulated icon buttons
        icon_buttons = [
            ("🏠", "Home", "#2196F3"),
            ("⚙️", "Settings", "#FF9800"),
            ("📊", "Statistics", "#4CAF50"),
            ("❌", "Exit", "#F44336")
        ]

        for icon, text, color in icon_buttons:
            btn_frame = tk.Frame(icon_frame, bg="white")
            btn_frame.pack(side="left", padx=10)

            btn = tk.Button(
                btn_frame,
                text=f"{icon}\n{text}",
                font=('Microsoft YaHei', 10),
                bg=color,
                fg="white",
                relief="flat",
                bd=0,
                width=8,
                height=3,
                cursor="hand2"
            )
            btn.pack()

    def run(self):
        self.root.mainloop()

# Run style demo
if __name__ == "__main__":
    demo = CustomButtonStyles()
    demo.run()
🎯 Summary
Through this in-depth study, we have comprehensively mastered the core skills of the Python Tkinter Button widget. From basic button creation to complex file manager development, each example reflects the application value of programming skills in practical projects.
Three Core Points:
- Solid Foundation Master the parameter configuration and event binding mechanism of Button
- Practical Orientation Understand the application of Button in complex interfaces through calculator and file manager projects
- Optimization Awareness Focus on performance optimization and user experience, laying the foundation for upper computer development.
Having mastered the Button widget, you have taken an important step in Python GUI development. Combined with the practical cases and best practices in this article, I believe you can develop more professional and practical desktop applications. Continue to delve into other Tkinter widgets, and your Python development skills will become more comprehensive and in-depth!