What are the common software engineering methods in embedded development?
Follow UsLearn Embedded Together, learn and grow together

1. Object-Oriented Programming (OOP)
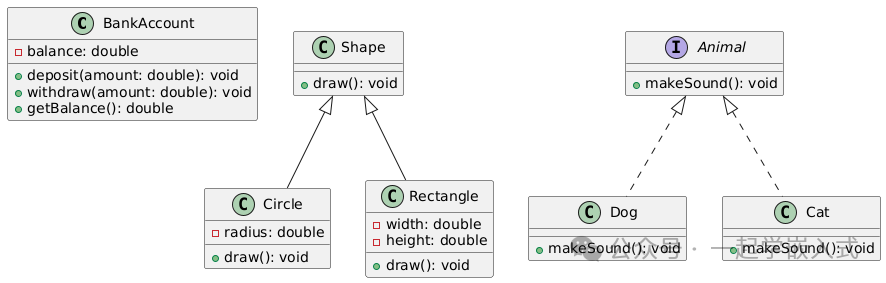
Although C is not an object-oriented programming language, with some programming techniques, it can achieve the core features of Object-Oriented Programming (OOP), such as encapsulation, inheritance, and polymorphism.
1. Encapsulation
Encapsulation is the bundling of data and the functions that operate on that data, hiding the internal implementation details from the outside. In embedded C, encapsulation can be achieved through structures and function pointers.
#include<stdio.h>

// Define an LED structure
typedef struct {
    int pin;
    void (*turnOn)(struct LED*);
    void (*turnOff)(struct LED*);
} LED;

// Implement LED turn on function
void ledTurnOn(LED* led) {
    printf("LED on pin %d is turned on.\n", led->pin);
}

// Implement LED turn off function
void ledTurnOff(LED* led) {
    printf("LED on pin %d is turned off.\n", led->pin);
}

// Initialize LED
void ledInit(LED* led, int pin) {
    led->pin = pin;
    led->turnOn = ledTurnOn;
    led->turnOff = ledTurnOff;
}

int main(void) {
    LED myLed;
    ledInit(&myLed, 13);
    myLed.turnOn(&myLed);
    myLed.turnOff(&myLed);
    return 0;
}
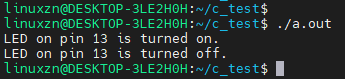
<span>LED</span> structure encapsulates the <span>pin</span> data and the <span>turnOn</span> and <span>turnOff</span> function pointers. The <span>ledInit</span> function is used to initialize the <span>LED</span> structure, assigning specific functions to the function pointers. External code can only operate on the <span>LED</span> through these function pointers without needing to understand the internal implementation details.
2. Inheritance
Inheritance allows one object to directly use the properties and methods of another object. In embedded C, inheritance can be implemented through nested structures.
#include<stdio.h>

// Define a base class structure
typedef struct {
    int id;
    void (*printInfo)(struct Base*);
} Base;

// Implement base class print info function
void basePrintInfo(Base* base) {
    printf("Base ID: %d\n", base->id);
}

// Define a derived class structure
typedef struct {
    Base base; // Inherit Base structure
    char* name;
} Derived;

// Implement derived class print info function
void derivedPrintInfo(Derived* derived) {
    basePrintInfo(&derived->base);
    printf("Derived Name: %s\n", derived->name);
}

// Initialize base class
void baseInit(Base* base, int id) {
    base->id = id;
    base->printInfo = basePrintInfo;
}

// Initialize derived class
void derivedInit(Derived* derived, int id, char* name) {
    baseInit(&derived->base, id);
    derived->name = name;
    derived->base.printInfo = (void (*)(Base*))derivedPrintInfo;
}

int main(void) {
    Derived myDerived;
    derivedInit(&myDerived, 1, "Derived Object");
    myDerived.base.printInfo((Base*)&myDerived);
    return 0;
}
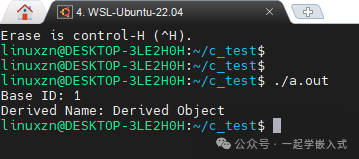
<span>Derived</span> structure nests the <span>Base</span> structure, thus inheriting the properties and methods of the <span>Base</span> structure. The <span>derivedInit</span> function initializes the <span>Derived</span> structure by calling the <span>baseInit</span> function to initialize the base class part and assigns the <span>printInfo</span> function pointer to the <span>derivedPrintInfo</span> function.
3. Polymorphism
Polymorphism refers to different objects responding differently to the same message. In embedded C, polymorphism can be achieved through function pointers.
#include<stdio.h>

// Define a base class structure
typedef struct {
    void (*operation)(struct Base*);
} Base;

// Define derived class 1 structure
typedef struct {
    Base base;
} Derived1;

// Define derived class 2 structure
typedef struct {
    Base base;
} Derived2;

// Derived class 1 operation function
void derived1Operation(Base* base) {
    printf("Derived1 operation.\n");
}

// Derived class 2 operation function
void derived2Operation(Base* base) {
    printf("Derived2 operation.\n");
}

// Initialize derived class 1
void derived1Init(Derived1* derived1) {
    derived1->base.operation = derived1Operation;
}

// Initialize derived class 2
void derived2Init(Derived2* derived2) {
    derived2->base.operation = derived2Operation;
}

// Perform operation
void performOperation(Base* base) {
    base->operation(base);
}

int main(void) {
    Derived1 myDerived1;
    Derived2 myDerived2;
    derived1Init(&myDerived1);
    derived2Init(&myDerived2);

    performOperation((Base*)&myDerived1);
    performOperation((Base*)&myDerived2);
    return 0;
}
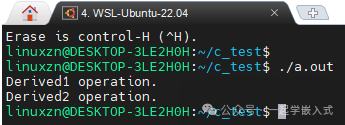
<span>Base</span> structure contains a function pointer <span>operation</span>. The <span>Derived1</span> and <span>Derived2</span> structures inherit from the <span>Base</span> structure and implement their own <span>operation</span> functions. The <span>performOperation</span> function receives a <span>Base</span> pointer and calls the corresponding <span>operation</span> function based on the specific object, thus achieving polymorphism.
2. Test-Driven Development (TDD)
Test-Driven Development (TDD) is a software development methodology that emphasizes writing test code before writing the actual functional code.
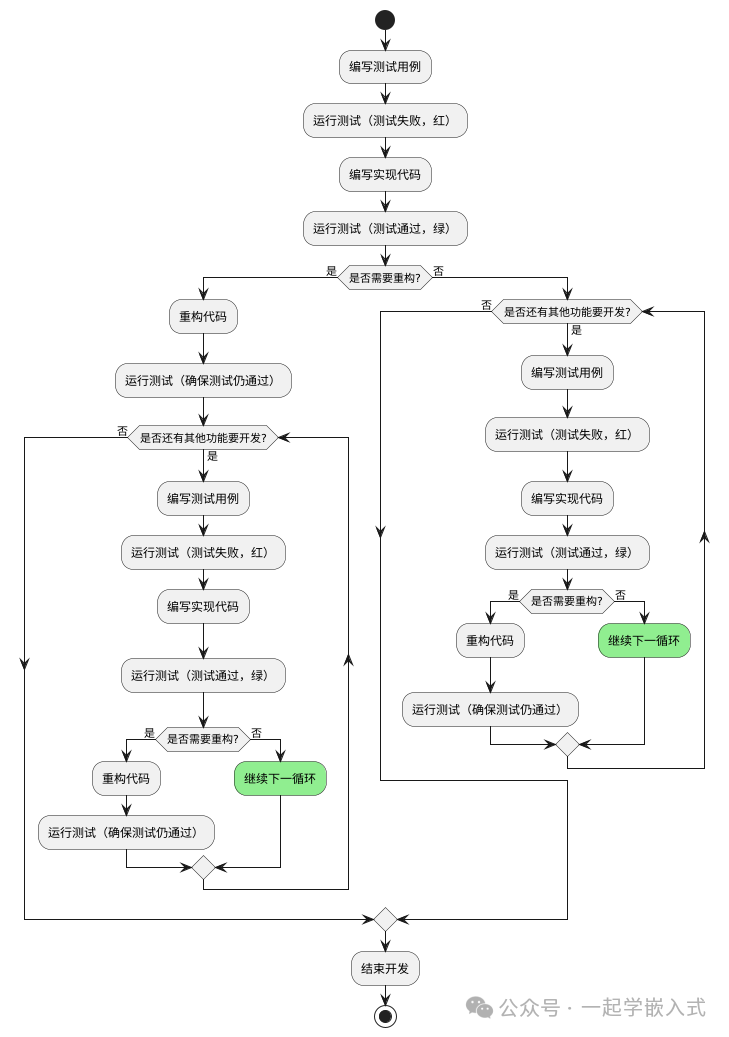
The core process of TDD follows the “Red – Green – Refactor” cycle, which will be detailed below, including its principles, processes, advantages, limitations, and examples.
TDD is based on the idea of “testing first”; developers first clarify requirements and translate them into specific test cases.
Since implementation code has not yet been written, the test cases will inevitably fail (showing a “red” state).
Next, developers write the minimum code necessary to pass the test cases (achieving a “green” state).
Finally, the code is refactored to optimize its internal structure without changing its external behavior, improving code readability, maintainability, and extensibility.
Practice: Using the Unity Testing Framework.
Unity is a lightweight testing framework implemented in C, and the code itself is very small. Most of its code consists of macro definitions, so the actual compiled code will be even smaller, <span>making it suitable for embedded testing applications</span>.
Unity has been briefly shared before:
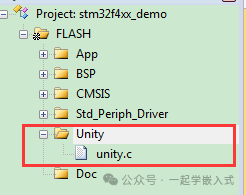
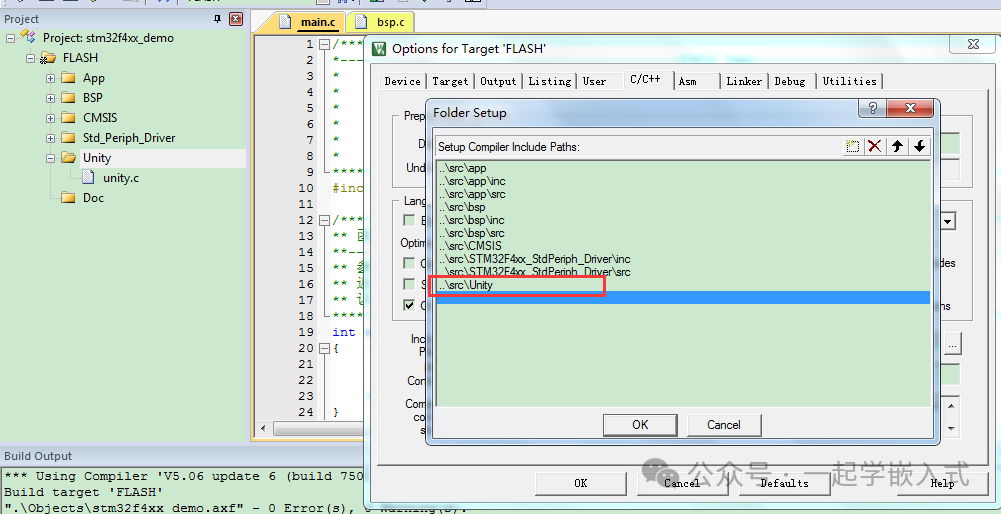
First, copy the three files <span>unity.c, unity.h, unity_internals.h</span> from the Unity source directory to our project directory, and add <span>unity.c</span> to our Keil project, then add the file path:
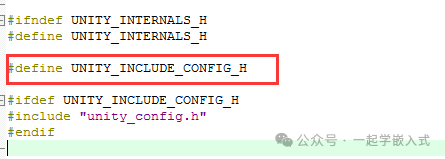
We open the <span>unity_internals.h</span> file and find that it includes a header file <span>unity_config.h</span>:
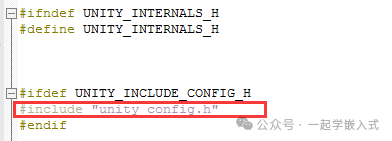
This file is a configuration file where we place platform-related features. However, this file <span>Unity</span> source does not provide it, so we need to create it ourselves. The content of the new <span>unity_config.h</span> file I created is as follows:
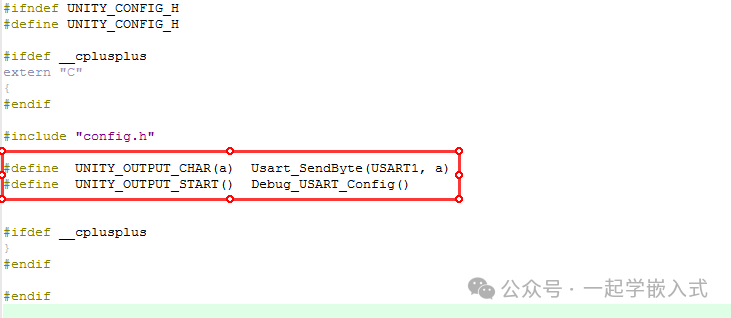
It mainly contains hardware-related header file inclusions and two necessary macro definitions. The first macro definition is used to redirect output to the serial port, and the second macro definition is our serial port initialization.
In <span>unity_internals.h</span>, we find that the <span>unity_config.h</span> file is conditionally compiled out, and we need to define a macro to enable it:
Finally, include the header file <span>unity.h</span> in our <span>main.c</span> to use the Unity testing framework. In <span>unity_internals.h</span>, there are many configurable options, such as the length of integers, which can vary across different platforms. Unity allows developers to set the length of integers. If not set, Unity’s default value is 32 bits. Our STM32 is 32 bits, so we do not need to modify it.
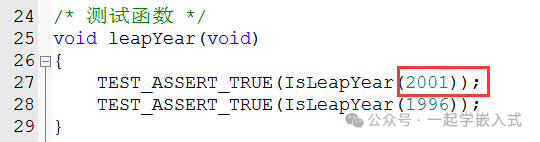
Next, we start writing test cases. In Unity, each test case is a function that has no parameters and no return value. Let’s test a leap year judgment function:

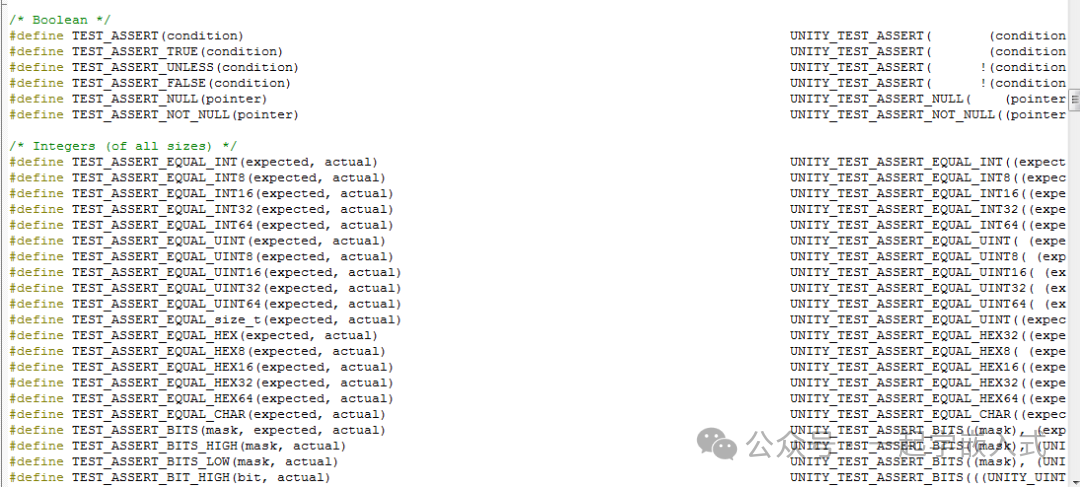
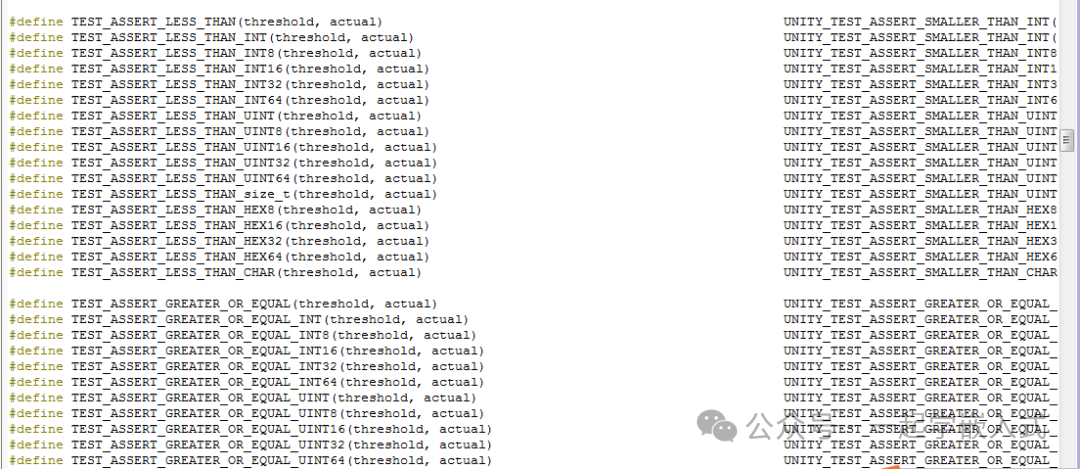
In the test function, we use <span>TEST_ASSERT_TRUE</span> and <span>TEST_ASSERT_FALSE</span>, which are two assertions implemented by Unity, used to determine whether a boolean expression is true or false. These testing frameworks generally use assertions for testing, including several frameworks shared above. In this example, only two assertions are used, but Unity has many assertions, as shown in the following partial list:
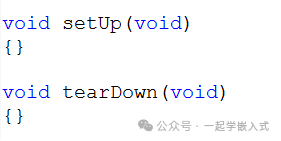
Unity requires implementing a setup function and a teardown function for each test case, both of which have no parameters and no return values. In the leap year judgment function test case, since no initialization or cleanup operations are needed, the two implemented functions are as follows:
After writing the test cases, we can run them in the main function. In Unity, we use the macro <span>RUN_TEST</span> to run the test case, with the parameter being the name of the test case function. The main function is as follows:

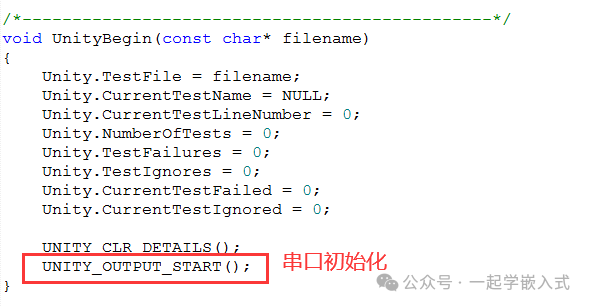
<span>UNITY_BEGIN</span> function is the UNITY initialization function, and our serial port initialization is also called here:

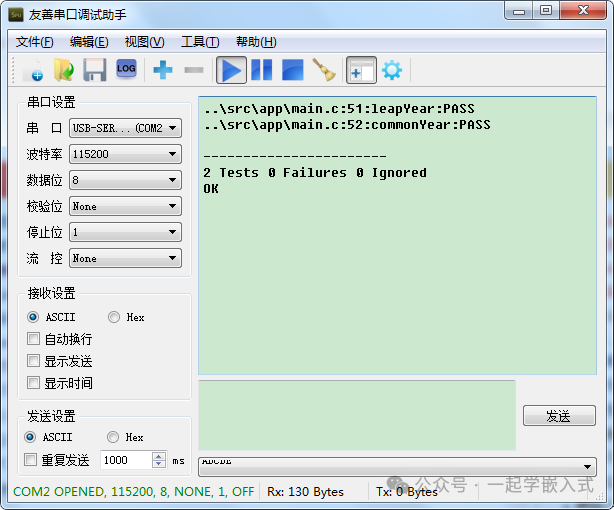
The <span>RUN_TEST</span> function is used to run our test case. The <span>UNITY_END</span> function returns our test results. Finally, the output results are as follows:
If we change the test leap year function from 2000 to 2001:
The output result will change to:
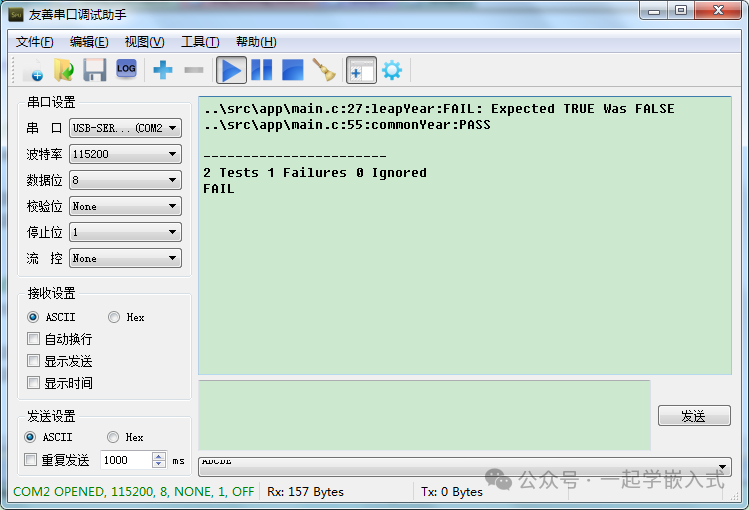
From the results, we can see the lines of code related to the failed test cases. Before conducting such tests, we must understand the functionality of our functional code and its expected output to design test cases and conduct testing.
Related Book: “Test-Driven Development in Embedded C”
3. Defensive Programming
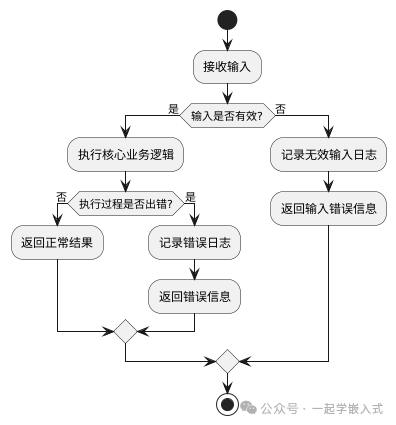
Defensive programming is a programming paradigm aimed at designing protective measures in advance by anticipating potential errors, exceptional inputs, or undefined behaviors, ensuring that the program can still run stably, degrade gracefully, or report errors clearly in unexpected situations, rather than crashing or causing uncontrollable consequences.
1. Core Principles
- Trust no input: Assume all inputs (including function parameters, user inputs, external interface data, etc.) are untrustworthy and must be validated.
- Minimize potential harm: Isolate risky code and limit scope to prevent local errors from spreading to the entire system.
- Clear error feedback: Provide clear error messages or logs when errors occur to facilitate debugging.
- Graceful degradation: When unable to handle errors, let the system enter a safe state.
2. Best Practices
(1) Parameter Validation
Check the legality of function entry parameters:
float safe_sqrt(float x) {
    if (x < 0) {
        return NAN;  // or trigger error handling
    }
    return sqrt(x);
}
(2) Assertions
Validate assumptions that “should not happen” to assist debugging:
#include<assert.h>

void memcpy_safe(void* dst, size_t dst_size, const void* src, size_t src_size) {
    assert(dst != NULL && src != NULL);  // Pointers must not be null
    assert(dst_size >= src_size);       // Target space must be sufficient
    // Actual copy logic
}
(3) Error Codes and Error Handling
Functions convey error status through return values or output parameters:
enum error_code {
    SUCCESS = 0,
    ERR_INVALID_PARAM,
    ERR_OUT_OF_MEM
};

enum error_code init_device(struct device* dev) {
    if (dev == NULL) return ERR_INVALID_PARAM;
    if (allocate_memory(dev) != 0) return ERR_OUT_OF_MEM;
    return SUCCESS;
}
(4) Preventing Undefined Behavior
Ensure integer division does not overflow:
int divide_safe(int a, int b) {
    if (b == 0) return INT_MAX;  // or trigger error
    if (a == INT_MIN && b == -1) return INT_MAX;  // Handle -2147483648 / -1 overflow
    return a / b;
}
Prevent null pointer dereference:
void print_string(const char* str) {
    if (str == NULL) {
        printf("(null)\n");
        return;
    }
    printf("%s\n", str);
}
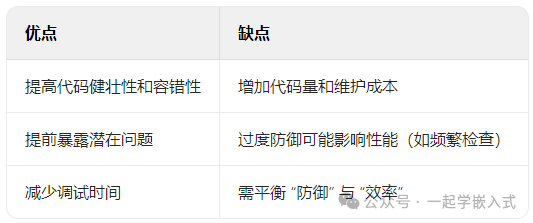
3. Pros and Cons of Defensive Testing
4. Agile Development
Agile development emphasizes rapid iteration, customer feedback, and team collaboration. In embedded development, projects can be divided into multiple small iterative cycles, each with a runnable version.
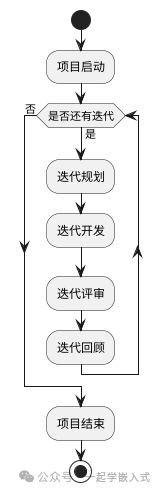
1. Iterative Development and Continuous Integration
- Short Iterative Cycles: Divide the project into multiple short iterative cycles, each typically lasting 1-4 weeks. In each iteration, the team completes a certain number of user stories and delivers a runnable product increment. Short iterative cycles help quickly validate requirements and designs, allowing timely adjustments to project direction.
- Continuous Integration: Establish an automated continuous integration environment that automatically compiles, tests, and integrates after each code submission. In embedded development, hardware integration testing is also required to ensure software and hardware compatibility. Continuous integration can promptly identify code conflicts and defects, improving code quality.
- Iteration Review and Retrospective: After each iteration, conduct an iteration review meeting to present the iteration results to customers and stakeholders, collecting feedback. At the same time, hold an iteration retrospective meeting where team members summarize the lessons learned from the iteration and propose improvements to apply in the next iteration.
5. Waterfall Model
The Waterfall Model is a traditional software development model that proceeds through stages of requirements analysis, design, coding, testing, and maintenance in a linear order, like a waterfall flowing down, where each stage is completed before moving to the next.
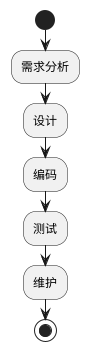
The Waterfall Model, as a classic software development method, has significant advantages in embedded development and many other fields.
1. Clear Stages and Order
The stages of the Waterfall Model are clearly defined, advancing sequentially from requirements analysis, design, coding, testing to maintenance.
This clear stage division makes the project process easy to understand and manage, with each stage having clear inputs and outputs, facilitating project team members to clarify their responsibilities and tasks.
2. Emphasis on Documentation
This model places great importance on documentation writing and management, producing corresponding documents at each stage, such as requirement specifications, design documents, and test reports.
These documents are not only important outcomes of each project stage but also serve as important communication tools among project team members, providing strong support for project maintenance and upgrades.
3. Easy to Control and Manage
Due to the linear order and clear stage division of the Waterfall Model, project managers can easily monitor and control the project.
Each stage has clear milestones and deliverables, allowing managers to assess project progress and quality based on these milestones, promptly identifying issues and taking appropriate measures for adjustments.
For example, after the coding phase ends, code reviews and unit tests can be conducted to assess code quality. If issues are found, feedback can be promptly provided to developers for modification.
This concludes this sharing. If you find the article helpful, please help share it, thank you.

Follow 【Learn Embedded Together】 to become better together。
If you like the article, click “Share”, “Like”, “Recommend”!