 Click to follow and stay on track — a public account that shares only valuable content in the low-code world
In front-end development, real-time communication is one of the core capabilities for building highly interactive applications. From smart device monitoring to real-time news push, different business scenarios have distinctly different requirements for communication reliability, bandwidth usage, and directional characteristics. Among the mainstream front-end real-time communication technologies, MQTT and EventSource occupy important positions in multi-device interaction and unidirectional message push scenarios, respectively, due to their unique design philosophies. This article will provide developers with a clear selection guide from three dimensions: underlying principles, code practices, and technical differences, helping you accurately match the best solution in actual projects.
1. Comparison of Underlying Principles: Core Design Differences of Two Technologies
The essence of real-time communication is to solve the problem of “how to efficiently transmit messages between the server and the client”. However, MQTT and EventSource have taken different paths from the source of their design — the former pursues “bidirectional communication adaptable to all scenarios”, while the latter focuses on “lightweight and efficient unidirectional push”.
1. MQTT: A Bidirectional Communication Protocol Based on Publish/Subscribe
MQTT (Message Queuing Telemetry Transport) is a protocol designed in 1999 specifically for low-bandwidth, high-latency networks, and is now widely used in scenarios such as the Internet of Things (IoT) and smart device monitoring. Its core principle revolves around the publish/subscribe (Pub/Sub) model, achieving message forwarding through a “broker”. The specific process is as follows:
-
Role division: Clients are divided into “Publishers” and “Subscribers”; they do not communicate directly but pass messages through the broker;
-
Topic mechanism: Messages are categorized by “Topics” (e.g., device/temperature/room1), and subscribers only need to subscribe to the topics of interest to receive all messages under that topic;
Core features:
-
Low bandwidth usage: The protocol header is only 2 bytes, and messages can be compressed, making it suitable for scenarios with limited bandwidth, such as IoT devices;
-
QoS (Quality of Service) levels: Provides three levels of reliability assurance to meet different business requirements for message delivery:
-
QoS 0 (At most once): Messages are sent only once, without confirmation or retransmission, suitable for non-critical data (e.g., real-time device logs);
-
QoS 1 (At least once): Messages will be retransmitted until the receiver confirms, which may result in duplicate messages, suitable for scenarios that require delivery assurance but can tolerate duplicates (e.g., smart lighting control commands);
-
QoS 2 (Exactly once): Ensures that messages are delivered only once through a two-confirmation mechanism, suitable for critical data (e.g., device failure alarms);
-
Heartbeat keep-alive: Clients periodically send heartbeat packets to the broker through the keepalive mechanism. If the broker does not receive a heartbeat within the timeout, it will disconnect and trigger a reconnection, ensuring long connection stability.
2. EventSource: Unidirectional Real-Time Push Based on SSE
EventSource is an API defined in the HTML5 standard, based on SSE (Server-Sent Events) technology, focusing on “unidirectional real-time push from server to client”. It solves the resource waste problem caused by traditional “polling” frequent requests. The core principle is as follows:
-
Unidirectional communication: Only supports sending messages from the server to the client; the client cannot actively push data to the server, suitable for scenarios where “only receiving without feedback” is needed (e.g., news push, stock price updates);
-
Long connection mechanism: The client establishes a single HTTP long connection with the server, allowing the server to continuously send messages to the client through this connection without frequently establishing new connections;
-
Message format: Messages sent by the server must follow a specific format (starting with data: and ending with a blank line), and the client listens for and parses messages through the onmessage event;
-
Automatic reconnection: If the connection is unexpectedly disconnected, EventSource will automatically attempt to reconnect (the default reconnection interval is 3 seconds), without requiring developers to manually implement reconnection logic.
2. Business Scenario Implementation: Complete Code Practice (Node.js + Front-End)
Theory must be combined with practice. This section will provide complete code for setting up a Node.js server and connecting the front end for typical business scenarios of the two technologies, helping developers quickly implement solutions.
1. MQTT Scenario: Smart Device Temperature Monitoring
Business requirement: A smart temperature sensor (client) sends temperature data to the server in real-time, and the front-end page (subscriber) receives and displays the temperature in real-time. If the temperature exceeds 30℃, an alarm is triggered.
Step 1: Set up MQTT Broker and Server
MQTT relies on a broker for message forwarding. Here, we use the open-source mosca library to set up a local broker and create a “temperature data publisher” (simulating a sensor):
// Server: server-mqtt.js
const mosca = require('mosca');
const mqtt = require('mqtt');

// 1. Set up MQTT Broker (port 1883)
const broker = new mosca.Server({ port: 1883 });
broker.on('ready', () => {
  console.log('MQTT Broker started successfully (port 1883)');
  // 2. Simulate sensor: publish temperature data every 2 seconds (topic: device/temperature/room1)
  const sensorClient = mqtt.connect('mqtt://localhost:1883');
  sensorClient.on('connect', () => {
    setInterval(() => {
      const temperature = (25 + Math.random() * 10).toFixed(1); // Random temperature between 25~35℃
      sensorClient.publish(
        'device/temperature/room1', // Topic
        JSON.stringify({ temperature, time: new Date().toLocaleTimeString() }), // Message content
        { qos: 1 } // QoS level 1 (at least once)
      );
    }, 2000);
  });
});
Step 2: Front-End Connects to MQTT to Subscribe to Messages
Using the mqtt.js library (can be included via CDN on the front end), subscribe to the temperature topic and display data in real-time:
<!-- Front-End: mqtt-client.html -->
<!DOCTYPE html>
<html>
<head>
  <title>Smart Device Temperature Monitoring</title>
  <!-- Include mqtt.js library -->
  <script src="https://unpkg.com/mqtt/dist/mqtt.min.js"></script>
</head>
<body>
  <h2>Room 1 Real-Time Temperature</h2>
  <div id="temperature"></div>
  <div id="alarm" style="color: red; display: none;">⚠️ Temperature too high!</div>
  <script>
    // Connect to MQTT Broker
    const client = mqtt.connect('mqtt://localhost:1883');
    // Subscribe to topic after successful connection
    client.on('connect', () => {
      console.log('MQTT client connected successfully');
      client.subscribe('device/temperature/room1', { qos: 1 }, (err) => {
        if (!err) console.log('Subscribed to temperature topic: device/temperature/room1');
      });
    });
    // Receive messages and update the page
    client.on('message', (topic, message) => {
      const data = JSON.parse(message.toString());
      document.getElementById('temperature').innerText =
        `Current temperature: ${data.temperature}℃ | Update time: ${data.time}`;
      // Trigger alarm if temperature exceeds 30℃
      if (parseFloat(data.temperature) > 30) {
        document.getElementById('alarm').style.display = 'block';
      } else {
        document.getElementById('alarm').style.display = 'none';
      }
    });
    // Listen for connection close
    client.on('close', () => {
      console.log('MQTT connection closed, attempting to reconnect...');
    });
  </script>
</body>
</html>
2. EventSource Scenario: Real-Time News Push
Business requirement: The server periodically pushes the latest news, and the front-end page receives and displays it in real-time without requiring the user to refresh the page.
Step 1: Set up EventSource Server
Using the express framework of Node.js to set up an SSE service, periodically generating simulated news and pushing it to the client:
// Server: server-eventsource.js
const express = require('express');
const app = express();
const port = 3000;

// News data (simulated)
const newsList = [
  "Front-end framework Vue 3.5 officially released, adding performance optimization features",
  "HTML5 EventSource becomes a mainstream solution for real-time push",
  "Node.js 20.x version released, supporting more ES6+ features"
];

// SSE interface: push real-time news to the client
app.get('/api/news', (req, res) => {
  // 1. Set SSE response headers (key)
  res.setHeader('Content-Type', 'text/event-stream');
  res.setHeader('Cache-Control', 'no-cache');
  res.setHeader('Connection', 'keep-alive');
  res.flushHeaders(); // Immediately send response headers to establish a long connection
  // 2. Periodically push news (every 5 seconds)
  const newsInterval = setInterval(() => {
    const randomNews = newsList[Math.floor(Math.random() * newsList.length)];
    // Send message in SSE format (starts with data: and ends with a blank line)
    res.write(`data: ${JSON.stringify({
       news: randomNews,
       time: new Date().toLocaleTimeString()
     })}\n\n`);
  }, 5000);
  // 3. Clear timer when the client disconnects
  req.on('close', () => {
    clearInterval(newsInterval);
    res.end();
  });
});

// Start service
app.listen(port, () => {
  console.log(`EventSource service started successfully (port ${port})`);
});
Step 2: Front-End Connects to EventSource to Receive Messages
Directly use the native EventSource API in the browser, no additional libraries needed, for a simple implementation of message reception:
<!-- Front-End: eventsource-client.html -->
<!DOCTYPE html>
<html>
<head>
  <title>Real-Time News Push</title>
</head>
<body>
  <h2>Latest News (Real-Time Update)</h2>
  <ul id="newsList"></ul>
  <script>
    // 1. Establish SSE connection (note: only supports GET requests)
    const eventSource = new EventSource('http://localhost:3000/api/news');
    // 2. Listen for messages (messages sent by the server will trigger this event)
    eventSource.onmessage = (e) => {
      const data = JSON.parse(e.data);
      const li = document.createElement('li');
      li.innerText = `[${data.time}] ${data.news}`;
      document.getElementById('newsList').prepend(li); // New news at the top
    };
    // 3. Listen for connection errors
    eventSource.onerror = (err) => {
      console.error('EventSource connection error:', err);
      eventSource.close(); // Close connection on error
    };
    // 4. Listen for successful connection (optional)
    eventSource.onopen = () => {
      console.log('EventSource connection successful');
    };
  </script>
</body>
</html>
3. Technical Differences and Selection Guide: Precisely Matching Business Needs
After mastering the principles and practices, the key is to choose the appropriate technology based on the business scenario. The table below compares the differences between MQTT and EventSource across core dimensions such as browser compatibility, message reliability, and concurrent processing capability, and provides selection recommendations:
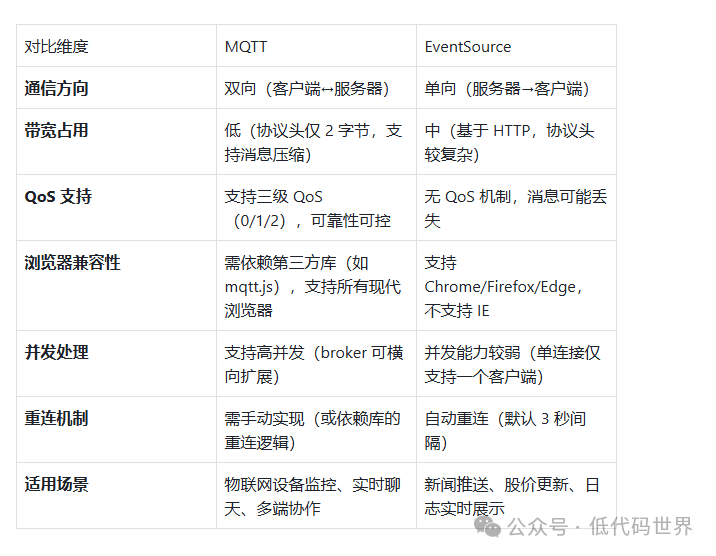
Selection Decision Tree (Quick Judgment)
Does the client need to send messages to the server?
Yes → Choose MQTT;
No → Proceed to the next step;
Is there a very high requirement for message reliability (e.g., critical alarms)?
Yes → Choose MQTT (QoS 2);
No → Proceed to the next step;
Does it need to be compatible with low-bandwidth, high-latency networks (e.g., IoT devices)?
Yes → Choose MQTT;
No → Choose EventSource (lower development cost).
4. Conclusion
MQTT and EventSource are not in a “substitution relationship” but rather a “complementary relationship”: MQTT is the “expert in bidirectional communication for all scenarios”, adapting to complex scenarios such as IoT and real-time collaboration through the publish/subscribe model and QoS mechanism; EventSource is a “lightweight unidirectional push tool”, reducing development costs for scenarios such as news push and log display through a simple API and automatic reconnection.
In actual projects, there is no need to struggle with “which technology is superior”, but rather to choose the solution that best fits business needs based on the three core elements of “communication direction, reliability requirements, and network environment” — this is the core logic of front-end real-time communication selection.
Appendix
Source code:
https://github.com/mqttjs/MQTT.js
Documentation:
https://mqtt.org/
——The End——
If you like it, please click to follow and bookmark it!
Please click the “Share, View” below to spread the word!