Get it at the end of the articleWhack-a-Mole WA+GSE One-Click Macro.

Why can other combat rogues deal impressive DPS,
while we always end up at the bottom?
Perhaps all you lack is just a technique
and a little understanding.
Today, I bring you
a practical sharing of ICC Bosses 1-4,
hoping to bring some light to those combat rogues
who are still confused
or have already given up.
Why is Combat Rogue DPS Always at the Bottom?
Damage can reach 25,000 instantly! Perhaps all you lack is just a technique and a little understanding.
Talent and Gear Configuration
Our talent build is the standard Sword and Axe build 20-51, with glyphs being fixed for Armor Penetration, Vanish, and variable for Killing Spree.
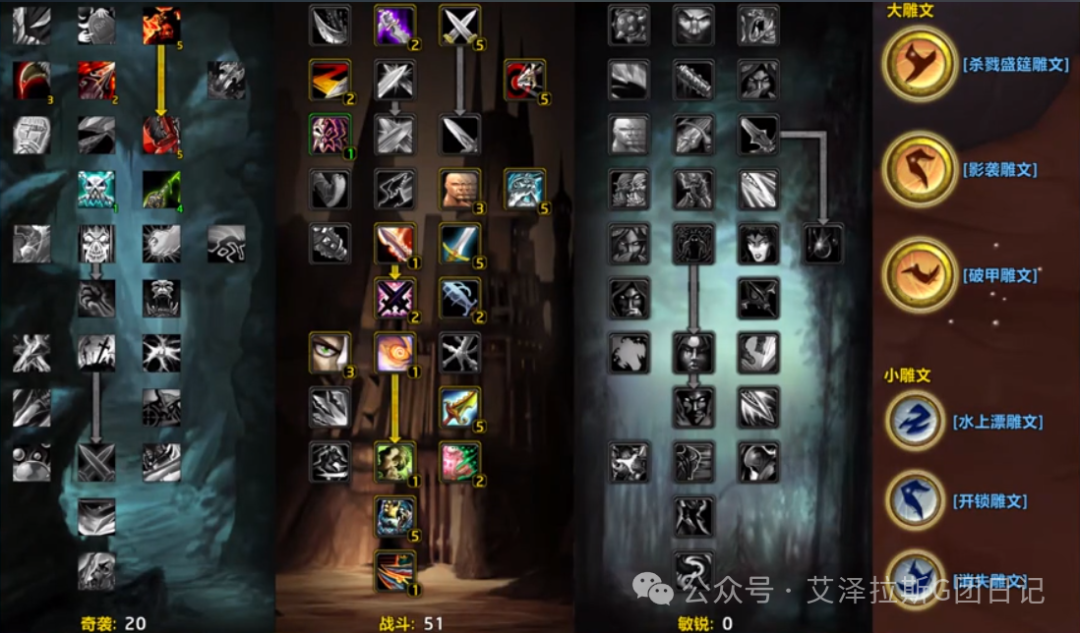
In terms of gear, this time the gear is quite strong; except for the weapon, everything else is maxed out. With full Armor Penetration gems, the Armor Penetration reached 1,347 points.

Lord 1: Hardcore Start and Burst Rhythm
Stealth Phase Control Details
At the start, we directly stealth and move forward. Since we are a combat rogue, remember to distract him when we are too close, so he faces away from us, making it harder for him to detect us, and saving a Rocket Boots.
Full Analysis of Burst Cycle
- Opening Move: After seeing the trajectory of our teammates’ skills, we can prepare to steal a speed boost. Start with Ambush, Armor Penetration, Ambush, and then Slice and Dice.
- BUFF Monitoring: After the opening move, check the triggering of BUFFs, whether there is a double yellow crit? Did the ring trigger?
- Burst Decision: If not, we can use two Shadow Strikes and wait. If still nothing, we should not hesitate and directly use Killing Spree (most of the time, the boss fight ends within 1 minute and 30 seconds; hesitation will affect the second Killing Spree coverage).
Core Mechanism of Blade Flurry AoE
- Skill Interaction: Activate Adrenaline Rush + Blade Flurry 15 seconds before Bone Spike appears, ensuring that the transformation of Will and Blade Flurry perfectly overlaps for 15 seconds.
- Energy Control Techniques: Use the overflow advantage during Adrenaline Rush to smooth out the rhythm and reserve energy, and immediately throw 2 Fan of Knives when Bone Spike appears.
- Damage Mechanism: Blade Flurry can replicate the main hand damage of Fan of Knives to the nearest target (during 4-target AoE, the damage of 3 secondary targets stacks onto the main target; it has been tested that a single wave of Blade Flurry damage exceeds 50,000).
♥
Boss 2: AoE Peak Practical Teaching
Positioning and Opening Details
Stealth close to the pillar position (even if not stealthed, you won’t be detected), after stealing the potion, execute the standard opening: Ambush, Armor Penetration, Ambush, and then Slice and Dice.
Golden Rules for Handling Minions
- Rhythm Control: Minions appear 10 seconds after the start, reaching us in 15 seconds; activate Adrenaline Rush early to seize the rhythm.
- Cycle Rules: Maintain the overlap of Slice and Dice and Armor Penetration, and when the minions are focused, activate Blade Flurry + Fan of Knives continuously (it has been tested that the DPS during this phase exceeds 25,000).
- Finishing Strategy: In Phase 2, maintain 20,000+ DPS; subsequent output only needs to align with the Killing Spree axis, leaving the rest to the team’s DPS pressure.
♥
Boss 3: Secrets of the Perpetual Cannon
We arrive at Boss 3, where a trick is to distract the mage after passing; he will stand still and won’t freeze our cannon, so if done correctly, we can keep firing without stopping.
♥
Boss 4: Ultimate Clarification in Blood Beast Phase
Analysis of Misuse of Blade Flurry
Many brothers are confused about whether to use Blade Flurry during the Blood Beast phase:
- Practical Verification: The replication mechanism of Blade Flurry has target randomness (if it replicates to the Blood Beast, it loses 95% damage).
- Optimal Solution: Treat it as pure single-target damage, binding Blade Flurry to the burst axis rather than the Blood Beast phase.
- Counterexample Explanation: Attempting to gather mobs through T leads to damage loss; it has been tested that Blade Flurry damage disperses to the Blood Beast, resulting in over 60% loss of single-wave damage.
♥
Core Principles for Combat Rogue Score Improvement
Strictly following the above process can achieve a score of 99 in the front hall boss fight; subsequent strategies for other bosses will focus on:
- Timeline: All burst skills must align strictly with the team’s kill rhythm.
- Detail Control: Sprint/Rocket Boots for key phase transitions.
- Target Monitoring: Blade Flurry must lock onto the main target to avoid damage dispersion.
(It has been tested that a single wave of Blade Flurry can exceed 50,000+, with sustained DPS of 25,000 throughout).
♥
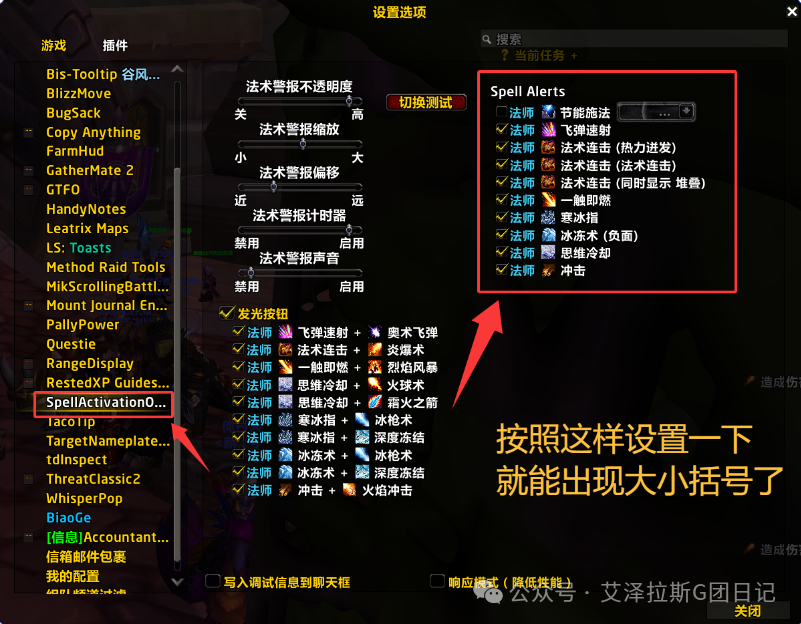
Useful Macros for World of Warcraft
- Armor Penetration Burst Macro:/castsequence reset=10 Ambush, Armor Penetration, Killing Spree
- Bone Spike AoE Macro:/cast [mod:shift] Blade Flurry; Fan of Knives
Related Topics#Armor Penetration Rogue Gem Combinations #ICC Timeline Control #Combat Rogue Macros #Fan of Knives AoE Techniques #Hardcore DPS Improvement
 If you need it,just leave a message, I will reply at the latestby tonight, as it requires manual work,and I still have to go to work.