Pulitzer Imaging Alliance
The Adams Zone Exposure Method is a complete theoretical system from exposure to film development to photo enlargement. When taking pictures, one must think about what to do next with the developed photos. Due to the blogger’s limited experience in the darkroom, only some content related to the Zone Exposure Method during shooting is organized here, which is applicable to both film and digital photography.
1. Introduction
Ansel Easton Adams (February 2, 1902 – April 22, 1984), also known as Ansel Adams in Chinese, was a famous American photographer known for his black and white landscape works, many of which are widely circulated. His published works such as “The Camera,” “The Negative,” and “The Print” have had a significant impact on the development of photographic technology during the black and white film era.
He proposed the concept of the Zone System, which is translated into Chinese as “分区曝光法” or “Zone System.” The core of this idea is to divide the various brightness ranges contained in the subject into 11 zones, ranging from 0 (pure black) to 10 (pure white). The effective zones for negatives are from 1 to 9, while the zones that can show texture are from 2 to 8. Among these zones, zones 0-3 are low-key areas, zones 4-6 are mid-tone areas, and zones 7-10 are high-key areas. The middle gray tone in zone 5 represents the mid-range of exposure.
In actual shooting and film developing processes, various methods are used to control the distribution of different scenes in these zones. According to this concept, we can place any brightness value in any zone, depending on the shooting effect you envision, and determine the camera’s exposure.
We can represent the zones and their numbers of the Zone Exposure Method with the following gray scale:

Due to the era in which Adams lived, photographic techniques were still in the purely “manual” operation phase of optical + mechanical, and the photosensitive materials used were black and white. For those of us using color digital cameras today, the Zone Exposure Method he proposed may seem outdated. Digital color photography and the era Adams lived in span two environments:
1. The transition from black and white film to color film.
2. The transition from color film to digital color photography.
But is this method really outdated? Perhaps it still holds reference value for some professional photographers? Maybe it can only be understood as a conceptual tool for photography composition?
In my recent study of digital photography, to better grasp the exposure and composition methods in photography, I diligently read Mr. Xie Hanjun’s book “A. Adams” on photography and greatly benefited from it. Through the complex technical operations described in words from the gradually fading black and white film era, I have found that the Zone Exposure Method at least provides beneficial assistance to photographers in the following aspects:
1. This method provides us with a concise, quantifiable way of thinking about photographic exposure control.
2. This method provides an effective means of communication among photographers.
3. This method can be applied to daily photography practice by establishing a certain connection with specific modern photographic techniques.
Although I have been in contact with cameras for decades, I have only truly started photography in the last two years. As a beginner in photography, I can feel its assistance, so it can be assumed that this method provides an entry point for those new to photography. Because the explanation of Adams’ Zone Exposure Method involves a large number of equipment selections, photographic operations, and printing process operations from the past black and white film photography, it makes it difficult for those lacking practical experience to interpret the philosophical methods displayed in these operations and to relate how to apply this method to real-world photographic practice.
With this in mind, I will share some of my experiences using this method in practical photography, hoping this information can be helpful to fellow photographers.
These experiences roughly include the following aspects of thought or practice:
1. How to interpret Zone Exposure in digital color photography
2. How to apply the Zone Exposure Method in digital color photography practice
3. How to use the Zone Exposure Method in the post-processing of digital images
2. From Black and White Film to Color Film
The changes in the shooting environment from black and white film photography to color film photography are mainly reflected in the following aspects:
1. In the color film era, the film developing and printing processes could not be fully intervened by manual operations as in the black and white film era. This reduces the possibility of adjusting and controlling the image performance in post-processing.
2. Since the exposure range of color film is less than that of black and white film, it decreases the image’s performance capability in terms of brightness and contrast. The exposure range of color reversal film is slightly less than that of color negatives.
3. Color photos visually tend to represent images formed by highlights, while black and white photos more often represent images formed by different depths of shadows on a white background.
Despite these differences, the Zone Exposure Method can still serve as a quantifiable way of thinking to help us consider the role of different brightness areas in photographic composition.
In the process of shooting color photos, we can imagine a color image as a black and white image, observing the composition formed by different brightness areas in the viewfinder or LCD screen.
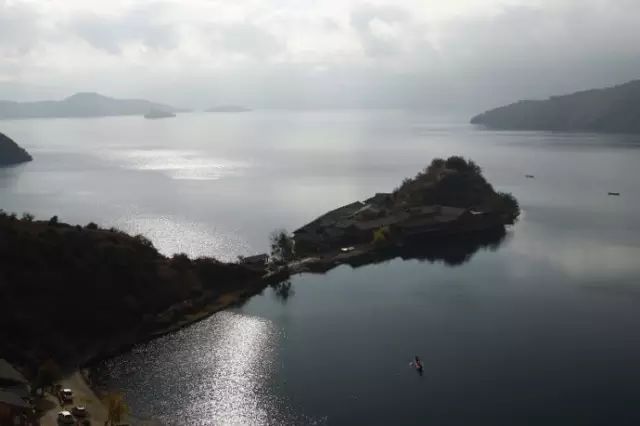
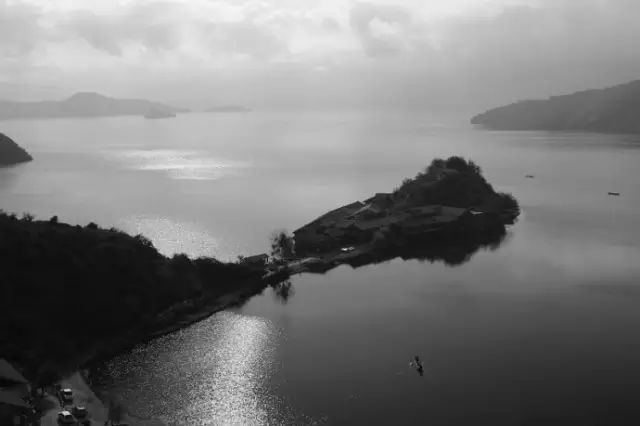
Below is an example of a color landscape photo and the corresponding black and white image, illustrating the approximate correlation between various parts of the image and the 11 zones mentioned in the Zone Exposure Method.
Note: For those who have never used computer image processing software like Photoshop, there is no need to follow the text instructions step by step; just grasp the thought process expressed in this operation.
Below is the original color photo:
Below is the image converted to black and white (grayscale) mode:
Below is the photo with the exposure zones marked according to the gray scale:
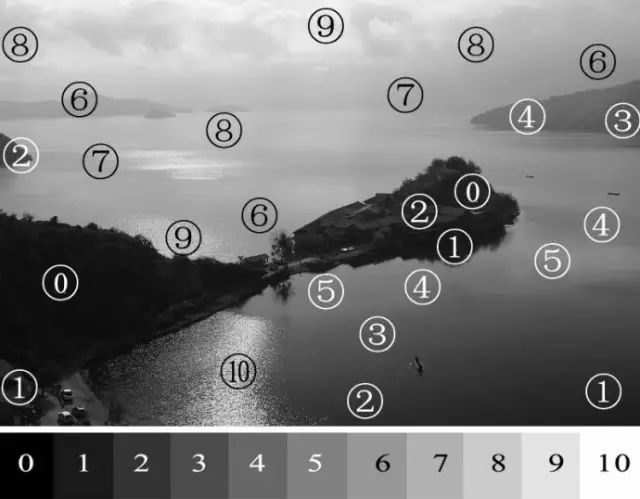
When marking the zone values on this black and white image, I used Photoshop as a tool. Below I will explain the operation process step by step, so that readers can repeat and feel this process:
First, open the color image file, convert it to black and white using the “Image -> Mode -> Grayscale” function in the Photoshop menu, and save this image.
Open the black and white image and the gray scale with zone numbers (please directly download and save this gray scale for this experiment).
At this point, there are two image windows in Photoshop: one window contains the black and white landscape photo, and the other contains the gray scale image. Use the first button (the Move Tool) in the left toolbar of Photoshop to drag the gray scale into the black and white landscape photo window. At this time, the black and white landscape photo window actually has two layers: the lower layer is the black and white landscape photo, and the upper layer is the gray scale image.
Continue using the Move Tool to move the gray scale image over the photo image, comparing which gray area of the photo image is similar to the gray scale. With this method, you can determine the distribution of various different brightness (gray) areas in the current photo.
The intention of the Adams Zone Exposure Method is not limited to post-analysis of photos but to conceptualize and plan the scene to be photographed before shooting. It requires not only planning the basic composition but also analyzing and thinking about the different brightness areas in the composition, imagining how the current scene would look in black and white, and planning this layout, adjusting the transition effects of brightness changes through the entire shooting and post-processing process.
If you still do not understand the intention of the Zone Exposure Method, please take a look at the image below and imagine: when Adams was behind the camera, he visualized the color scene in the optical viewfinder as such a scene (Note: he was shooting black and white photos, but the image seen through the optical viewfinder is the same color image we see today), and imagined whether the lines formed by the bright and dark areas in this image met aesthetic requirements, whether a brightness area could be changed through exposure and post-development to make it darker or brighter, thereby improving the overall composition effect.
This sounds incredible: photography represents an image of objective things, and the black parts of this image cannot turn white, nor can the white parts turn black! But the reality is: this inversion of black and white can be achieved; the image on the negative is just like that. The question is whether such a result can be accepted aesthetically by people. In practical applications, if the texture of a certain gray area is increased while keeping the texture of other gray areas unchanged, the composition of the image is effectively altered artificially. What the Zone Exposure Method aims to do can be understood as a similar control process. This process has a fundamental limitation: the adjustment of brightness within the same gray area is global. In other words, the same gray area distributed in different locations in the image will be adjusted simultaneously. This is fundamentally different from modern digital image processing technology, which allows arbitrary modification of any pixel in the image.
As technical means have developed, human control and use of digital images have reached an almost omnipotent level. Once the results of photographic techniques have been modified to a certain extent through various technical processes, they can no longer be regarded as photographic works. We can consider the image processing methods permitted in the photography industry as the boundary of photographic technology. The application of the Zone Exposure Method can be considered a creative and re-creative process based on natural images within the boundaries allowed in the photography industry.
In the language of the black and white film era, the Zone Exposure Method can be explained as: controlling the distribution of texture in different density areas of the image through the processes of camera framing, film exposure, film development, paper exposure, and paper development to achieve perfect composition.
In the language of modern digital photography, the Zone Exposure Method can be explained as: controlling the distribution of texture in different gray areas of the image through the processes of camera framing, camera exposure, and computer post-processing of digital images to achieve perfect composition.
Looking at Adams’ annotations on the meanings of each zone number, it is not difficult to understand why the Zone Exposure Method also has guiding significance for color photography: 0 pure black 1 near black, with slight tonal variation but no texture details 2 the darkest part with some discernible detail 3 dark material with discernible shadow detail 4 dark leaves, dark stones, or shadows in the scenery 5 middle gray: clear northern sky, shadow areas of skin, wood under general light 6 typical white skin, bright stones, shadows of snow in the scenery 7 very bright skin, shadows of snow with a certain reflective quality 8 bright and discernible textured stones, textures of snow 9 with slight tonal variation but no texture details, reflective parts of snow 10 pure white: light sources and bright reflections
3. From Color Film to Digital Photography
The Zone Exposure Method can also be applied to digital photography. According to online sources, Adams himself actually ventured into the realm of digital imaging. Digital photography also requires completing the exposure processing of highlights and shadows.
Initially, the dynamic range that digital photography could capture was smaller than that of film, but with the development of technology, digital image processing has greatly improved in both image resolution and dynamic range. Multiple exposure and post-processing high dynamic range (HDR) techniques have further enhanced the dynamic performance of digital images.
Modern professional cameras typically use RAW format to record photographic images. This format usually employs the Adobe RGB color space, which is large enough to accommodate sufficient color and tonal information. Many consumer cameras, however, use the sRGB color space, which can only express image colors and tones in 8-bit binary numbers. Photos taken with these cameras can meet the needs of viewing photos on televisions or computer monitors and can also satisfy daily family photo printing needs.
Other factors affecting the digital dynamic image processing capability include computer monitors and printing output devices.
Common computer monitors can only display image colors and tones expressed in 8-bit binary numbers, and cannot show the color and tonal details in high dynamic digital images. Looking at the two gray scales on the right side of the gray scale image below will help you understand whether your monitor has such limitations.
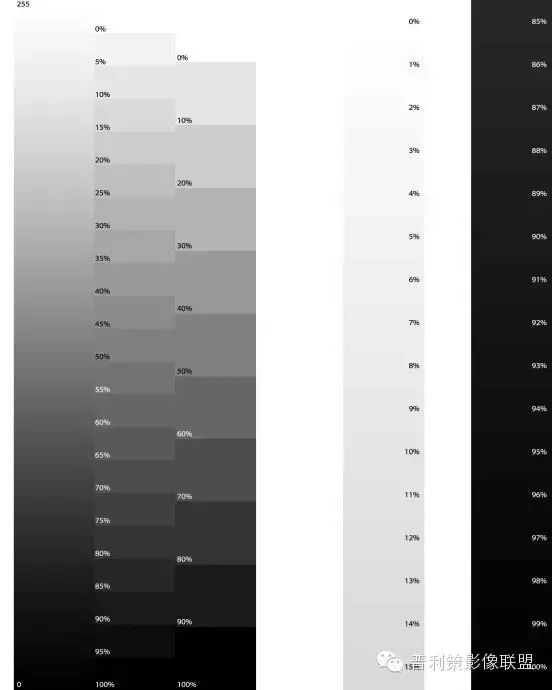 According to the divisions of the Zone Exposure Method, the brightness zones of 0 and 10 are the areas of pure black and pure white. If your monitor cannot express the levels of the two gray scales on the right side of the image above, it does not affect the observation of digital photos on such a monitor. Because these two gray levels belong to the 0 (pure black) and 10 (pure white) zones defined by the Zone Exposure Method.
Some professional image processing monitors can display image colors and tones expressed in 16-bit binary numbers, which generally meet the requirements for digital image processing. However, such monitors are usually quite expensive.
Printing output is another factor that limits the expression of digital images. General home or office color printers and paper can only express a limited range of tones and levels, while professional color printing processes and professional photo printing equipment can express richer image content.
The above changes and developments in technology have not altered the ultimate purpose of photography; they have only changed certain processes of photography. Therefore, the practical application of the Zone Exposure Method remains meaningful.
In fact, new technical means not only change and simplify the processes of photography and post-production but also provide many convenient tools for applying the Zone Exposure Method. These tools include:
1. Built-in metering functions of digital cameras and built-in histogram display functions of digital cameras.
2. Level adjustment functions provided by digital image post-processing software.
3. Curve adjustment functions provided by digital image post-processing software.
These functions integrate the complex equipment operations of the film era into a digital camera and a computer. We only need to slightly adjust our habitual shooting and post-production processes to apply the Zone Exposure Method in daily photography practice.
4. Camera Settings Related to Zone Exposure Method Application
Note: This section is still an operable experiment. This experimental process helps to more accurately understand the relationship between the Zone Exposure Method and the actual photographic operation process. The operation process described here is not a mandatory process to follow for the Zone Exposure Method but is a relatively complex operational process. This process is complex in operation but relatively easy to express in words. If automated functions on the camera are used to achieve this process, it may be more difficult to understand the mechanism of camera exposure control. The author will attempt to introduce practical operational methods of this mechanism in the actual photography process in subsequent blog posts.
For convenience of expression, here are some basic camera setting items for conducting experiments with the Zone Exposure Method. The camera used for the experiment can be a DSLR or a compact digital camera with the following functions:
Spot metering function, histogram (bar chart) display function, exposure assist function displayed in scale form, manual exposure control function.
After turning on the camera, make the following settings:
Set the camera dial to manual exposure control, which is usually indicated by the letter “M,” as shown below.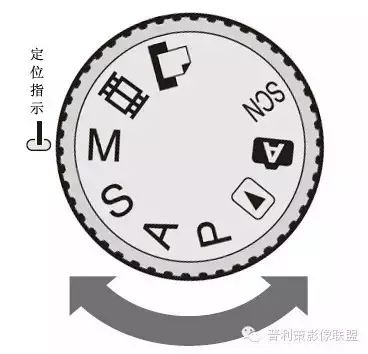
Open the camera settings menu, find the “Metering Mode” setting, and set this item to “Spot Metering.”
Set an appropriate ISO sensitivity value according to the shooting environment, for example, set it to ISO 100 in outdoor sunlight, ISO 200 to 400 in outdoor cloudy weather, and ISO 400 to 800 indoors during the day.
Set the shutter speed to 1/100 seconds.
Set the aperture to F5.6 or 8.
If using a compact digital camera, find the screen display mode switch function in the camera menu to allow the LCD screen to display the shooting scene while also showing the histogram (bar chart) or exposure status in scale form.
If using a DSLR, when observing the scene in the optical viewfinder, half-press the shutter button and pay attention to the exposure status displayed in scale form in the viewfinder.
The exposure status displayed in the histogram is shown below:
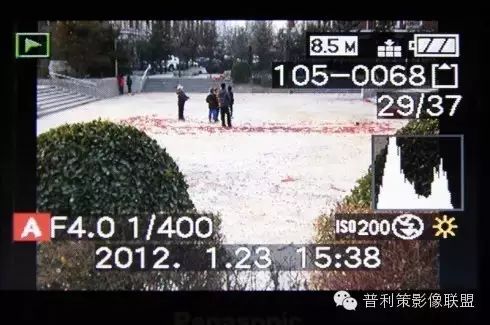
We can establish a correlation between this histogram and the brightness zones of the Zone Exposure Method, as shown below:
This histogram contains many vertical lines, each representing the number of pixels distributed at a certain gray level. We can categorize these vertical lines into 11 groups corresponding to the 11 brightness zones of the Zone Exposure Method.
From the histogram above, we can see that most of the brightness distribution of the scene is in zones 2 and 8, while other areas have less content. The brightest area is roughly in zone 8, while the highest brightness area is in zone 9, and the bright parts of the leaves may be in zone 6. If the camera can only display the current exposure status through the histogram, it can still be somewhat challenging to analyze the exposure areas of each part of the image. However, viewing the histogram before and after shooting is undoubtedly the only effective way to grasp correct exposure.
Whether through the optical viewfinder or the LCD display, the feeling of observing the scene in different lighting environments varies greatly and cannot serve as a reference for whether the exposure is correct. I remember seeing a saying from a senior photographer online, roughly paraphrased: “To master correct exposure, trust the histogram, not the LCD screen or optical viewfinder.”
The exposure indicator in the optical viewfinder of a digital DSLR can serve as a more intuitive analysis tool for Zone Exposure control.
The exposure status displayed in scale form is shown below:
 We can establish a correlation between this scale and the brightness zones of the Zone Exposure Method, as shown below:
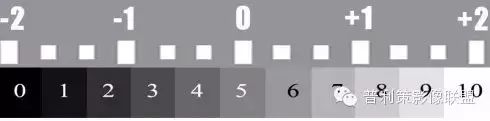
When we point the camera’s metering spot at an object being photographed, the camera acts like a light meter, providing exposure information for that area through the scale. According to the correlation between the scale and the brightness zones of the Zone Exposure Method, we can roughly determine the brightness zone of that area under the current exposure settings. For example, if we meter the bright part of a person’s face and adjust the aperture or shutter speed to make the exposure indicator stop at the +1 position, the brightness zone of the bright part of the face in the resulting image will fall between zones 7 and 8.
Below, we will illustrate the actual operation process using the exposure indicator scale:
During shooting, if we aim the camera’s center metering point at an area in the scene, the camera will act like a light meter, providing exposure information for that area through the scale. Based on the correlation with the brightness zones of the Zone Exposure Method, we can roughly deduce the brightness zone of that area in the captured image under the current exposure settings.
If we are shooting a portrait, we should aim the center metering point at the person’s face and half-press the shutter. At this point, there should be a marker on the exposure indicator stopping at a certain scale position, indicating the exposure status of the currently metered area. If the exposure of the currently metered area is too high or too low, the exposure indicator will show a prompt at the -2 or +2 end. At this point, by adjusting the aperture size, shutter speed, or ISO sensitivity, we can make the exposure indication of the metered area appear between the -2 and +2 ends.
According to the Zone Exposure Method, the bright parts of a person’s face should fall within zones 6 or 7:
6 typical white skin, bright stones, shadows of snow in the scenery
7 very bright skin, shadows of snow with a certain reflective quality
Therefore, the correct exposure indication should stay between 0 and +1. If the actual indication is偏左, it indicates underexposure, requiring an increase in exposure by adjusting the aperture, shutter, or ISO. If the actual indication is偏右, it indicates overexposure, requiring a decrease in exposure by adjusting the aperture, shutter, or ISO.
Note: The adjustment range of the aperture and shutter speed on many cameras corresponds to the exposure indicator shown in the above image: within each exposure integer level, there are also two levels, namely 1/3 and 2/3. The exposure amount before each integer level increases or decreases by a factor of two. If the originally set exposure amount is 0 when measuring the exposure of the scene, increasing one level of exposure will move the exposure indicator to +1.
Below is the relationship between aperture levels and changes in exposure (assuming F8 is the middle level; in the level type, the exposure difference between levels marked with an asterisk is a factor of two; the common terms “one stop difference,” “one stop increase,” and “one stop decrease” refer to this level difference):
|
Level Type |
* |
* |
* |
* |
* |
||||||||||
|
Aperture Value |
F3.5 |
F4.0 |
F4.5 |
F5.0 |
F5.6 |
F6.3 |
F7.1 |
F8.0 |
F9.0 |
F10 |
F11 |
F13 |
F14 |
F16 |
F18 |
|
Exposure Amount |
-1/3 |
-2 |
-2/3 |
-1/3 |
-1 |
-2/3 |
-1/3 |
0 |
+1/3 |
+2/3 |
+1 |
+1/3 |
+2/3 |
+2 |
+1/3 |
Below is the relationship between shutter speed levels and changes in exposure (assuming 1/100 seconds is the middle level; in the level type, the exposure difference between levels marked with an asterisk is a factor of two; the common terms “one stop difference,” “one stop increase,” and “one stop decrease” refer to this level difference):
|
Level Type |
* |
* |
* |
* |
* |
||||||||||
|
Shutter Speed |
1/20 |
1/25 |
1/30 |
1/40 |
1/50 |
1/60 |
1/80 |
1/100 |
1/125 |
1/160 |
1/200 |
1/250 |
1/320 |
1/400 |
1/500 |
|
Exposure Amount |
-1/3 |
-2 |
-2/3 |
-1/3 |
-1 |
-2/3 |
-1/3 |
0 |
+1/3 |
+2/3 |
+1 |
+1/3 |
+2/3 |
+2 |
+1/3 |
Note: I am not a professional in photography, and the expressions above may not be sufficiently professional, but I hope they do not cause misunderstandings.
From the two illustrations above, it is not difficult to see that each increase or decrease in the brightness zone of the Zone Exposure Method roughly corresponds to a 1/3 stop of aperture or shutter speed. Thus, we can basically remember: adjusting the aperture and shutter speed by one 1/3 stop is equivalent to moving all brightness zones in the image by one zone according to the Zone Exposure Method. For example, if the shutter speed is adjusted from 1/50 seconds to 1/60 seconds, the image that originally had brightness in zone 5 will move to zone 6, the image that originally had brightness in zone 6 will move to zone 7, and so on.
Once the exposure value of the subject to be photographed is determined, the center metering point can be aimed at other parts of the image, such as hair, leaves in the background, bright walls, shadows on the ground, the sky, etc., to check whether different brightness areas are in the correct brightness distribution zone.
If bright areas or darker areas deviate from the expected position, for example:
According to the Zone Exposure Method, dark leaves, dark stones, or shadows in the scenery should fall in zone 4, which means the exposure indicator should stop between 0 and -1.
During shooting, it may be necessary to adjust the aperture to control depth of field. In this case, to maintain the correct exposure of the subject, for every stop decrease in aperture (for example, from F5.6 to F8), the shutter speed needs to be reduced by a factor of two (for example, from 1/100 seconds to 1/50 seconds) to maintain the correct exposure of the subject being photographed.
In the shooting process, the control of brightness in various areas is limited. If the contrast between the subject and the background is too great or too small (remember, the current exposure is suitable for the subject), it is necessary to adjust the distribution of other exposure areas while maintaining the exposure distribution of the subject. At this point, adjustments will need to be made in post-processing using computer software.
The Zone Exposure Method seems to guide us in correctly controlling the exposure of the subject being photographed. Since we cannot change the brightness relationship between different areas in the image during the shooting process, the application of the Zone Exposure Method during shooting has limited potential (this is just my current understanding).
However, this way of thinking will help us gain a deeper understanding of the design of the texture in the captured images and correctly master the exposure control of the subject being photographed. Images captured using this thinking method can truly adjust the brightness of various exposure zones during the post-processing of digital images, resulting in stunning photographs.
Below are two photos, one is the image after appropriate exposure control (top left). At this point, the effect of the photo has not fully manifested. The image after adjustment using the “Levels” function of image editing software (top right) looks completely different:
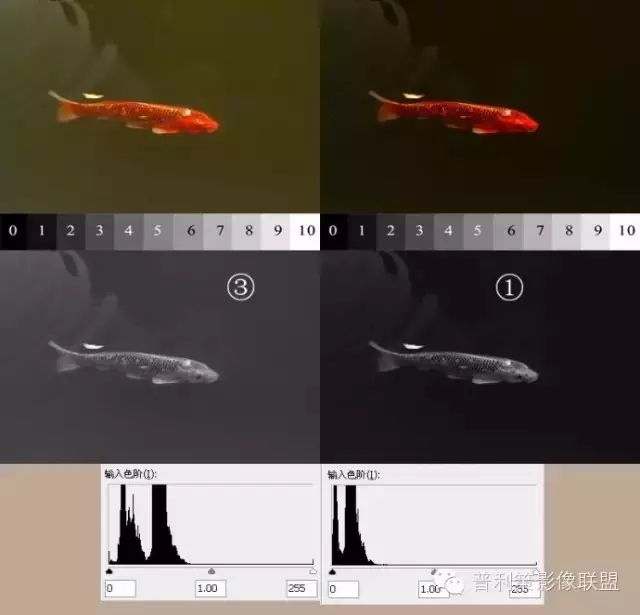 From the corresponding black and white image (middle left) of the top left image, we can see that most of the water surface is distributed in zone 3. In the corresponding black and white image (middle right) of the top right image, most of the water surface has been adjusted to zone 1. From the two histograms below, we can also observe the changes in the distribution of different gray pixel values in the images.
This fully manual control process may seem complex, but it greatly aids in understanding the mechanism of camera exposure control. With this experimental operation as a foundation, we can continually discover and create simpler exposure control methods in actual shooting. Based on a deep understanding of the mechanism of camera exposure control, it becomes easier to understand the reasons behind others’ methods when discovering or borrowing their experiences and techniques, transforming these methods into living knowledge and skills.
5. Case Analysis
Below is a portrait photo. The left side shows the original photo, and the right side shows the corrected photo. After opening the photo in Photoshop, I opened the “Color” window and switched the color display from RGB mode to LAB mode. Since the L value in LAB mode represents the gray value of the image, with a range of 0-100, pure black being 0 and pure white being 100, this value divided by 10 roughly corresponds to the 0-10 values of the Zone Exposure Method. Using the eyedropper tool in the toolbar to select the highlight area of the face in the photo, the obtained value is 77, which is roughly in zone 8 of the Zone Exposure Method. This is slightly higher than the suggested zone for “very bright skin” in zone 7, and while these areas are discernible in detail on the monitor, they appear somewhat harsh.
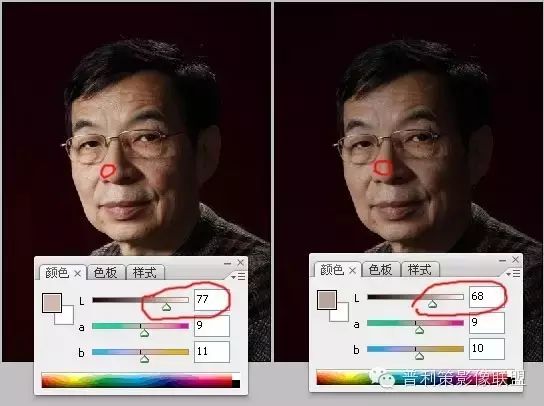 After reducing the brightness using Photoshop’s brightness adjustment function, the resulting image on the right shows an L value of 68 for the same area, and the detail representation of the highlight area has improved.
In commercial photography, high-key photography is often used for portraits. Below is a partial high-key portrait photo. After converting this color photo to black and white, it can be seen that the face of the portrait generally falls between zones 8 and 9:
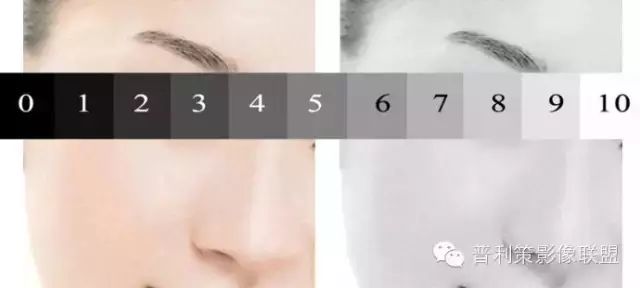 Thus, for exposure control, there are no hard and fast rules; it completely depends on the style of image the photographer wishes to convey. In general, when taking photos, correct exposure should be mastered to allow the camera to record the details of various brightness areas in the scene as completely as possible.
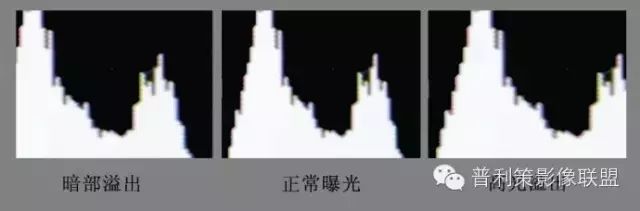
Below are three histograms, from left to right representing underexposure, normal exposure, and overexposure:
When the histogram of the captured photo shows the left-side pattern, the details in the dark areas will not be recorded. Conversely, when the histogram of the captured photo shows the right-side pattern, the details in the highlight areas will not be recorded.
Sometimes, when the contrast of the scene is very high, even when most of the image is correctly exposed, some areas may still be overexposed. To showcase more details in the image, it is necessary to utilize the RAW format function provided by the camera to record the image.
Below is a photo taken with the LX5 digital camera. During shooting, I felt that the contrast of the scene was very high, and it was difficult to distinguish the mid-tone areas, so I set the camera’s image quality to RAW format to achieve a higher exposure latitude. At the same time, I set the metering mode to evaluative metering, selected aperture priority shooting mode, and chose the camera’s smallest aperture F8. After shooting, two image files were obtained: one in the commonly used JPG format and one in RAW format.
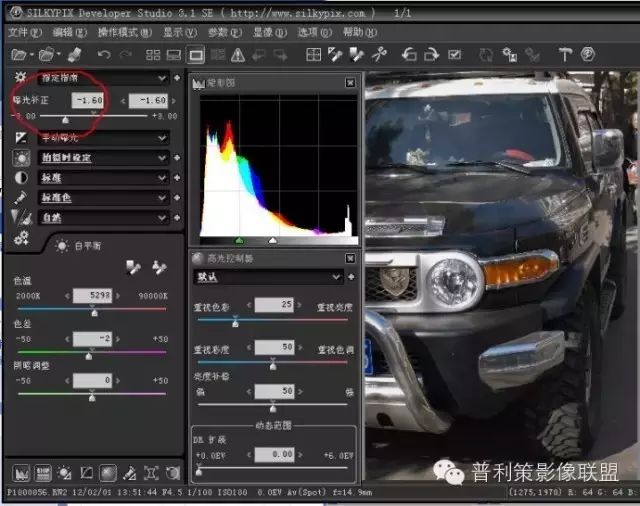
After opening the JPG format file in the randomly provided RAW format editing software SILKYPIX Developer Studio, the image seen is very similar to the scene observed, with the entire image appearing very bright:
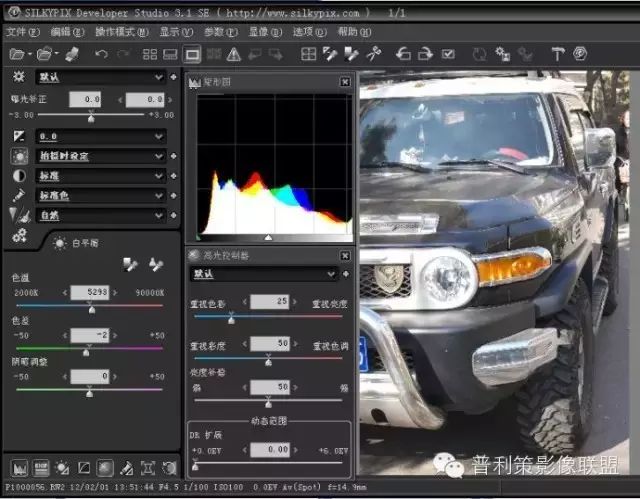 From the histogram displayed on the right side of the software, it can be seen that the highlight part is clipped, indicating that the detail in the highlight area has been lost. For images stored in JPG format, this detail cannot be recovered.
After opening the RAW format file in the same software, the initial view is the same as the above image. However, by using the “Exposure Compensation” function provided by the software (marked with a red circle in the image), reducing the exposure value allows a small peak to appear in the highlight area of the histogram on the right. This part is the highlight detail recorded by the RAW format file. The adjusted image also shows that the originally bright car headlights now have depth and texture, making the entire image more visually comfortable.
 6. Exposure Control During Shooting
Based on the previous analysis and the suggestions of the Zone Exposure Method, some basic methods for exposure control during shooting can be roughly derived (theory followed by practice):
Manual Mode:
Using spot metering, aim the central metering point of the camera viewfinder or display screen at the subject being photographed.
If the reference subject is:dark leaves, dark stones, or shadows in the scenery
Then adjust the aperture, shutter, or ISO so that the exposure indicator indicates one stop to the left of 0 (-1/3 stop, corresponding to Zone 4 of the Zone Exposure Method), then compose, focus, and press the shutter.
If the reference subject is:clear northern sky, shadow areas of skin, wood under general light
Then adjust the aperture, shutter, or ISO so that the exposure indicator indicates 0 (corresponding to Zone 5 of the Zone Exposure Method), then focus, compose, and press the shutter.
If the reference subject is:typical white skin, bright stones, shadows of snow in the scenery
Then adjust the aperture, shutter, or ISO so that the exposure indicator indicates one stop to the right of 0 (+1/3 stop, corresponding to Zone 6 of the Zone Exposure Method), then focus, compose, and press the shutter.
If the reference subject is:very bright skin, shadows of snow with a certain reflective quality
Then adjust the aperture, shutter, or ISO so that the exposure indicator indicates two stops to the right of 0 (+2/3 stop, corresponding to Zone 7 of the Zone Exposure Method), then focus, compose, and press the shutter.
If the reference subject is:bright and discernible textured stones, textures of snow
Then adjust the aperture, shutter, or ISO so that the exposure indicator indicates +1 stop (corresponding to Zone 8 of the Zone Exposure Method), then focus, compose, and press the shutter.
Aperture Priority or Shutter Priority:
Set the ISO sensitivity to automatic, adjust the aperture or shutter to the desired position. Using spot metering, aim the central metering point of the camera viewfinder or display screen at the subject being photographed.
If the reference subject is:dark leaves, dark stones, or shadows in the scenery
Set the exposure compensation to -1/3 stop (corresponding to Zone 4 of the Zone Exposure Method), then lock the exposure (press the exposure lock button), focus, compose, and press the shutter.
If the reference subject is:clear northern sky, shadow areas of skin, wood under general light
Set the exposure compensation to 0 (corresponding to Zone 5 of the Zone Exposure Method), then lock the exposure (press the exposure lock button), focus, compose, and press the shutter.
If the reference subject is:typical white skin, bright stones, shadows of snow in the scenery
Set the exposure compensation to +1/3 stop (corresponding to Zone 6 of the Zone Exposure Method), then lock the exposure (press the exposure lock button), focus, compose, and press the shutter.
If the reference subject is:very bright skin, shadows of snow with a certain reflective quality
Set the exposure compensation to +2/3 stop (corresponding to Zone 7 of the Zone Exposure Method), then lock the exposure (press the exposure lock button), focus, compose, and press the shutter.
If the reference subject is:bright and discernible textured stones, textures of snow
Set the exposure compensation to +1 stop (corresponding to Zone 8 of the Zone Exposure Method), then lock the exposure (press the exposure lock button), focus, compose, and press the shutter.
Important Note: The methods above are merely a reference for exposure control thinking and are not definitive rules!