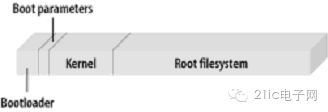
An embedded Linux system can typically be divided into four layers from a software perspective:1. Boot Loader.It includes the boot code (optional) embedded in the firmware and the Boot Loader itself.2. Linux Kernel.A customized kernel specific to the embedded board and the kernel’s boot parameters.3. File System.Including the root file system and file systems built on Flash memory devices.Typically, a ram disk is used as the root file system.4. User Applications.Applications specific to the user.Sometimes, there may also be an embedded graphical user interface between the user applications and the kernel layer.Common embedded GUIs include:MicroWindows and MiniGUI.The Boot Loader is the first piece of software code that runs after the system is powered on.Recalling the architecture of a PC, we know that the Boot Loader in a PC consists of the BIOS (which is essentially a piece of firmware) and the OS Boot Loader located in the hard disk MBR (such as LILO and GRUB).After completing hardware detection and resource allocation, the BIOS reads the Boot Loader from the hard disk MBR into the system’s RAM and then hands over control to the OS Boot Loader.The main task of the Boot Loader is to read the kernel image from the hard disk into RAM and then jump to the entry point of the kernel to run, thus starting the operating system.In embedded systems, there is usually no firmware program like the BIOS (note that some embedded CPUs may also have a small built-in boot program), so the entire system loading task is entirely handled by the Boot Loader.For example, in an embedded system based on the ARM7TDMI core, the system typically starts executing from address 0x00000000 when powered on or reset, and this address usually contains the Boot Loader program.This article will discuss the Boot Loader of embedded systems from four aspects: the concept of Boot Loader, the main tasks of Boot Loader, the framework structure of Boot Loader, and the installation of Boot Loader.The Concept of Boot LoaderIn simple terms, the Boot Loader is a small program that runs before the operating system kernel.Through this small program, we can initialize hardware devices, establish a memory mapping, thus bringing the system’s software and hardware environment to a suitable state to prepare the correct environment for the final invocation of the operating system kernel.Typically, the Boot Loader is heavily dependent on hardware, especially in the embedded world.Therefore, it is almost impossible to establish a universal Boot Loader in the embedded world.Nevertheless, we can still summarize some general concepts of Boot Loader to guide users in the design and implementation of specific Boot Loaders.1. CPUs and Embedded Boards Supported by Boot LoaderEach different CPU architecture has its own Boot Loader.Some Boot Loaders also support multiple CPU architectures; for example, U-Boot supports both ARM and MIPS architectures.In addition to being dependent on the CPU architecture, the Boot Loader also relies on the specific configuration of the embedded board.This means that for two different embedded boards, even if they are built on the same CPU, to run the Boot Loader program from one board on another board usually requires modifying the source code of the Boot Loader.2. Installation Medium of Boot LoaderAfter powering on or resetting the system, all CPUs typically fetch instructions from a pre-arranged address set by the CPU manufacturer.For example, CPUs based on the ARM7TDMI core typically fetch their first instruction from address 0x00000000 upon reset.Embedded systems based on CPUs usually have some type of solid-state storage device (such as ROM, EEPROM, or FLASH) mapped to this pre-arranged address.Therefore, after powering on, the CPU will first execute the Boot Loader program.The following diagram illustrates a typical memory allocation structure of a solid-state storage device that contains the Boot Loader, kernel boot parameters, kernel image, and root file system image.
Figure 1: Typical Memory Allocation Structure of Solid-State Storage Device
3. Devices or Mechanisms Used to Control Boot LoaderThe host and target machines are generally connected via a serial port, and the Boot Loader software typically performs I/O through the serial port during execution, such as:outputting print information to the serial port, reading user control characters from the serial port, etc.4. Single-Stage (Single Stage) or Multi-Stage (Multi-Stage) Boot Loader Startup ProcessTypically, multi-stage Boot Loaders can provide more complex functions and better portability.Boot Loaders that boot from solid-state storage devices are mostly two-stage boot processes, meaning the boot process can be divided into stage 1 and stage 2.The specific tasks completed in stage 1 and stage 2 will be discussed below.5. Operation Mode of Boot LoaderMost Boot Loaders include two different operation modes:“Boot loading” mode and “Downloading” mode; this distinction is only meaningful for developers.However, from the end user’s perspective, the role of the Boot Loader is to load the operating system, and there is no distinction between the so-called boot loading mode and downloading mode.Boot loading mode:This mode is also known as “Autonomous” mode.In this mode, the Boot Loader loads the operating system from a solid-state storage device on the target machine into RAM to run, and the entire process does not involve user intervention.This mode is the normal operating mode of the Boot Loader, so when embedded products are released, the Boot Loader must obviously operate in this mode.
Downloading mode:In this mode, the Boot Loader on the target machine will download files from the host via a serial connection or network connection, such as:downloading kernel images and root file system images, etc.Files downloaded from the host are typically first saved to the target machine’s RAM by the Boot Loader and then written to the target machine’s FLASH solid-state storage device.
This mode of the Boot Loader is usually used when initially installing the kernel and root file system; moreover, subsequent system updates will also use this working mode of the Boot Loader.Boot Loaders operating in this mode typically provide a simple command-line interface to their end users.Powerful Boot Loaders like Blob or U-Boot usually support both working modes and allow users to switch between these two modes.For example, Blob starts in the normal boot loading mode but will delay for 10 seconds waiting for the end user to press any key to switch Blob to downloading mode.If no user key is pressed within 10 seconds, Blob continues to boot the Linux kernel.6. Communication Devices and Protocols Used for File Transfer Between Boot Loader and HostThe most common scenario is that the Boot Loader on the target machine transfers files to the host via a serial port, and the transfer protocol is usually one of the xmodem/ymodem/zmodem protocols.However, since the speed of serial transmission is limited, downloading files via an Ethernet connection using the TFTP protocol is a better choice.Additionally, when discussing this topic, the software used on the host side must also be considered.For example, when downloading files via Ethernet and TFTP protocol, the host must have software to provide TFTP services.After discussing the above concepts of Boot Loader, let’s take a closer look at the main tasks and typical structural framework of Boot Loader.Main Tasks and Typical Structural Framework of Boot LoaderBefore continuing this section’s discussion, let’s make an assumption that:the kernel image and root file system image are loaded into RAM to run.The reason for this assumption is that in embedded systems, the kernel image and root file system image can also run directly in solid-state storage devices like ROM or Flash.However, this approach undoubtedly sacrifices running speed.From the operating system’s perspective, the overall goal of the Boot Loader is to correctly invoke the kernel for execution.
Additionally, since the implementation of the Boot Loader depends on the CPU architecture, most Boot Loaders are divided into two main parts: stage 1 and stage 2.Code that depends on the CPU architecture, such as device initialization code, is typically placed in stage 1 and is usually implemented in assembly language to achieve brevity.Stage 2 is usually implemented in C language, allowing for more complex functionality and better code readability and portability.
Stage 1 of Boot Loader typically includes the following steps (in execution order):
· Hardware device initialization.
· Preparing RAM space for loading stage 2 of the Boot Loader.· Copying stage 2 of the Boot Loader into RAM space.· Setting up the stack.
· Jumping to the C entry point of stage 2.
Stage 2 of Boot Loader typically includes the following steps (in execution order):· Initializing hardware devices to be used in this stage.· Detecting the system memory map.· Reading the kernel image and root file system image from flash into RAM space.· Setting boot parameters for the kernel.· Invoking the kernel.Stage 1 of Boot LoaderBasic Hardware InitializationThis is the operation that the Boot Loader executes first, aiming to prepare a basic hardware environment for the execution of stage 2 and the subsequent kernel execution.It typically includes the following steps (in execution order):1. Masking all interrupts.Providing interrupt services is typically the responsibility of the OS device driver, so there is no need to respond to any interrupts during the entire execution of the Boot Loader.Interrupt masking can be accomplished by writing to the CPU’s interrupt mask register or status register (such as the ARM CPSR register).2. Setting the CPU speed and clock frequency.3. RAM initialization.This includes correctly setting the function registers of the system’s memory controller and various memory control registers.4. Initializing LEDs.Typically, LEDs are driven by GPIO to indicate whether the system status is OK or Error.If there are no LEDs on the board, this can also be accomplished by initializing UART to print the Boot Loader’s logo character information to the serial port.5. Disabling the CPU’s internal instruction/data cache.Preparing RAM Space for Loading Stage 2To achieve faster execution speed, stage 2 is typically loaded into RAM space for execution, so a usable RAM space range must be prepared for loading stage 2 of the Boot Loader.Since stage 2 is usually executed in C language, when considering space size, in addition to the size of the stage 2 executable image, stack space must also be considered.Moreover, the space size is best a multiple of the memory page size (usually 4KB).Generally, 1MB of RAM space is sufficient.The specific address range can be arranged arbitrarily; for example, Blob arranges its stage 2 executable image to execute in a 1MB space starting from the system RAM starting address 0xc0200000.However, it is recommended to arrange stage 2 at the top 1MB of the entire RAM space (i.e., (RamEnd-1MB) – RamEnd).For convenience in the following discussion, we denote the size of the arranged RAM space range as:stage2_size (bytes), and denote the starting and ending addresses as:stage2_start and stage2_end (both addresses aligned to a 4-byte boundary).Thus:stage2_end = stage2_start + stage2_size. Additionally, it must be ensured that the arranged address range is indeed writable RAM space, so the arranged address range must be tested. A specific testing method can adopt a method similar to Blob, that is, testing each memory page starting with two words for readability and writability. For convenience in the following discussion, we denote this detection algorithm as: test_mempage, with the specific steps as follows:
1. First, save the contents of the first two words of the memory page.
2. Write arbitrary numbers into these two words.For example:write 0x55 to the first word and 0xaa to the second word.
3. Then, immediately read back the contents of these two words.Clearly, the contents we read should be 0x55 and 0xaa respectively.If not, it indicates that this memory page does not occupy a valid RAM space.4. Write arbitrary numbers into these two words again.For example:write 0xaa to the first word and 0x55 to the second word.5. Then, immediately read back the contents of these two words.Clearly, the contents we read should be 0xaa and 0x55 respectively.If not, it indicates that this memory page does not occupy a valid RAM space.6. Restore the original contents of these two words.Testing is complete.To obtain a clean RAM space range, we can also zero out the arranged RAM space range.Copying Stage 2 into RAM
When copying, two points must be determined:
(1) The starting and ending addresses where the stage 2 executable image is stored in the solid-state storage device;
(2) The starting address of the RAM space.
Setting the Stack Pointer sp
Setting the stack pointer is to prepare for executing C language code.Typically, we can set the value of sp to (stage2_end-4), that is, at the top of the 1MB RAM space arranged in section 3.1.2 (the stack grows downwards).
Additionally, before setting the stack pointer sp, we can also turn off the LED to indicate to the user that we are ready to jump to stage 2.
After the above execution steps, the physical memory layout of the system should be as shown in the following figure.Jumping to the C Entry Point of Stage 2
Once everything is ready, we can jump to execute stage 2 of the Boot Loader.For example, in ARM systems, this can be achieved by modifying the PC register to the appropriate address.
Figure 2: System Memory Layout When Stage 2 Executable Image of Boot Loader Has Just Been Copied to RAM Space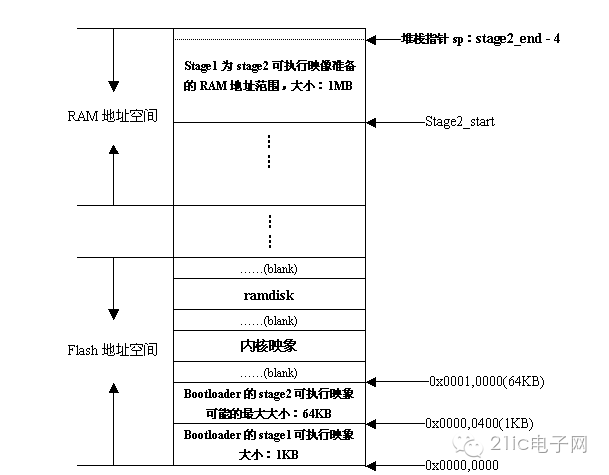 Stage 2 of Boot LoaderAs mentioned earlier, the code of stage 2 is usually implemented in C language to facilitate more complex functionality and achieve better code readability and portability.However, unlike ordinary C language applications, when compiling and linking programs like Boot Loader, we cannot use any support functions from the glibc library.The reason is obvious.This raises a question: where do we jump into the main() function?Directly using the starting address of the main() function as the entry point of the entire stage 2 executable image may seem like the most straightforward idea.However, this approach has two drawbacks:1) It is impossible to pass function parameters through the main() function;2) It is impossible to handle the return situation of the main() function.A more clever method is to utilize the concept of a trampoline.That is, write a small trampoline program in assembly language and use this trampoline program as the entry point of the stage 2 executable image.Then we can use CPU jump instructions in the trampoline assembly program to jump into the main() function for execution;when the main() function returns, the CPU execution path obviously returns to our trampoline program again.In short, the idea of this method is:to use this trampoline program as an external wrapper for the main() function.Below is a simple example of a trampoline program (from Blob):.text.globl _trampoline_trampoline:bl main/* if main ever returns we just call it again */b _trampolineIt can be seen that when the main() function returns, we again use a jump instruction to re-execute the trampoline program—of course, this also means re-executing the main() function, which is the meaning of the term trampoline.Initializing Hardware Devices to Be Used in This StageThis typically includes:(1) Initializing at least one serial port to perform I/O output information to the terminal user;(2) Initializing timers, etc.Before initializing these devices, we can also turn the LED back on to indicate that we have entered the execution of the main() function.After the device initialization is complete, some print information can be output, such as the program name string, version number, etc.Detecting the System Memory Map
The so-called memory map refers to which address ranges in the entire 4GB physical address space are allocated for addressing the system’s RAM units.For example, in the SA-1100 CPU, the address space starting from 0xC0000000 is used as the system’s RAM address space, while in the Samsung S3C44B0X CPU, the address space from 0x0c000000 to 0x10000000 is used as the system’s RAM address space.Although CPUs typically reserve a large enough address space for system RAM, when building specific embedded systems, it may not necessarily implement all of the CPU-reserved RAM address space.This means that specific embedded systems often only map a portion of the entire CPU-reserved RAM address space to RAM units, leaving the remaining portion of the reserved RAM address space unused.Due to this fact, the stage 2 of the Boot Loader must detect the entire system’s memory mapping situation before it can perform any actions (such as reading the kernel image stored in flash into RAM space); that is, it must know which of the entire CPU-reserved RAM address space is actually mapped to RAM address units and which is in an “unused” state.
(1) Description of Memory MappingIt can be described using the following data structure for a continuous address range in the RAM address space:typedef struct memory_area_struct {u32 start; /* the base address of the memory region */u32 size; /* the byte number of the memory region */int used;} memory_area_t;
This continuous address range in the RAM address space can be in one of two states:(1) used=1, indicating that this continuous address range has been implemented, meaning it is truly mapped to RAM units.
(2) used=0, indicating that this continuous address range has not been implemented by the system and is in an unused state.
Based on the above memory_area_t data structure, the entire CPU-reserved RAM address space can be represented by an array of type memory_area_t, as follows:memory_area_t memory_map[NUM_MEM_AREAS] = {[0 … (NUM_MEM_AREAS – 1)] = {.start = 0,.size = 0,.used = 0},};
(2) Detection of Memory Mapping
Below is a simple and effective algorithm that can be used to detect the memory mapping situation of the entire RAM address space:
/* Array initialization */for(i = 0; i < NUM_MEM_AREAS; i++)memory_map[i].used = 0;/* first write a 0 to all memory locations */for(addr = MEM_START; addr < MEM_END; addr += PAGE_SIZE)* (u32 *)addr = 0;for(i = 0, addr = MEM_START; addr < MEM_END; addr += PAGE_SIZE) { /* * Detect whether the address space starting from base address MEM_START+i*PAGE_SIZE, with a size of* PAGE_SIZE, is a valid RAM address space. */ Call the algorithm test_mempage() from section 3.1.2; if ( current memory page is not a valid RAM page) {/* no RAM here */if(memory_map[i].used )i++;continue;}/* * The current page is already a valid address range mapped to RAM * but we also need to check whether the current page is just an alias of some address page in the 4GB address space? */if(* (u32 *)addr != 0) { /* alias? *//* This memory page is an alias of some address page in the 4GB address space */if ( memory_map[i].used )i++;continue;}/* * The current page is already a valid address range mapped to RAM * and it is not an alias of some address page in the 4GB address space. */if (memory_map[i].used == 0) {memory_map[i].start = addr;memory_map[i].size = PAGE_SIZE;memory_map[i].used = 1;} else {memory_map[i].size += PAGE_SIZE;}} /* end of for (…) */
After using the above algorithm to detect the system’s memory mapping situation, the Boot Loader can also print the detailed information of the memory mapping to the serial port.
Loading Kernel Image and Root File System Image(1) Planning Memory Occupancy Layout
This includes two aspects:(1) The memory range occupied by the kernel image;(2) The memory range occupied by the root file system.When planning the memory occupancy layout, the main considerations are the base address and the size of the image.
For the kernel image, it is generally copied to a memory range starting from (MEM_START + 0x8000) of about 1MB size (embedded Linux kernels generally do not exceed 1MB).Why should we leave the 32KB memory space from MEM_START to MEM_START + 0x8000 empty?This is because the Linux kernel needs to place some global data structures in this memory, such as:boot parameters and kernel page table information.
For the root file system image, it is generally copied to a location starting from MEM_START + 0x00100000.If using Ramdisk as the root file system image, its uncompressed size is generally 1MB.
(2) Copying from Flash
Since embedded CPUs like ARM typically address Flash and other solid-state storage devices in a unified memory address space, reading data from Flash is no different from reading data from RAM units.A simple loop can accomplish the task of copying images from Flash devices:
while(count) {*dest++ = *src++; /* they are all aligned with word boundary */count -= 4; /* byte number */};Setting Kernel Boot Parameters
It should be said that after copying the kernel image and root file system image into RAM space, we can prepare to start the Linux kernel.However, before invoking the kernel, one preparatory step should be taken:setting the Linux kernel’s boot parameters.
Linux kernels after 2.4.x expect boot parameters to be passed in the form of a tagged list.The boot parameter tagged list starts with the ATAG_CORE tag and ends with the ATAG_NONE tag.Each tag consists of a tag_header structure identifying the passed parameters and the subsequent parameter value data structure.The data structures tag and tag_header are defined in the Linux kernel source include/asm/setup.h header file:
/* The list ends with an ATAG_NONE node. */#define ATAG_NONE 0x00000000struct tag_header {u32 size; /* Note that size is in words */u32 tag;};……struct tag {struct tag_header hdr;union {struct tag_core core;struct tag_mem32 mem;struct tag_videotext videotext;struct tag_ramdisk ramdisk;struct tag_initrd initrd;struct tag_serialnr serialnr;struct tag_revision revision;struct tag_videolfb videolfb;struct tag_cmdline cmdline;/* * Acorn specific */struct tag_acorn acorn;/* * DC21285 specific */struct tag_memclk memclk;} u;};
In embedded Linux systems, common boot parameters that need to be set by the Boot Loader include:ATAG_CORE, ATAG_MEM, ATAG_CMDLINE, ATAG_RAMDISK, ATAG_INITRD, etc.
For example, the code to set ATAG_CORE is as follows:
params = (struct tag *)BOOT_PARAMS;params->hdr.tag = ATAG_CORE;params->hdr.size = tag_size(tag_core);params->u.core.flags = 0;params->u.core.pagesize = 0;params->u.core.rootdev = 0;params = tag_next(params);
Here, BOOT_PARAMS indicates the starting base address of the kernel boot parameters in memory, and the pointer params is a pointer of type struct tag.The macro tag_next() takes the pointer pointing to the current tag as a parameter and calculates the starting address of the next tag immediately following the current tag.Note that the device ID of the root file system where the kernel is located is set here.
Below is an example code for setting the memory mapping situation:
for(i = 0; i < NUM_MEM_AREAS; i++) {if(memory_map[i].used) {params->hdr.tag = ATAG_MEM;params->hdr.size = tag_size(tag_mem32);params->u.mem.start = memory_map[i].start;params->u.mem.size = memory_map[i].size;params = tag_next(params);}}
It can be seen that in the memory_map[] array, each valid memory segment corresponds to an ATAG_MEM parameter tag.
The Linux kernel can receive information in the form of command line parameters at startup, utilizing this to provide hardware parameter information that the kernel cannot detect itself or override (override) information detected by the kernel itself.For example, we can use a command line parameter string “console=ttyS0,115200n8” to inform the kernel to use ttyS0 as the console, with the serial port set to “115200bps, no parity, 8 data bits”.Below is a segment of example code for setting the kernel command line parameter string:char *p;/* eat leading white space */for(p = commandline; *p == ‘ ‘; p++);/* skip non-existent command lines so the kernel will still * use its default command line. */if(*p == ‘\0’)return;params->hdr.tag = ATAG_CMDLINE;params->hdr.size = (sizeof(struct tag_header) + strlen(p) + 1 + 4) >> 2;strcpy(params->u.cmdline.cmdline, p);params = tag_next(params);
Note that in the above code, when setting the size of the tag_header, it must include the string’s terminating character ‘\0’, and the byte count must be rounded up to 4 bytes, as the size member in the tag_header structure represents the number of words.
Below is an example code for setting ATAG_INITRD, which tells the kernel where to find the initrd image (compressed format) in RAM and its size:params->hdr.tag = ATAG_INITRD2;params->hdr.size = tag_size(tag_initrd);params->u.initrd.start = RAMDISK_RAM_BASE;params->u.initrd.size = INITRD_LEN;params = tag_next(params);
Below is an example code for setting ATAG_RAMDISK, which tells the kernel how large the uncompressed Ramdisk is (in KB):
params->hdr.tag = ATAG_RAMDISK;params->hdr.size = tag_size(tag_ramdisk);params->u.ramdisk.start = 0;params->u.ramdisk.size = RAMDISK_SIZE; /* Note that the unit is KB */params->u.ramdisk.flags = 1; /* automatically load ramdisk */params = tag_next(params);
Finally, set the ATAG_NONE tag to end the entire boot parameter list:
static void setup_end_tag(void){params->hdr.tag = ATAG_NONE;params->hdr.size = 0;}Invoking the KernelThe Boot Loader invokes the Linux kernel by directly jumping to the first instruction of the kernel, that is, directly jumping to the address MEM_START + 0x8000.When jumping, the following conditions must be met:1. Setting of CPU registers:· R0 = 0;· R1 = machine type ID;For information on Machine Type Number, refer to linux/arch/arm/tools/mach-types.· R2 = starting base address of the boot parameter tagged list in RAM;
2. CPU Mode:
· Interrupts (IRQs and FIQs) must be disabled;· CPU must be in SVC mode;
3. Cache and MMU Settings:
· MMU must be turned off;· Instruction Cache can be on or off;· Data Cache must be turned off;If using C language, the following example code can be used to invoke the kernel:
Each card can nest images or other templates.
void (*theKernel)(int zero, int arch, u32 params_addr) = (void (*)(int, int, u32))KERNEL_RAM_BASE;……theKernel(0, ARCH_NUMBER, (u32) kernel_params_start);
Note that the theKernel() function call should never return.If this call returns, it indicates an error.
About Serial Port Terminal
In the design and implementation of the boot loader program, nothing is more exciting than correctly receiving print information from the serial port terminal.Moreover, printing information to the serial port terminal is also a very important and effective debugging method.However, we often encounter issues where the serial port terminal displays garbled characters or does not display anything at all.The main reasons for this problem are two:
(1) The boot loader’s initialization settings for the serial port are incorrect.
(2) The terminal emulation program running on the host side has incorrect settings for the serial port, including:baud rate, parity, data bits, and stop bits settings.
Additionally, sometimes we encounter the issue where we can correctly output information to the serial port terminal during the boot loader’s execution, but after the boot loader starts the kernel, we cannot see the kernel’s startup output information.The reasons for this issue can be considered from the following aspects:(1) First, please confirm that your kernel is configured to support the serial port terminal during compilation and has the correct serial port driver configured.(2) Your boot loader’s initialization settings for the serial port may be inconsistent with the kernel’s initialization settings for the serial port.Moreover, for CPUs like s3c44b0x, the settings of the CPU clock frequency will also affect the serial port, so if the boot loader and kernel have inconsistent settings for the CPU clock frequency, it will also prevent the serial port terminal from displaying information correctly.(3) Finally, ensure that the base address used by the boot loader for the kernel must be consistent with the run base address used during the kernel image compilation, especially for uClinux.For example, if your kernel image was compiled with a base address of 0xc0008000, but your boot loader loads it to 0xc0010000, then the kernel image cannot execute correctly.ConclusionThe design and implementation of the Boot Loader is a very complex process.If you cannot receive the exciting “uncompressing linux……………… done, booting the kernel……” kernel startup information from the serial port, I am afraid no one can say:“Hey, my boot loader has successfully started!”“.