1. Introduction to AWX
● AWX is the open-source version of Ansible Tower (the upstream product of the enterprise version), a visual interface server automation deployment and operation management platform.
● AWX provides a web-based user interface, REST API, and a task engine built on Ansible.
● The graphical AWX makes it easier to orchestrate and deploy Ansible Playbooks, providing centralized logging, auditing, and system tracking.
● AWX allows us to manage Ansible playbooks, inventories, and scheduled tasks through a web interface.
GitHub address:https://github.com/ansible/awx
Official project deployment documentation:https://github.com/ansible/awx/blob/devel/INSTALL.md
Official image address:
https://hub.docker.com/r/ansible/awx (< 18.0.0)
https://quay.io/repository/ansible/awx (> 18.0.0)
AWX versions prior to 17 can be installed through various distributions, such as running directly with the docker-compose tool. However, starting from version 18, it can only be installed using the AWX operator method on k8s or OpenShift. If you want to install it locally, there are only two methods: the first is to install the development version of AWX, and the second is to downgrade to version 17.1.0. Today, we will mainly introduce the deployment method in k8s.
2. Deploying AWX
This section only introduces the operator deployment method; please refer to other documents for older versions. For operator deployment, you can refer to the link below:
https://readthedocs.ansible.org.cn/projects/awx-operator/en/latest/installation/basic-install.html
1. Install the AWX operator
$ git clone https://github.com/ansible/awx-operator.git $ cd awx-operator $ git tag $ git checkout tags/2.19.1 $ export NAMESPACE=ansible-awx $ make deploy $ kubectl apply -k . $ kubectl get pods -n ansible-awx NAME READY STATUS RESTARTS AGE awx-operator-controller-manager-666ddcf9c5-2m5rv 2/2 Running 0 41m
2. Create an AWX instance
1) Copy the instance file
$ cp config/samples/awx_v1beta1_awx.yaml myawx.yml
2) Modify the instance file
— apiVersion: awx.ansible.com/v1beta1 kind: AWX metadata: name: easyops-awx namespace: awx spec: postgres_security_context_settings: fsGroup: 26 runAsGroup: 26 fsGroupChangePolicy: “OnRootMismatch”# Only change permissions when the root directory does not match postgres_data_volume_init: true postgres_init_container_commands: | chown –recursive -R 26:26 /var/lib/pgsql/data chmod 700 /var/lib/pgsql/data #service_type: ClusterIP service_type: NodePort #ostgres_configuration_secret: awx-postgres-configuration #admin_user: admin #admin_password_secret: easyops-awx-admin-password postgres_storage_class: nfs-csi image_pull_policy: IfNotPresent web_resource_requirements: requests: cpu: 50m memory: 128M task_resource_requirements: requests: cpu: 50m memory: 128M ee_resource_requirements: requests: cpu: 50m memory: 64M
3) Create
$ kubectl apply -f myawx.yaml -n awx $ kubectl logs -f deployments/awx-operator-controller-manager -c awx-manager -n awx $ kubectl get pods -l “app.kubernetes.io/managed-by=awx-operator” -n awx $ kubectl get service -l “app.kubernetes.io/managed-by=awx-operator” -n awx $ kubectl get pvc -n awx $ kubectl get pv
Postgre container startup permission issues:
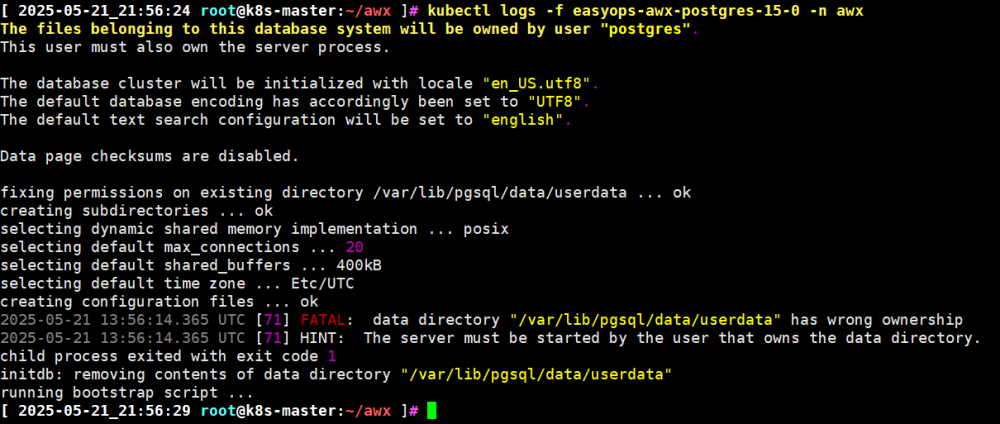
Solution:https://github.com/ansible/awx-operator/issues/1775
Add the following parameters to the instance:
… spec: postgres_security_context_settings: fsGroup: 26 runAsGroup: 26 fsGroupChangePolicy: “OnRootMismatch”# Only change permissions when the root directory does not match postgres_data_volume_init: true postgres_init_container_commands: | chown –recursive -R 26:26 /var/lib/pgsql/data chmod 700 /var/lib/pgsql/data service_type: NodePort postgres_storage_class: nfs-csi …
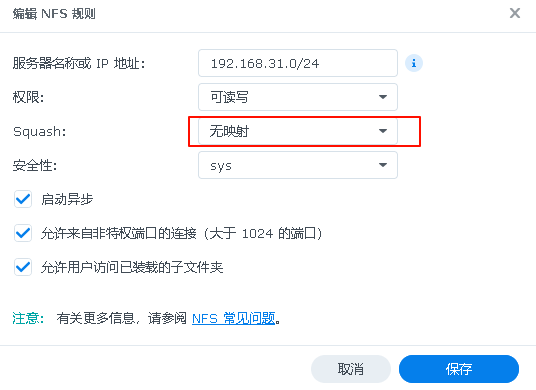
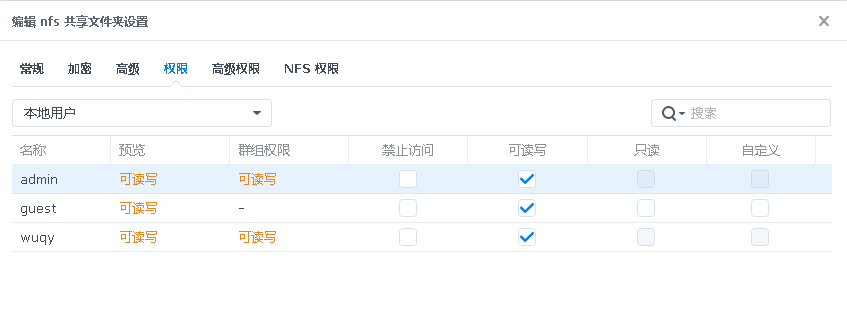
Also, pay attention to the settings in the nfsstorageclass:
kind: StorageClass metadata: name: nfs-csi annotations: # This operation is a new alpha feature above 1.25, which sets this storageclass as default storageclass.kubernetes.io/is-default-class: “true” # Here specifies the name of csidrivers provisioner: nfs.csi.k8s.io parameters: # NFS Server server: 192.168.31.199 # NFS storage path share: /volume1/nfs reclaimPolicy: Delete volumeBindingMode: Immediate mountOptions: # Here you can configure not only the version of nfs but also other parameters #- nfsvers=3 – hard – nolock #- nfsvers=4.1 – rw – noatime – nodiratime – nconnect=8 – hard – intr
The server (I am using my own Synology NAS to provide NFS, for reference only):
3. Verify the instance
$ kubectl get pods -n awx -w awx-operator-controller-manager-666ddcf9c5-2m5rv 2/2 Running 12 (6h51m ago) 3d18h easyops-awx-migration-24.6.1-pb8gm 0/1 Completed 0 77m easyops-awx-postgres-15-0 1/1 Running 0 77m easyops-awx-task-7f648cdd88-67qzs 4/4 Running 0 77m easyops-awx-web-756dddb645-rcc45 3/3 Running 0 77m $ kubectl get service -n awx NAME TYPE CLUSTER-IP EXTERNAL-IP PORT(S) AGE awx-operator-controller-manager-metrics-service ClusterIP 10.106.52.69
4. Get the admin password
$ kubectl get secret -n awx NAME TYPE DATA AGE easyops-awx-admin-password Opaque 1 79m easyops-awx-app-credentials Opaque 3 79m easyops-awx-broadcast-websocket Opaque 1 79m easyops-awx-postgres-configuration Opaque 6 79m easyops-awx-receptor-ca kubernetes.io/tls 2 79m easyops-awx-receptor-work-signing Opaque 2 79m easyops-awx-secret-key Opaque 1 79m redhat-operators-pull-secret Opaque 1 79m $ kubectl get secret easyops-awx-admin-password-n awx -o jsonpath=”{.data.password}” | base64 –decode; echo 5Ya41s60nO7KcP38XkcDh8KzwVk77SUq # If not using a nodeport type service, you can refer to the method below for port forwarding #kubectl port-forward service/ansible-awx-service –address 0.0.0.0 10445:80
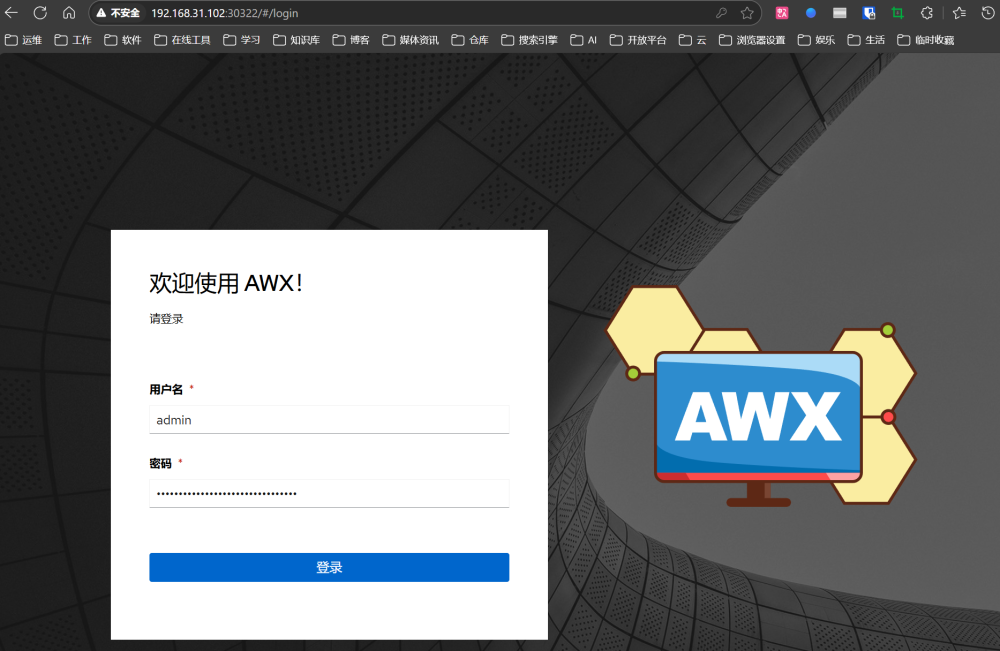
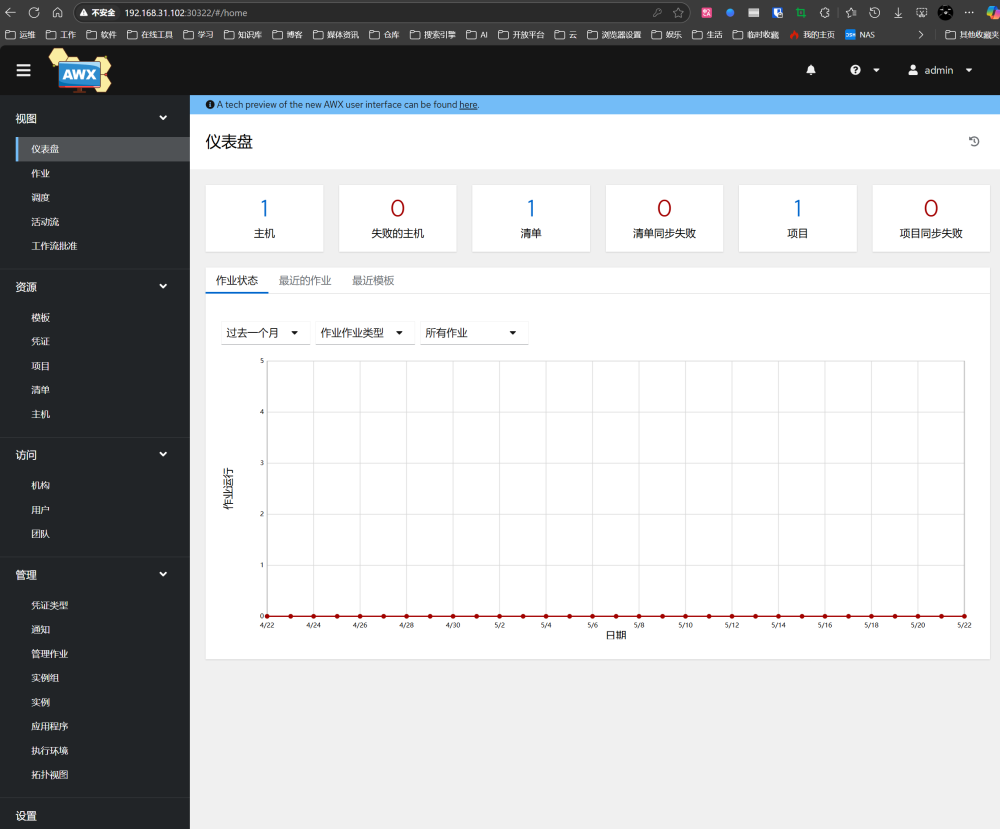
5. Log in to AWX
URL: http://<node ip>
Username: admin
Password: The password output from the previous step
3. Using AWX
Reference documentation:
https://readthedocs.ansible.org.cn/projects/awx/en/latest/quickstart/create_credential.html
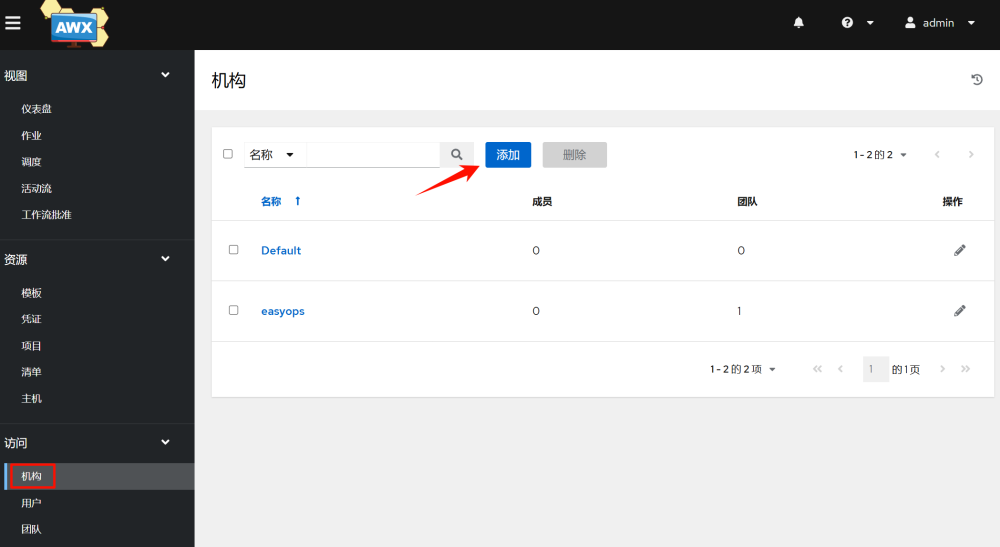
3.1 Adding Organizations
Organizations are similar to companies, and you can customize and add one. Here we take easyops as an example:
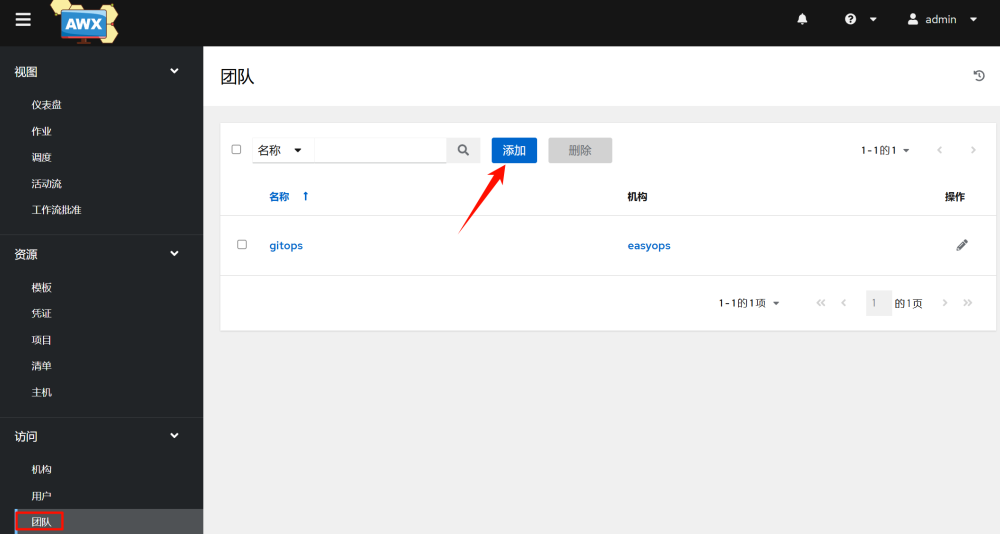
3.2 Adding Teams
Teams are a department under a company. Here we take gitops as an example:
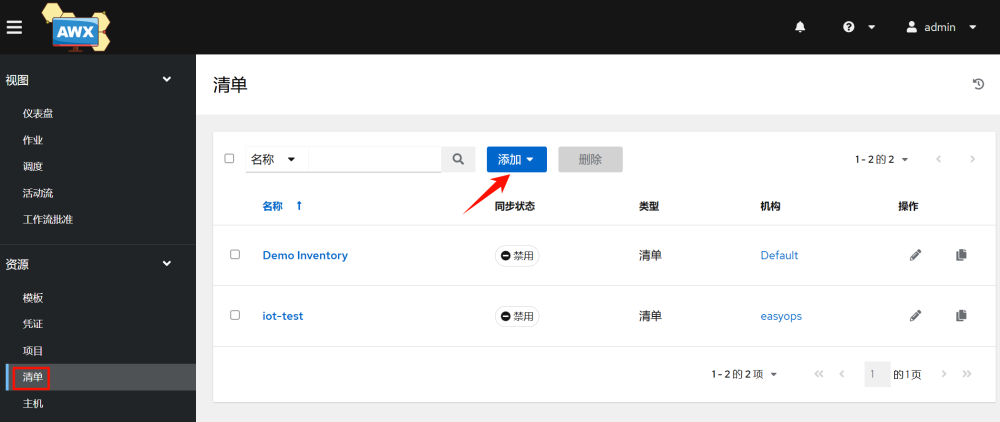
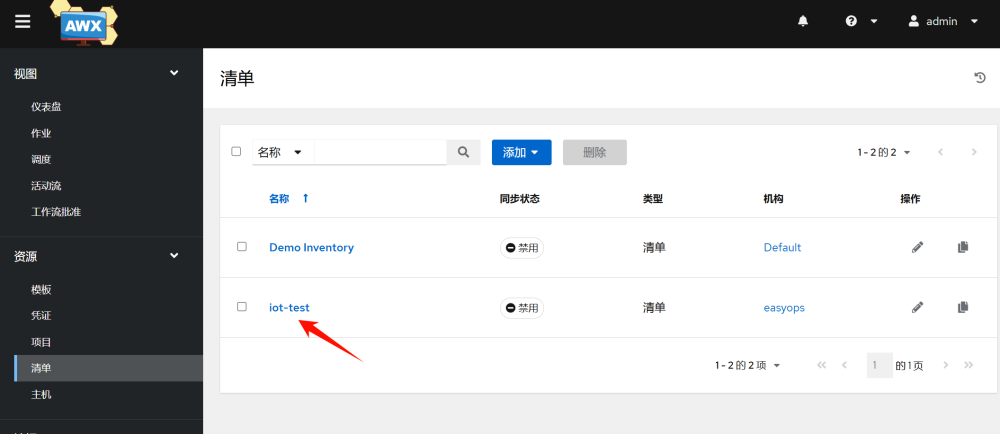
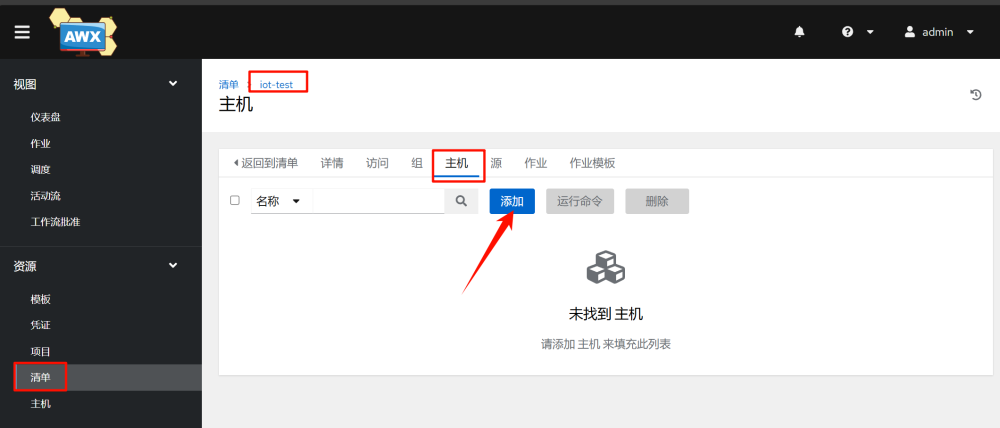
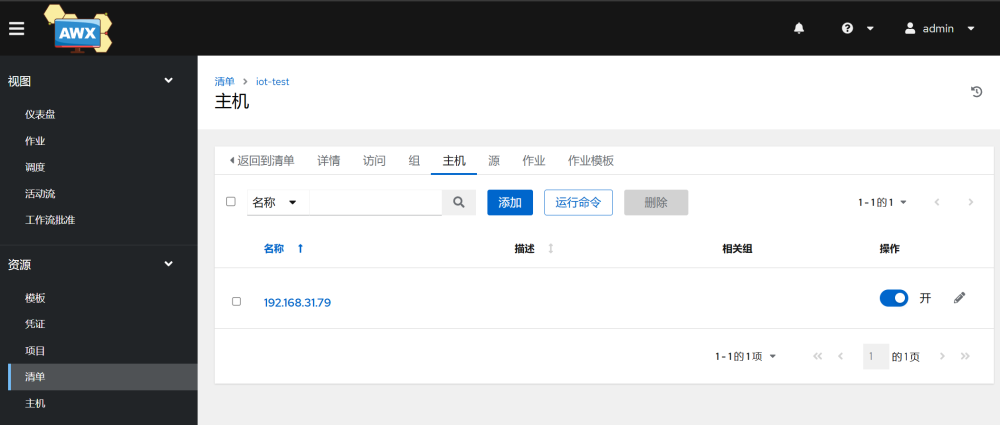
3.3 Adding Hosts
Add hosts in an inventory:
1.Add an inventory, which is similar to categorizing hosts. Here we take iot-test as an example.
2.Add the inventory-host–add
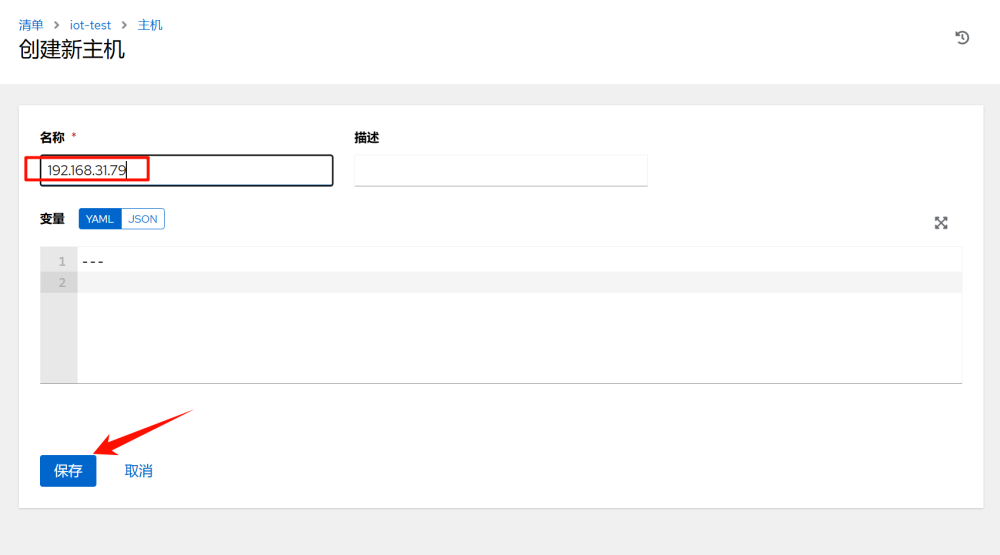
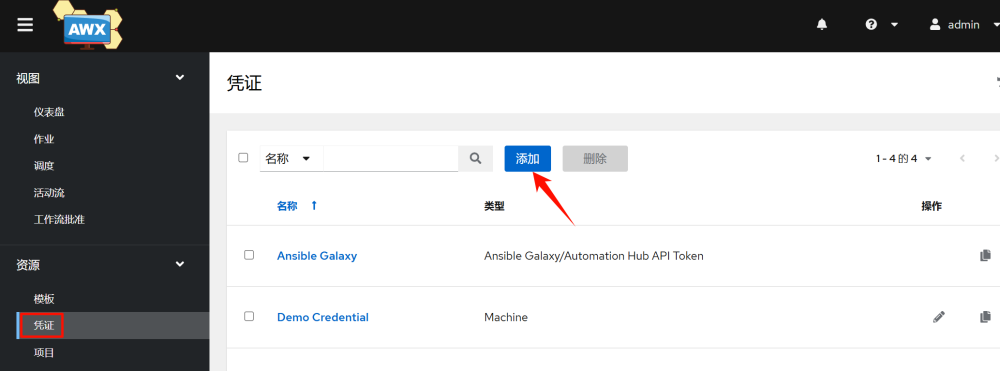
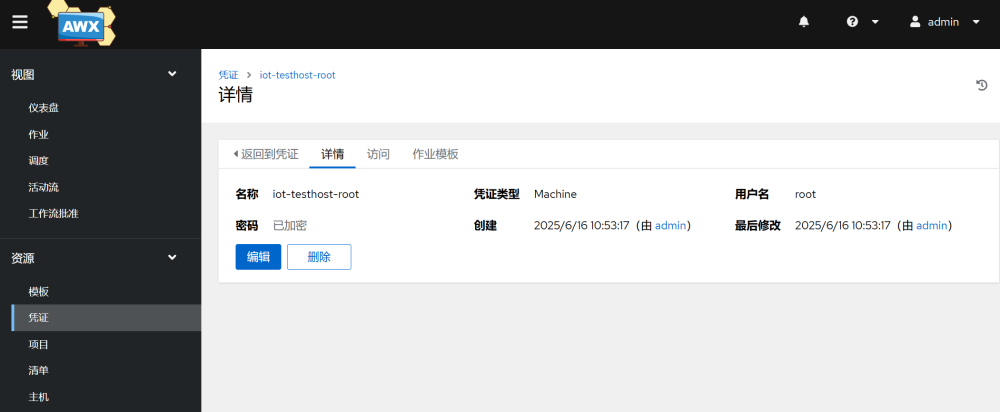
3.Add host credentials
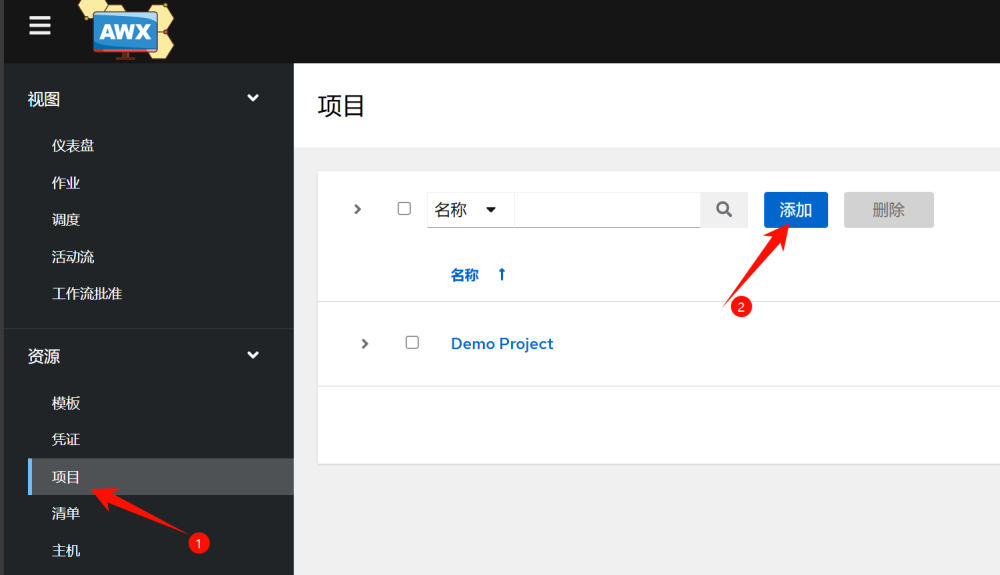
3.4 Adding Projects
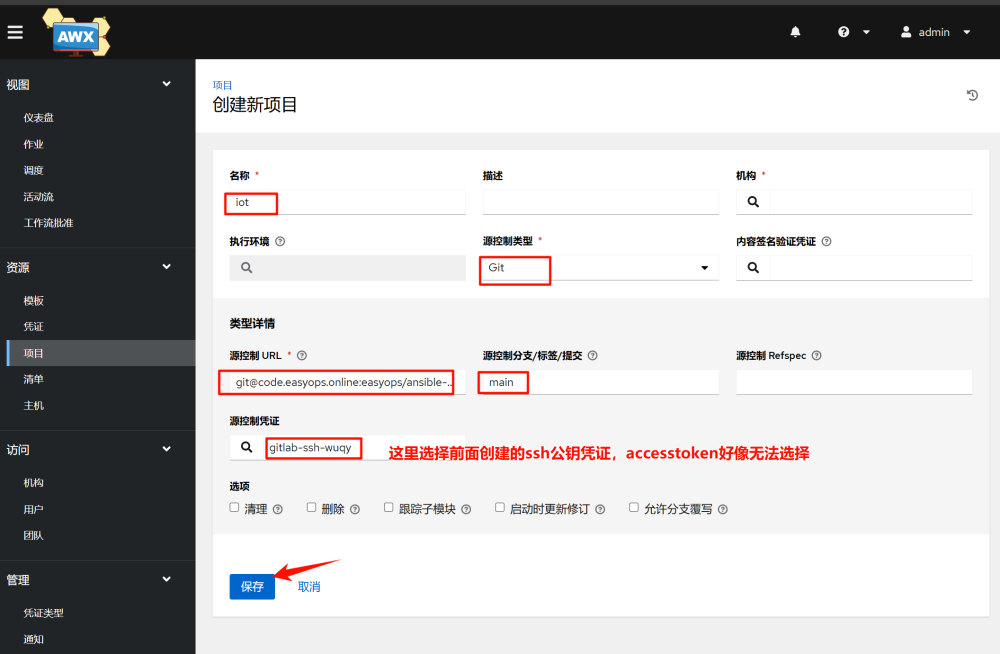
Projects are used to manage the location of playbooks, which can exist locally, in git repositories, svn repositories, and other version control tools. Here we introduce the use of gitlab.
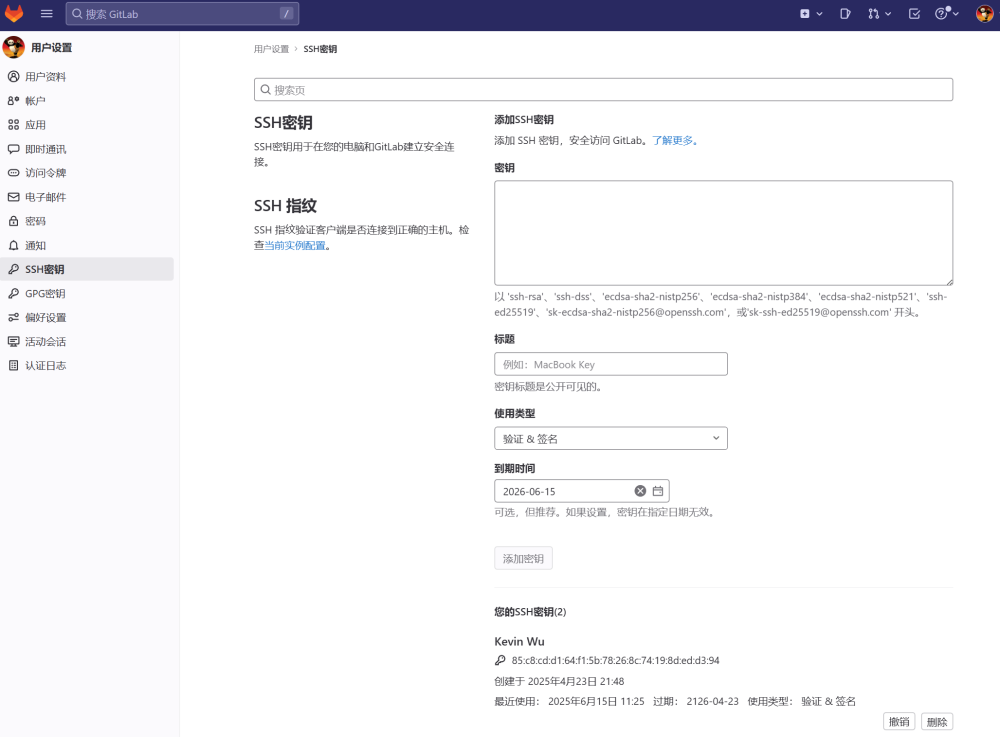
1. Add SSH public key in gitlab
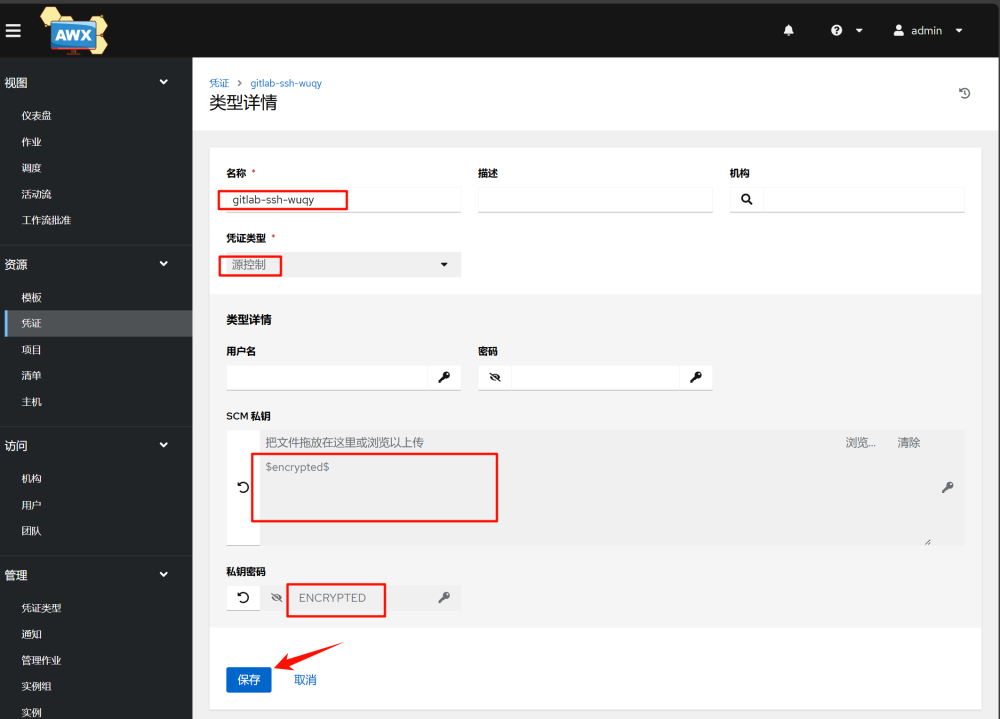
2.Add SSH key in AWX
3.Add project
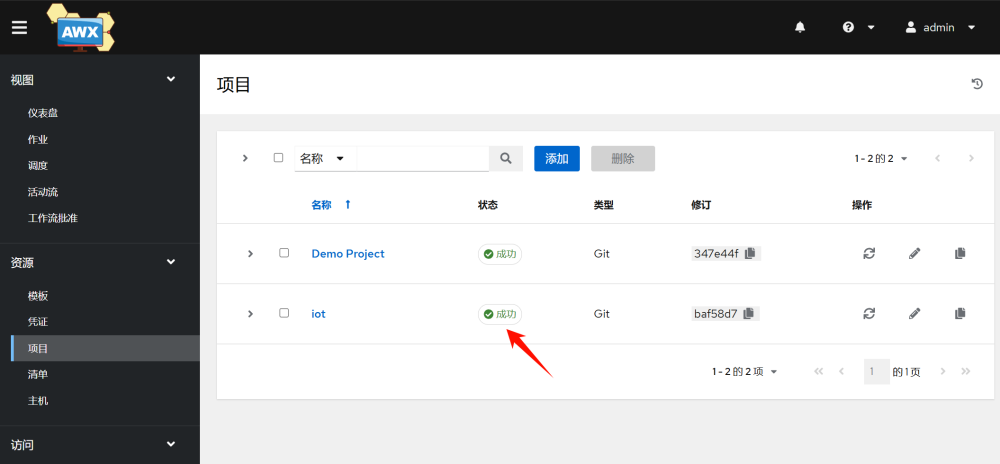
Seeing success means it’s OK
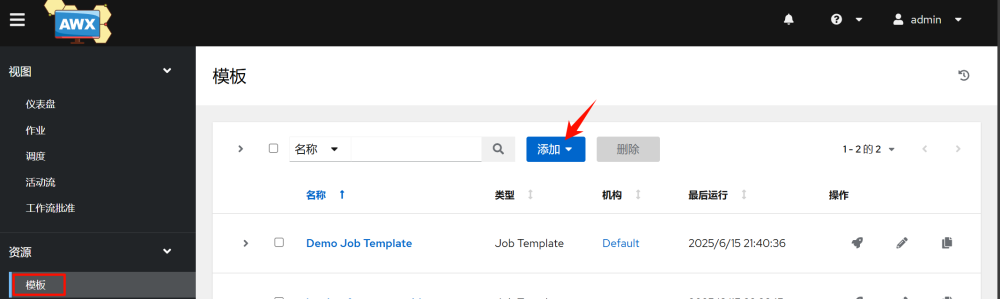
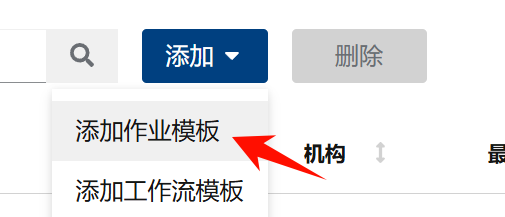
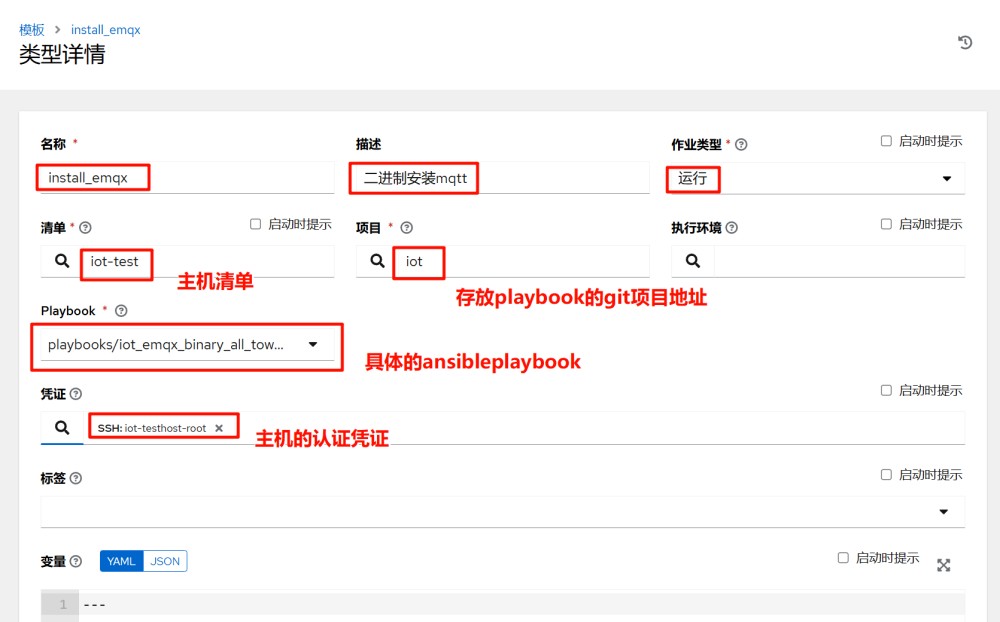
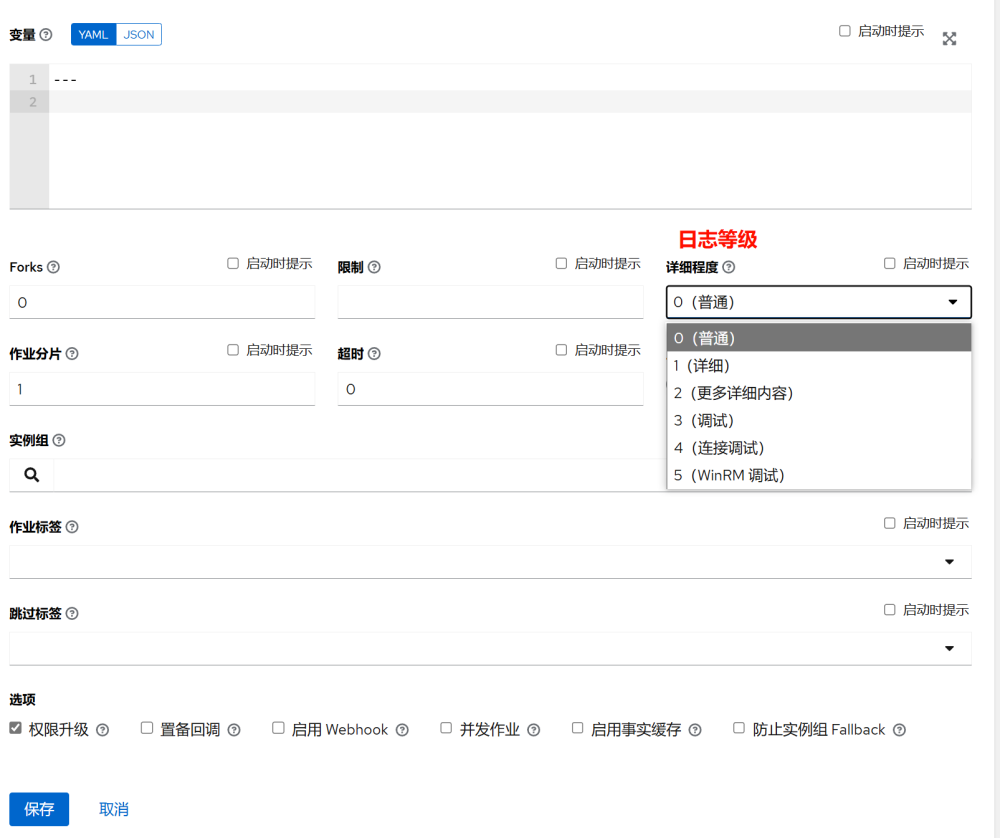
3.5 Adding Templates
In AWX, a template is a reference to a playbook. Executing a template means executing a playbook.
1.Create a job template; a workflow template can chain multiple templates together in sequence.
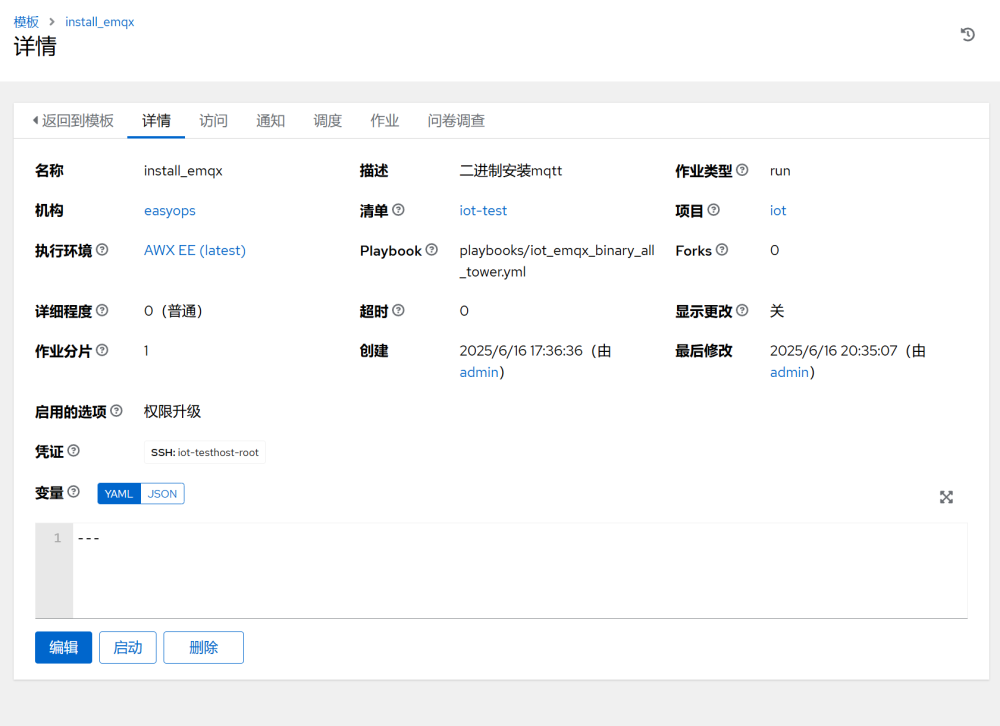
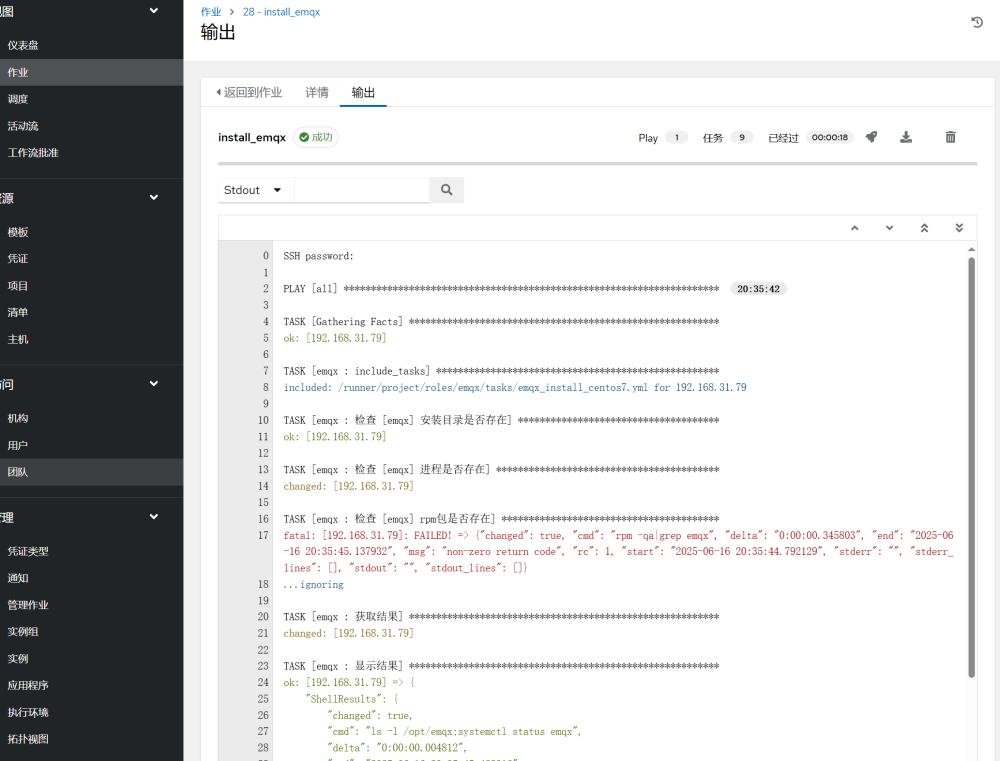
In the template, start the task:

Once the task is completed, you can see the detailed execution information:
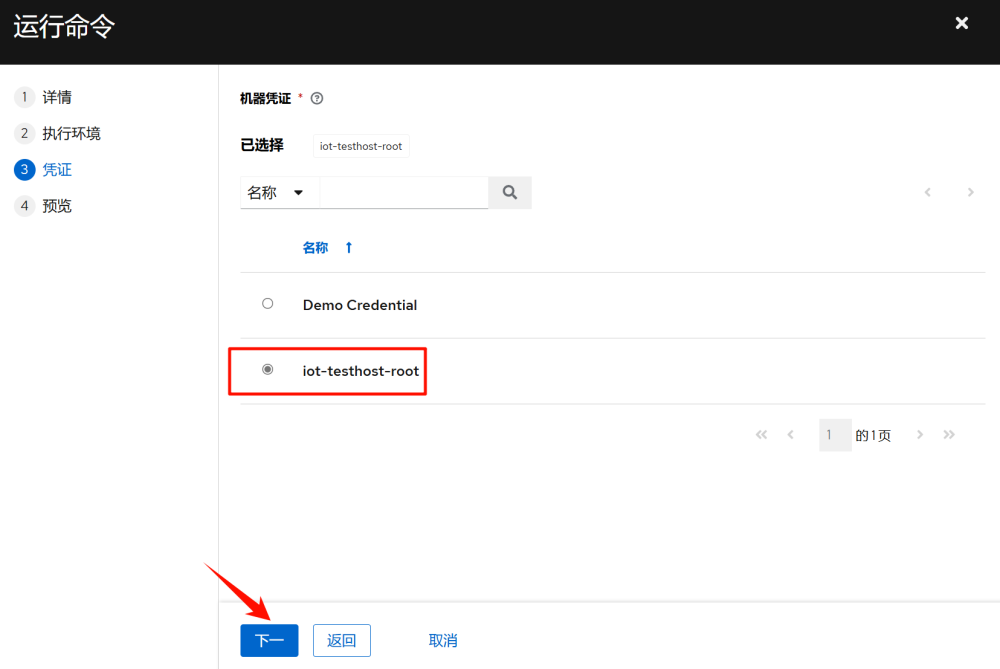
3.6 Running Commands
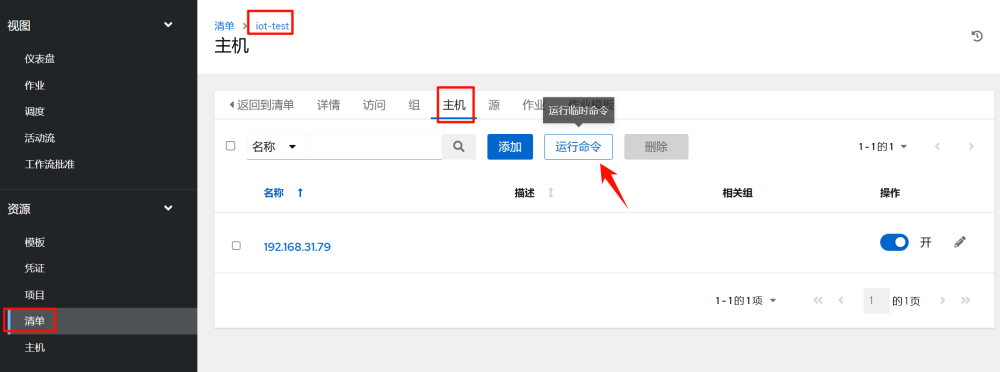
In “Inventory” >> “iot” >> “Hosts” select the host to execute, and click “Run Command”
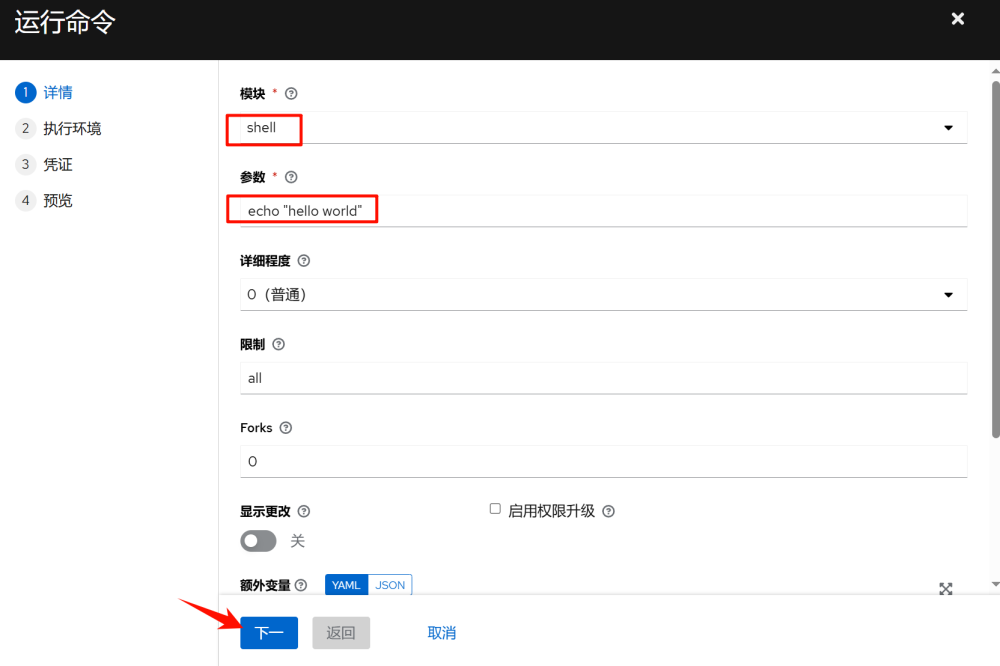
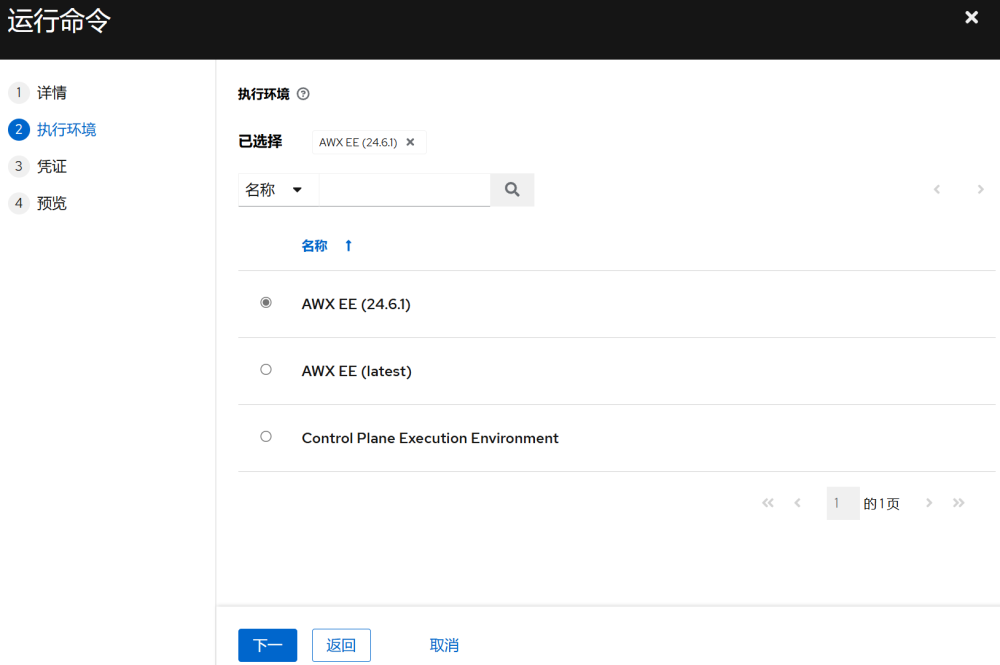
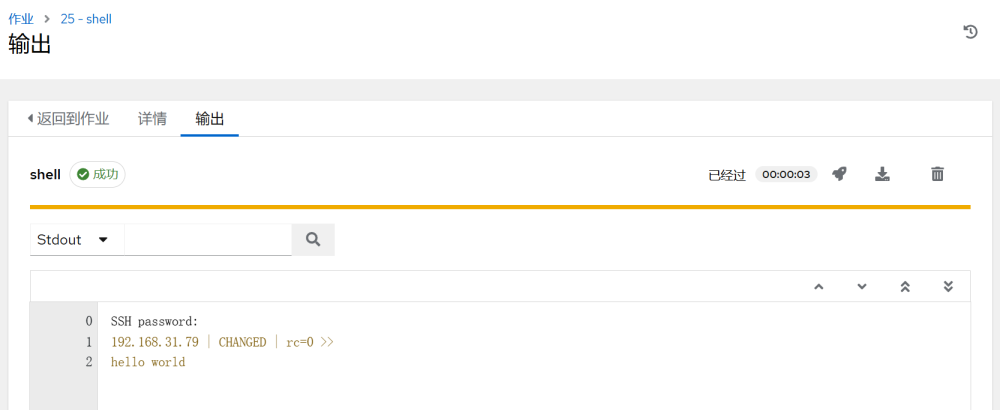
Once executed, you can see the detailed execution information:
That’s all for today’s sharing. I hope it helps everyone. If you find it useful, please give a thumbs up and follow. Click the link below to directly enter this public account and view historical articles. Thank you all ^_^