Welcome FPGA engineers to join the official WeChat technical group
Clickthe blue textto follow us at FPGA Home – the largest and best FPGA-only engineering community in China

-
Introduction
-
Why simulate an ARM system?
-
What is Qemu?
-
The two modes of Qemu
-
What can Qemu do? Or what is it suitable for?
-
Setting up an ARM virtual machine using Qemu on Ubuntu 16.04
-
Testing a HelloWorld application
-
Conclusion
-
Software download links
Introduction
Recently, due to work requirements, I did some research on ARM emulators. The purpose of the research was: since there are many participants in the project and resources are tight, if everyone has an ARM development board, it would be helpful to use an emulator as a substitute.
During the research period, I spent a lot of time checking information and validating tests. In the actual validation process, I found a phenomenon: many articles provided either simple or detailed operational steps, but most did not clarify the background of the operations or the versions of the software, which led to needing to read the entire article and go through all the operational steps to understand what the author meant and what the purpose of the operation was.
I believe that any article should first let readers know why they should read it, or what benefits they can gain from it.
If it’s a highly operational article, it is necessary to clearly explain the background of the working platform, what goals need to be achieved, and what the overall steps are. Only in this way can readers build a macro framework in their minds, and on the basis of understanding this framework, proceed with practical operations, making it easier to comprehend.
Of course, everyone has different learning and reading habits; the above is just my personal feeling, or rather, I prefer articles that are more organized, so as not to feel lost.
Returning to the topic of Qemu, this article mainly organizes and summarizes the research results, including the following content:
Why is there a need for an ARM simulation system? What is Qemu? What can Qemu do? Or what is it suitable for? What are the operational steps to set up an ARM virtual machine on Ubuntu 16.04? How to write a HelloWorld program and execute it in the virtual machine?
Why simulate an ARM system?
Software development work on the ARM platform can be divided into two categories:
Application development System development (kernel, file system, driver)
Application development
When developing embedded projects, we generally complete most of the functionality on the x86 platform first and then cross-compile to obtain executable programs or library files for the ARM platform. We then use scp commands or NFS remote mounting to copy these files to the ARM board for execution.
Generally speaking, application programs utilize various resources and peripherals of hardware products to achieve specific functionalities, such as: data collection, controlling external devices, network transmission, etc. The main characteristic is interaction with various external devices.
System development (BSP)
The ultimate goal of system development is to prepare a basic execution environment for the execution of application programs, which includes: bootloader, kernel, root file system, and drivers for all devices in the system. In actual project development, system development is generally more challenging; once completed, it is unlikely to change easily for a board, and the code’s usage lifecycle is longer.
The above two classifications are mainly based on the content of the development work. It can be seen that:
Application development: more flexibility, more demand changes (product managers or project managers often change requirements). System software development: more stable demands, much of the code is officially provided or open-source, and the work involves customization and trimming.
For system software development, if every time a bootloader or kernel is compiled, it needs to be verified on an ARM development board, it can indeed be quite cumbersome. If there is an ARM simulation system that can simulate directly on x86, work efficiency will improve significantly.
What is Qemu?
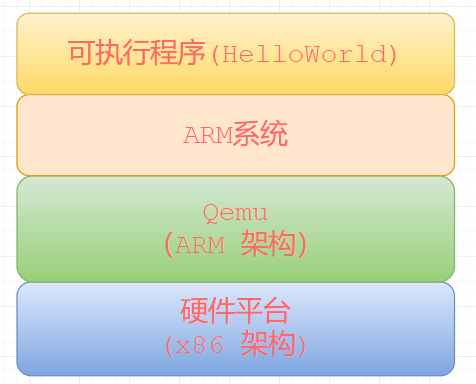
Qemu is an open-source managed virtual machine that implements virtualization simulators through pure software, capable of simulating almost any hardware device. For example, Qemu can simulate components of an ARM system such as: CPU, memory, I/O devices, etc. Then, on this simulation layer, an ARM virtual machine can run, which thinks it is interacting with hardware, but in reality, these hardware components are simulated by Qemu.

Because Qemu is implemented purely in software, all instructions must go through its conversion, resulting in very low performance. Therefore, in production environments, most practices involve combining it with KVM to complete virtualization work, as KVM is a hardware-assisted virtualization technology primarily responsible for the more complex CPU and memory virtualization, while Qemu handles I/O virtualization. The cooperation of the two leverages their respective advantages, complementing each other. This part is not the focus, so I will not delve into it.
The two modes of Qemu
Qemu has two execution modes:
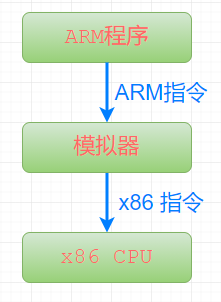
User mode: uses dynamic code translation to execute code from different host architectures, for example: simulating ARM code execution on an x86 platform, meaning: we write an ARM instruction, pass it into the entire simulator, and the simulator will translate the entire instruction into an x86 platform instruction, which is then executed on the x86 CPU.
System mode: simulates an entire computer system, utilizing other VMMs (Xen, KVM) to use hardware-provided virtualization support, creating a fully functional virtual machine close to host performance.
What can Qemu do? Or what is it suitable for?
Because Qemu uses pure software simulation, its strength lies in simulating scenarios that do not involve specific external hardware devices, such as:
Want to learn how to customize bootloader; want to trim the file system in an ARM system, learn the file system mounting process; want to experience how to configure and trim the Linux kernel; want to learn about device trees in Linux systems; …
All of these scenarios are very suitable for using Qemu to simulate an ARM system.
Setting up an ARM virtual machine using Qemu on Ubuntu 16.04
Options for using Qemu virtual machines
To run an ARM virtual machine using Qemu, you have two options:
Simple method: directly download a pre-compiled image file (including the kernel and root file system) and execute it. The downside is: the pre-compiled image may not suit your needs and cannot be customized. Complex method: download the kernel code and root file system code (e.g., busybox) and compile them yourself. The advantage is: you can customize the kernel and root file system according to your actual needs.
In the second complex mode, there are two choices:
2-1. Manually compile all kernel and root file system code and finally organize the compilation results into a folder to form your root directory; 2-2. Use the buildroot framework, where you only need to manually configure (for example: the location of the cross-compiler on your machine, output path, system trimming), and then you can compile a complete system with one click, which can be directly flashed onto the machine!
The choice of these operational methods can be made according to your actual needs. If you are already very familiar with the entire process of building a system, then use buildroot; if you want to learn more thoroughly how to create a system, then manually compile and operate step by step a few times, and you will become an expert.
Next, we will proceed with the actual operation using 2-2. I will directly paste the code for all command parts, instead of screenshots, to facilitate copying.
Testing platform
My work computer is Windows 10, running Ubuntu 16.04 virtual machine, 64-bit system through VirtualBox.
The following operations can be smoothly compiled in the Ubuntu 16.04 virtual machine; of course, some basic tools (e.g., build-essential, make, etc.) will not be detailed here.
Installing the cross-compiler
The role of the cross-compiler does not need detailed explanation, as we are compiling on the x86 platform while the running platform is the ARM system, and these two platforms have different instruction sets, so cross-compilation is needed to obtain programs executable on the ARM system.
sudo apt-get install gcc-arm-linux-gnueabi
Verify the installation result
dpkg -l gcc-arm-linux-gnueabi
It should display as follows:

Some articles suggest downloading the cross-compiler manually and then setting environment variables. I actually tried it, and the manually downloaded cross-compilation toolchain reported errors when compiling the kernel, so I still recommend using apt-get for direct installation.
Compiling the kernel
The role of the kernel is self-evident, just like our Windows operating system; without this operating system, the hardware is just a pile of scrap metal. When the system starts, it loads the kernel into memory and begins execution from the kernel’s entry address.
-
Download the kernel version: linux-4.14.212.tar. I will list all software package download links at the end.
-
Use the existing vexpress development board’s config file
make CROSS_COMPILE=arm-linux-gnueabi- ARCH=arm vexpress_defconfig
This operation will save vexpress_defconfig as a configuration file named .config, which will be used for compiling the kernel based on the configurations in this config.
If you need to trim the kernel, execute:
make menuconfig
Customize the kernel according to your actual needs. For example: you can configure the network and NFS to automatically mount a certain directory on the host during system startup.
-
Compile the kernel
make CROSS_COMPILE=arm-linux-gnueabi- ARCH=arm
This will compile and generate the kernel file arch/arm/boot/zImage, which needs to be specified when starting Qemu.
Creating the root file system
After the kernel starts, when executing the last step, it needs to mount the root file system and then execute the specified executable program in the file system, such as: /etc/rc.local.
If there is no root file system, the kernel will prompt: panic… when executing the last step.
-
Download busybox
Version: busybox-1.20.2.tar.bz2.
-
Create the rootfs directory
mkdir -p rootfs/{dev,etc/init.d,lib}
-
Copy the files from busybox-1.20.2 to the rootfs directory, mainly some basic commands
cp busybox-1.20.2/_install/* -r rootfs/
-
Copy the library files from the cross-compilation toolchain to the lib folder in the rootfs directory
sudo cp -P /usr/arm-linux-gnueabi/lib/* rootfs/lib/
-
Create the root file system image
The root file system image is equivalent to a hard disk, which copies all files in the above rootfs directory to this hard disk.
(1) Generate a 512M size disk image
qemu-img create -f raw disk.img 512M
(2) Format the disk image to ext4 file system
mkfs -t ext4 ./disk.img
(3) Copy all files from the rootfs directory to the disk image. The operation steps are: create a mount point – mount – copy files – unmount.
mkdir tmpfs sudo mount -o loop ./disk.img tmpfs/ sudo cp -r rootfs/* tmpfs/sudo umount tmpfs
(4) Use the file command to check
file disk.img

Using Qemu to start the ARM virtual machine
1. Start the virtual machine
This command is a bit long; it is recommended to copy and paste directly during testing.
qemu-system-arm -M vexpress-a9 -m 512M -kernel ./linux-4.14.212/arch/arm/boot/zImage -dtb ./linux-4.14.212/arch/arm/boot/dts/vexpress-v2p-ca9.dtb -nographic -append "root=/dev/mmcblk0 rw console=ttyAMA0" -sd disk.img
2. Stop the virtual machine
In another terminal window in Ubuntu, use the killall command to stop it.
killall qemu-system-arm
Of course, you can also find the process ID of qemu-system-arm using the ps command and stop the virtual machine using kill -9.
Testing the HelloWorld application
-
In any directory on Ubuntu, write a HelloWorld executable program hello.c:
#include <stdio.h> int main() { printf("HelloWorld! \n"); return 0; }
-
Cross-compile hello.c to obtain the executable program hello:
arm-linux-gnueabi-gcc hello.c -o hello
Use the file command to check the hello program:
file hello

-
Stop the virtual machine using the kill command.
-
Copy the hello executable program to the disk image disk.img. The operation steps are: mount – copy files – unmount.
sudo mount -o loop ./disk.img tmpfs/ cp hello tmpfs/ sudo umount tmpfs
-
Execute the hello program
Restart the virtual machine, and now you can see the hello file in the root directory and execute it to see the output result.
Conclusion
In the above operational steps, we manually compiled and operated all the programs required before starting an ARM system. It’s easy to understand just by reading, but performing the operations yourself leaves a deeper impression.
Some parts of the operational process still need to be further explored, for example: after the system starts, automatically mount a certain folder in the host (Ubuntu system), so that you can copy executable programs like hello to the mounted directory and execute them directly in the ARM system, without having to go through a series of operations (stop the virtual machine – mount the disk image – copy files – unmount – start the virtual machine).
Finally, I hope this summary brings you small gains and improvements!
Software download links
1. linux-4.14.212.tar.xz
Link: https://pan.baidu.com/s/1d8RxjMkYQhPtbZgiybD8Gw
Extraction code: b6ft.
2. busybox-1.20.2.tar.bz2
Link:https://pan.baidu.com/s/1oPeH7juEWuFR6y1Qpna_BA
Extraction code:9kh6

Welcome FPGA, embedded, signal processing, and other engineers to follow our public account

National First FPGA WeChat Technical Group
Welcome everyone to join the national FPGA WeChat technical group, which has tens of thousands of engineers, a group of technology-loving engineers, where FPGA engineers help each other, share knowledge, and create a strong technical atmosphere!Hurry up and invite your friends to join!!

Press and hold to join the national FPGA technical group
FPGA Home Component City
Advantageous component services, please scan the code to contact the group owner: Jin Juan Email: [email protected] Welcome to recommend to procurement
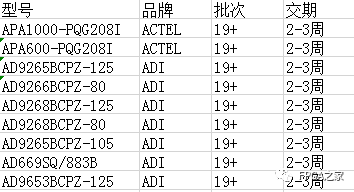
ACTEL, AD some advantageous orders (operating the full series):
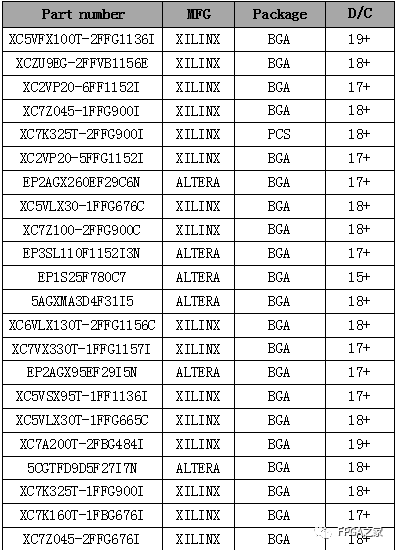
XILINX, ALTERA advantageous spot or orders (operating the full series):
(The above components are some models; for more models, please consult the group owner Jin Juan)
Service philosophy: FPGA Home Component City aims to facilitate engineers in quickly purchasing components. After years of dedicated service, our customer service covers large domestic listed companies, military research units, and small and medium enterprises. Our biggest advantage is emphasizing a service-oriented philosophy and achieving fast delivery with competitive prices!
Directly operated brands: Xilinx, ALTERA, ADI, TI, NXP, ST, E2V, and more than a hundred component brands, particularly skilled in components subject to U.S. embargo against China.We welcome engineer friends to recommend us to procurement or consult us personally!We will continue to provide the best service in the industry!

FPGA technical group official thanks to brands: Xilinx, Intel (Altera), Microsemi (Actel), Lattice, Vantis, Quicklogic, Lucent, etc.