Click on the above“Xiaobai Learns Vision”, select to add “Star” or “Top”Important content delivered first time

Have you ever frantically pressed ↑ to find a historical command while using Ubuntu?
Have you ever made mistakes in commands due to shaky hands or forgetting the names?
Do you need to multitask but struggle with frequently switching command line terminals?
Do you feel shoulder and neck discomfort after long periods of using the keyboard and mouse?
……
I don’t know if you have experienced these, but I certainly have!! Until a friend of mine, Hua, recommended a few tools to me, these issues were perfectly solved.
Today, I will summarize these high-efficiency tools for you, take what you need:-D
1. Split Screen Tool: tmux
Sometimes, when handling multiple tasks or needing to compare results, switching between several terminals can be a hassle.
Especially for Vim users, if you have to do :wq every time after editing, and then reopen it if there’s an issue, it seems inconvenient.
Wouldn’t it be great if you could split a terminal screen into several sections and display them in one window?
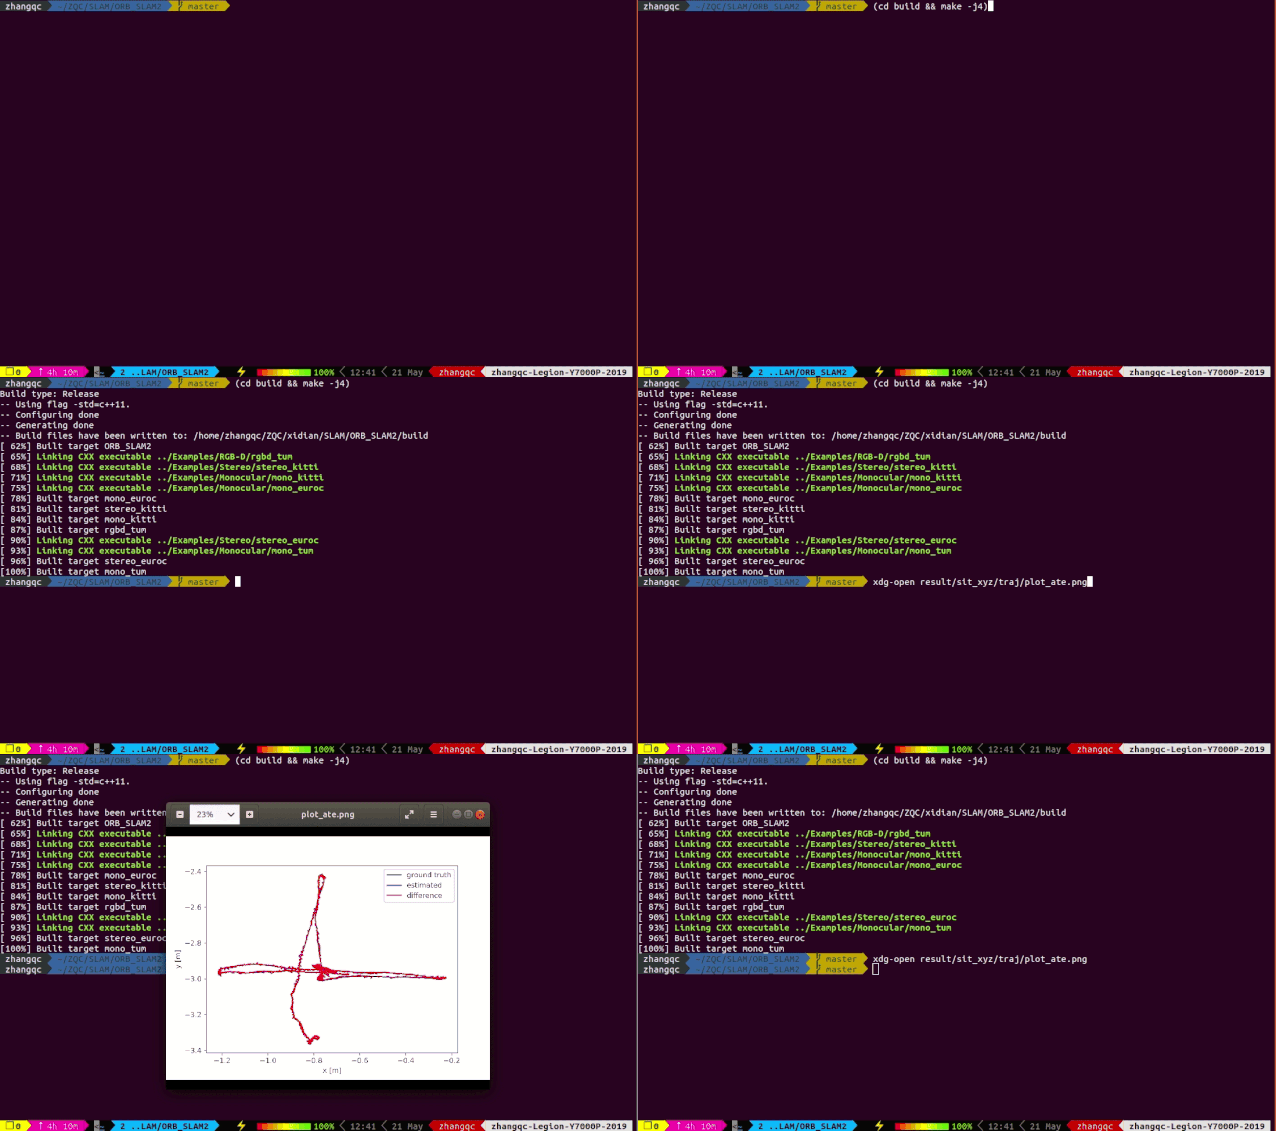
For example, you can see an interface like this. Isn’t it a bit cool?
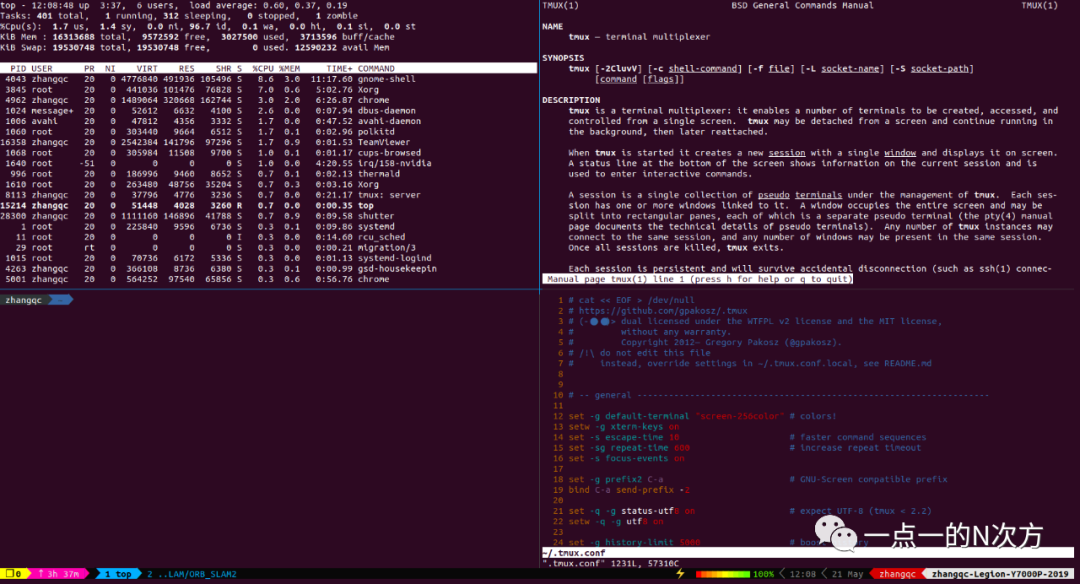
Well, tmux can do that!
tmux is a “terminal multiplexer: it enables a number of terminals (or windows), each running a separate program, to be created, accessed, and controlled from a single screen. tmux may be detached from a screen and continue running in the background, then later reattached.”
https://wiki.archlinux.org/index.php/Tmux
Looks good, let’s give it a try. Don’t be afraid to try it out. Actually, installation is very simple.
~$ sudo apt-get install tmuxJust one command to install, and then you can use it by typing tmux in the terminal!
After installation, you might wonder why your interface looks so plain, not at all like the one in my picture?
Don’t worry, this is not a trick. You still need to configure tmux; you need the assistance of oh-my-tmux:-D
Search for oh my tmux or .tmux on GitHub; this is a popular tmux configuration project.
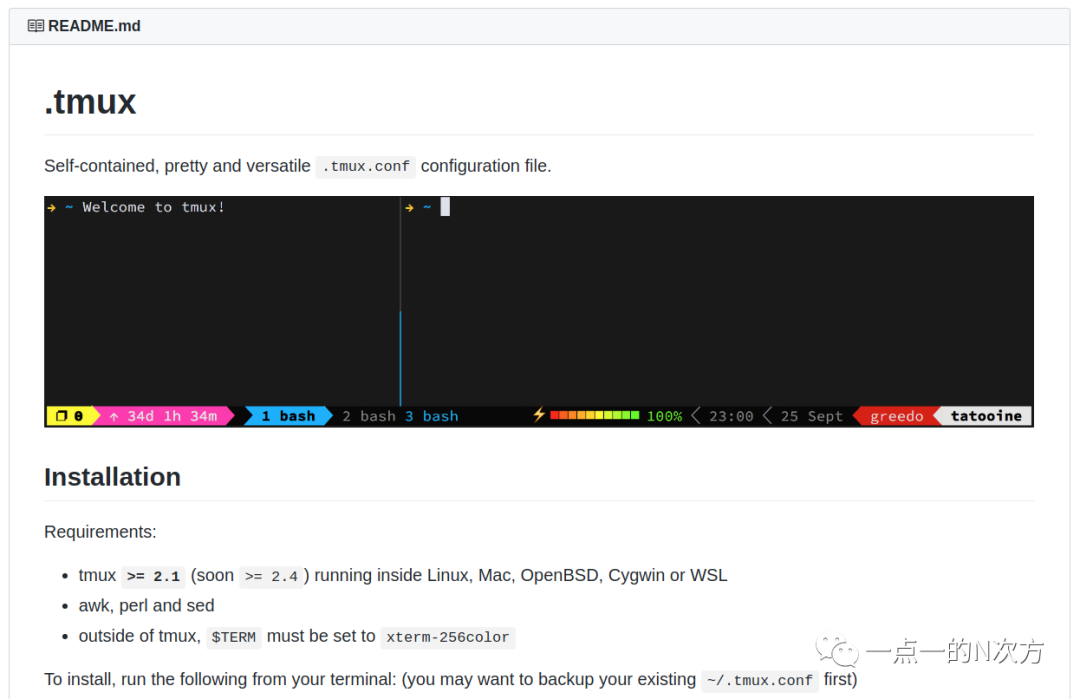
Follow the README document to configure it.
~$ cd~$ git clone https://github.com/gpakosz/.tmux.git~$ ln -s -f .tmux/.tmux.conf~$ cp .tmux/.tmux.conf.local .You can also install Powerline fonts, so you can use some of Powerline’s icons. Actually, the next tool will also use it, so let’s install it now.
~$ sudo apt-get install fonts-powerlineThen, use the Ctrl+a e shortcut to open the .tmux.conf.local file, where you can change some configurations. Once done, you can see this cool interface!
Of course, just having a pretty interface isn’t enough; you also need to learn some common tmux operations to make it easier for everyone 🙂
Let’s use the previous interface as an example!
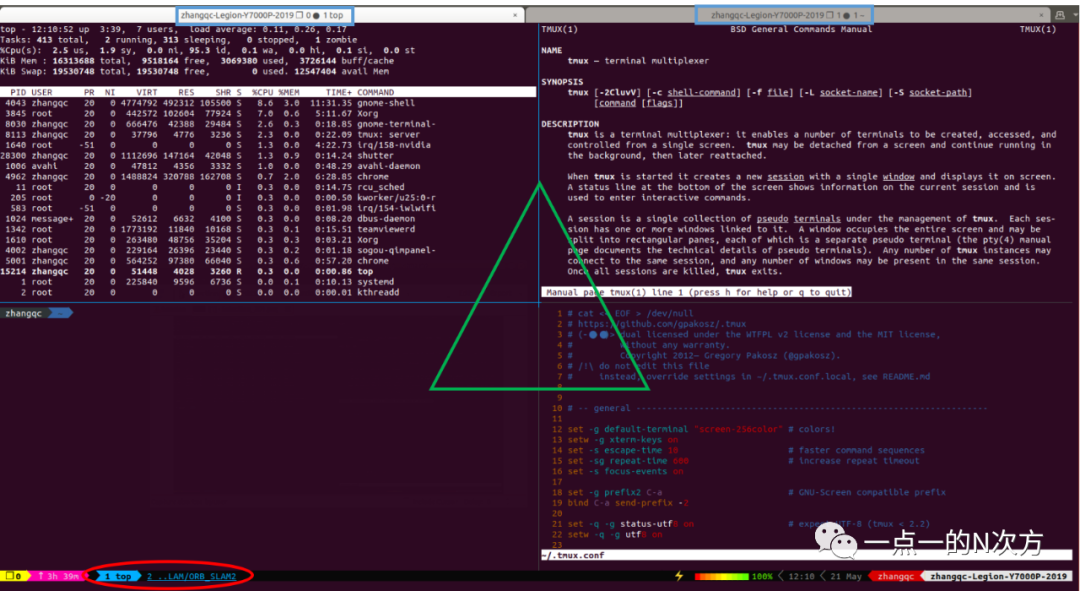
The blue box at the top of the image represents a tmux Session. When you start tmux in the terminal, it creates a session, which is numbered starting from 0 if not specifically named.
We can manage sessions with the following commands:
~$ tmux new -s <session_name> # Create a session named session_name~$ tmux ls # Show all existing sessions~$ tmux detach # Detach the current session, it continues to exist in the background~$ tmux attach -t <session_name> # Reattach to the session named session_name~$ tmux kill-session -t <session_name> # Kill the session, it will not be retrievableThe red oval at the bottom of the image represents a tmux Window. When you start tmux and create a session, a window is also created, numbered starting from 1 if not specifically named.
You can create a new window with the shortcut Ctrl+a c, close the current window with Ctrl+a &, and switch to a specific numbered window with Ctrl+a 1/2/3….
Generally, when using shortcuts in tmux, you need to prefix with Ctrl+b, but the oh-my-tmux configuration installed earlier can use Ctrl+a instead, as the b key is a bit far from the Ctrl key (~_~;)
Finally, the green triangle in the middle of the image represents a tmux Pane. When tmux starts, it also creates a pane.
For example, below is the interface when starting tmux, which simultaneously creates a session (blue), a window (red), and a pane (green).
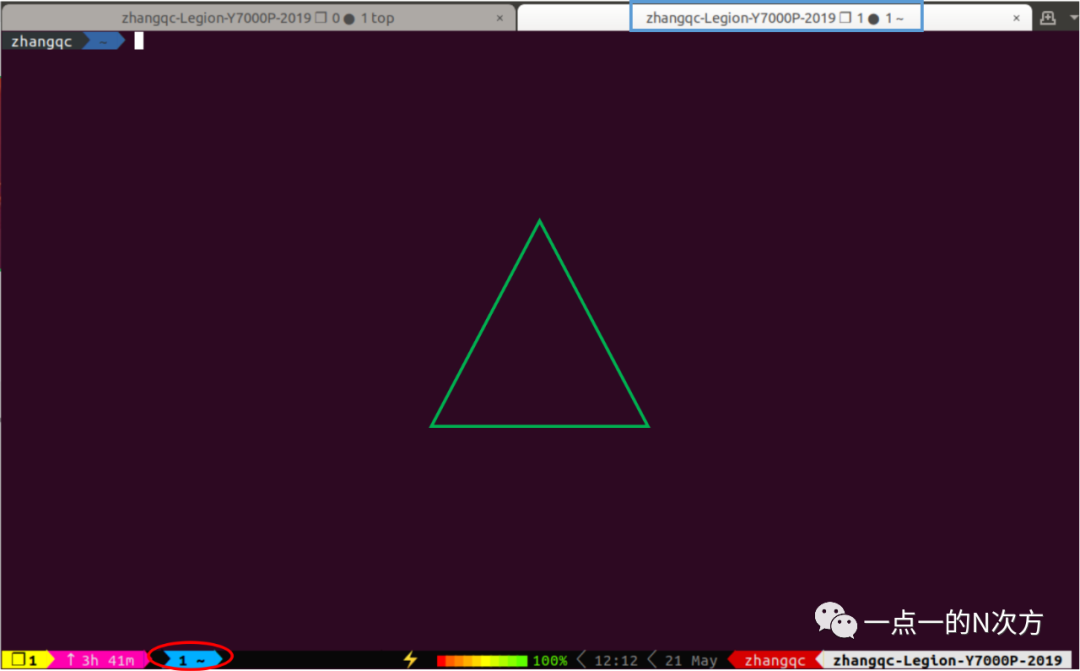
The split screen we mentioned can be understood as dividing multiple panes within a single window; the previous image shows a window divided into 4 panes.
Previously, you needed to open 4 terminals to operate, or operate in the same terminal and scroll back through history; now you can display everything in one window!
For splitting panes in a window, we only need to familiarize ourselves with a few common shortcut operations.
Ctrl+a % splits the current pane into two left and right, Ctrl+a “ splits it into two up and down, Ctrl+a ↑/↓/←/→ can switch to other panes.
If you are familiar with Vim, you can also switch panes using Ctrl+a k/j/h/l, and to resize the panes, use the uppercase versions of the corresponding keys Ctrl+a K/J/H/L.
Of course, there’s more to the operations; you can find corresponding tutorials online to further learn its operations!
At first, I also thought this thing didn’t have much use for me, but once I started using it, it unexpectedly created some other needs!
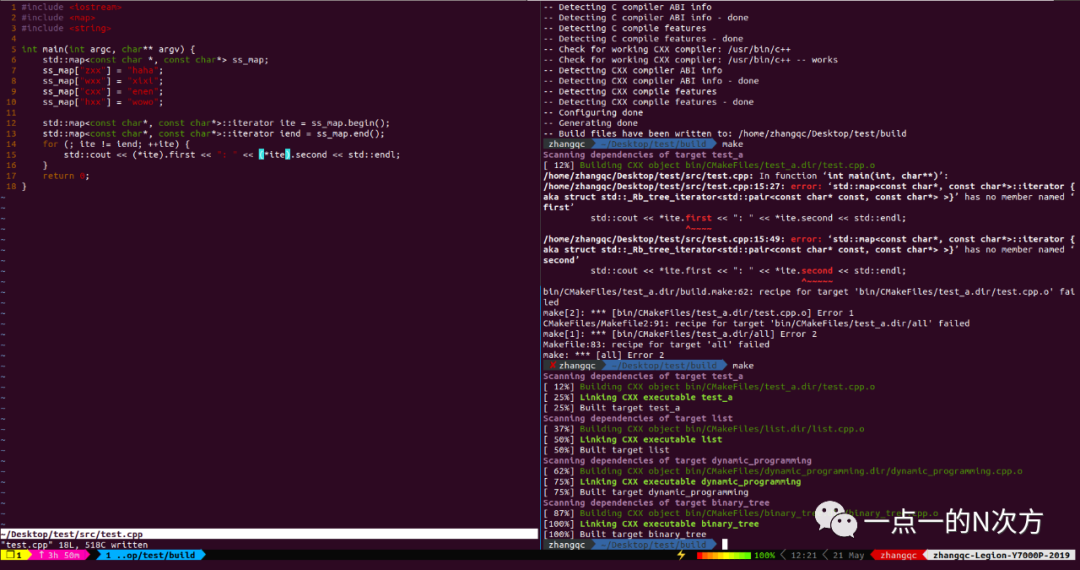
For example, sometimes when writing a simple program to verify functionality, I can use split screen to write code on one side and compile and run on the other. If there’s an error, I can switch back to the code side to continue modifying…
If you’re observant, you might notice that even at this point, your terminal operation interface still looks a bit different from mine. Next, let’s introduce the second high-efficiency tool—zsh!
2. Command Line Tool: zsh
zsh is actually a shell, which is a command line interpreter. The default shell in Ubuntu is bash, and you can check the current shell with the command echo $SHELL.
Bash also has some convenient operations, such as the tab key for command or file completion, and the ↑/↓ keys to find previously entered commands.
But it’s still somewhat inconvenient; for example, if there are many historical commands, you have to keep scrolling back to find them. Or if you remember the command or file name incorrectly, no amount of tab will help you complete it!!
That’s when the advantages of zsh become apparent; this thing is something you only know once you use it.
Like tmux, installing it is as simple as one command!
~$ sudo apt-get install zshFor convenience, set zsh as the default shell, and bash can clock out…
~$ chsh -s $(which zsh)Restart and open the terminal to test.
~$ echo $SHELL~$ $SHELL --versionIf it shows /usr/bin/zsh and zsh 5.4.2 or similar, it means it’s installed and set up correctly:-D
Once set up, you can enjoy the fluid operation of zsh, like the one below.
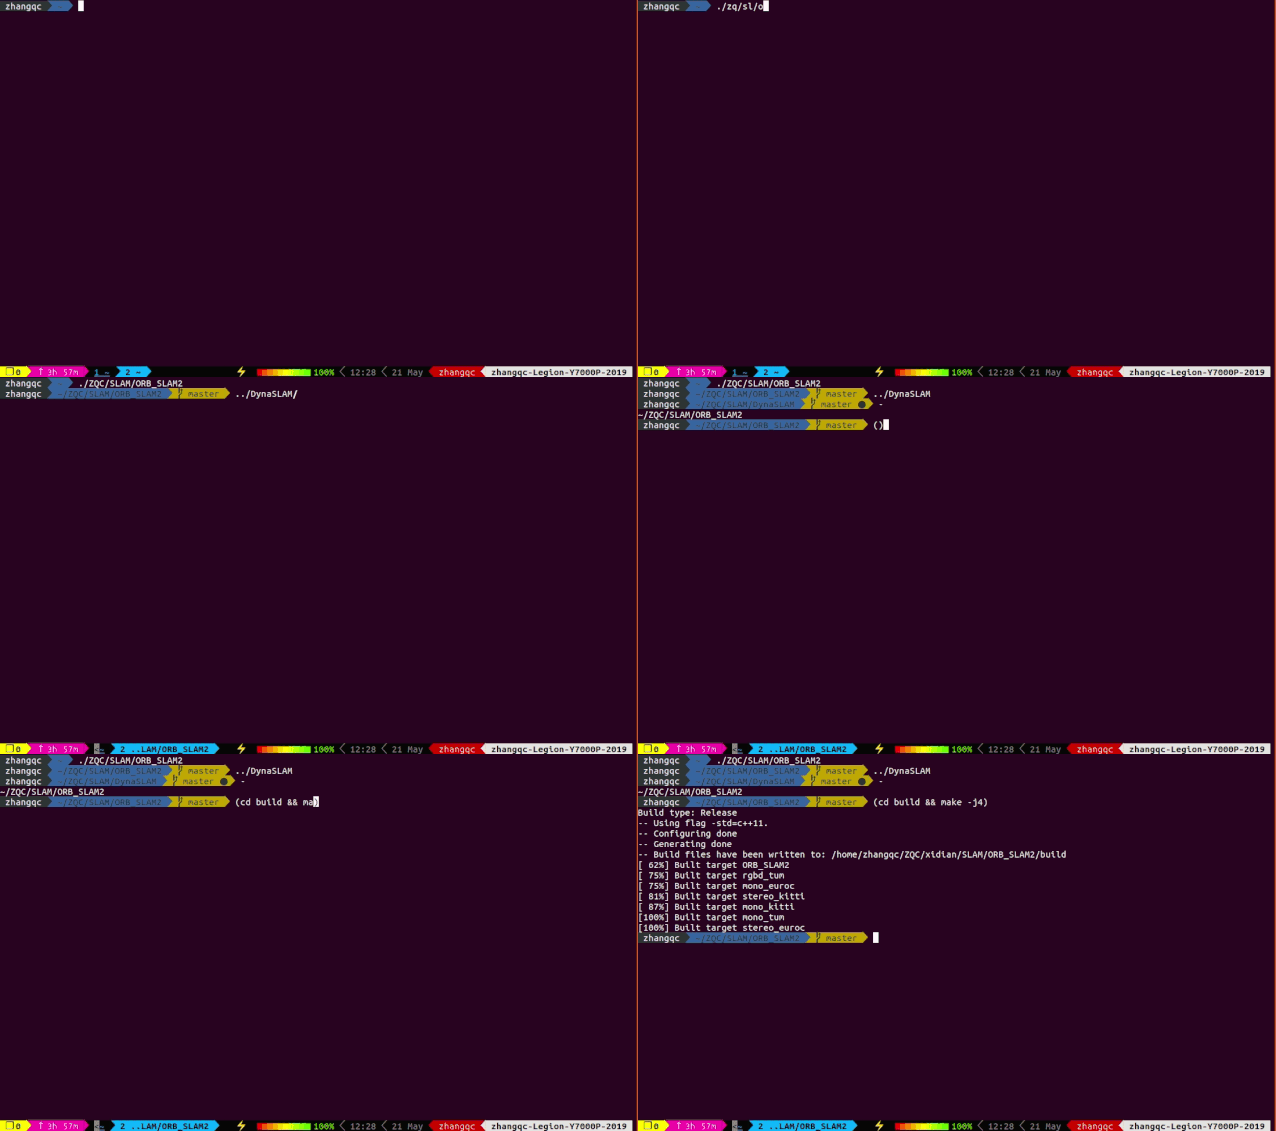
You’ll find that switching to a certain path doesn’t require the cd command; you can just enter the path directly.
Of course, if you’re used to using cd, that’s fine too. For example, my command cd build && make -j4 has become muscle memory, and changing it will still take time.
The key is that you don’t need to be so precise with your input to get completion! For example, entering zq/sl/orb can complete the correct paths ZQC/SLAM/ORB_SLAM2, it’s simply too friendly.
If you remember the name incorrectly or accidentally miss a character while typing, zsh can automatically correct it for you 😀
If your command is somewhat vague and cannot be completed immediately, tab has another magical feature: it allows you to manually select. See the image below.
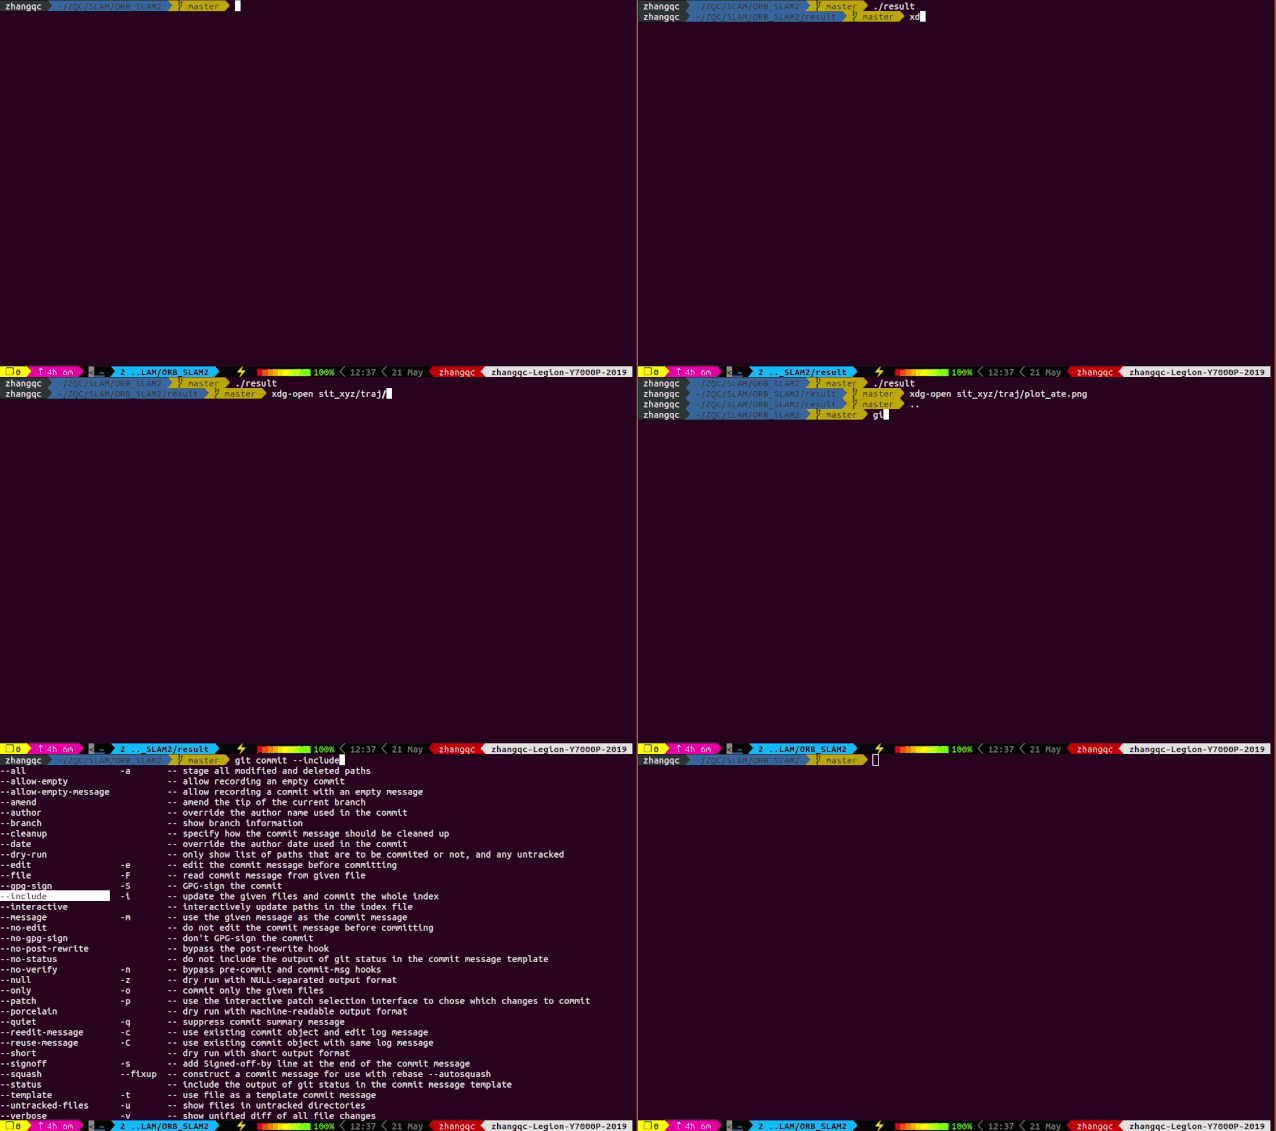
When completion is vague, pressing the tab key twice will pop up all possible completions, and you can select the command or path you want using ↑/↓/←/→.
Even command parameters can be completed; the image above shows git commit -<tab> as a parameter completion option. Are you already eager to install zsh? Don’t just think about it!
You might have noticed that your interface still looks different from mine. Like tmux, you also need oh-my-zsh!
This oh-my-zsh is much more powerful than oh-my-tmux. The first sentence on its website is “Your terminal never felt this good before.”
Oh My Zsh is a delightful, open-source, community-driven framework for managing your Zsh configuration. It comes bundled with thousands of helpful functions, helpers, plugins, themes, and a few things that make you shout…
https://ohmyz.sh/
Indeed, it lives up to its name, being a project with over 110,000 stars!
It also requires just one command to install.
~$ sh -c "$(wget -O- https://raw.githubusercontent.com/ohmyzsh/ohmyzsh/master/tools/install.sh)"You can set your favorite theme and install various plugins. Of course, if you like tinkering, you can DIY.
For more details, please refer to the GitHub Wiki, which has a detailed introduction; I won’t elaborate here!
The theme I’m currently using is agnoster, and I find it quite nice.
If the current path is a git repository, it will show the current branch. If there are no changes in the repository, the branch will be green; if changes are made, it will turn yellow 😀
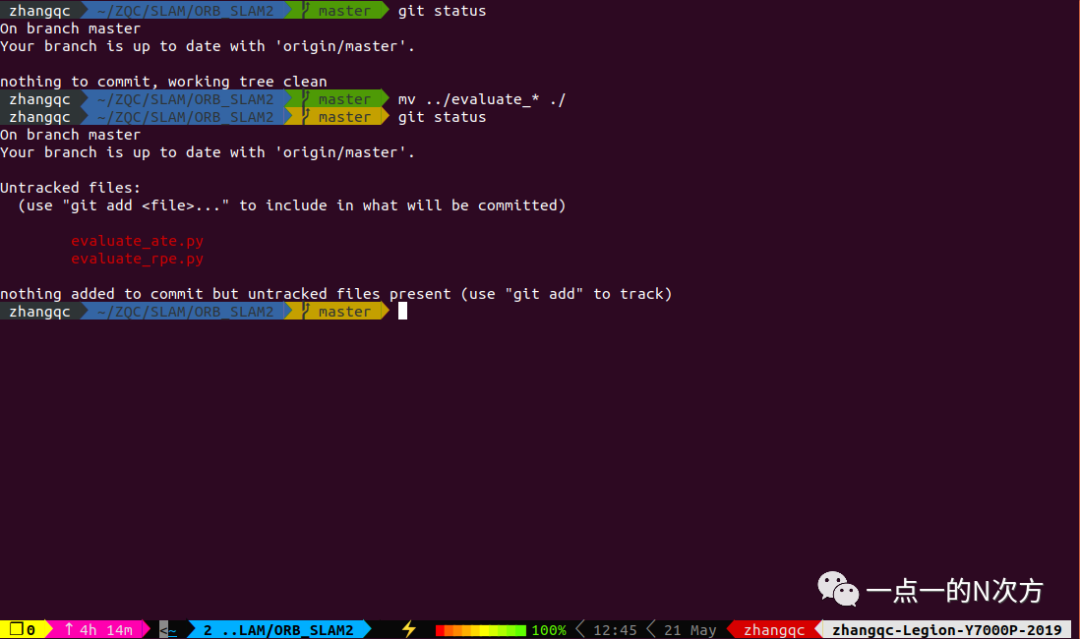
Another efficient feature is that when you enter part of a command, pressing ↑/↓ allows you to scroll through historical commands with the same characters!
For example, in the image below, entering (c and then pressing ↑ will find the previous command (cd build && make -j4), and entering xdg and then pressing ↑ will do the same. This way, you can quickly locate the historical command you want 😀
But for some older commands, scrolling up and down only shows one at a time, which is still inconvenient. What should you do? There’s another little tool that can help!
3. Fuzzy Search Tool: fzf
fzf is a command-line fuzzy search tool that works perfectly with zsh.
Previously, searching historical commands meant scrolling back one by one, but fzf can display them all at once.
If you use bash, the history can only store 1,000 entries, while zsh can store 50,000 entries; isn’t that great? You can check this with the command echo $HISTSIZE!
Its installation command is also just two short lines.
~$ git clone --depth 1 https://github.com/junegunn/fzf.git ~/.fzf~$ ~/.fzf/installAfter installation, restart the terminal, and by pressing Ctrl+r, you can open fzf and search for historical commands by entering key characters; it can find even the most vague ones.
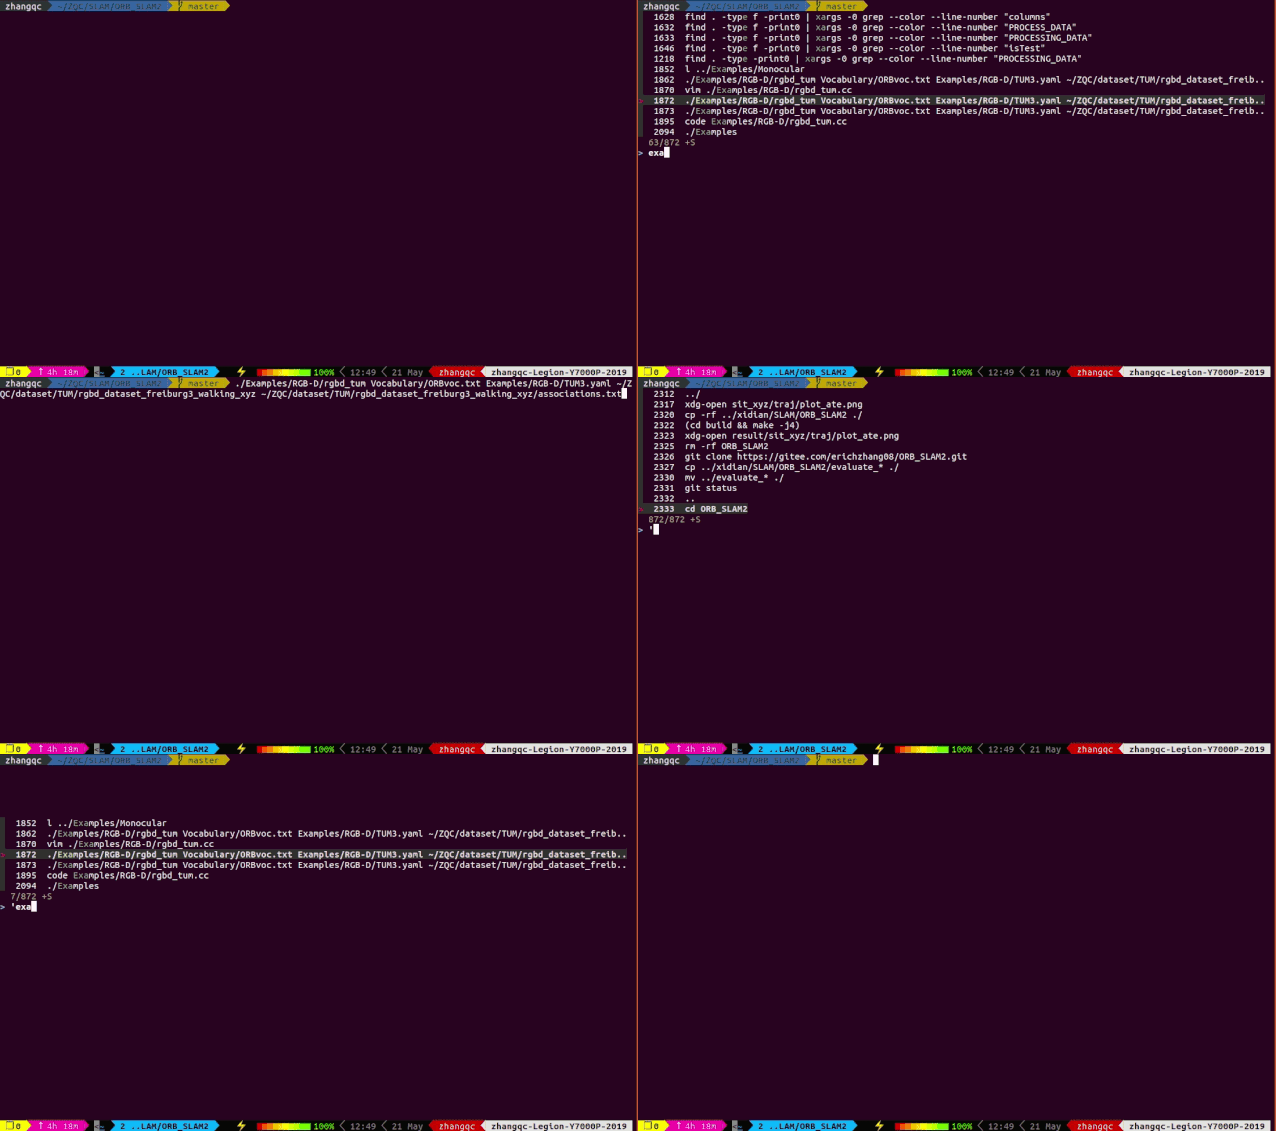
If you find the search results too messy, you can add a ‘ in front of the search characters to search for fully matching historical commands!
Of course, there are more operations; you can delve deeper into the GitHub Wiki. The length of this article seems a bit long, so I won’t elaborate further.
All three tools mentioned above are command line tools, so they are also applicable in the Ubuntu command line mode!
4. Chrome Plugin: Vimium
And the last amazing tool can make you basically forget the existence of the mouse while using the Chrome browser 😀
That is the Chrome plugin Vimium; just by looking at the name, you can tell it has something to do with Vim.
Indeed, some of its operation keys are similar to Vim. Once you install this plugin, you can navigate and control Chrome directly using the keyboard.
The general operation process is: t to open a new tab -> enter the website or search content in the address bar -> press enter -> f/F to select links -> k/j/h/l to scroll up and down the screen -> J/K to switch tabs…
f/F will mark all the links you can jump to with letters on the interface; just press the corresponding letter key to select which one you want, which is equivalent to clicking on the link with the mouse.
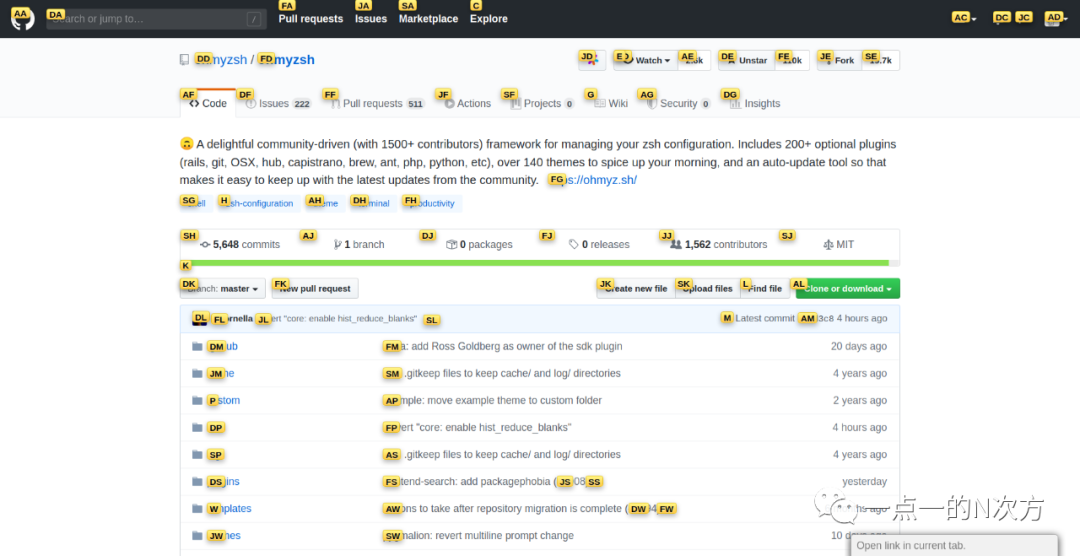
It seems a bit cumbersome, but if you spend a few minutes getting familiar with a few key positions, you’ll really feel that touching the mouse is an inconvenience!
Even if you forget the shortcuts, just type ? on the interface, and they will be displayed for you; how considerate!
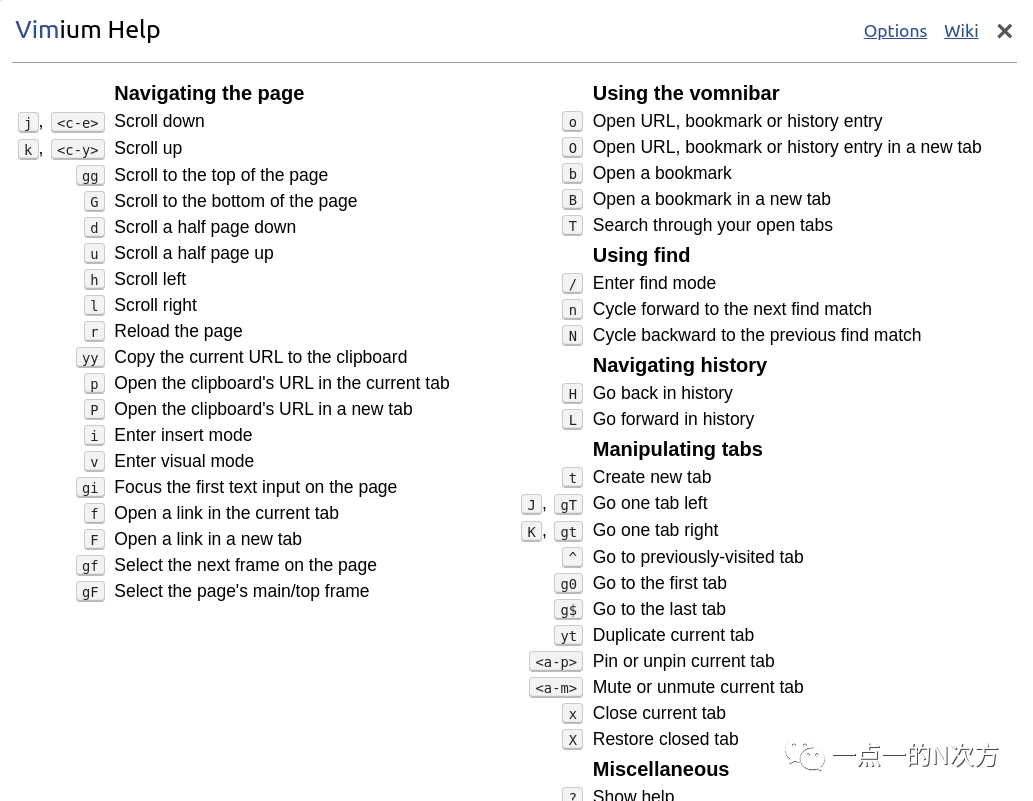
In some cases, Vimium may not work; in that case, pairing it with some native Chrome shortcuts will be perfect!
I don’t know why, but after using the mouse for a long time in the lab, my right shoulder and neck hurt, while these four tools have successfully solved this problem 😀
After getting used to keyboard operations, every time I switch to Windows, I feel very uncomfortable; I believe you will feel the same after using it for a while!
You might think these tools look complicated, but as long as you spend some time practicing the basic operations, you can look up what you need when you need it. Given time, you will appear to be performing operations like a pro to outsiders.
Setting up a pleasing environment, along with some fluid shortcuts, can add a bit of fun to your daily study and work; it’s also a way to treat yourself well 😀
Download 1: OpenCV-Contrib Extension Module Chinese Version Tutorial

Reply "Extension Module Chinese Tutorial" in the "Xiaobai Learns Vision" public account backend to download the first Chinese version of the OpenCV extension module tutorial online, covering installation of extension modules, SFM algorithms, stereo vision, object tracking, biological vision, super-resolution processing, and more than twenty chapters of content.

Download 2: Python Vision Practical Project 52 Lectures

Reply "Python Vision Practical Project" in the "Xiaobai Learns Vision" public account backend to download 31 vision practical projects including image segmentation, mask detection, lane line detection, vehicle counting, eyeliner addition, license plate recognition, character recognition, emotion detection, text content extraction, face recognition, etc., to assist in quickly learning computer vision.

Download 3: OpenCV Practical Project 20 Lectures

Reply "OpenCV Practical Project 20 Lectures" in the "Xiaobai Learns Vision" public account backend to download 20 practical projects based on OpenCV, achieving advanced learning of OpenCV.

Discussion Group

You are welcome to join the public account reader group to communicate with peers. Currently, there are WeChat groups for SLAM, 3D vision, sensors, autonomous driving, computational photography, detection, segmentation, recognition, medical imaging, GAN, algorithm competitions, etc. (which will gradually be subdivided). Please scan the WeChat number below to join the group, and note: "Nickname + School/Company + Research Direction", for example: "Zhang San + Shanghai Jiao Tong University + Vision SLAM". Please follow the format; otherwise, you will not be approved. After successful addition, you will be invited to join related WeChat groups according to your research direction. Please do not send advertisements in the group; otherwise, you will be removed from the group. Thank you for your understanding~