At the request of readers, Embedded ARM will continue to introduce domestic products that can replace STM32. Today, we present the Dongsoft Carrier ES32F369x, which can perfectly replace STM32.Dongsoft Carrier was formerly known as Shanghai Haier Integrated Circuit Co., Ltd., and later renamed Shanghai Dongsoft Carrier Microelectronics Co., Ltd. Dongsoft Carrier has an 8-bit MCU series, 32-bit ES/HR8P, 32-bit ES32 M0, and 32-bit ES32M3.
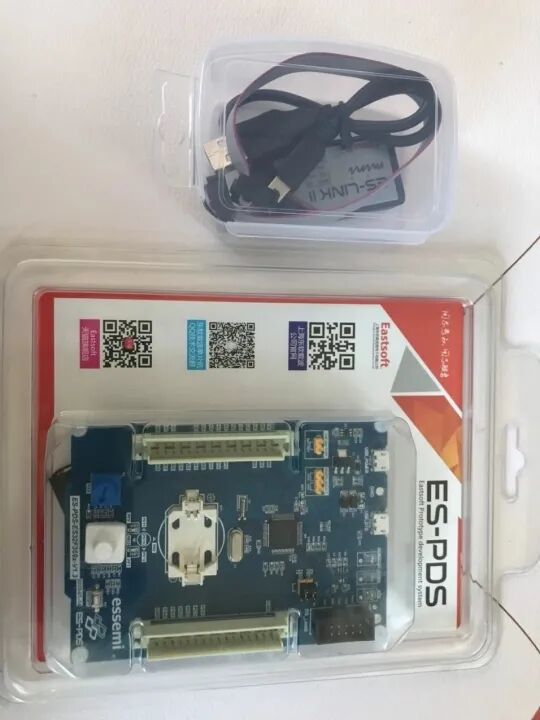
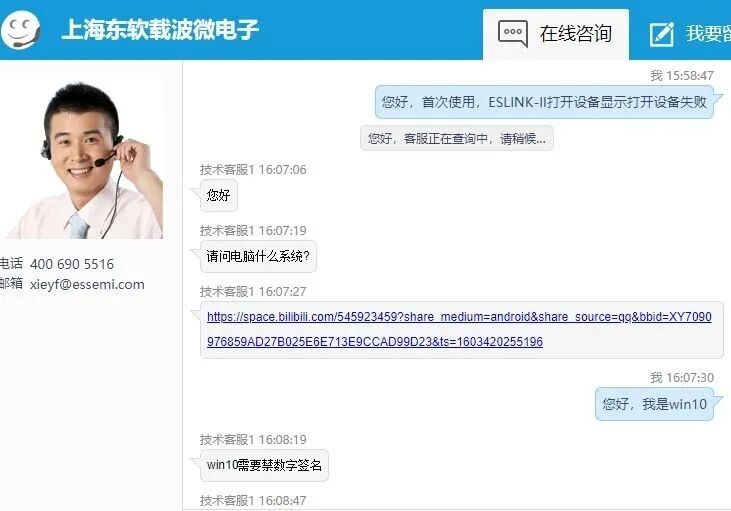
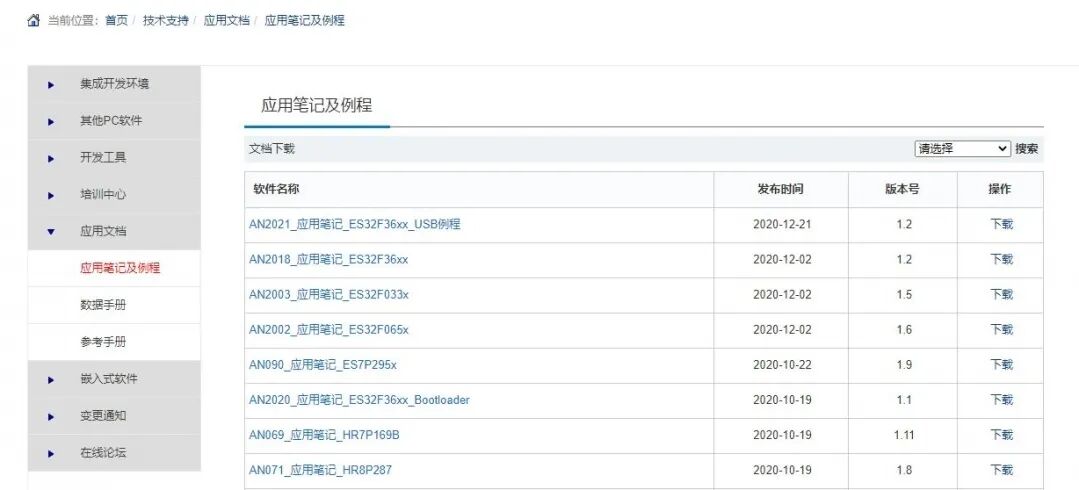
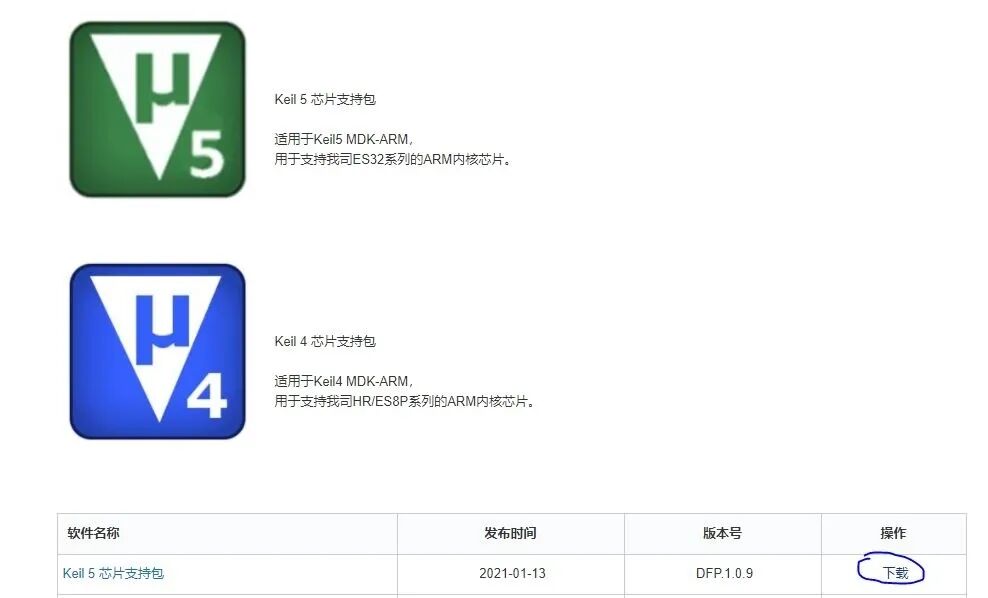
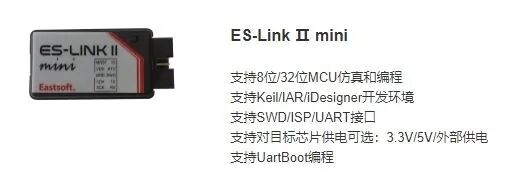
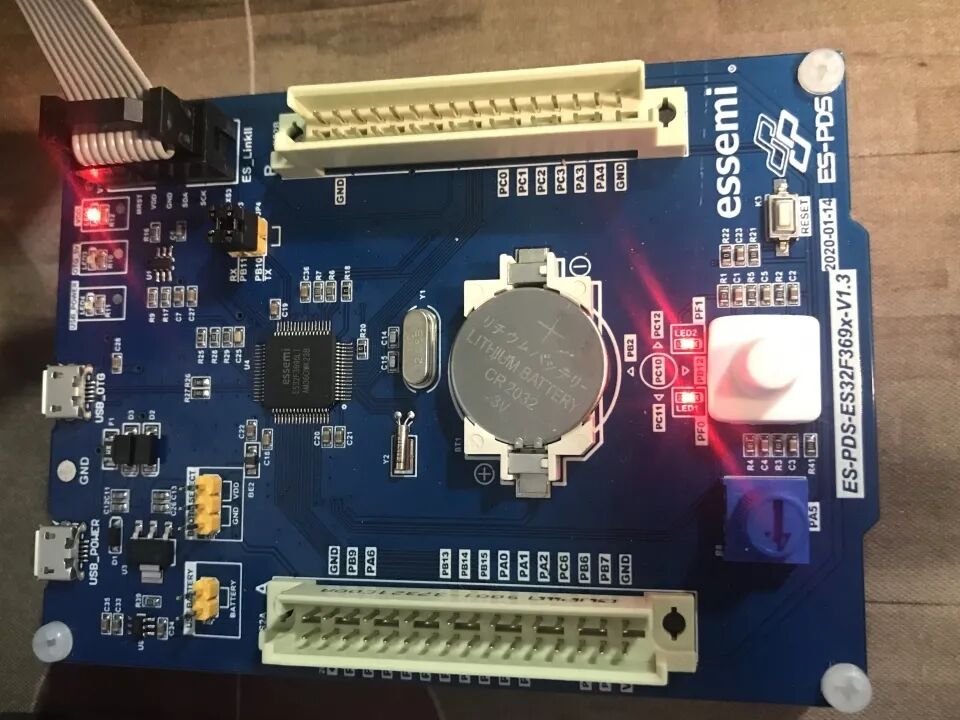
Today, we will introduce the M3 core ES32F369x. Recently, the 21ic forum conducted a testing event for the ES32F369x series. How is the performance of this product? Instead of talking too much, let’s directly look at some evaluations from 21ic users:[Simple Evaluation of Dongsoft Carrier ES32F369x] Simple configuration with vscode and gccUser: Daft DiodeShanghai Dongsoft Carrier Microelectronics, formerly known as Shanghai Haier Integrated Circuit, has an office in Qingdao. As a Qingdao native, I have a good impression of Dongsoft. A high school buddy of mine studied computer science in college, and at that time, he complained to me that their school had a partnership with Dongsoft. I wonder if that Dongsoft is the same as Dongsoft Carrier…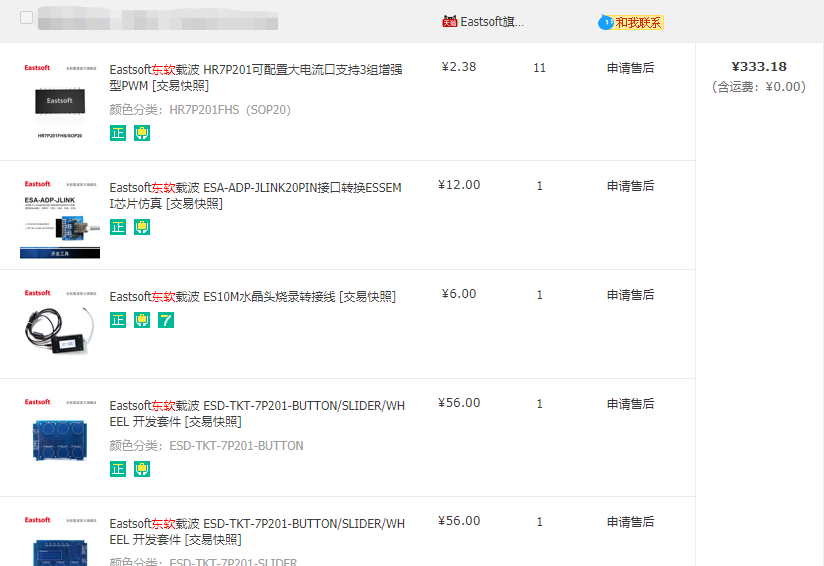 I have previously used Dongsoft Carrier’s products, and customers expressed great satisfaction with the sensitivity. Here is the proof~I must praise the customer service, who was very communicative. At that time, I was in a hurry to catch a flight, so I wanted to send it via SF Express. I originally thought it could only be sent on Monday since Sunday is a holiday, but the customer service arranged for SF Express on Sunday, which was very impressive~Thanks to my aunt and Dongsoft Carrier for organizing this event. I was fortunate to apply for the ES32F3696 development board, and I hope to fully utilize this prototype development board for solution validation in the future~First, let’s introduce the resources of the ES32F3696 and compare it with the STM32F103 that everyone is most familiar with.The ES32F3696 currently has two sub-models, and the MCU model for this event is the LQFP64 packaged ES32F3696LT.The ES32F3696LT features a Cortex-M3 core, which is a very classic and excellent Arm core, with a frequency of 96MHz that can meet most working scenarios.The pinout is essentially pin-to-pin compatible with STM32, making it very easy for engineers familiar with STM32 to get started.With 512K of Flash and 96K of SRAM, the configuration is quite luxurious, and running a system is completely feasible.It supports a wide voltage range, directly driving from 2.0V to 5.5V, which is much more convenient than STM32. Previously, there was a project that required compatibility with both 3.3V and 5.0V voltages.It comes with CRC, arithmetic accelerators, true random number generators, AES encryption, DES encryption, and other computational units that are usually only found in M4.What interests me the most is that the ES32F3696 has an on-chip USB HS PHY. This is a rare feature among M3 products, giving it a significant edge over similar products.The event also provided an ESLINK2 for easy programming and debugging, but there is no ESLINK2 option in Keil and IAR. In fact, ESLINK2 is essentially an open-source CMSIS-DAP, and you can use it normally by selecting CMSIS-DAP during programming and debugging.I downloaded the SDK package and the Keil5 ES32F396 chip PACK from the official website.Double-clicking the mdk project, configuring the programmer, compiling, and downloading went very smoothly. I will start by turning on a light~
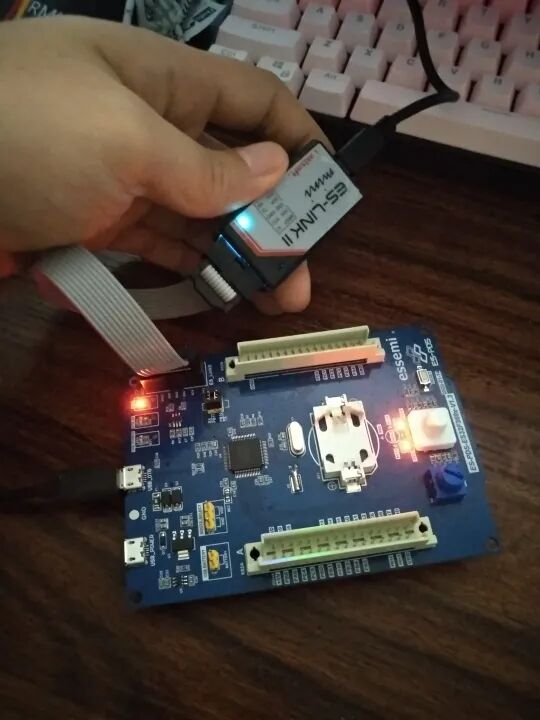 I want to praise Dongsoft Carrier’s SDK and documentation.To be honest, I have encountered quite a few domestic microcontrollers, and very few can provide such comprehensive SDK and documentation.Most domestic MCU manufacturers either provide only a few demos in the SDK, or have numerous bugs, or require you to directly use ST’s standard library, or do not even have an RM manual, or only provide DS and RM without any other manuals.However, Dongsoft Carrier’s SDK is indeed very comprehensive, providing not only three driver libraries but also a wealth of examples and rare manuals.Moreover, Dongsoft Carrier has also partnered with RT-Thread to add support for Dongsoft products in RTT. In the third-party component folder of the accompanying SDK, you can find RTT examples.SDK’s driver libraries include:1. MD, Micro Driver, which focuses on register operations for maximum execution efficiency.2. ALD, Abstraction Layer Driver, which encapsulates commonly used functions again. ALD drivers can provide interfaces for upper-layer applications as well as operating systems, file systems, and other application and system-level software, improving portability and optimizing development efficiency.3. BSP, Board Support Package, which corresponds to the driver for this prototype development board.In addition to the necessary Datasheet and Reference Manual, there are application notes and detailed descriptions of the corresponding driver libraries. Any software package you are unsure how to use comes with accompanying documentation, which is quite rare among domestic manufacturers.Moreover, if you take a closer look at the various manuals, the information is detailed, and there is no sign of plagiarism. The accompanying compilation templates include not only the common Keil and IAR but also GCC, which is rarely provided by other domestic manufacturers! You can feel Dongsoft Carrier’s attitude and sincerity in their work!Every example in the SDK comes with project files for Keil and IAR, making compilation and downloading very easy once you install the corresponding MCU pack.However, I personally prefer to use vscode and gcc. Not to mention that Keil and IAR are paid software, I find IAR not very user-friendly, and Keil lacks even the most basic code formatting functionality (although it can be added via plugins), and I feel it is no different from blindly typing code!Since I often write in C, C++, C#, Python, JavaScript, and TypeScript, installing too many IDEs is really exhausting, so it’s better to unify them. Moreover, vscode is indeed user-friendly.I searched for other users’ evaluation posts, and it seems that very few have used vscode for development, so I will provide a simple tutorial here and mention two pitfalls I encountered during the configuration process. Currently, there are two approaches to developing ES32 with vscode: 1. Configure gcc yourself, 2. Use the vscode plugin provided by Dongsoft Carrier.Personally, I prefer the former because it is flexible and can be configured for all chips, making it more universal.The gcc configuration for vscode has a tutorial written by a master in this version, so I won’t elaborate on it here. I will only mention the issues I encountered while compiling with gcc:I will skip the process of downloading and installing arm-none-eabi. After configuring arm-none-eabi, there is a gcc directory under the corresponding example code. In the gcc directory, just type make and press enter to compile the project! However, it is important to note that the official accompanying makefile has a pitfall, and direct compilation will fail.This is due to either a permission issue or a flaw in the makefile, which lacks a temporary directory for obj files.
 As shown in the figure, create an obj folder in the parent directory of gcc, at the same level as the gcc directory. Then, make again, and the results will come out smoothly!
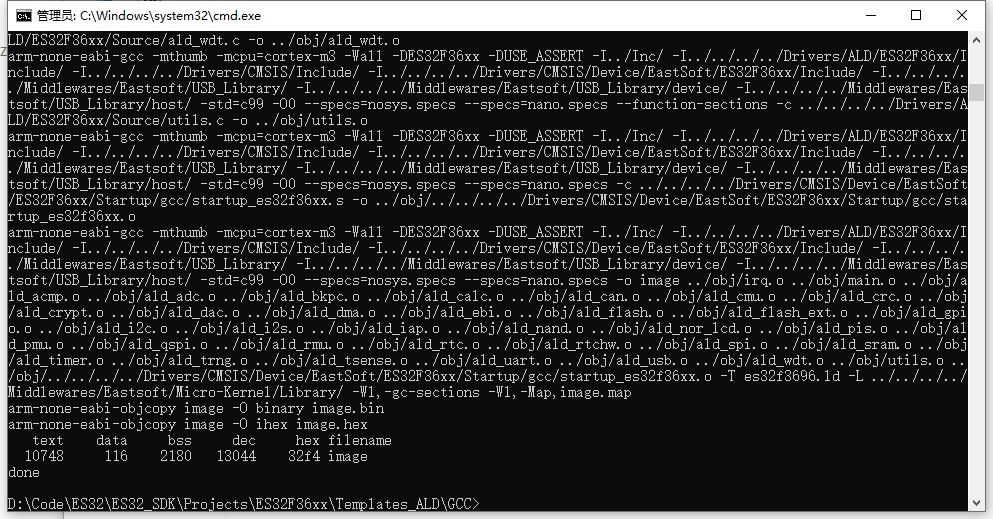 Next, let’s discuss how to configure the project in Dongsoft Carrier’s vscode.First, download the integrated development environment VSCode For essemi from the official website, install the vscode plugin after downloading, and once installed, open vscode, and you will see an E icon.
 This icon is the Dongsoft Carrier vscode plugin.The plugin has functions for creating new projects, opening projects, and adding projects, but the “Create New Project” function requires you to configure the paths for the ALD or MD driver libraries yourself, which is relatively cumbersome. So, we will look for a shortcut by importing the configuration from Keil and IAR projects, which is much faster~
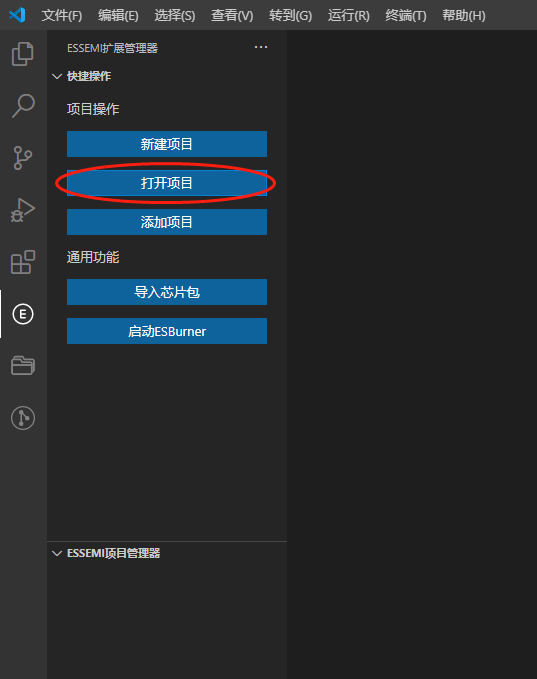 First, click the open project icon, find the corresponding Keil or IAR project file, and select the file type in the lower right corner as other project. I will take importing a Keil project as an example.
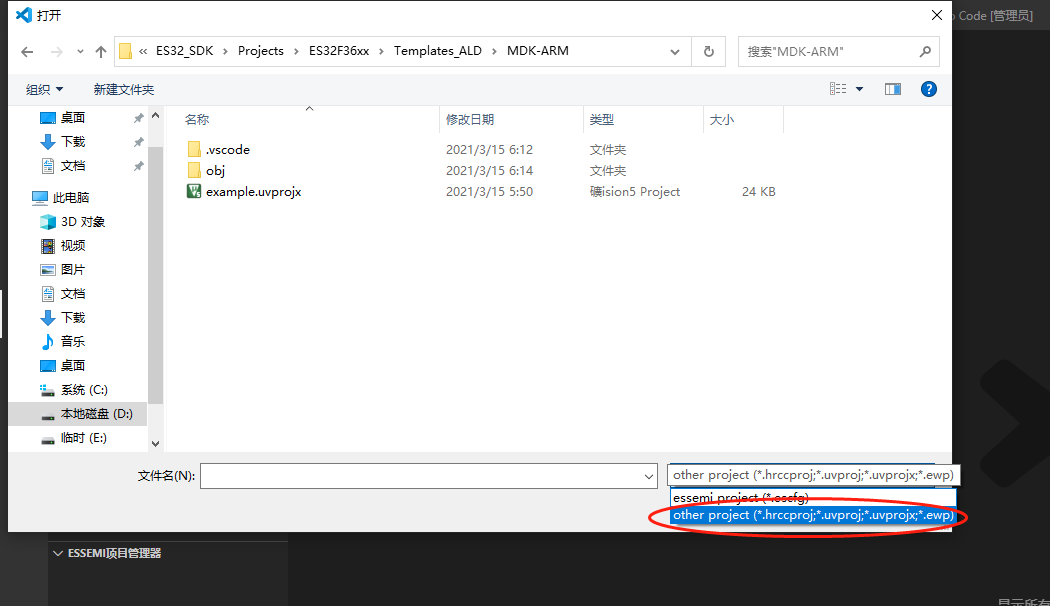 After importing the project, you can right-click on example to compile.
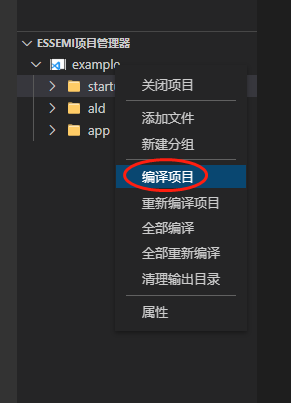 However, at this point, the compilation will definitely report an error.
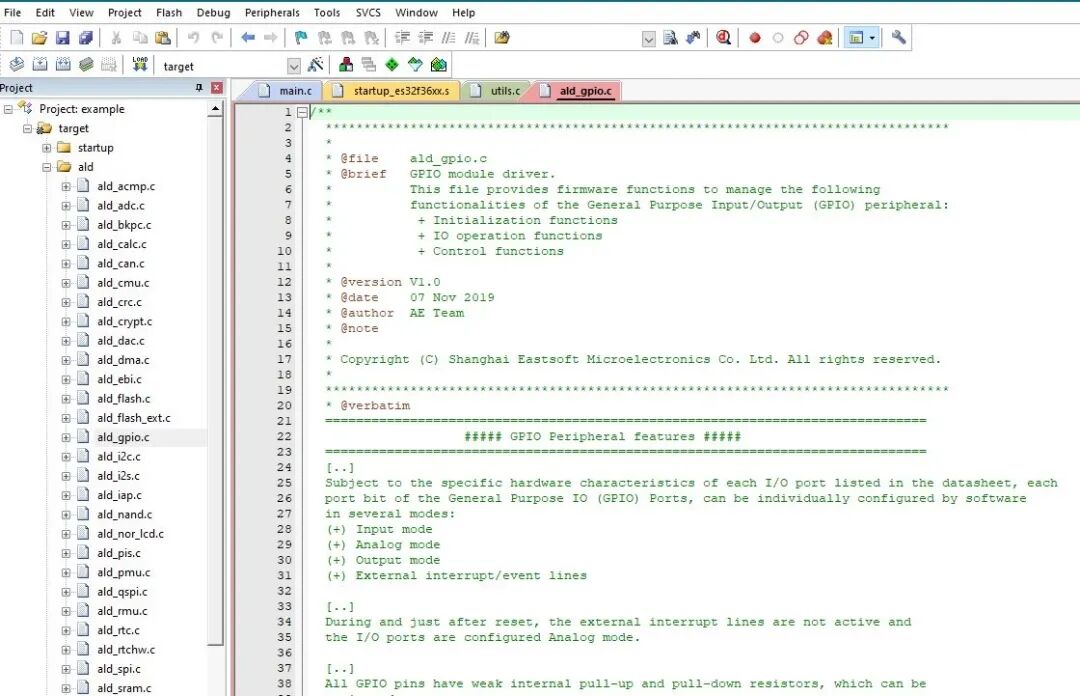
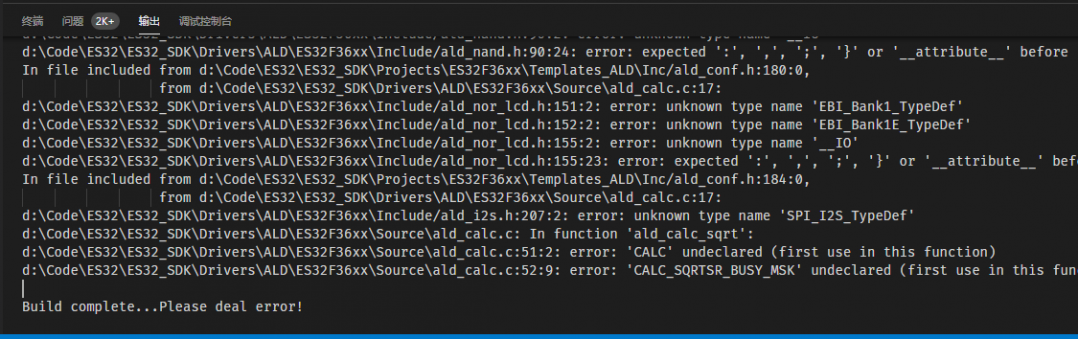 Although Dongsoft Carrier’s vscode plugin also comes with a user manual for a plugin, it is somewhat rough and does not detail the issues encountered and configurations, only briefly mentioning how to create a project while simply mentioning the steps for importing a project.In fact, after carefully examining the compilation error codes, it is relatively easy to troubleshoot the issues. Since we imported a Keil project, the startup file for the ES32F3696 is configured for the Keil compiler, but now we are using clang and gcc for development, so we need to replace the startup file as well. First, delete the startup_es32f36xx.s file.
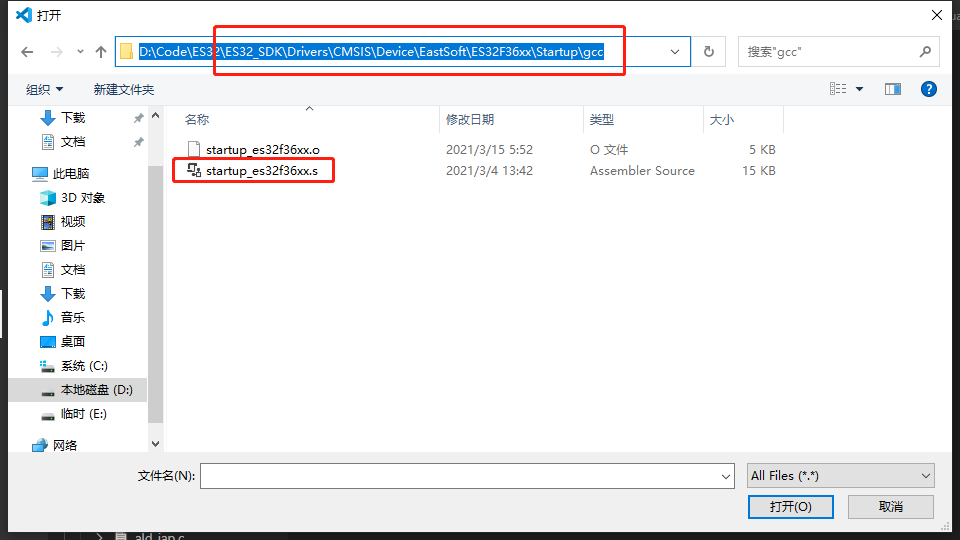
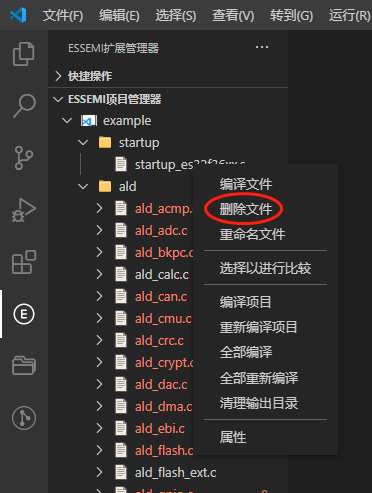 Then, right-click on the startup group and select Add File.
 Replacing the startup file and recompiling will still result in errors because the vscode plugin provided by Dongsoft Carrier has some bugs when importing projects and does not import macro definitions, so here we need to right-click on example and go to properties.
 Switch to the last page, “Compile Options,” and fill in the macro definition field with ES32F36xx.
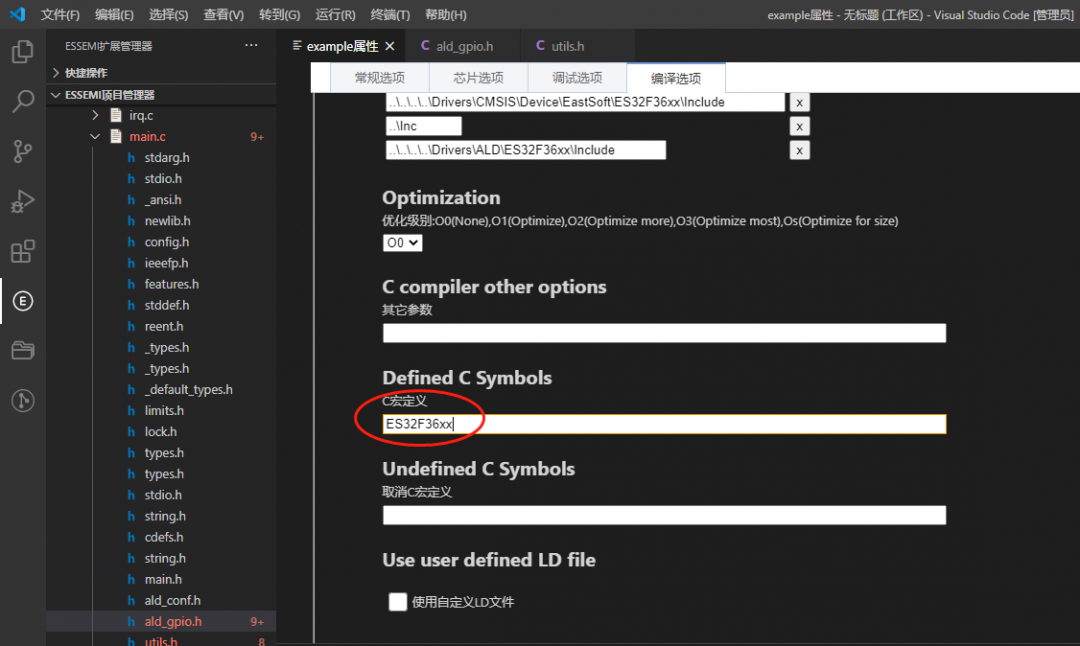 After making the modifications, remember to click the “Save Compile Configuration” button in the lower right corner.
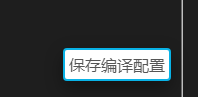 At this point, when recompiling, it will indicate that the compilation was successful.
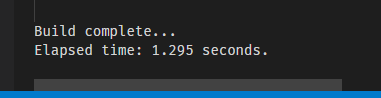 Overall, I am extremely satisfied with this event.Not only does the chip itself meet my needs, but the materials provided by Dongsoft Carrier are also very comprehensive.By the way, in the materials provided by Dongsoft Carrier, there is mention of a 32-bit MCU based on the RISC-V architecture. I am very much looking forward to Dongsoft Carrier releasing a new model with a pin-to-pin compatibility similar to the current ES32F3696 based on RISC-V architecture. Although the licensing fees for ARM may be much cheaper when spread out, I still hope Dongsoft Carrier can design a completely self-owned intellectual property RISC-V 32-bit MCU to replace ARM…I look forward to Dongsoft Carrier’s future products!Dongsoft Carrier ES32F369x + ADC SamplingUser: freeelectron1. The pin used is PA5, which is ADC channel 9
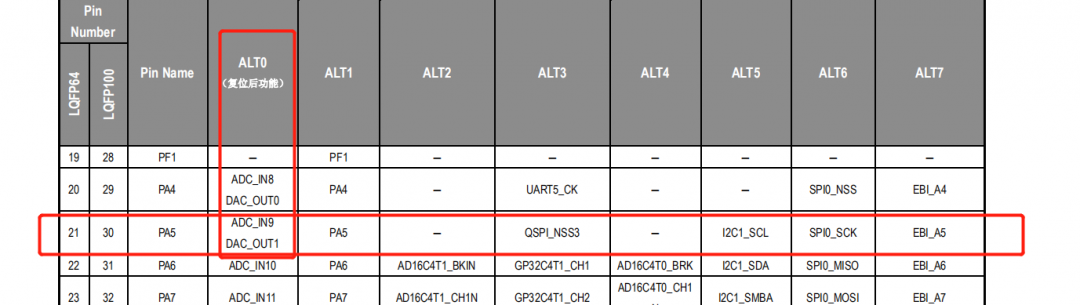
void adc_init(void){        md_gpio_init_t x;
        x.mode  = MD_GPIO_MODE_INPUT;        x.pupd  = MD_GPIO_PUSH_UP;        x.odos  = MD_GPIO_PUSH_PULL;        x.podrv = MD_GPIO_OUT_DRIVE_1;        x.nodrv = MD_GPIO_OUT_DRIVE_1;        x.flt   = MD_GPIO_FILTER_DISABLE;        x.type  = MD_GPIO_TYPE_CMOS;        x.func  = MD_GPIO_FUNC_0;        md_gpio_init(GPIOA, MD_GPIO_PIN_5, &x);
        md_adc_init_t h_adc;  md_adc_nch_conf_t config;
  md_adc_struct_init(&h_adc);        md_adc_normal_struct_init(&config);        md_adc_init(ADC0, &h_adc);        md_adc_normal_channel_config(ADC0, &config);}
4. Get ADC Value
uint32_t get_adc_value(void){ uint32_t value=0; /* Start normal convert */ md_adc_set_normal_channel_conv_start_nchtrg(ADC0); /* Wait convert finish */ while (md_adc_get_stat_nche(ADC0) == 0); /* Clear complete flag */ md_adc_set_clr_nche(ADC0); /* Read normal convert result */ value = md_adc_get_normal_channel_val(ADC0);
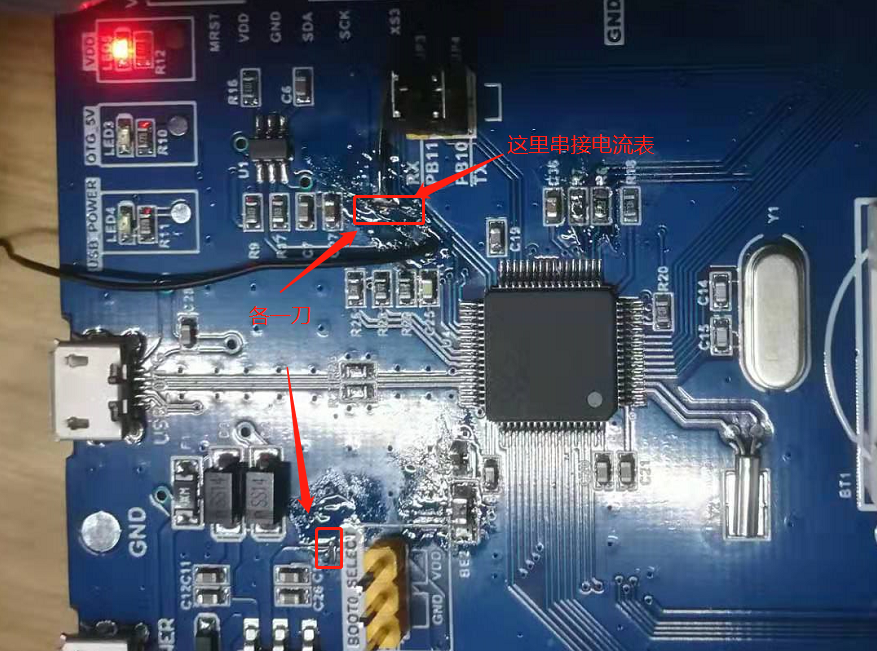
return value;}5. PhenomenonBy adjusting the resistance value of R8, you can see the change in ADC sampling values.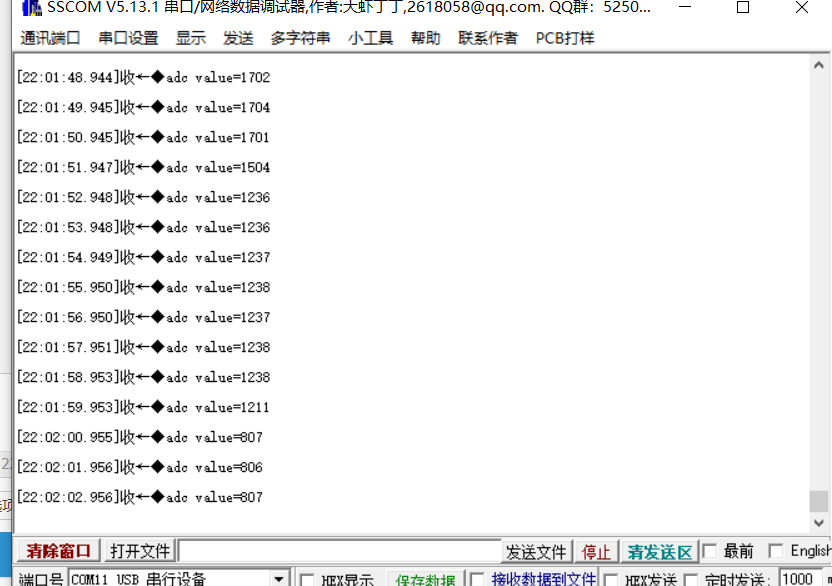

 # DataSheet Power Consumption Data
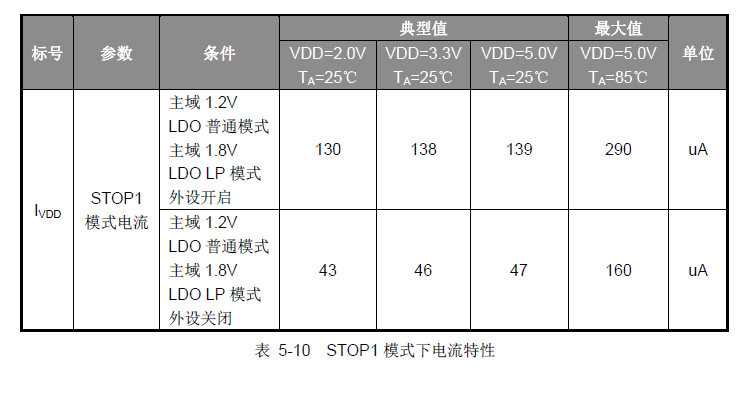
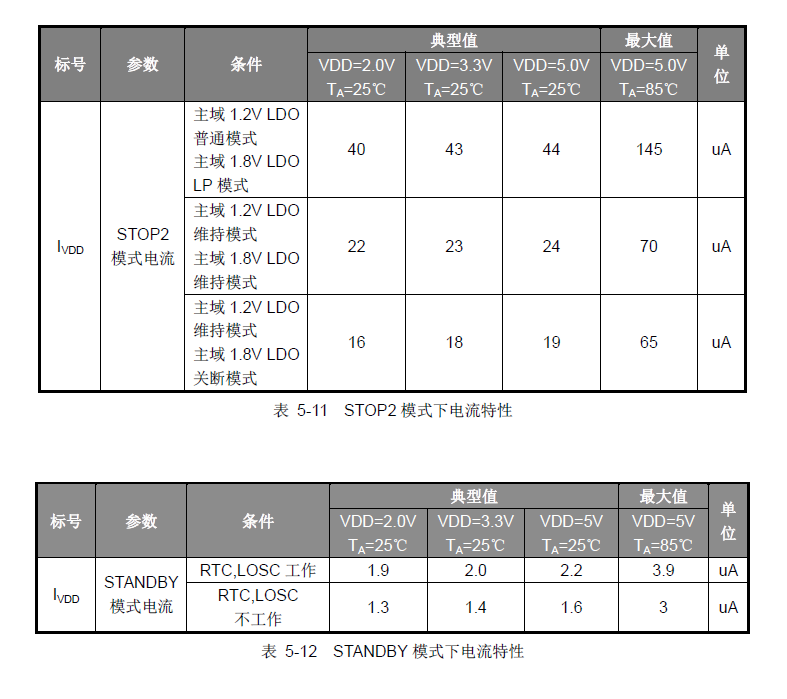
| Mode | Minimum (uA) | Maximum (uA) | 20S Average (uA) |
| STOP 1 (Main domain 1.2V LDO normal mode, Main domain 1.8V LDO LP mode with peripheral clock enabled) | 49.7 | 97.7 | 68.8 |
| STOP 2 (Main domain 1.2V LDO hold mode, Main domain 1.8V LDO hold mode) | 16.4 | 58.1 | 37.4 |
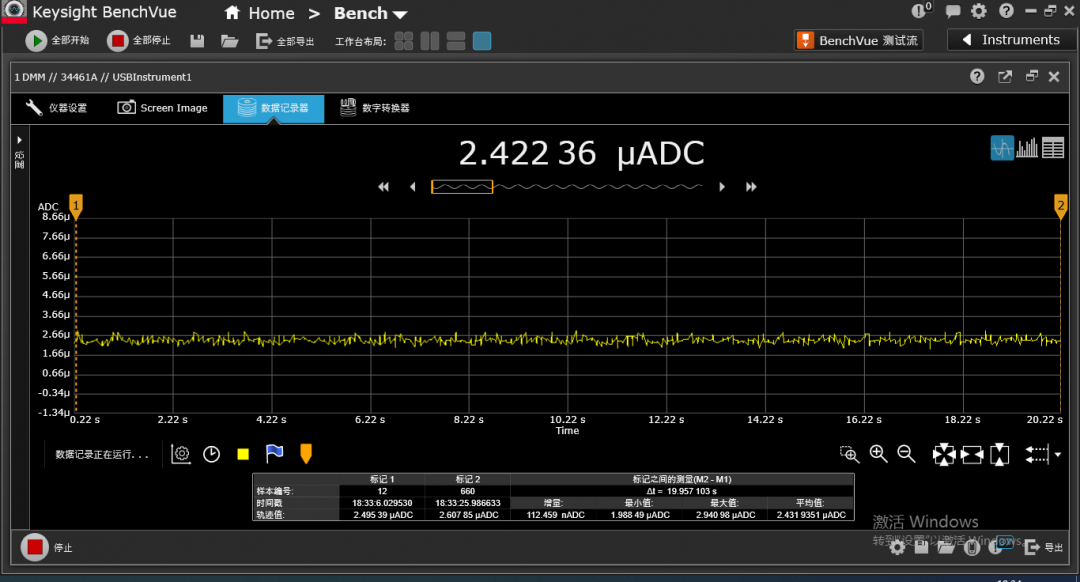
| STANDBY (RTC, LOSC working) | 1.9 | 2.9 | 2.4 |
Measured current waveforms:STOP 1: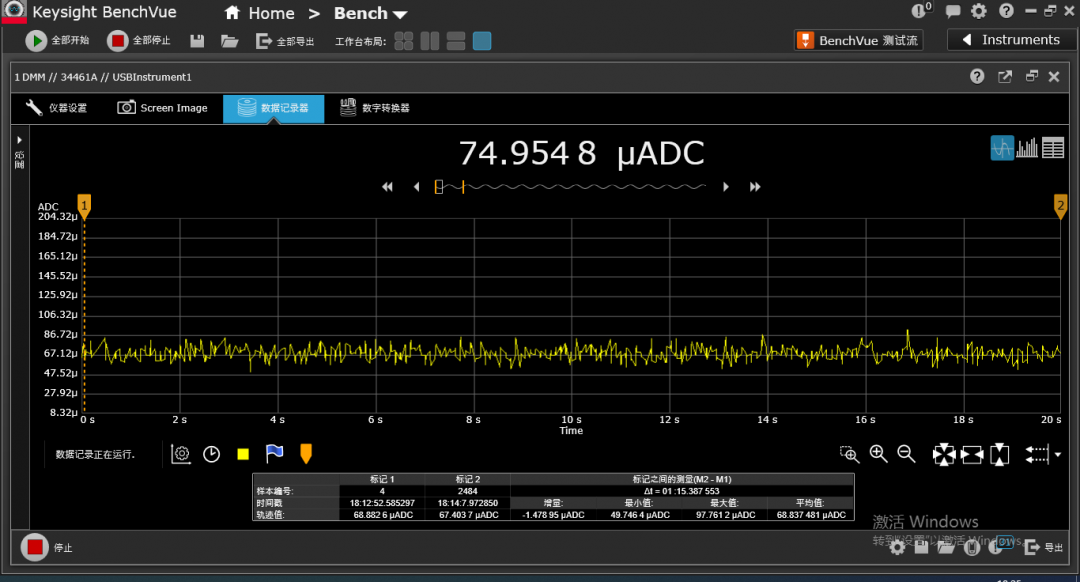

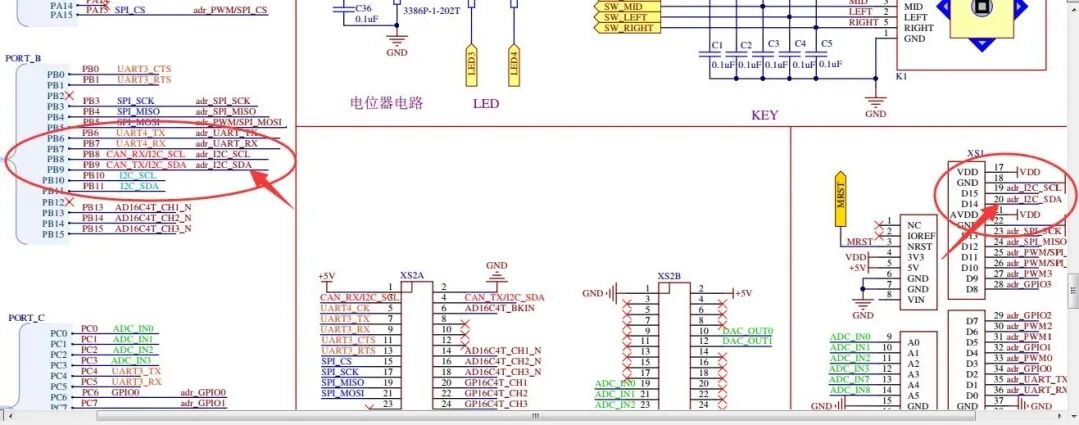
void i2c_gpio_init( void ){#ifdef I2C_USE_GPIO
#else gpio_init_t a;
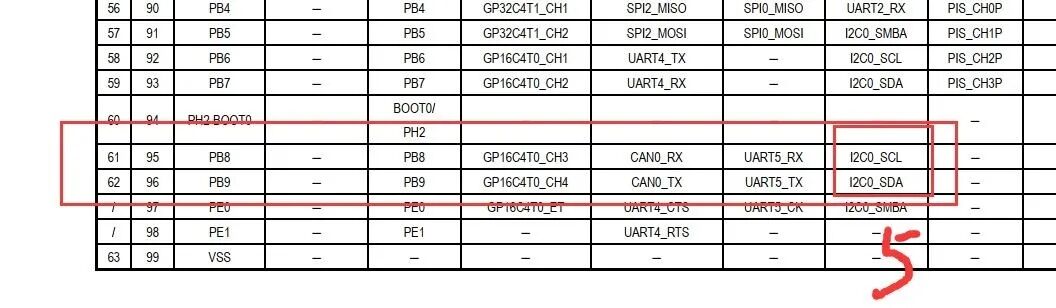
/* Initialize scl pin */ a.mode = GPIO_MODE_OUTPUT; a.odos = GPIO_OPEN_DRAIN; a.pupd = GPIO_PUSH_UP; a.nodrv = GPIO_OUT_DRIVE_6; a.podrv = GPIO_OUT_DRIVE_6; a.flt = GPIO_FILTER_DISABLE; a.type = GPIO_TYPE_TTL; a.func = GPIO_FUNC_5; ald_gpio_init(I2C_SCL_Port, I2C_SCL_PIN, &a);
/* Initialize sda pin */ a.mode = GPIO_MODE_OUTPUT; a.odos = GPIO_OPEN_DRAIN; a.pupd = GPIO_PUSH_UP; a.nodrv = GPIO_OUT_DRIVE_6; a.podrv = GPIO_OUT_DRIVE_6; a.flt = GPIO_FILTER_DISABLE; a.type = GPIO_TYPE_TTL; a.func = GPIO_FUNC_5; ald_gpio_init(I2C_SDA_Port, I2C_SDA_PIN, &a);
/* Initialize I2C struct */ memset(&h_i2c, 0, sizeof(h_i2c));
/* Enable i2c interrupt */// ald_mcu_irq_config(I2C1_EV_IRQn, 3, 3, ENABLE);// ald_mcu_irq_config(I2C1_ERR_IRQn, 3, 3, ENABLE);
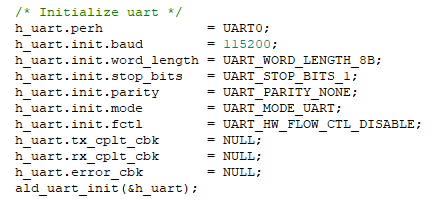
/* Initialize I2C */ h_i2c.perh = I2C0; h_i2c.init.clk_speed = 100000; h_i2c.init.module = I2C_MODULE_MASTER; h_i2c.init.dual_addr = I2C_DUALADDR_ENABLE; h_i2c.init.own_addr1 = 0xA0; h_i2c.init.addr_mode = I2C_ADDR_7BIT; h_i2c.init.general_call = I2C_GENERALCALL_ENABLE; h_i2c.init.no_stretch = I2C_NOSTRETCH_ENABLE;
ald_i2c_reset(&h_i2c); ald_i2c_init(&h_i2c);#endif}int main(){ uint32_t ms,ledms; uint32_t key_val,key_old,key_xor; uint8_t utbuff[6];
float press; float temp; uint16_t ps; float als;
/* Initialize ALD */ ald_cmu_init(); /* Configure system clock */ ald_cmu_pll1_config(CMU_PLL1_INPUT_HOSC_3, CMU_PLL1_OUTPUT_96M); ald_cmu_clock_config(CMU_CLOCK_PLL1, 96000000); /* Enable peripheral clock */ ald_cmu_perh_clock_config(CMU_PERH_GPIO, ENABLE); ald_cmu_perh_clock_config(CMU_PERH_UART0, ENABLE); ald_cmu_perh_clock_config(CMU_PERH_I2C0, ENABLE);
uart_stdio_init(); memset(uart_buf, 0x0, 64);
light_init(); key_init(); lcd_gpio_init(); i2c_gpio_init();
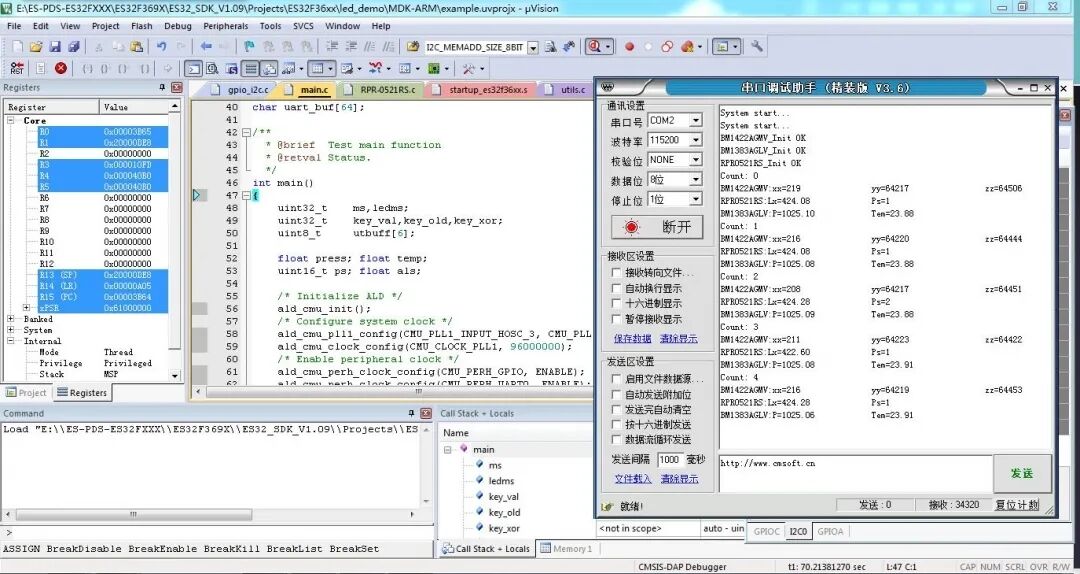
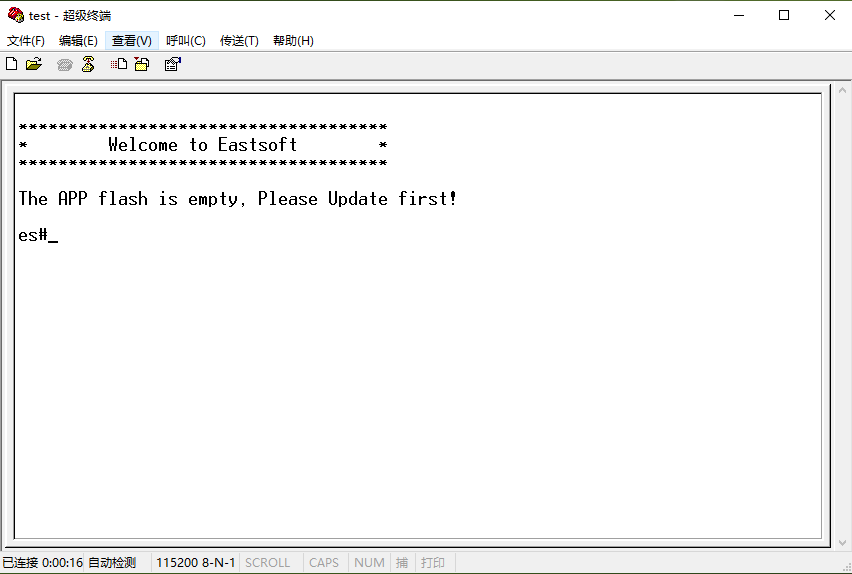
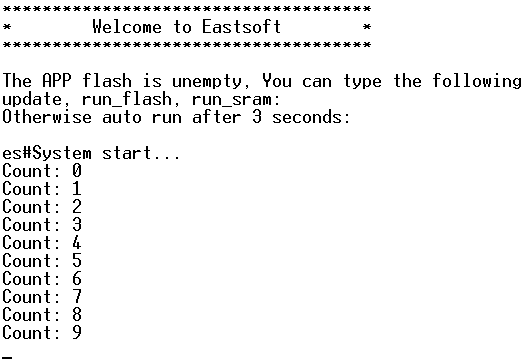
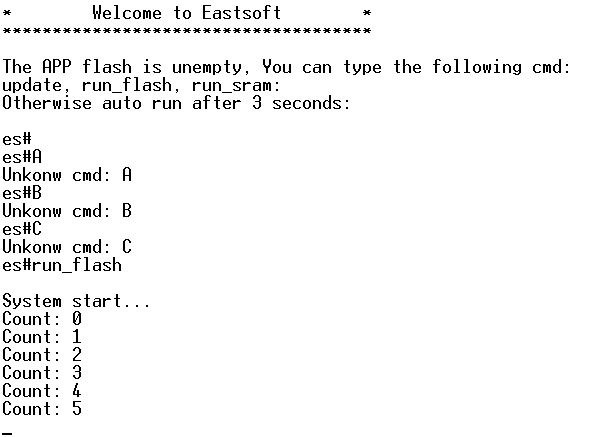
printf_e("System start...\n"); light_ctrl(LIGHT_IDX_2, LIGHT_CTRL_ON); ald_delay_ms(1000); light_ctrl(LIGHT_IDX_2, LIGHT_CTRL_OFF); ald_delay_ms(1000);
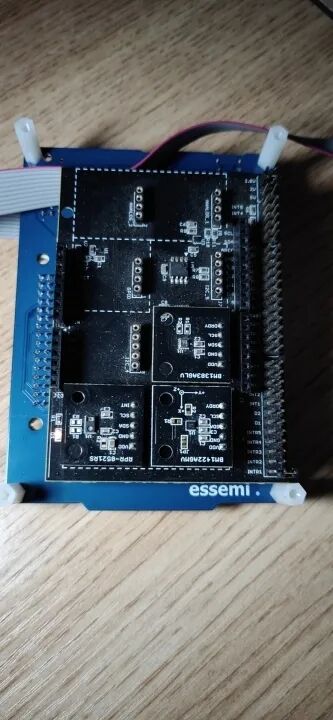
if(BM1422AGMV_Init() == 0) { printf_e("BM1422AGMV_Init OK\r\n"); } if(BM1383AGLV_Init() == 0) { printf_e("BM1383AGLV_Init OK\r\n"); } if(RPR0521RS_Init() == 0) { printf_e("RPR0521RS_Init OK\r\n"); }
ms = ald_get_tick()+10; ledms = ald_get_tick()+1000; key_old = 0; while (1) { //按键扫描 if(ms < ald_get_tick()) { ms = ald_get_tick()+10;
key_val = 0; if(ald_gpio_read_pin(KEY_UP_PORT, KEY_UP_PIN) == 0) key_val |= 0x01; if(ald_gpio_read_pin(KEY_DOWN_PORT, KEY_DOWN_PIN) == 0) key_val |= 0x02; if(ald_gpio_read_pin(KEY_LEFT_PORT, KEY_LEFT_PIN) == 0) key_val |= 0x04; if(ald_gpio_read_pin(KEY_RIGHT_PORT, KEY_RIGHT_PIN) == 0) key_val |= 0x08; if(ald_gpio_read_pin(KEY_CENTER_PORT, KEY_CENTER_PIN) == 0) key_val |= 0x10;
key_xor = key_old ^ key_val; if(key_xor & 0x01) { if(key_val &0x01) { printf_e("key up press +\n"); }else { printf_e("key up release -\n"); } }
if(key_xor & 0x02) { if(key_val &0x02) { printf_e("key down press +\n"); }else { printf_e("key down release -\n"); } }
if(key_xor & 0x04) { if(key_val &0x04) { printf_e("key left press +\n"); }else { printf_e("key left release -\n"); } }
if(key_xor & 0x08) { if(key_val &0x08) { printf_e("key right press +\n"); }else { printf_e("key right release -\n"); } }
if(key_xor &0x10) { if(key_val &0x10) { printf_e("key center press +\n"); }else { printf_e("key center release -\n"); } } key_old = key_val; }
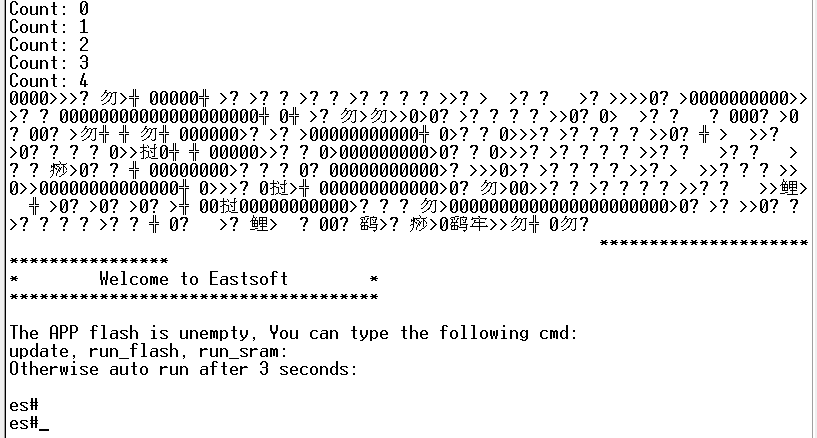
if(ledms < ald_get_tick()) { ledms = ald_get_tick()+1000; light_ctrl(LIGHT_IDX_1, LIGHT_CTRL_TOGGLE); light_ctrl(LIGHT_IDX_2, LIGHT_CTRL_TOGGLE); printf_e("Count: %d\n", __cnt++);
BM1422AGMV_get_rawdata(utbuff); printf_e("BM1422AGMV:xx=%u\t\tyy=%u\t\tz=%u\r\n",(uint16_t)(utbuff[1]<<8)|utbuff[0], (uint16_t)(utbuff[3]<<8)|utbuff[2], (uint16_t)(utbuff[5]<<8)|utbuff[4]); RPR0521RS_get_psalsval(&ps,&als); printf_e("RPR0521RS:Lx=%0.2f\t\tPs=%d\n",als,ps);
BM1383AGLV_get_val(&press,&temp); printf_e("BM1383AGLV:P=%0.2f\t\tTem=%0.2f\n",press,temp); } }}The data read below shows the values of the three sensors displayed on the serial port.