Link: https://www.hahack.com/codes/cmake/
Recommended: Hello Series | CMake Brief Basics
What is CMake
You may have heard of several Make tools, such as GNU Make, QT’s qmake, Microsoft’s MS nmake, BSD Make (pmake), Makepp, etc. These Make tools follow different specifications and standards, and the Makefile formats they execute vary widely.
This brings a serious problem: if software wants to be cross-platform, it must ensure that it can be compiled on different platforms. If you use the above Make tools, you would need to write a Makefile for each standard, which can be a frustrating task.
CMake is a tool designed to address the above issue: it allows developers to write a platform-independent CMakeLists.txt file to customize the entire build process, and then generates the required localized Makefiles and project files based on the target user’s platform, such as Unix Makefiles or Windows Visual Studio projects.
Thus achieving “Write once, run everywhere.” Clearly, CMake is a more advanced build configuration tool than the aforementioned Make tools. Some well-known open-source projects that use CMake as their project architecture system include VTK, ITK, KDE, OpenCV, OSG, etc. [1].
The process of using CMake to generate a Makefile and compile on the Linux platform is as follows:
-
Write the CMake configuration file CMakeLists.txt. -
Execute the command cmake PATHorccmake PATHto generate the Makefile (the difference betweenccmakeandcmakeis that the former provides an interactive interface). Here,PATHis the directory where CMakeLists.txt is located. -
Use the makecommand to compile.
This article will start with examples to explain the common usage of CMake step by step. All example codes in the text can be found here. If you still feel unsatisfied after reading, you can continue to learn from other resources I provide at the end of the article.
Getting Started Example: Single Source File
The source code for this section is located at:
https://github.com/wzpan/cmake-demo/tree/master/Demo1
For simple projects, you only need to write a few lines of code. For example, suppose our project currently has only one source file main.cc, and the purpose of this program is to calculate the power of a number.
#include <stdio.h>
#include <stdlib.h>

/**
 * power - Calculate the power of number.
 * @param base: Base value.
 * @param exponent: Exponent value.
 *
 * @return base raised to the power exponent.
 */
double power(double base, int exponent)
{
    int result = base;
    int i;

    if (exponent == 0) {
        return 1;
    }

    for(i = 1; i < exponent; ++i){
        result = result * base;
    }

    return result;
}

int main(int argc, char *argv[])
{
    if (argc < 3){
        printf("Usage: %s base exponent \n", argv[0]);
        return 1;
    }
    double base = atof(argv[1]);
    int exponent = atoi(argv[2]);
    double result = power(base, exponent);
    printf("%g ^ %d is %g\n", base, exponent, result);
    return 0;
}
Writing CMakeLists.txt
First, write the CMakeLists.txt file and save it in the same directory as the main.cc source file:
# Minimum required version of CMake
cmake_minimum_required (VERSION 2.8)

# Project information
project (Demo1)

# Specify the target to generate
add_executable(Demo main.cc)
The syntax of CMakeLists.txt is relatively simple, consisting of commands, comments, and whitespace, where commands are case-insensitive. The content after the symbol # is considered a comment. Commands consist of command names, parentheses, and parameters, separated by spaces.
In the above CMakeLists.txt file, several commands appear in order:
-
cmake_minimum_required: specifies the minimum version of CMake required to run this configuration file; -
project: the parameter value isDemo1, indicating that the project name isDemo1. -
add_executable: compiles the source file named main.cc into an executable file named Demo.
Compiling the Project
Then, execute cmake . in the current directory to obtain the Makefile, and then use the make command to compile to obtain the Demo1 executable file.
[ehome@xman Demo1]$ cmake .
-- The C compiler identification is GNU 4.8.2
-- The CXX compiler identification is GNU 4.8.2
-- Check for working C compiler: /usr/sbin/cc
-- Check for working C compiler: /usr/sbin/cc -- works
-- Detecting C compiler ABI info
-- Detecting C compiler ABI info - done
-- Check for working CXX compiler: /usr/sbin/c++
-- Check for working CXX compiler: /usr/sbin/c++ -- works
-- Detecting CXX compiler ABI info
-- Detecting CXX compiler ABI info - done
-- Configuring done
-- Generating done
-- Build files have been written to: /home/ehome/Documents/programming/C/power/Demo1
[ehome@xman Demo1]$ make
Scanning dependencies of target Demo
[100%] Building C object CMakeFiles/Demo.dir/main.cc.o
Linking C executable Demo
[100%] Built target Demo
[ehome@xman Demo1]$ ./Demo 5 4
5 ^ 4 is 625
[ehome@xman Demo1]$ ./Demo 7 3
7 ^ 3 is 343
[ehome@xman Demo1]$ ./Demo 2 10
2 ^ 10 is 1024
Multiple Source Files
Same Directory, Multiple Source Files
The source code for this subsection is located at:
https://github.com/wzpan/cmake-demo/tree/master/Demo2
The previous example had only a single source file. Now suppose we separate the power function into a source file named MathFunctions.c, making the project structure as follows:
./Demo2
    |
    +--- main.cc
    |
    +--- MathFunctions.cc
    |
    +--- MathFunctions.h
In this case, the CMakeLists.txt can be modified as follows:
# Minimum required version of CMake
cmake_minimum_required (VERSION 2.8)

# Project information
project (Demo2)

# Specify the target to generate
add_executable(Demo main.cc MathFunctions.cc)
The only change is that we added the MathFunctions.cc source file in the add_executable command. This is certainly fine, but if there are many source files, adding all the file names can be a tedious task. A more convenient method is to use the aux_source_directory command, which searches for all source files in the specified directory and stores the results in a specified variable. Its syntax is as follows:
aux_source_directory(<dir> <variable>)Therefore, we can modify the CMakeLists.txt as follows:
# Minimum required version of CMake
cmake_minimum_required (VERSION 2.8)

# Project information
project (Demo2)

# Find all source files in the current directory
# and save the names to the DIR_SRCS variable
aux_source_directory(. DIR_SRCS)

# Specify the target to generate
add_executable(Demo ${DIR_SRCS})
In this way, CMake will assign the filenames of all source files in the current directory to the variable DIR_SRCS, and then instruct that the source files in the variable DIR_SRCS need to be compiled into an executable file named Demo.
Multiple Directories, Multiple Source Files
The source code for this subsection is located at:
https://github.com/wzpan/cmake-demo/tree/master/Demo3
Now let’s move the MathFunctions.h and MathFunctions.cc files to a math directory.
./Demo3
    |
    +--- main.cc
    |
    +--- math/
          |
          +--- MathFunctions.cc
          |
          +--- MathFunctions.h
In this case, we need to write a CMakeLists.txt file in both the root directory Demo3 and the math directory. For convenience, we can first compile the files in the math directory into a static library and then call it from the main function.
The CMakeLists.txt in the root directory:
# Minimum required version of CMake
cmake_minimum_required (VERSION 2.8)

# Project information
project (Demo3)

# Find all source files in the current directory
# and save the names to the DIR_SRCS variable
aux_source_directory(. DIR_SRCS)

# Add the math subdirectory
add_subdirectory(math)

# Specify the target to generate
add_executable(Demo main.cc)

# Add link library
target_link_libraries(Demo MathFunctions)
This file adds the following content: Line 3 uses the add_subdirectory command to indicate that this project includes a subdirectory math, so the CMakeLists.txt file and source code in the math directory will also be processed. Line 6 uses the target_link_libraries command to indicate that the executable file main needs to link to a library named MathFunctions.
The CMakeLists.txt in the subdirectory:
# Find all source files in the current directory
# and save the names to the DIR_LIB_SRCS variable
aux_source_directory(. DIR_LIB_SRCS)

# Generate link library
add_library (MathFunctions ${DIR_LIB_SRCS})
In this file, the add_library command is used to compile the source files in the src directory into a static link library.
Custom Build Options
The source code for this subsection is located at:
https://github.com/wzpan/cmake-demo/tree/master/Demo4
CMake allows adding build options for projects, so that the most suitable build scheme can be selected based on the user’s environment and needs.
For example, we can set the MathFunctions library as an optional library. If this option is ON, the mathematical functions defined by this library will be used for calculations. Otherwise, the standard library’s math functions will be called.
Modifying the CMakeLists File
The first step we need to do is to add this option in the top-level CMakeLists.txt file:
# Minimum required version of CMake
cmake_minimum_required (VERSION 2.8)

# Project information
project (Demo4)

# Add a configuration header file to handle CMake settings for the source code
configure_file (
  "${PROJECT_SOURCE_DIR}/config.h.in"
  "${PROJECT_BINARY_DIR}/config.h"
  )

# Use own MathFunctions library
option (USE_MYMATH
       "Use provided math implementation" ON)

# Include MathFunctions library
if (USE_MYMATH)
  include_directories ("${PROJECT_SOURCE_DIR}/math")
  add_subdirectory (math)
  set (EXTRA_LIBS ${EXTRA_LIBS} MathFunctions)
endif (USE_MYMATH)

# Find all source files in the current directory
# and save the names to the DIR_SRCS variable
aux_source_directory(. DIR_SRCS)

# Specify the target to generate
add_executable(Demo ${DIR_SRCS})
target_link_libraries (Demo  ${EXTRA_LIBS})
Among them:
-
Line 7’s configure_filecommand is used to add a configuration header file config.h, which is generated by CMake from config.h.in. Through this mechanism, we can control the generation of code by pre-defining some parameters and variables. -
Line 13’s optioncommand adds aUSE_MYMATHoption, with the default value set toON. -
Line 17 decides whether to use our own MathFunctions library based on the value of the USE_MYMATHvariable.
Modifying the main.cc File
Next, modify the main.cc file to determine whether to call the standard library or the MathFunctions library based on the predefined value of USE_MYMATH:
#include <stdio.h>
#include <stdlib.h>
#include "config.h"

#ifdef USE_MYMATH
  #include "math/MathFunctions.h"
#else
  #include <math.h>
#endif


int main(int argc, char *argv[])
{
    if (argc < 3){
        printf("Usage: %s base exponent \n", argv[0]);
        return 1;
    }
    double base = atof(argv[1]);
    int exponent = atoi(argv[2]);

#ifdef USE_MYMATH
    printf("Now we use our own Math library. \n");
    double result = power(base, exponent);
#else
    printf("Now we use the standard library. \n");
    double result = pow(base, exponent);
#endif
    printf("%g ^ %d is %g\n", base, exponent, result);
    return 0;
}
Writing the config.h.in File
It is worth noting that in the above program, line 2 references a config.h file, which predefines the value of USE_MYMATH. However, we do not write this file directly; instead, we write a config.h.in file for convenience in importing configuration from CMakeLists.txt, with the following content:
#cmakedefine USE_MYMATHThus, CMake will automatically generate the config.h file based on the settings in the CMakeLists configuration file.
Compiling the Project
Now let’s compile this project. To facilitate interactive selection of the variable’s value, we can use the ccmake command (you can also use the cmake -i command, which provides an interactive configuration interface):
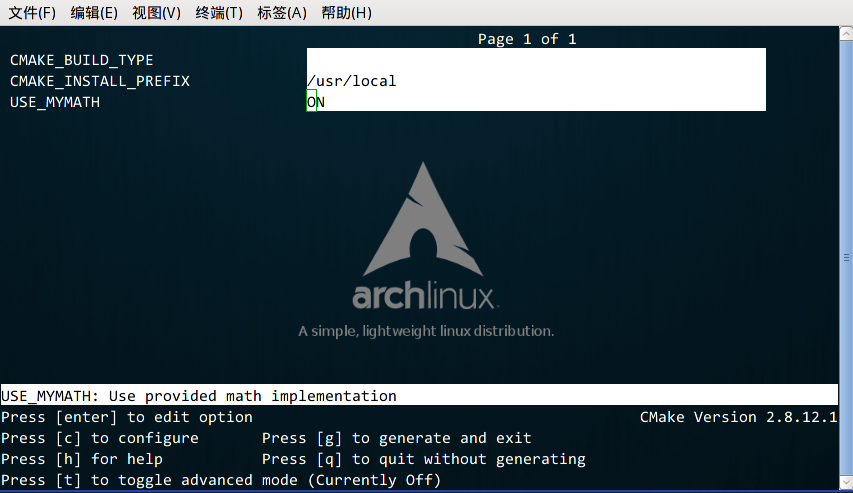
From there, you can find the just defined USE_MYMATH option. You can jump between different option windows using the keyboard arrow keys and modify the option by pressing the enter key. After modification, you can press the c option to complete the configuration, and then press the g key to confirm the generation of the Makefile. Other operations of ccmake can refer to the instructions provided at the bottom of the window.
We can try setting USE_MYMATH to ON and OFF and see the results:
USE_MYMATH is ON
Running result:
[ehome@xman Demo4]$ ./Demo
Now we use our own MathFunctions library.
 7 ^ 3 = 343.000000
 10 ^ 5 = 100000.000000
 2 ^ 10 = 1024.000000
At this point, the content of config.h is:
#define USE_MYMATHUSE_MYMATH is OFF
Running result:
[ehome@xman Demo4]$ ./Demo
Now we use the standard library.
 7 ^ 3 = 343.000000
 10 ^ 5 = 100000.000000
 2 ^ 10 = 1024.000000
At this point, the content of config.h is:
/* #undef USE_MYMATH */Installation and Testing
The source code for this subsection is located at:
https://github.com/wzpan/cmake-demo/tree/master/Demo5
CMake can also specify installation rules and add tests. These two functions can be executed by using make install and make test after generating the Makefile.
In previous GNU Makefiles, you might need to write two phony targets and corresponding rules for this, but in CMake, such work only requires simple calls to a few commands.
Custom Installation Rules
First, add the following two lines in the math/CMakeLists.txt file:
# Specify the installation path of the MathFunctions library
install (TARGETS MathFunctions DESTINATION bin)
install (FILES MathFunctions.h DESTINATION include)
This specifies the installation path of the MathFunctions library. Then similarly modify the root directory’s CMakeLists file, adding the following lines at the end:
# Specify installation path
install (TARGETS Demo DESTINATION bin)
install (FILES "${PROJECT_BINARY_DIR}/config.h"
         DESTINATION include)
Through the above customization, the generated Demo file and MathFunctions function library libMathFunctions.o will be copied to /usr/local/bin, while MathFunctions.h and the generated config.h file will be copied to /usr/local/include.
We can verify this (by the way, /usr/local/ is the default installation root, and you can specify where these files should be copied by modifying the CMAKE_INSTALL_PREFIX variable’s value):
[ehome@xman Demo5]$ sudo make install
[ 50%] Built target MathFunctions
[100%] Built target Demo
Install the project...
-- Install configuration: ""
-- Installing: /usr/local/bin/Demo
-- Installing: /usr/local/include/config.h
-- Installing: /usr/local/bin/libMathFunctions.a
-- Up-to-date: /usr/local/include/MathFunctions.h
Adding Tests to the Project
Adding tests is also very simple. CMake provides a testing tool called CTest. All we need to do is call a series of add_test commands in the project’s root CMakeLists file.
# Enable testing
enable_testing()

# Test if the program runs successfully
add_test (test_run Demo 5 2)

# Test if the help information can be prompted normally
add_test (test_usage Demo)
set_tests_properties (test_usage
  PROPERTIES PASS_REGULAR_EXPRESSION "Usage: .* base exponent")

# Test the square of 5
add_test (test_5_2 Demo 5 2)

set_tests_properties (test_5_2
 PROPERTIES PASS_REGULAR_EXPRESSION "is 25")

# Test 10 to the power of 5
add_test (test_10_5 Demo 10 5)

set_tests_properties (test_10_5
 PROPERTIES PASS_REGULAR_EXPRESSION "is 100000")

# Test 2 to the power of 10
add_test (test_2_10 Demo 2 10)

set_tests_properties (test_2_10
 PROPERTIES PASS_REGULAR_EXPRESSION "is 1024")
The above code includes four tests. The first test test_run is used to check whether the program runs successfully and returns a value of 0. The remaining three tests check whether the results of 5 squared, 10 to the power of 5, and 2 to the power of 10 are correct. The PASS_REGULAR_EXPRESSION is used to test whether the output contains the following strings.
Let’s take a look at the test results:
[ehome@xman Demo5]$ make test
Running tests...
Test project /home/ehome/Documents/programming/C/power/Demo5
    Start 1: test_run
1/4 Test #1: test_run .........................   Passed    0.00 sec
    Start 2: test_5_2
2/4 Test #2: test_5_2 .........................   Passed    0.00 sec
    Start 3: test_10_5
3/4 Test #3: test_10_5 ........................   Passed    0.00 sec
    Start 4: test_2_10
4/4 Test #4: test_2_10 ........................   Passed    0.00 sec

100% tests passed, 0 tests failed out of 4

Total Test time (real) =   0.01 sec
If you want to test more input data, writing test cases one by one as above can be too cumbersome. This can be achieved by writing macros:
# Define a macro to simplify testing work
macro (do_test arg1 arg2 result)
  add_test (test_${arg1}_${arg2} Demo ${arg1} ${arg2})
  set_tests_properties (test_${arg1}_${arg2}
    PROPERTIES PASS_REGULAR_EXPRESSION ${result})
endmacro (do_test)

# Use this macro for a series of data tests
do_test (5 2 "is 25")
do_test (10 5 "is 100000")
do_test (2 10 "is 1024")
For more detailed usage of CTest, you can refer to the CTest documentation by using man 1 ctest.
Support for gdb
Setting CMake to support gdb is also very easy; you just need to specify the -g option in Debug mode:
set(CMAKE_BUILD_TYPE "Debug")
set(CMAKE_CXX_FLAGS_DEBUG "$ENV{CXXFLAGS} -O0 -Wall -g -ggdb")
set(CMAKE_CXX_FLAGS_RELEASE "$ENV{CXXFLAGS} -O3 -Wall")
After that, you can directly use gdb to debug the generated program.
Adding Environment Checks
The source code for this subsection is located at:
https://github.com/wzpan/cmake-demo/tree/master/Demo6
Sometimes you may need to check the system environment, for example, when you want to use a platform-specific feature. In this example, we check whether the system has the pow function. If it has the pow function, we will use it; otherwise, we will use our defined power function.
Adding CheckFunctionExists Macro
First, add the CheckFunctionExists.cmake macro in the top-level CMakeLists file, and call the check_function_exists command to test whether the linker can find the pow function during the linking phase.
# Check if the system supports pow function
include (${CMAKE_ROOT}/Modules/CheckFunctionExists.cmake)
check_function_exists (pow HAVE_POW)
Place the above code before the configure_file command.
Predefine Related Macro Variables
Next, modify the config.h.in file to predefine related macro variables.
// does the platform provide pow function?
#cmakedefine HAVE_POW
Using Macros and Functions in Code
The final step is to modify main.cc to use macros and functions in the code:
#ifdef HAVE_POW
    printf("Now we use the standard library. \n");
    double result = pow(base, exponent);
#else
    printf("Now we use our own Math library. \n");
    double result = power(base, exponent);
#endif
Adding Version Numbers
The source code for this subsection is located at:
https://github.com/wzpan/cmake-demo/tree/master/Demo7
Adding and maintaining version numbers for a project is a good practice, as it helps users understand the maintenance status of each version and stay informed about whether the current version is outdated or potentially incompatible.
First, modify the top-level CMakeLists file, adding the following two lines after the project command:
set (Demo_VERSION_MAJOR 1)
set (Demo_VERSION_MINOR 0)
This specifies the current project’s major and minor version numbers.
Next, to obtain version information in the code, we can modify the config.h.in file to add two predefined variables:
// the configured options and settings for Tutorial
#define Demo_VERSION_MAJOR @Demo_VERSION_MAJOR@
#define Demo_VERSION_MINOR @Demo_VERSION_MINOR@
Thus, you can directly print version information in the code:
#include <stdio.h>
#include <stdlib.h>
#include <math.h>
#include "config.h"
#include "math/MathFunctions.h"

int main(int argc, char *argv[])
{
    if (argc < 3){
        // print version info
        printf("%s Version %d.%d\n",
            argv[0],
            Demo_VERSION_MAJOR,
            Demo_VERSION_MINOR);
        printf("Usage: %s base exponent \n", argv[0]);
        return 1;
    }
    double base = atof(argv[1]);
    int exponent = atoi(argv[2]);

#if defined (HAVE_POW)
    printf("Now we use the standard library. \n");
    double result = pow(base, exponent);
#else
    printf("Now we use our own Math library. \n");
    double result = power(base, exponent);
#endif
    printf("%g ^ %d is %g\n", base, exponent, result);
    return 0;
}
Generating Installation Packages
The source code for this subsection is located at:
https://github.com/wzpan/cmake-demo/tree/master/Demo8
This section will learn how to configure the generation of installation packages for various platforms, including binary installation packages and source installation packages. To accomplish this task, we need to use CPack, which is also a tool provided by CMake, specifically for packaging.
First, add the following lines at the end of the top-level CMakeLists.txt file:
# Build a CPack installation package
include (InstallRequiredSystemLibraries)
set (CPACK_RESOURCE_FILE_LICENSE
  "${CMAKE_CURRENT_SOURCE_DIR}/License.txt")
set (CPACK_PACKAGE_VERSION_MAJOR "${Demo_VERSION_MAJOR}")
set (CPACK_PACKAGE_VERSION_MINOR "${Demo_VERSION_MINOR}")
include (CPack)
The above code does the following:
-
Imports the InstallRequiredSystemLibraries module so that the CPack module can be imported later; -
Sets some CPack related variables, including copyright information and version information, where the version information uses the version number defined in the previous section; -
Imports the CPack module.
The next step is to build the project as usual and execute the cpack command.
-
Generate a binary installation package:
cpack -C CPackConfig.cmake-
Generate a source installation package:
cpack -C CPackSourceConfig.cmakeWe can try this. After generating the project, execute the cpack -C CPackConfig.cmake command:
[ehome@xman Demo8]$ cpack -C CPackSourceConfig.cmake
CPack: Create package using STGZ
CPack: Install projects
CPack: - Run preinstall target for: Demo8
CPack: - Install project: Demo8
CPack: Create package
CPack: - package: /home/ehome/Documents/programming/C/power/Demo8/Demo8-1.0.1-Linux.sh generated.
CPack: Create package using TGZ
CPack: Install projects
CPack: - Run preinstall target for: Demo8
CPack: - Install project: Demo8
CPack: Create package
CPack: - package: /home/ehome/Documents/programming/C/power/Demo8/Demo8-1.0.1-Linux.tar.gz generated.
CPack: Create package using TZ
CPack: Install projects
CPack: - Run preinstall target for: Demo8
CPack: - Install project: Demo8
CPack: Create package
CPack: - package: /home/ehome/Documents/programming/C/power/Demo8/Demo8-1.0.1-Linux.tar.Z generated.
At this point, three different formats of binary package files will be created in that directory:
[ehome@xman Demo8]$ ls Demo8-*
Demo8-1.0.1-Linux.sh  Demo8-1.0.1-Linux.tar.gz  Demo8-1.0.1-Linux.tar.Z
These three binary package files contain the same content. We can execute one of them. At this point, an interactive installation interface automatically generated by CPack will appear:
[ehome@xman Demo8]$ sh Demo8-1.0.1-Linux.sh
Demo8 Installer Version: 1.0.1, Copyright (c) Humanity
This is a self-extracting archive.
The archive will be extracted to: /home/ehome/Documents/programming/C/power/Demo8

If you want to stop extracting, please press <ctrl-C>.
The MIT License (MIT)

Copyright (c) 2013 Joseph Pan(http://hahack.com)

Permission is hereby granted, free of charge, to any person obtaining a copy of
this software and associated documentation files (the "Software"), to deal in the Software without restriction, including without limitation the rights to use, copy, modify, merge, publish, distribute, sublicense, and/or sell copies of the Software, and to permit persons to whom the Software is furnished to do so, subject to the following conditions:

The above copyright notice and this permission notice shall be included in all copies or substantial portions of the Software.

THE SOFTWARE IS PROVIDED "AS IS", WITHOUT WARRANTY OF ANY KIND, EXPRESS OR IMPLIED, INCLUDING BUT NOT LIMITED TO THE WARRANTIES OF MERCHANTABILITY, FITNESS FOR A PARTICULAR PURPOSE AND NONINFRINGEMENT. IN NO EVENT SHALL THE AUTHORS OR COPYRIGHT HOLDERS BE LIABLE FOR ANY CLAIM, DAMAGES OR OTHER LIABILITY, WHETHER IN AN ACTION OF CONTRACT, TORT OR OTHERWISE, ARISING FROM, OUT OF OR IN CONNECTION WITH THE SOFTWARE OR THE USE OR OTHER DEALINGS IN THE SOFTWARE.


Do you accept the license? [yN]:
y
By default the Demo8 will be installed in:
  "/home/ehome/Documents/programming/C/power/Demo8/Demo8-1.0.1-Linux"
Do you want to include the subdirectory Demo8-1.0.1-Linux?
Saying no will install in: "/home/ehome/Documents/programming/C/power/Demo8" [Yn]:
y

Using target directory: /home/ehome/Documents/programming/C/power/Demo8/Demo8-1.0.1-Linux
Extracting, please wait...

Unpacking finished successfully
After completion, it prompts that it has been installed in the Demo8-1.0.1-Linux subdirectory, and we can go in and execute the program:
[ehome@xman Demo8]$ ./Demo8-1.0.1-Linux/bin/Demo 5 2
Now we use our own Math library.
5 ^ 2 is 25
For more detailed usage of CPack, you can refer to the CPack documentation by using man 1 cpack.
Project Migration
CMake can easily build a project environment suitable for execution on various platforms. If the current project environment is not CMake but based on a specific platform, is it possible to migrate to CMake? The answer is yes. Below are migration solutions for several common platforms.
autotools
-
am2cmake can convert autotools-based projects to CMake; a successful case of this tool is KDE. -
Alternative Automake2CMake can convert KDevelop project files using automake. -
Converting autoconf tests
qmake
-
qmake converter can convert QT-based qmake projects.
Visual Studio
-
vcproj2cmake.rb can generate CMakeLists.txt files based on Visual Studio project files (with extensions .vcprojor.vcxproj). -
vcproj2cmake.ps1 is the PowerShell version of vcproj2cmake. -
folders4cmake generates corresponding “source_group” information based on Visual Studio project files, which can be easily used in CMake scripts. It supports Visual Studio 9/10 project files.
CMakeLists.txt Automatic Inference
-
gencmake infers CMakeLists.txt files based on existing files. -
CMakeListGenerator uses a set of file and directory analysis to create complete CMakeLists.txt files. It only supports Win32 platform.
Related Links
-
Official Homepage: https://github.com/wzpan/cmake-demo/tree/master/Demo1 -
Official Documentation: http://www.cmake.org/cmake/help/cmake2.4docs.html -
Official Tutorial: http://www.cmake.org/cmake/help/cmake_tutorial.html
Similar Tools
-
SCons: A project architecture tool recommended by Eric S. Raymond, Timothee Besset, Zed A. Shaw, and other experts. The biggest difference from CMake is that it uses Python as the execution script.
Friendly Reminder
Due to recent changes in WeChat official account push rules, if you want to see our articles frequently, you can click “like” or “view” at the bottom of the page after each reading, so that each pushed article will appear in your subscription list as soon as possible.
Copyright Statement: This article is sourced from the internet, freely conveying knowledge, and the copyright belongs to the original author. If there are any copyright issues, please contact me for deletion.
You may also like:
Practical | A Simple Sharing of a High-Performance Communication Library
Reply with1024 in the WeChat public account chat interface to obtain embedded resources; reply with m to view the article summary.