Why Unit Testing is Important
<span>print()</span> function to print the output to the console.def myfunc(*args, **kwargs):
do_something()
data = ...
print(data)
<span>print()</span> function frequently to ensure the accuracy of results. However, as the number of modules or functions to be tested increases, various unremoved or uncommented <span>print()</span> calls gradually clutter the code, making it less clean.<span>print()</span> into unit tests.<span>unittest</span>. However, for beginners, <span>unittest</span> has a slightly steep learning curve because it requires encapsulation through inheritance of the test case class (<span>TestCase</span>), necessitating a good understanding of object-oriented knowledge. Being tied to classes means that achieving customization or module decoupling may require additional time spent on design separation.
<span>TestCase</span>. We only need to keep our original code logic unchanged, adding an <span>assert</span> keyword to assert the results, and pytest will handle the rest.# main.py
import pytest
raw_data = read_data(...)
def test_myfunc(*args, **kwargs):
do_something()
data = ...
assert data == raw_data
if __name__ == '__main__':
pytest.main()
<span>main.py</span> file containing the above code to see the results of the tests in the terminal console. If the result passes, there will be no excessive information displayed; if the test fails, an error message will be thrown, indicating what the content in <span>data</span> was.Quickly Implement Your First Pytest Test
<span>pip install pytest</span>, we can quickly implement our first test.<span>test_main.py</span>, and keep the following content:from typing import Union
import pytest
def add(
x: Union[int, float],
y: Union[int, float],
) -> Union[int, float]:
return x + y
@pytest.mark.parametrize(
argnames="x,y,result",
argvalues=[
(1,1,2),
(2,4,6),
(3.3,3,6.3),
]
)
def test_add(
x: Union[int, float],
y: Union[int, float],
result: Union[int, float],
):
assert add(x, y) == result
<span>pytest -v</span> to see that pytest has already helped us pass the test parameters into the testing function and achieve the corresponding results: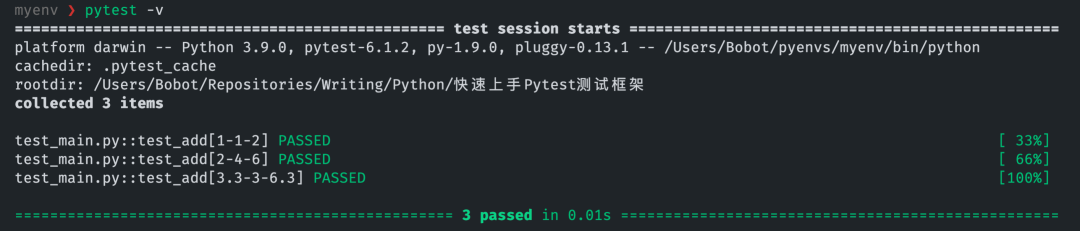
<span>for</span> loop to pass parameters, and we can intuitively see the specific values of the parameters passed in each test from the results. Here we only need to use the <span>mark.parametrize</span> decorator provided by pytest to achieve this. This also indicates that the learning curve of pytest is relatively easy, although we need to understand some concepts within this framework.Pytest Concepts and Usage
Naming
<span>test_*</span> or ending with <span>*_test</span>, adhering to the standard testing conventions. If we remove the <span>test_</span> prefix from the filename of the quick start example, we will find that pytest does not collect the corresponding test cases.# content of pytest.ini
# Example 1: have pytest look for "check" instead of "test"
[pytest]
python_files = check_*.py
python_classes = Check
python_functions = *_check
pytest test.py::test_demo
pytest test.py::TestDemo::test_demo
Marks
<span>mark</span> marks are a very useful feature. By decorating our test objects with marking decorators, pytest can perform corresponding operations on our functions during testing based on the <span>mark</span> functionality.<span>mark</span> functionalities, but we will only mention the commonly used ones.Parameterized Testing: pytest.parametrize
<span>mark.parametrize</span> is mainly used for scenarios where we want to pass different parameters or combinations of parameters to a test object.<span>test_add()</span> example, we tested:-
When <span>x=1</span>and<span>y=1</span>, whether the result is<span>result=2</span>. -
When <span>x=2</span>and<span>y=4</span>, whether the result is<span>result=6</span>. -
When <span>x=3.3</span>and<span>y=3</span>, whether the result is<span>result=6.3</span>. -
……
import pytest

@pytest.mark.parametrize("x", [0, 1])
@pytest.mark.parametrize("y", [2, 3])
@pytest.mark.parametrize("result", [2, 4])
def test_add(x, y, result):
    assert add(x,y) == result
<span>parametrize</span>, pytest can still help us test all cases. This way, we no longer need to write redundant code.<span>parametrize</span> and another important concept we will discuss later, <span>fixture</span>, have some differences: the former mainly simulates what output the test object will produce under different parameters, while the latter tests what results can be obtained under fixed parameters or data.Skipping Tests
<span>add()</span> for Python version 3.3, but using it when the version is greater than Python 3.3 will inevitably cause problems.<span>mark.skip</span> and <span>mark.skipif</span>, with the latter being used more frequently.import pytest
import sys
@pytest.mark.skipif(sys.version_info >= (3,3))
def test_add(x, y, result):
assert add(x,y) == result
<span>sys</span> module to check whether the Python interpreter version is greater than 3.3. If so, it will be skipped automatically.Expected Exceptions
def div(x, y):
    return x / y
<span>y=0</span>, it will inevitably raise a <span>ZeroDivisionError</span> exception. Thus, in the testing process, if we want to test whether the exception assertion can be correctly raised, we can use the <span>raises()</span> method provided by pytest:import pytest
@pytest.mark.parametrize("x", [1])
@pytest.mark.parametrize("y", [0])
def test_div(x, y):
with pytest.raises(ValueError):
div(x, y)
<span>ValueError</span> that we specified to be raised after the <span>ZeroDivisionError</span>, not the former. Of course, we can use another marked method (<span>pytest.mark.xfail</span>) in combination with <span>pytest.mark.parametrize</span>:
@pytest.mark.parametrize(
    "x,y,result",
    [
        pytest.param(1,0, None, marks=pytest.mark.xfail(raises=(ValueError))),
    ]
)
def test_div_with_xfail(x, y, result):
    assert div(x,y) == result
Fixture
<span>fixture</span>. Most people directly translate <span>fixture</span> as “夹具” (jig), but if you are familiar with the Java Spring framework, you will find it easier to understand it as something similar to an IoC container. However, I believe it might be more appropriate to call it “载具” (carrier).<span>fixture</span> is to provide a fixed, freely detachable general object for our test cases, functioning like a container that carries something inside; when we use it for our unit tests, pytest will automatically inject the corresponding object into the fixture.<span>connect()</span> method, perform operations, and finally disconnect it using the <span>close()</span><code><span> method to release resources.</span># test_fixture.py
import pytest
class Database(object):
def __init__(self, database):
self.database = database
def connect(self):
print(f"\n{self.database} database has been connected\n")
def close(self):
print(f"\n{self.database} database has been closed\n")
def add(self, data):
print(f"`{data}` has been add to database.")
return True
@pytest.fixture
def myclient():
db = Database("mysql")
db.connect()
yield db
db.close()
def test_foo(myclient):
assert myclient.add(1) == True
<span>@pytest.fixture</span> decorator. With this decorator, we can directly use a function with resources as our fixture. When using it, we pass the function’s signature (i.e., its name) as a parameter into our test case. During the test run, pytest will automatically help us with the injection.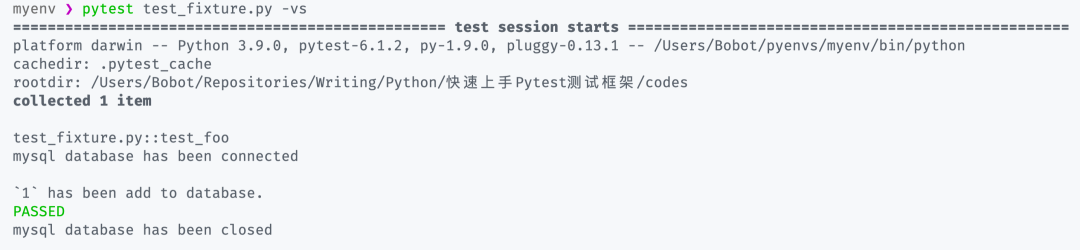
<span>connect()</span> method of the <span>db</span> object in <span>myclient()</span>, simulating the method for connecting to the database. After the test is complete, it will call the <span>close()</span><code><span> method again to release resources.</span><span>fixture</span> mechanism of pytest is key to achieving complex testing. Imagine that we only need to write a fixture with test data once, and it can be reused in different modules, functions, or methods, truly achieving “one-time creation, everywhere used.” -
<span>function</span>: function scope (default) -
<span>class</span>: class scope -
<span>module</span>: module scope -
<span>package</span>: package scope -
<span>session</span>: session scope
<span>scope</span> parameter to <span>@pytest.fixture()</span> to extend the range of the fixture’s effect.<span>conftest.py</span> for unified management:# conftest.py
import pytest
class Database:
def __init__(self, database):
self.database:str = database
def connect(self):
print(f"\n{self.database} database has been connected\n")
def close(self):
print(f"\n{self.database} database has been closed\n")
def add(self, data):
print(f"\n`{data}` has been add to database.")
return True
@pytest.fixture(scope="package")
def myclient():
db = Database("mysql")
db.connect()
yield db
db.close()
<span>test_add()</span> test part without explicitly importing the <span>myclient</span> fixture, and it can be injected and used directly:from typing import Union
import pytest
def add(
x: Union[int, float],
y: Union[int, float],
) -> Union[int, float]:
return x + y
@pytest.mark.parametrize(
argnames="x,y,result",
argvalues=[
(1,1,2),
(2,4,6),
]
)
def test_add(
x: Union[int, float],
y: Union[int, float],
result: Union[int, float],
myclient
):
assert myclient.add(x) == True
assert add(x, y) == result
<span>pytest -vs</span> to see the output results: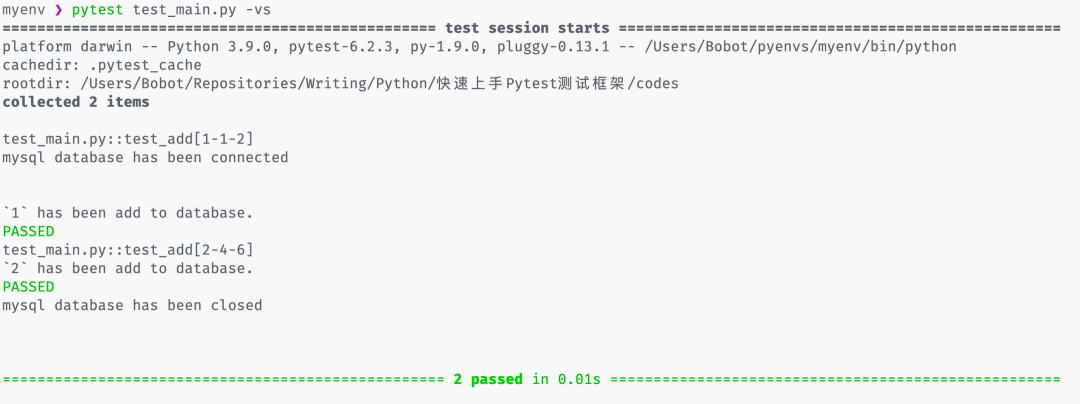
Pytest Extensions
<span>pip</span> command, and finally, we only need to refer to the plugin’s documentation to write the corresponding parts and start pytest testing.pytest-xdist
<span>-n <CPU_NUMBER></span> parameter when starting pytest testing, where the CPU number can directly use <span>auto</span> as a substitute; it will automatically adjust the number of CPU cores used for pytest testing: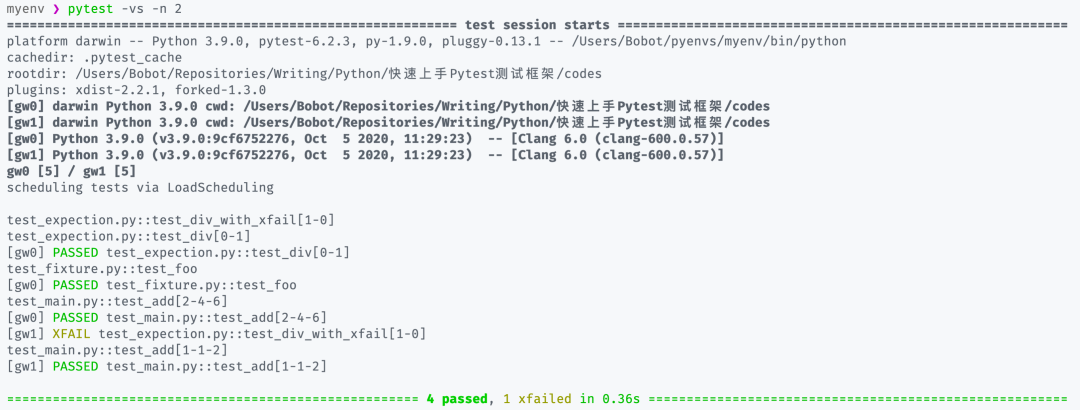
pytest-asyncio
<span>@pytest.mark.asyncio</span> decorator to decorate asynchronous functions or methods in the test:import asyncio
import pytest
async def foo():
await asyncio.sleep(1)
return 1
@pytest.mark.asyncio
async def test_foo():
r = await foo()
assert r == 1
Conclusion
Author: 100gle, a non-serious liberal arts student with less than two years of practice, enjoys coding, writing articles, and experimenting with various new things; currently engaged in big data analysis and mining work.
Support the Author

More Reading
Top 10 Best Popular Python Libraries of 2020
Top 10 Hot Articles in the Python Chinese Community of 2020
Master Python Object References in 5 Minutes
Special Recommendations

Click below to read the original text and join the community membership