If you don’t want to miss my updates, remember to check the public account in the upper right corner and set it as a star, take down the stars and give them to me.


Are there forgetful friends like me? Things are right at hand, but with a breath and a turn, I forget where I put them~ If this happens at work, it can be a big waste of time! In the past, I relied on sticky notes, but their adhesion is too poor and they often fall off. By the end of the day, I find a sticky note has fallen off, and related work hasn’t been done. Recently, I discovered this electronic memo project, which is really useful, and I recommend it to friends with a “goldfish brain”!
In a world of digital convenience and minimalist style, e-paper displays provide an excellent way to keep track of things we easily forget, notes, reminders, and to-do lists without the clutter of traditional sticky notes, and it’s a reusable low-power memo!
This project turns the Waveshare 2.9-inch e-paper display and Seeed Studio XIAO ESP32C3, two very simple components, into a stylish, always-visible sticky note that can be easily updated using a web application. Whether it’s jotting down daily tasks, sharing inspirational quotes, or displaying interesting images, this e-paper sticky note can keep our workspace tidy and can appear in the forefront, center, or any position you want it to be.
The hardware used for the electronic sticky note is all common:
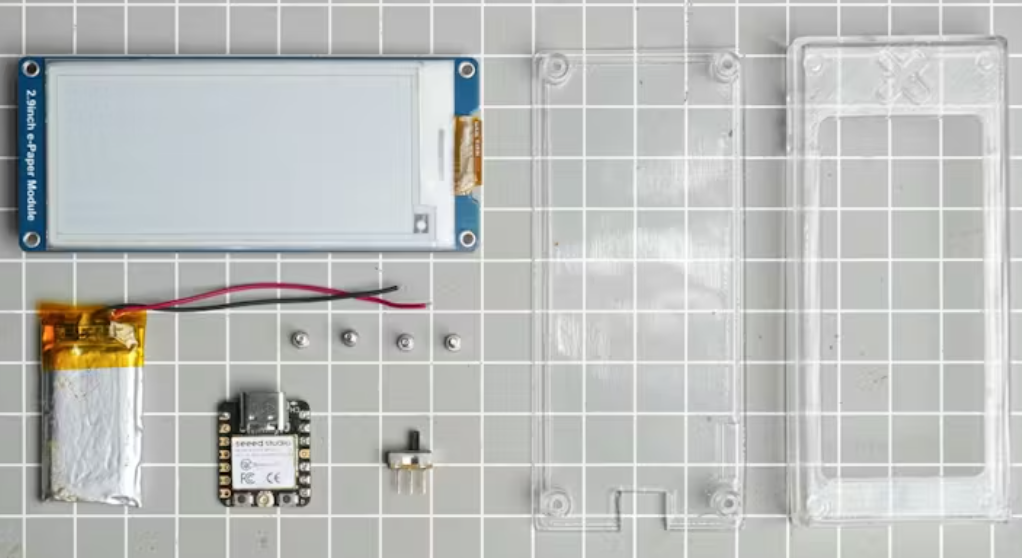
- Seeedstudio XIAO ESP32C3
- Waveshare 2.9-inch E-Paper Display
- Sliding Power Switch
- Battery
- Multipurpose Glue
- 3D Printed Case
Step 1: Case Design and 3D Printing
The author used Fusion 360 to plan and design this project, optimizing the space carefully. It is necessary to fit all components into the smallest possible form factor while ensuring practicality, including enough wiring space and ease of assembly.
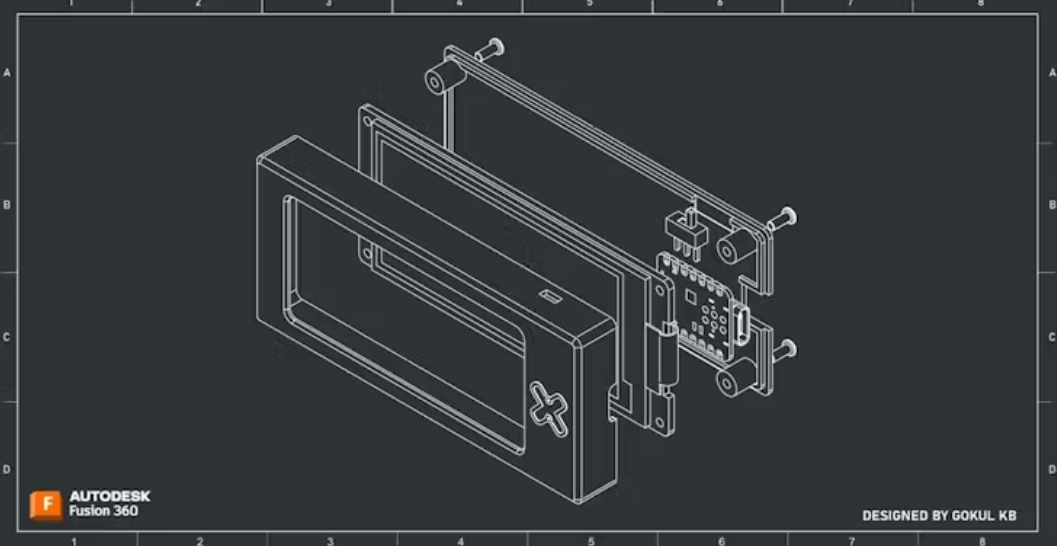
At the end of the article, there is a link to share the related 3D printing files.
FDM 3D printing is usually used to make cases, but for this project, the author decided to try SLS printing. The 3D printing service from JLC3DP was used, and 3201 PA-F Nylon was chosen because it has a granular surface texture, and 8001 Resin was selected to try for a transparent appearance.
Step 2: Code
This project uses the 2.9-inch e-paper display to turn the Seeed Studio XIAO ESP32C3 into a smart electronic sticky note. The project hosts a web application that allows users to input text and images, preview them, and send the final content to the e-paper screen. The web interface features a modern, minimalist UI with a basic text editor and image upload functionality. The XIAO ESP32C3 processes the input, converts it to bitmap format, and updates the e-paper display accordingly.
This is an early version of the project (v0.1), which has some issues, especially in image upload handling and text alignment. As an open-source project, if anyone is interested, they can improve the functionality, fix bugs, and enhance the overall user experience.
Below is the specific code, which can be scrolled up and down to view. Note that you need to ensure you have the required library files and replace the WIFI password and SSID in the code.
#include<GxEPD2_BW.h>
#include<WiFi.h>
#include<WebServer.h>
#include<LittleFS.h>
#include<Fonts/FreeMonoBold9pt7b.h>
#include<Fonts/FreeSans9pt7b.h>
#include<Fonts/FreeSerif9pt7b.h>
#include<Fonts/FreeMonoBold12pt7b.h>
#include<Fonts/FreeSans12pt7b.h>
#include<Fonts/FreeSerif12pt7b.h>

// E-Paper Display Pins
#define CS_PIN D1
#define DC_PIN D3
#define RST_PIN D0
#define BUSY_PIN D5

// Initialize E-Paper Display
GxEPD2_BW<GxEPD2_290_BS, GxEPD2_290_BS::HEIGHT> display(GxEPD2_290_BS(CS_PIN, DC_PIN, RST_PIN, BUSY_PIN));

// Wi-Fi Credentials
const char* ssid = "*********";
const char* password = "*********";

// Web Server
WebServer server(80);

// Default Font
const GFXfont* currentFont = &FreeMonoBold9pt7b;
uint16_t textColor = GxEPD_BLACK;
uint16_t textAlign = 0; // 0 = Left, 1 = Center, 2 = Right

// Function Prototypes
void handleRoot();
void handleUpdate();
void handleImageUpload();
void handleImageUploadFile();
void updateDisplay(String text);
void displayImage(const char* filename);
void displayIPAddress(String ip);

// Embedded Web App HTML with Modern UI
const char* html = R"rawliteral(
<!DOCTYPE html>
<html lang="en">
<head>
<meta charset="UTF-8">
<meta name="viewport" content="width=device-width, initial-scale=1.0">
<title>E-Paper Sticky Note</title>
<script src="https://cdn.tailwindcss.com"></script>
</head>
<body class="bg-gray-100">
<div class="max-w-md mx-auto mt-10 p-6 bg-white rounded-lg shadow-md">
<h1 class="text-2xl font-bold mb-6">E-Paper Sticky Note</h1>

<form id="textForm" class="mb-6">
<label class="block text-sm font-medium mb-2">Text:</label>
<textarea id="text" name="text" class="w-full p-2 border rounded-md mb-4"></textarea>

<label class="block text-sm font-medium mb-2">Font:</label>
<select id="font" name="font" class="w-full p-2 border rounded-md mb-4">
<option value="mono9">Monospace (9pt)</option>
<option value="sans9">Sans-Serif (9pt)</option>
<option value="serif9">Serif (9pt)</option>
<option value="mono12">Monospace (12pt)</option>
<option value="sans12">Sans-Serif (12pt)</option>
<option value="serif12">Serif (12pt)</option>
</select>

<label class="block text-sm font-medium mb-2">Text Alignment:</label>
<select id="align" name="align" class="w-full p-2 border rounded-md mb-4">
<option value="0">Left</option>
<option value="1">Center</option>
<option value="2">Right</option>
</select>

<button type="submit" class="w-full bg-blue-500 text-white p-2 rounded-md hover:bg-blue-600">Update Display</button>
</form>

<h2 class="text-xl font-bold mb-4">Upload Image</h2>
<form id="imageForm">
<input type="file" id="image" name="image" accept="image/bmp" class="mb-4">
<button type="submit" class="w-full bg-green-500 text-white p-2 rounded-md hover:bg-green-600">Upload Image</button>
</form>
</div>

<script>
const textForm = document.getElementById('textForm');
const imageForm = document.getElementById('imageForm');

textForm.addEventListener('submit', async (e) => {
e.preventDefault();
const formData = new FormData(textForm);
const response = await fetch('/update', {
method: 'POST',
body: new URLSearchParams(formData)
});
if (response.ok) {
alert("Display updated successfully!");
}
});

imageForm.addEventListener('submit', async (e) => {
e.preventDefault();
const formData = new FormData(imageForm);
const response = await fetch('/image', {
method: 'POST',
body: formData
});
if (response.ok) {
alert("Image uploaded successfully!");
}
});
</script>
</body>
</html>
)rawliteral";

void setup() {
Serial.begin(115200);

// Initialize E-Paper Display
display.init(115200, true, 50, false);
display.setRotation(1);

// Connect to Wi-Fi
WiFi.begin(ssid, password);
while (WiFi.status() != WL_CONNECTED) {
delay(1000);
Serial.println("Connecting to Wi-Fi...");
}
Serial.println("Connected to Wi-Fi");
Serial.println(WiFi.localIP());

// Display IP Address on E-Paper
displayIPAddress(WiFi.localIP().toString());

// Initialize LittleFS
if (!LittleFS.begin(true)) {
Serial.println("Failed to mount LittleFS");
return;
}

// Serve the web app
server.on("/", HTTP_GET, handleRoot);
server.on("/update", HTTP_POST, handleUpdate);
server.on("/image", HTTP_POST, handleImageUpload, handleImageUploadFile);
server.begin();
Serial.println("HTTP server started");
}

void loop() {
server.handleClient();
}

// Serve the web app
void handleRoot() {
server.send(200, "text/html", html);
}

// Handle text and font updates
void handleUpdate() {
String text = server.arg("text");
String font = server.arg("font");
textAlign = server.arg("align").toInt();

// Set the selected font
if (font == "mono9") {
currentFont = &FreeMonoBold9pt7b;
} else if (font == "sans9") {
currentFont = &FreeSans9pt7b;
} else if (font == "serif9") {
currentFont = &FreeSerif9pt7b;
} else if (font == "mono12") {
currentFont = &FreeMonoBold12pt7b;
} else if (font == "sans12") {
currentFont = &FreeSans12pt7b;
} else if (font == "serif12") {
currentFont = &FreeSerif12pt7b;
}

// Update the display
updateDisplay(text);
server.send(200, "text/plain", "Display updated");
}

// Handle image upload
void handleImageUpload() {
server.send(200, "text/plain", "Image uploaded");
}

void handleImageUploadFile() {
HTTPUpload& upload = server.upload();
if (upload.status == UPLOAD_FILE_START) {
// Open the file for writing
File file = LittleFS.open("/image.bmp", "w");
if (!file) {
Serial.println("Failed to open file for writing");
return;
}
} else if (upload.status == UPLOAD_FILE_WRITE) {
// Write the received data to the file
File file = LittleFS.open("/image.bmp", "a");
if (file) {
file.write(upload.buf, upload.currentSize);
file.close();
}
} else if (upload.status == UPLOAD_FILE_END) {
// Display the uploaded image
displayImage("/image.bmp");
}
}

// Update the display with text
void updateDisplay(String text) {
display.setFullWindow();
display.firstPage();
do {
display.fillScreen(GxEPD_WHITE);
display.setFont(currentFont);
display.setTextColor(textColor);

// Calculate text position based on alignment
int16_t x = 0; // Default left alignment
int16_t y = 11;

if (textAlign == 1) { // Center alignment
x = (display.width() / 2) - (text.length() * 6); // Approximate center alignment
} else if (textAlign == 2) { // Right alignment
x = display.width() - (text.length() * 12) - 10; // Approximate right alignment
}

display.setCursor(x, y);
display.println(text);
} while (display.nextPage());
}

// Display an image on the E-Paper
void displayImage(const char* filename) {
File file = LittleFS.open(filename, "r");
if (!file) {
Serial.println("Failed to open image file");
return;
}

// Read the BMP file into a buffer
size_t fileSize = file.size();
uint8_t* buffer = (uint8_t*)malloc(fileSize);
if (!buffer) {
Serial.println("Failed to allocate memory for image");
file.close();
return;
}
file.read(buffer, fileSize);
file.close();

// Display the image
display.setFullWindow();
display.firstPage();
do {
display.fillScreen(GxEPD_WHITE);
display.drawImage(buffer, 0, 0, display.width(), display.height(), false, false, false);
} while (display.nextPage());

// Free the buffer
free(buffer);
}

// Display IP Address on E-Paper
void displayIPAddress(String ip) {
display.setFullWindow();
display.firstPage();
do {
display.fillScreen(GxEPD_WHITE);
display.setFont(&FreeMonoBold9pt7b);
display.setTextColor(GxEPD_BLACK);
display.setCursor(10, 30);
display.println("IP Address:");
display.setCursor(10, 60);
display.println(ip);
} while (display.nextPage());
}
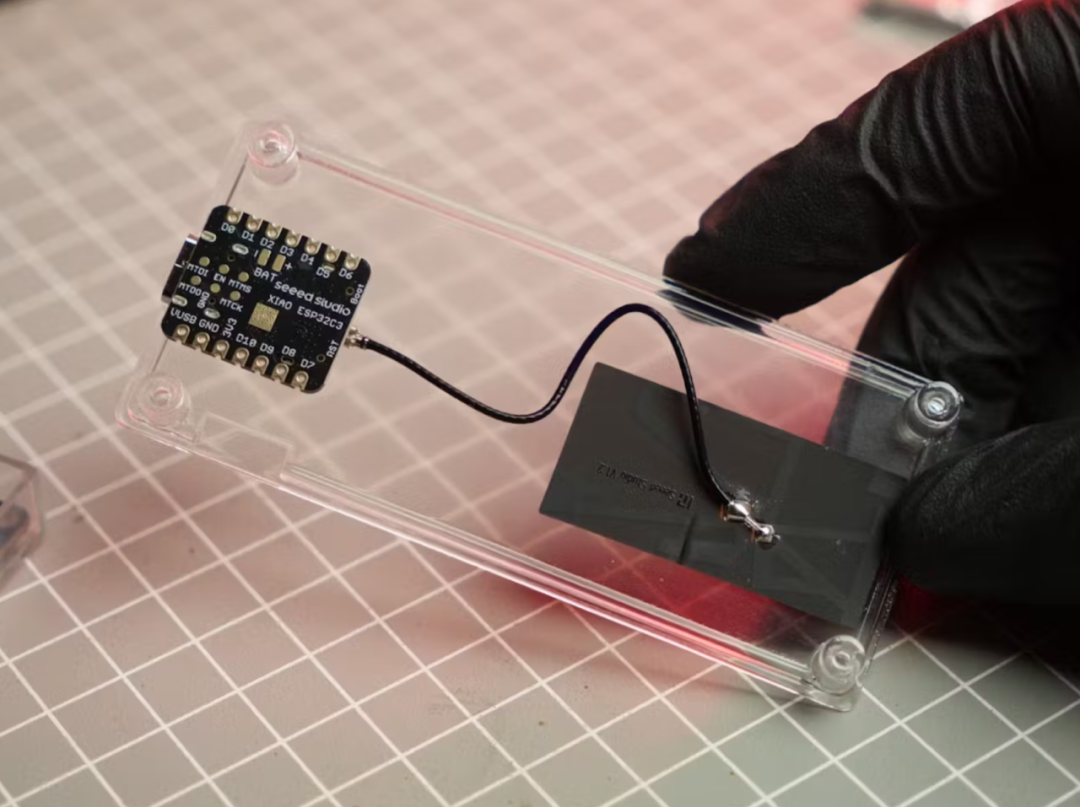
Step 3: Assembly and Wiring
This project is quite simple, so here are the installation steps:
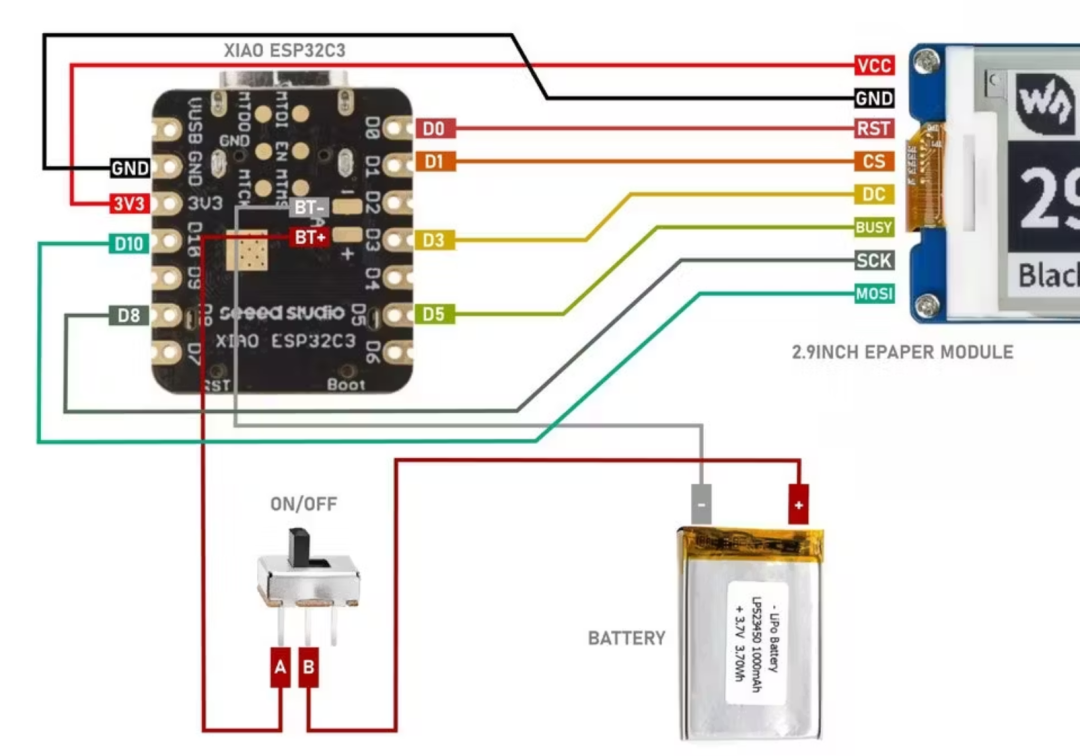
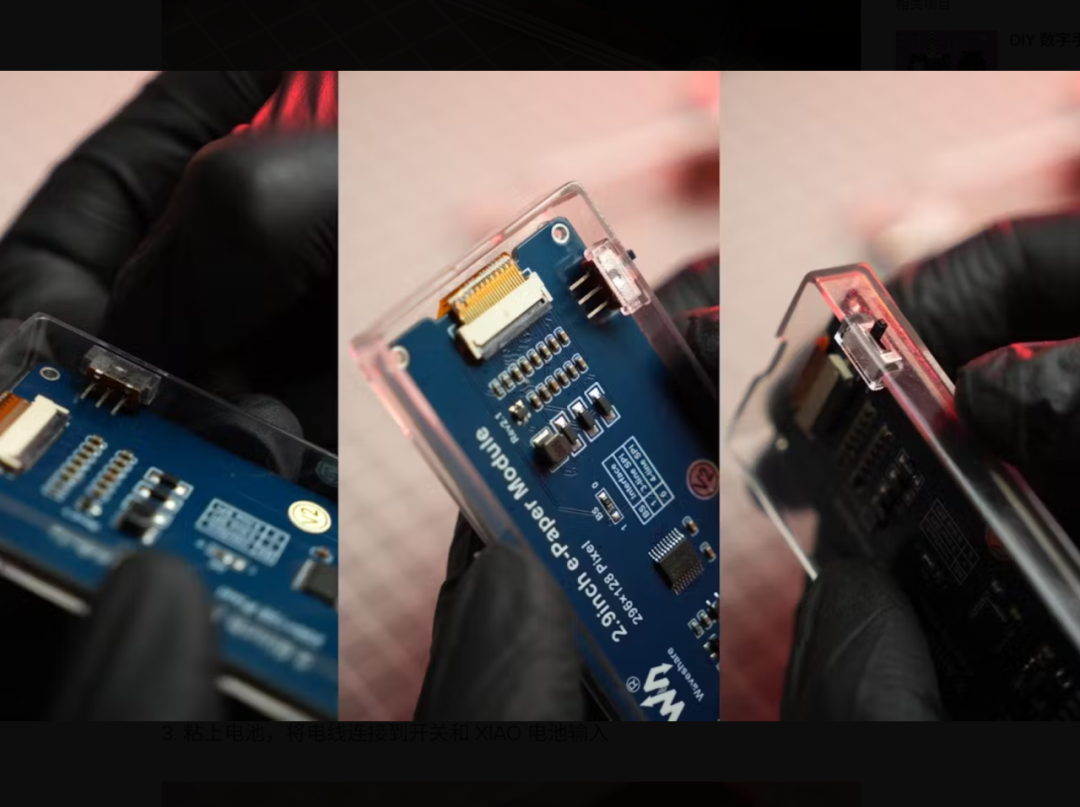
1. Start assembling by sticking the Xiao to the back panel with the antenna.
2. Place the e-paper display module and stick the sliding switch onto the 3D printed slot.
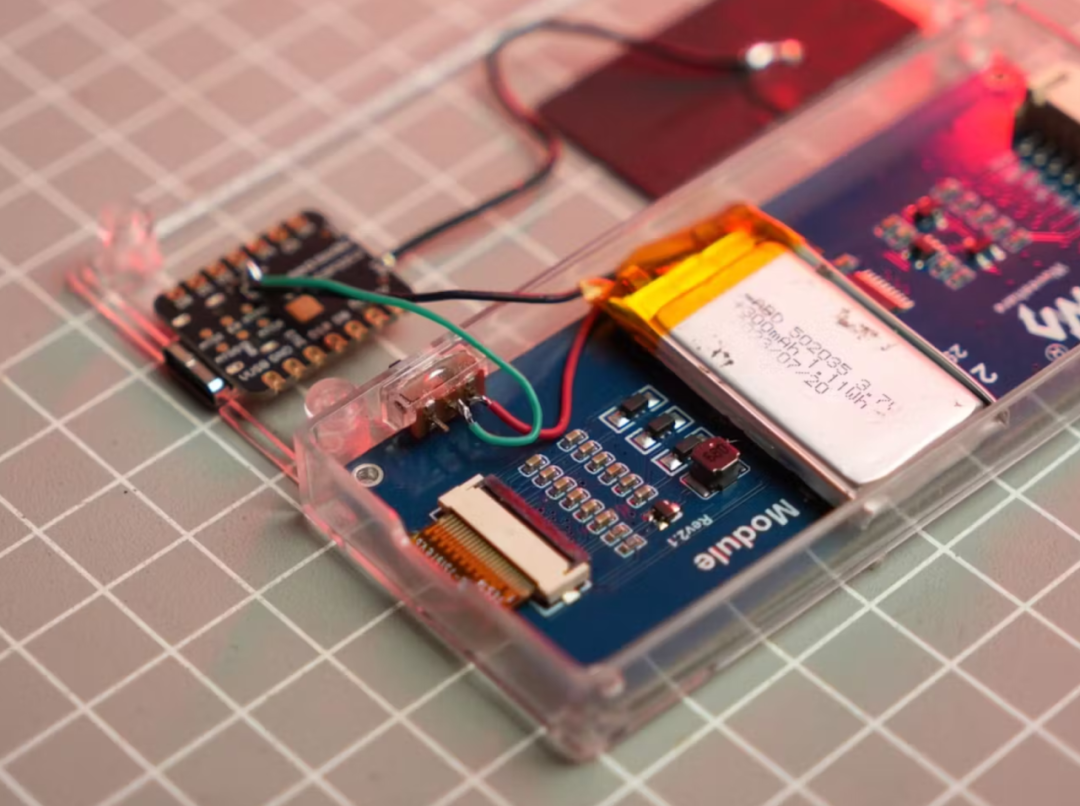
3. Stick the battery and connect the wires to the switch and XIAO battery input.
4. Then complete the remaining wiring according to the provided circuit diagram.
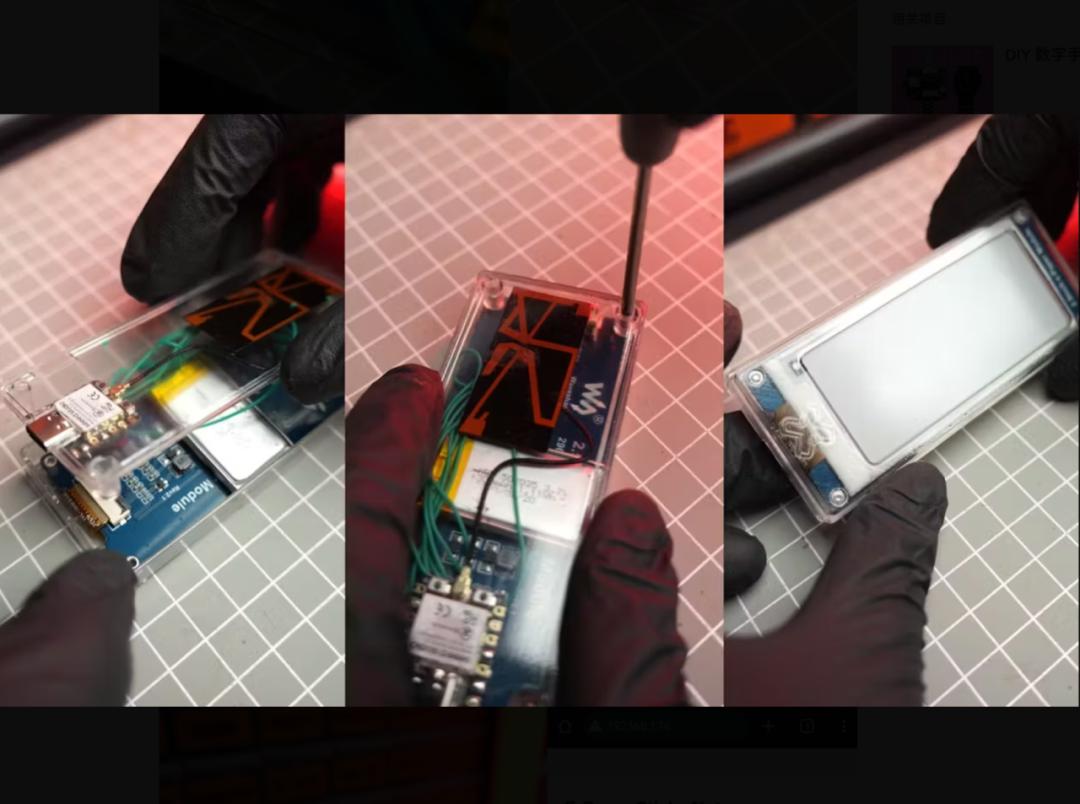
5. Finally, secure everything with the screws that come with the e-paper module.

Swipe left and right to see more···
Step 4: Testing
Power on and open the device. If the entered Wi-Fi details are correct, it will connect to the Wi-Fi network and display the IP address. Enter that IP address in the browser to ensure the control device is also connected to the same network.
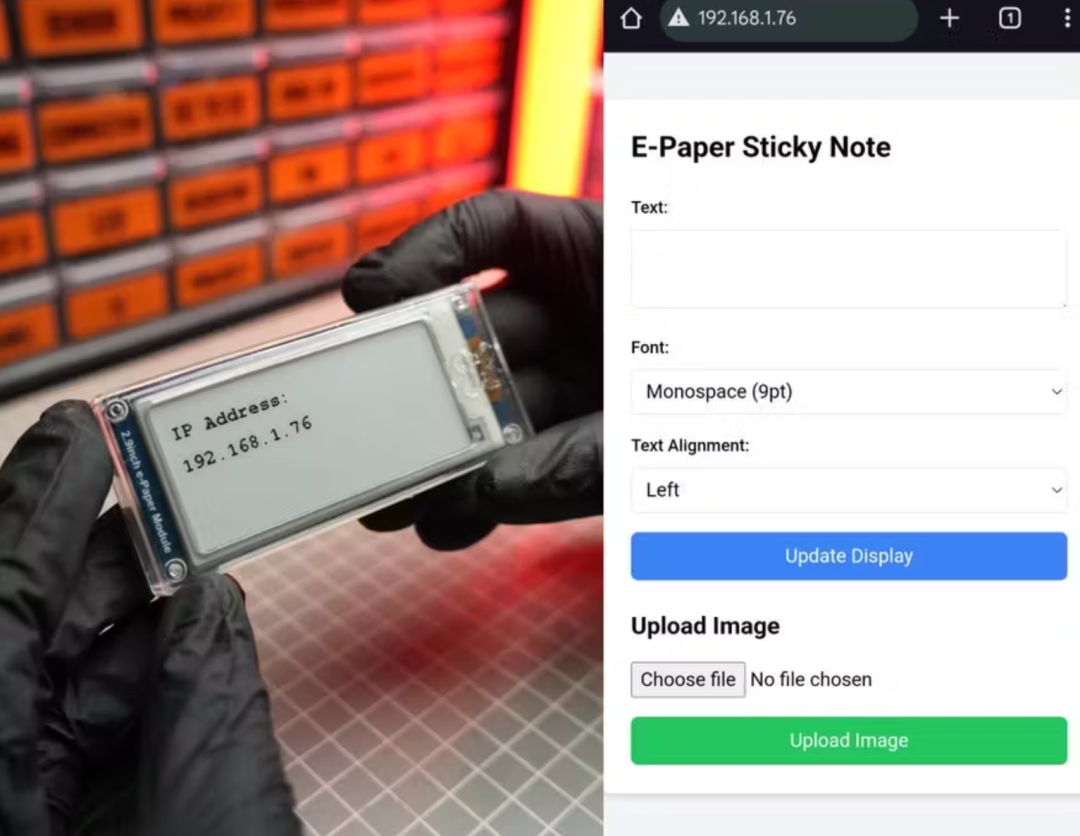
On the control page, you can type the text you want to display on the device and also choose to change the font. After entering the message, press the “Update Display” button to refresh the content on the e-sticky, and you can also save battery by turning off the device after the display is updated.
Isn’t this a very simple yet practical project? We can replicate it using the screen and ESP32 development board we have on hand.
Original link:
https://www.hackster.io/Gokux/esticky-a-tiny-paperless-way-to-keep-your-thoughts-organize-d0cd05
Copyright belongs to: Gokul K B
END More practical project recommendations:
<<< STM32 Project Collection>>>
<<< Raspberry Pi Project Collection >>>
<<< ESP32 Project Collection >>>
<<< ESP8266 Project Collection >>>
<<< Arduino Project Collection >>>
<<< Darwin Project Share Series >>>
Recommended Reading: Project Share | Electric Competition Series | Artificial Intelligence | Postgraduate Entrance Examination Must-Know Points | Graduation Project| Switch Power Supply | Job Seeking We are Ni Mo, the founder of Darwin, a sister who only talks about technology and not flirting. The Darwin online education platform aims to serve professionals in the electronics industry, providing skill training videos covering popular topics in various subfields, such as embedded systems, FPGA, artificial intelligence, etc. It also tailors layered learning content for different groups, such as commonly used knowledge points, disassembly assessments, electric competitions/intelligent vehicles/postgraduate entrance examinations, etc. Welcome to follow. Official website: www.darwinlearns.com Bilibili: Darwin