DF PROFI II is a high-performance PROFIBUS DP/DPV1 interface card that can be used as a DP master or DP slave, capable of being rapidly and flexibly applied in various automation industries. It supports a wide range of applications across different fields. In addition to standard PROFIBUS DP/DPV1 services, it also provides a watchdog function, including physical disconnection of the PROFIBUS line, in line with the redundancy concept of master class 1. If the operating PC system fails, a seamless switch can occur to a redundant backup system.
Below, I will introduce the Profibus master/slave solution based on the DF PROFI II communication card.
Contents:
-
Introduction to the Card
-
Building the Test Platform
-
C/C++ Slave Testing
-
Visual Basic Slave Testing
-
Labview Slave Testing
Building the Test Platform:
Ø Hardware: One DF PROFI II PCI card
Ø One PC (with PCI interface)
Ø Software: Driver (included in the delivery list)
Installing the PCI Card
Ø Install the PCI card into the PCI slot of the PC
Ø Power on the PC and enter the system
Ø Install the driver (from the COMSOFT driver CD)
Ø Install the Configurator II configuration software
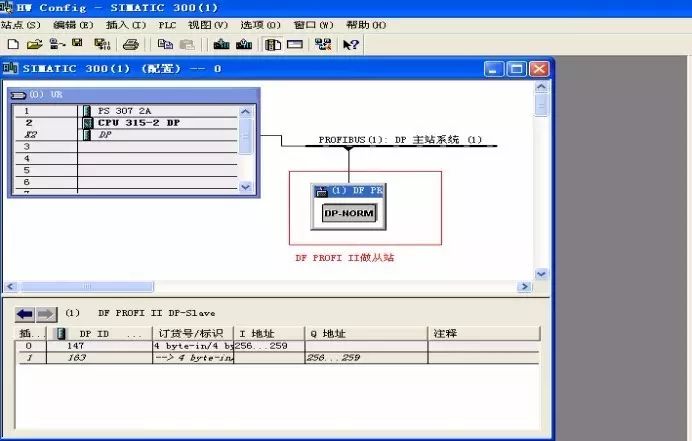
Using DF PROFI II Communication Card as Slave
The DF PROFI II card can be used as a Profibus master to read, write, and monitor network data, while it can also be utilized as a Profibus slave, connecting to the Profibus network through the slave GSD file for network data monitoring.
Taking Siemens PLC as an example, the PLC acts as the master, while the DF PROFI II PCI card serves as the slave. Profibus network configuration can be performed in the Siemens configuration software STEP7. For specific configuration processes, please refer to the STEP7 user manual and software Help files.

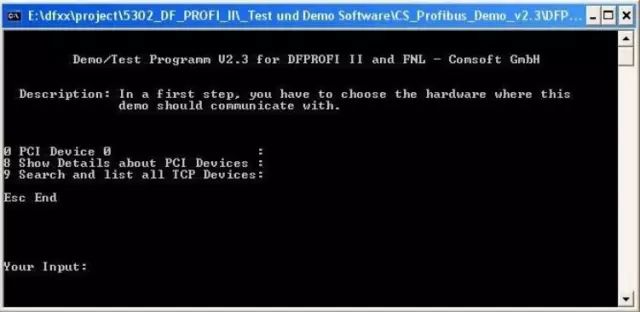
How to Perform Slave Testing in C/C++:
The card comes with a C/C++ sample program: “DFProfi_2_PCI_DEMO.cpp”. To set up the Profibus network, Configurator III supports many graphical functionalities in its powerful online mode. The included “DFProfi_2_PCI_DEMO.exe” sample can be used directly, and can also be modified as needed. For the sample program to work correctly, a valid Profibus configuration must be downloaded to the DF PROFI II card.
Main Steps:
Step 1: Initialize DFXX.DLL and create file operations for hardware access.
Step 2: Reset the DF PROFI II hardware.
Step 3: Open the communication channel to the DF PROFI II.
Step 4: Open Profibus data on the DF PROFI II.
Step 5: Get the current configuration running on the DF PROFI II.
Step 6: Exchange data on the Profibus bus.
Step 7: Reset the DF PROFI II hardware and stop the Profibus bus.
Key Analysis of the Sample Program Included:
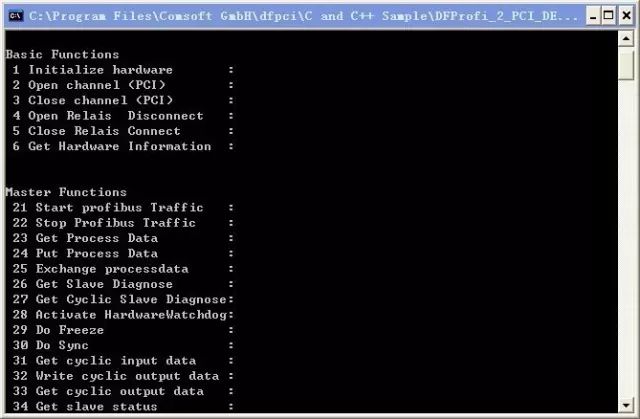
Click on C drive — Program Files — Comsoft GmbH — C and C++ Sample — DFProffi_2_PCI_DEMO
Ø Included in the delivery list are C/C++ codes including:
Ø Initialization of the DF PROFI II card
Ø Starting the DF PROFI EE card
Ø Completing process data exchange and diagnostic data
Ø DPV1 services
The above samples must also have the PCI card inserted in the PC and the configuration network downloaded to the PCI before the program can run and display results.
Steps to Activate the Program:
Ø Type “1” to complete card initialization, the green light on the card panel lights up.
Ø Type “2” to open the communication channel.
Ø Type “3” to close the communication channel.
Ø Type “21” to start the Profibus network, at which point the yellow light on the card panel lights up. If the network configuration is incorrect, or if there is an improper connection with the slave, the red light will light up.
Ø Type “23” to read process data.
Ø Type “24” to write process data.
Ø Type “25” to read and write process data.
Ø Type “D” to read process data.
Ø ……
How to Perform Slave Testing in Visual Basic:
Included in the delivery is a Visual Basic sample program that describes how to access the DF PROFI II sample program from Visual Basic: This sample program only shows the most commonly used functions, and can be modified to add more features as needed.
“C:\programmes\Comsoft GmbH\dfpci\Visual Basic V6.0 Sample\DFProfi2.exe”.
The above program shows that the DF PROFI II card can operate in both master and slave modes, but only one mode can be executed at a time; they cannot be mixed.
Slave Functionality
Ø “DfParam” initializes the card (as a slave). The three important parameters are: slave address (0-128; must be different from other slaves), baud rate, and input/output data. The sample provides the most commonly used data formats for selection; more formats can be referenced from the DF PROFI II GSD file and added to the VB program source code.
Ø “Start DF Profi II as Slave” activates the DF PROFI II card as a slave.
Ø “Put and Get Data” sets data to be sent from the DP master and receives data from the DP master, displaying all data in the dialog box.
Extended Functions
Ø “Get Slave Diagnose” reads diagnostic data from a specific slave (address: 1-128).
Ø “Activate Watchdog” activates the card’s watchdog function; if the process data is not updated within the specified time, the card will be reset. In this example, watchdog time=1.024s. This can be changed in the VB source code.
Ø “Open Relais” disconnects the card from the PROFIBUS physically. This function applies to the DP redundancy concept.
Ø “Close Relais” reconnects the card to the PROFIBUS network.
Ø “Send Freeze” and “Send Sync” apply to freeze and sync functionalities.
Auxiliary Functions
Ø Return values:
Each time a command is executed, the value in the left “Wrapper Return” dialog box is updated.
If “Wrapper Return” ≒ 0; the command has been executed correctly;
If “Wrapper Return” ≠ 0; detailed error information will be displayed;
Using the “Open Channel” button for testing twice, when pressed the second time, the program refuses to open the Profibus channel because the channel is already open. This means that when the channel is opened the first time, it must be in a closed state.
Ø Windows Error:
In this dialog, if the driver is not correct, the Windows driver error information for the card will be displayed.
Ø Windows Error:
In this dialog, information about the Profibus protocol will be displayed.
How to Perform Slave Testing in Labview:
There are two ways to choose from:
Find the DF PROFI II DP-Slave VI sample program, or directly open the Express VI sample program to run. However, note that before the DFP2_DP-SlaveExample sample program can run, you must select the tab for DP slave and choose the card named DFP2 that will be used. Additionally, select the address, baud rate, and slave module from the module list; their parameters must match the configuration of the PROFIBUS master.
In Labview, you can find the COMSOFT DF PROFI II menus:
Ø COMSOFT Library 
Ø Profibus VISA Driver 
Ø DF PROFI II DP-Slave 
You can also directly open the Express VI sample program for quick access, which can be found under the COMSOFT DF PROFI II menu.
Ø DP-Slave Express 
Run this DFP2_DP-SlaveVI sample program.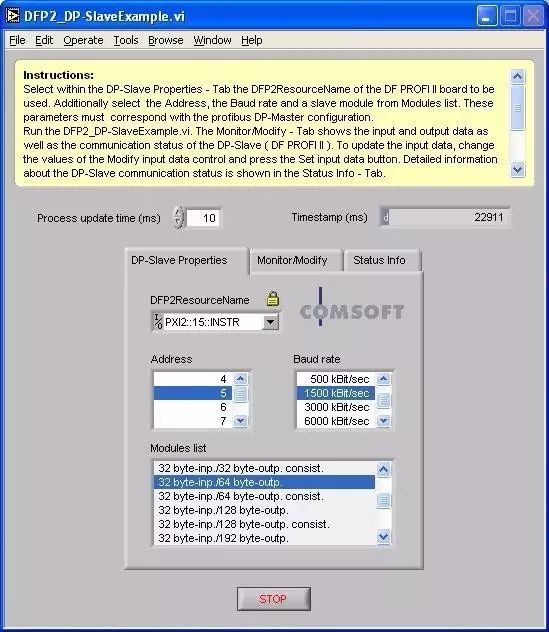
In the Monitor/Modify tab, the displayed input/output data also includes the communication status of the DP-slave. To update input data, change parameters, click the set input data button to enable data monitoring and modification.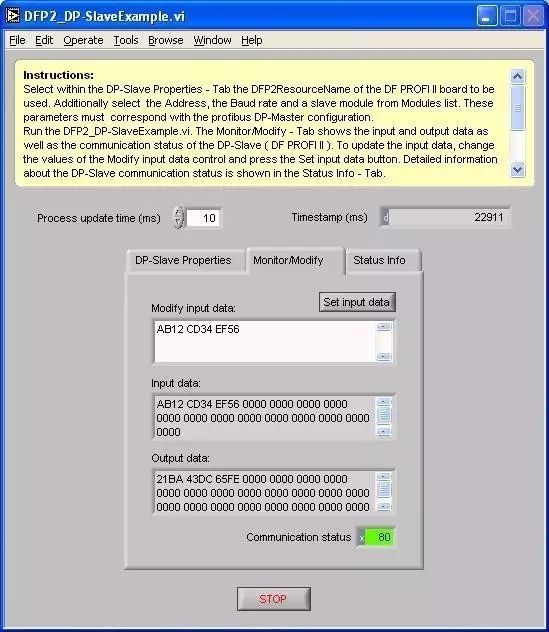
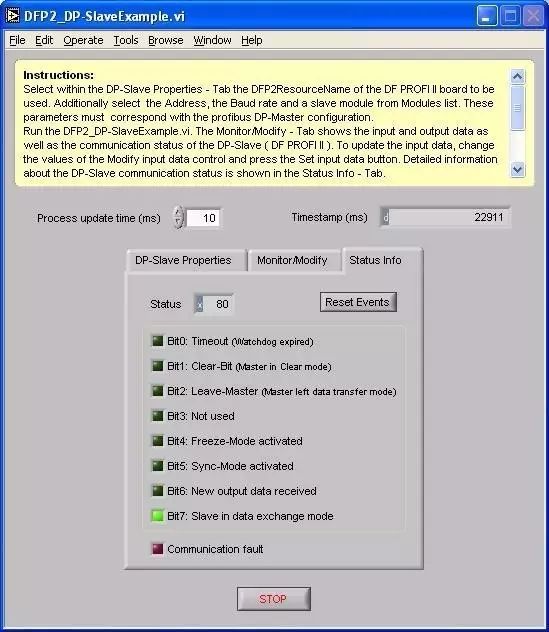
This status info displays the details of the DP slave communication status.
Accessing DP PROFI II as a slave can be done using VI’s block, showing how to access it: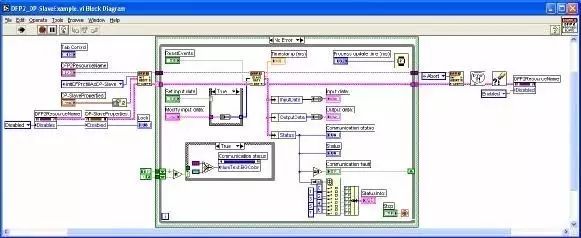
Quick access to PROFIBUS DP slave using the Express VI sample program is also possible; drag the Express-VI to the dialog box, open and configure the DP-slave, select the DF PROFI II card as the slave PROFIBUS address, and set the baud rate.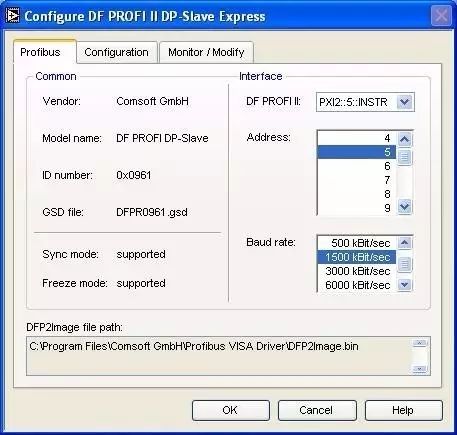
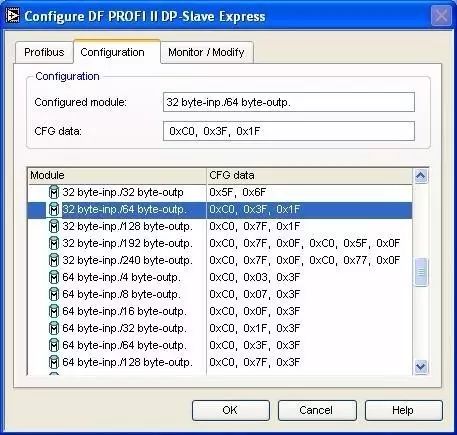
The configuration tab of the card shows the supported slave modules; the selected slave module must match the configuration of the master.
Note: Before monitoring and modifying modules, a valid PROFIBUS address, baud rate, and selection of a module must be configured.
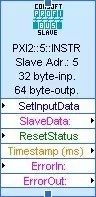
In the Monitor/Modify tab, the input/output data and the communication status as a slave are displayed. The output data can be modified directly by clicking the value and entering new data; this data must match the displayed format; otherwise, the input data will be ignored.
After completing all configurations, the Express VI will show the necessary DP slave data. Parameters can be modified by double-clicking the Express VI.
Feel free to contact us:
Phone: 020-38743032
Email: [email protected]