Click on the “K8S Chinese Community” above and select “Top Official Account”
Key moments, delivered at the first time!

NFS stands for Network File System, which is a type of file system supported by FreeBSD. NFS is implemented based on RPC (Remote Procedure Call), allowing a system to share directories and files over the network. By using NFS, users and programs can access files on remote systems as if they were local files. NFS is a very stable and portable network file system, characterized by scalability and high performance, meeting enterprise-level application quality standards. Due to increased network speed and reduced latency, NFS systems have always been a competitive choice for providing file system services over the network.
1.1 NFS Principles
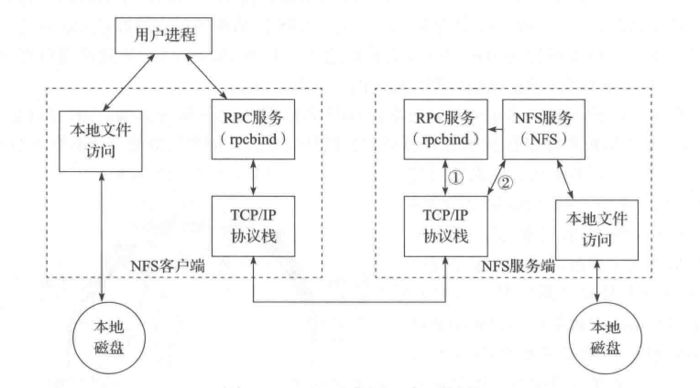
NFS uses the RPC (Remote Procedure Call) mechanism for implementation, allowing clients to call functions on the server. Additionally, due to the existence of VFS, clients can use the NFS file system just like any other ordinary file system. Through the operating system kernel, the NFS file system’s call requests are sent to the NFS service on the server via TCP/IP. The NFS server performs the relevant operations and returns the results to the client.

The main NFS service processes include:
-
rpc.nfsd: The primary NFS process that manages client logins
-
rpc.mountd: Manages mounting and unmounting of NFS file systems, including permission management
-
rpc.lockd: Optional, manages file locks to avoid write errors
-
rpc.statd: Optional, checks file consistency and can repair files
The key tools for NFS include:
-
Main configuration file: /etc/exports;
-
NFS file system maintenance command: /usr/bin/exportfs;
-
Log file for shared resources: /var/lib/nfs/*tab;
-
Command for clients to query shared resources: /usr/sbin/showmount;
-
Port configuration: /etc/sysconfig/nfs.
1.2 Sharing Configuration
The main configuration file for the NFS server is /etc/exports, where shared file directories can be set. Each configuration record consists of the NFS shared directory, the NFS client address, and parameters, formatted as follows:
[NFS shared directory] [NFS client address1 (parameter1, parameter2, parameter3…)] [client address2 (parameter1, parameter2, parameter3…)]
-
NFS shared directory: The file directory shared from the server;
-
NFS client address: The client address allowed to access the NFS server, which can be a client IP address or a subnet (192.168.64.0/24);
-
Access parameters: Comma-separated items in parentheses, mainly permission options.
1) Access permission parameters

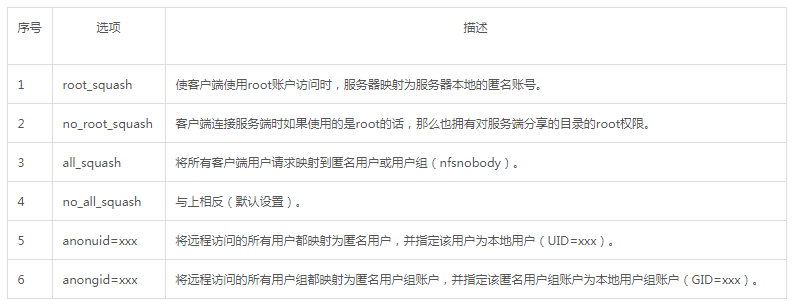
2) User mapping parameters chart

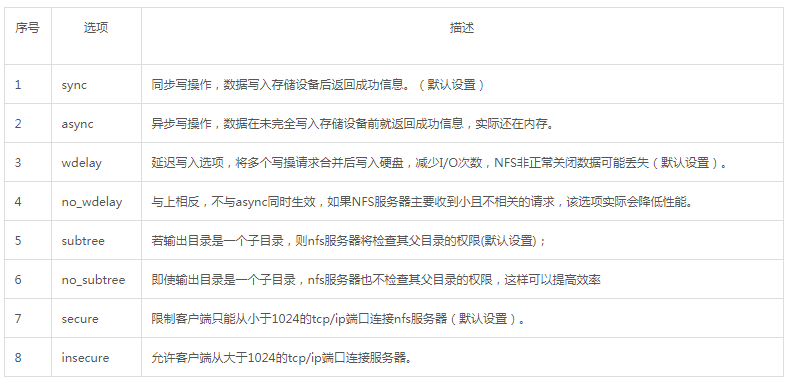
3) Other configuration parameters chart

2
Before using NFS as a network file storage system, first, you need to install the NFS and rpcbind services; next, create a user for the shared directory; then configure the shared directory, which is a relatively important and complex step; finally, start the rpcbind and NFS services for application use.
2.1 Install NFS Service
1) Install NFS and rpcbind services via the yum repository:
$ yum -y install nfs-utils rpcbind
2) Check if the NFS service is installed correctly
$ rpcinfo -p localhost
2.2 Create User
Add a user for the NFS service, create a shared directory, and set access permissions for the user on the shared directory:
$ useradd -u nfs
$ mkdir -p /nfs-share
$ chmod a+w /nfs-share
2.3 Configure Shared Directory
Configure the shared directory for clients on the NFS server:
$ echo "/nfs-share 172.16.0.0(rw,async,no_root_squash)" >> /etc/exports
Execute the following command to make the configuration effective:
$ exportfs -r
2.4 Start Services
1) The rpcbind service must be started first, followed by the NFS service, so that the NFS service can register successfully on the rpcbind service:
$ systemctl start rpcbind
2) Start the NFS service:
$ systemctl start nfs-server
3) Set rpcbind and nfs-server to start at boot:
$ systemctl enable rpcbind

$ systemctl enable nfs-server
2.5 Check if NFS Service is Running Normally
$ showmount -e localhost

$ mount -t nfs 127.0.0.1:/data /mnt
3
NFS can be used directly as a storage volume. Below is a YAML configuration file for deploying Redis. In this example, the persistent data of Redis is stored in the /data directory in the container; the storage volume uses NFS, with the service address of NFS being: 192.168.8.150, and the storage path is: /k8s-nfs/redis/data. The container determines the storage volume used by the value of volumeMounts.name.
apiVersion: apps/v1 # for versions before 1.9.0 use apps/v1beta2
kind: Deployment
metadata:
  name: redis
spec:
  selector:
    matchLabels:
      app: redis
  revisionHistoryLimit: 2
  template:
    metadata:
      labels:
        app: redis
    spec:
      containers:
      # Application image
      - image: redis
        name: redis
        imagePullPolicy: IfNotPresent
        # Internal port of the application
        ports:
        - containerPort: 6379
          name: redis6379
        env:
        - name: ALLOW_EMPTY_PASSWORD
          value: "yes"
        - name: REDIS_PASSWORD
          value: "redis"
        # Persistent mount location in Docker
        volumeMounts:
        - name: redis-persistent-storage
          mountPath: /data
      volumes:
      # Directory on the host
      - name: redis-persistent-storage
        nfs:
          path: /k8s-nfs/redis/data
          server: 192.168.8.150
4
In the current version of Kubernetes, a persistent storage volume of type NFS can be created to provide storage volumes for PersistentVolumeClaim. In the following PersistentVolume YAML configuration file, a persistent storage volume named nfs-pv is defined, providing 5G of storage space, which can only be read and written by one PersistentVolumeClaim. The NFS server address used by this persistent storage volume is 192.168.5.150, and the storage path is /tmp.
apiVersion: v1
kind: PersistentVolume
metadata:
  name: nfs-pv
spec:
  capacity:
    storage: 5Gi
  volumeMode: Filesystem
  accessModes:
  - ReadWriteOnce
  persistentVolumeReclaimPolicy: Recycle
  storageClassName: slow
  mountOptions:
  - hard
  - nfsvers=4.1
  # This persistent storage volume uses the NFS plugin
  nfs:
    # NFS shared directory is /tmp
    path: /tmp
    # NFS server address
    server: 192.168.5.150
Execute the following command to create the above persistent storage volume:
$ kubectl create -f {path}/nfs-pv.yaml
Once the storage volume is created successfully, it will be in an available state, waiting for PersistentVolumeClaim to use. PersistentVolumeClaim will automatically select a suitable storage volume based on access mode and storage space and bind to it.
5
5.1 Deploy NFS Provisioner
Select storage status and data storage volumes for the nfs-provisioner instance, and mount the storage volume to the container’s /export command.
...
 volumeMounts:
    - name: export-volume
      mountPath: /export
volumes:
  - name: export-volume
    hostPath:
      path: /tmp/nfs-provisioner
...
Choose a provider name for StorageClass and set it in deploy/kubernetes/deployment.yaml.
args:
  - "-provisioner=example.com/nfs"
...
The complete content of the deployment.yaml file is as follows:
kind: Service
apiVersion: v1
metadata:
  name: nfs-provisioner
  labels:
    app: nfs-provisioner
spec:
  ports:
    - name: nfs
      port: 2049
    - name: mountd
      port: 20048
    - name: rpcbind
      port: 111
    - name: rpcbind-udp
      port: 111
      protocol: UDP
  selector:
    app: nfs-provisioner
---

apiVersion: extensions/v1beta1
kind: Deployment
metadata:
  name: nfs-provisioner
spec:
  replicas: 1
  strategy:
    type: Recreate
  template:
    metadata:
      labels:
        app: nfs-provisioner
    spec:
      containers:
        - name: nfs-provisioner
          image: quay.io/kubernetes_incubator/nfs-provisioner:v1.0.8
          ports:
            - name: nfs
              containerPort: 2049
            - name: mountd
              containerPort: 20048
            - name: rpcbind
              containerPort: 111
            - name: rpcbind-udp
              containerPort: 111
              protocol: UDP
          securityContext:
            capabilities:
              add:
                - DAC_READ_SEARCH
                - SYS_RESOURCE
          args:
            # Define the provider's name, which the storage class specifies
            - "-provisioner=nfs-provisioner"
          env:
            - name: POD_IP
              valueFrom:
                fieldRef:
                  fieldPath: status.podIP
            - name: SERVICE_NAME
              value: nfs-provisioner
            - name: POD_NAMESPACE
              valueFrom:
                fieldRef:
                  fieldPath: metadata.namespace
          imagePullPolicy: "IfNotPresent"
          volumeMounts:
            - name: export-volume
              mountPath: /export
      volumes:
        - name: export-volume
          hostPath:
            path: /srv
After setting up the deploy/kubernetes/deployment.yaml file, deploy the nfs-provisioner in the Kubernetes cluster using the kubectl create command.
$ kubectl create -f {path}/deployment.yaml
5.2 Create StorageClass
Below is the StorageClass configuration file for example-nfs, which defines a storage class named nfs-storageclass, with the provider being nfs-provisioner.
apiVersion: storage.k8s.io/v1
kind: StorageClass
metadata:
  name: nfs-storageclass
  provisioner: nfs-provisioner
Create using the above configuration file with the kubectl create -f command:
$ kubectl create -f deploy/kubernetes/class.yaml
storageclass "example-nfs" created
Once the storage class is created correctly, a PersistentVolumeClaim can be created to request the StorageClass, which will automatically create an available PersistentVolume for the PersistentVolumeClaim.
5.3 Create PersistentVolumeClaim
A PersistentVolumeClaim is a declaration for a PersistentVolume, where the PersistentVolume is the provider of storage, and the PersistentVolumeClaim is the consumer of storage. Below is the YAML configuration file for PersistentVolumeClaim, which specifies the storage class used through the metadata.annotations[].volume.beta.kubernetes.io/storage-class field.
In this configuration file, the nfs-storageclass storage class is used to create a PersistentVolume for the PersistentVolumeClaim, with the requested storage space size being 1Mi, which can be read and written by multiple containers.
apiVersion: v1
kind: PersistentVolumeClaim
metadata:
  name: nfs-pvc
  annotations:
    volume.beta.kubernetes.io/storage-class: "nfs-storageclass"
spec:
  accessModes:
  - ReadWriteMany
  resources:
    requests:
      storage: 1Mi
Create the above persistent storage volume claim using the kubectl create command:
$ kubectl create -f {path}/claim.yaml
5.4 Create Deployment Using PersistentVolumeClaim
Here is a YAML configuration file defining a deployment named busybox-deployment, using the busybox image. The container based on the busybox image needs to persist data under the /mnt directory, specifying to use the PersistentVolumeClaim named nfs for data persistence.
# This mounts the nfs volume claim into /mnt and continuously
# overwrites /mnt/index.html with the time and hostname of the pod.
apiVersion: v1
kind: Deployment
metadata:
  name: busybox-deployment
spec:
  replicas: 2
  selector:
    name: busybox-deployment
  template:
    metadata:
      labels:
        name: busybox-deployment
    spec:
      containers:
      - image: busybox
        command:
        - sh
        - -c
        - 'while true; do date > /mnt/index.html; hostname >> /mnt/index.html; sleep $(($RANDOM % 5 + 5)); done'
        imagePullPolicy: IfNotPresent
        name: busybox
        volumeMounts:
        # name must match the volume name below
        - name: nfs
          mountPath: "/mnt"
     #
     volumes:
     - name: nfs
       persistentVolumeClaim:
         claimName: nfs-pvc
Create the busy-deployment deployment using kubectl create:
$ kubectl create -f {path}/nfs-busybox-deployment.yaml
References
“Persistent Volumes”
https://kubernetes.io/docs/concepts/storage/persistent-volumes/
“Storage Classes”
https://kubernetes.io/docs/concepts/storage/storage-classes/
“Dynamic Volume Provisioning”
https://kubernetes.io/docs/concepts/storage/dynamic-provisioning/
“Volumes”
https://kubernetes.io/docs/concepts/storage/volumes/
“nfs”
https://github.com/kubernetes-incubator/external-storage/tree/master/nfs
Author’s Bio:
Ji Xiangyuan, Product Manager at Beijing Shenzhou Aerospace Software Technology Co., Ltd. The copyright of this article belongs to the original author.

(If you are interested in Kubernetes, you can join our technical exchange WeChat group. To join, reply “Join Group” in the public account backend)
Recommended Reading
The most valuable Kubernetes global certification, detailed CKA exam guide is coming!
Kubernetes v1.10+Keepalived HA cluster wall internal deployment practice
Kubernetes co-founder: The future of K8S is Serverless
Operating tens of thousands of Docker servers, a world-class browser IT architecture journey
MySQL official recommendation: K8S deployment of MySQL high availability solution
A detailed explanation of the K8S system architecture evolution process and the reasons driving it
Kubernetes HA 1.9 high availability cluster, local offline deployment
IBM Micro Lecture Production | Kubernetes internal skill training practice
Comic: Minions learn Kubernetes Service