This article covers:
1. Installing Containerd
2. Running a busybox image
3. Creating a CNI network
4. Enabling network functionality for containerd containers
5. Sharing directories with the host
6. Sharing namespaces with other containers
7. Using docker/containerd together
1. Installing Containerd
Local installation of Containerd:
yum install -y yum-utils yum-config-manager --add-repo https://download.docker.com/linux/centos/docker-ce.repo yum install -y containerd epel-release yum install -y jqContainerd version:
[root@containerd ~]# ctr version Client: Version: 1.4.3 Revision: 269548fa27e0089a8b8278fc4fc781d7f65a939b Go version: go1.13.15 Server: Version: 1.4.3 Revision: 269548fa27e0089a8b8278fc4fc781d7f65a939b UUID: b7e3b0e7-8a36-4105-a198-470da2be02f2Initialize Containerd configuration:
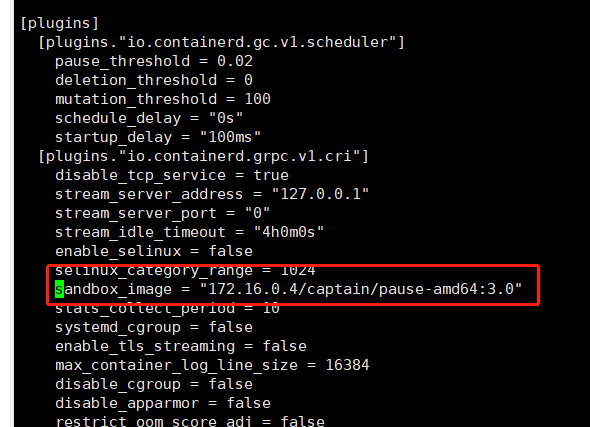
containerd config default > /etc/containerd/config.toml systemctl enable containerd systemctl start containerdReplace the default sandbox image for containerd by editing /etc/containerd/config.toml:
# registry.cn-hangzhou.aliyuncs.com/google-containers/pause-amd64:3.0 You can use Alibaba Cloud mirror source sandbox_image = "172.16.0.4/captain/pause-amd64:3.0"Apply the configuration and restart the containerd service
systemctl daemon-reload systemctl restart containerd
2. Running a busybox image:
Preparation:
[root@containerd ~]# # Pull the image [root@containerd ~]# ctr -n k8s.io i pull docker.io/library/busybox:latest [root@containerd ~]# # Create a container (not running yet) [root@containerd ~]# ctr -n k8s.io container create docker.io/library/busybox:latest busybox [root@containerd ~]# # Create a task [root@containerd ~]# ctr -n k8s.io task start -d busybox [root@containerd ~]# # The above steps can also be simplified as follows [root@containerd ~]# # ctr -n k8s.io run -d docker.io/library/busybox:latest busyboxCheck the PID of the container on the host:
[root@containerd ~]# ctr -n k8s.io task ls TASK PID STATUS busybox 2356 RUNNING [root@containerd ~]# ps ajxf|grep "containerd-shim-runc\|2356"|grep -v grep 1 2336 2336 1178 ? -1 Sl 0 0:00 /usr/bin/containerd-shim-runc-v2 -namespace k8s.io -id busybox -address /run/containerd/containerd.sock 2336 2356 2356 2356 ? -1 Ss 0 0:00 \_ shEnter the container:
[root@containerd ~]# ctr -n k8s.io t exec --exec-id $RANDOM -t busybox sh / # uname -a Linux containerd 3.10.0-1062.el7.x86_64 #1 SMP Wed Aug 7 18:08:02 UTC 2019 x86_64 GNU/Linux / # ls /etc group localtime network passwd shadow / # ip a 1: lo: <LOOPBACK,UP,LOWER_UP> mtu 65536 qdisc noqueue qlen 1000 link/loopback 00:00:00:00:00:00 brd 00:00:00:00:00:00 inet 127.0.0.1/8 scope host lo valid_lft forever preferred_lft forever inet6 ::1/128 scope host valid_lft forever preferred_lft forever / #Send a SIGKILL signal to terminate the container:
[root@containerd ~]# ctr -n k8s.io t kill -s SIGKILL busybox [root@containerd ~]# ctr -n k8s.io t rm busybox WARN[0000] task busybox exit with non-zero exit code 1373. Creating a CNI network
Visit the following two Git projects and download the latest version from the release page:
| Link | Description |
|---|---|
| containernetworking/plugins | CNI plugin source code (Tutorial version: v0.9.0) Filename: cni-plugins-linux-amd64-v0.9.0.tgz |
| containernetworking/cni | CNI source code (Tutorial version: v0.8.0) Filename: cni-v0.8.0.tar.gz |
| https://www.cni.dev/plugins/ | CNI plugin list introduction document |
Download to the HOME directory and extract:
[root@containerd ~]# pwd /root [root@containerd ~]# # Extract to HOME directory's cni-plugins/ folder [root@containerd ~]# mkdir -p cni-plugins [root@containerd ~]# tar xvf cni-plugins-linux-amd64-v0.9.0.tgz -C cni-plugins [root@containerd ~]# # Extract to HOME directory's cni/ folder [root@containerd ~]# tar -zxvf cni-v0.8.0.tar.gz [root@containerd ~]# mv cni-0.8.0 cniIn this tutorial, we will first create a network card using the bridge plugin. First, execute the following command:
mkdir -p /etc/cni/net.d cat >/etc/cni/net.d/10-mynet.conf <<EOF { "cniVersion": "0.2.0", "name": "mynet", "type": "bridge", "bridge": "cni0", "isGateway": true, "ipMasq": true, "ipam": { "type": "host-local", "subnet": "10.22.0.0/16", "routes": [ { "dst": "0.0.0.0/0" } ] }} EOF cat >/etc/cni/net.d/99-loopback.conf <<EOF { "cniVersion": "0.2.0", "name": "lo", "type": "loopback"} EOFThen activate the network card (Note: Execute ip a command on the host to see a cni0 network card):
[root@containerd ~]# cd cni/scripts/ [root@containerd scripts]# CNI_PATH=/root/cni-plugins ./priv-net-run.sh echo "Hello World" Hello World [root@containerd scripts]# ip a 1: lo: <LOOPBACK,UP,LOWER_UP> mtu 65536 qdisc noqueue state UNKNOWN group default qlen 1000 link/loopback 00:00:00:00:00:00 brd 00:00:00:00:00:00 inet 127.0.0.1/8 scope host lo valid_lft forever preferred_lft forever inet6 ::1/128 scope host valid_lft forever preferred_lft forever 2: ens33: <BROADCAST,MULTICAST,UP,LOWER_UP> mtu 1500 qdisc pfifo_fast state UP group default qlen 1000 link/ether 00:0c:29:ea:35:42 brd ff:ff:ff:ff:ff:ff inet 192.168.105.110/24 brd 192.168.105.255 scope global noprefixroute ens33 valid_lft forever preferred_lft forever inet6 fe80::1c94:5385:5133:cd48/64 scope link noprefixroute valid_lft forever preferred_lft forever 10: cni0: <NO-CARRIER,BROADCAST,MULTICAST,UP> mtu 1500 qdisc noqueue state DOWN group default qlen 1000 link/ether de:12:0b:ea:a4:bc brd ff:ff:ff:ff:ff:ff inet 10.22.0.1/24 brd 10.22.0.255 scope global cni0 valid_lft forever preferred_lft forever inet6 fe80::dc12:bff:feea:a4bc/64 scope link valid_lft forever preferred_lft forever4. Enabling Network Functionality for Containerd Containers
In detail, we will find that the busybox container currently only has a local network card, which cannot access any network. So how can we enable inter-container communication and external network communication? We can execute the following command:
[root@containerd ~]# ctr -n k8s.io t ls TASK PID STATUS busybox 5111 RUNNING [root@containerd ~]# # pid=5111 [root@containerd ~]# pid=$(ctr -n k8s.io t ls|grep busybox|awk '{print $2}') [root@containerd ~]# netnspath=/proc/$pid/ns/net [root@containerd ~]# CNI_PATH=/root/cni-plugins /root/cni/scripts/exec-plugins.sh add $pid $netnspathThen we will find that a new network card has been added and external network access is possible when we enter the busybox container:
[root@containerd ~]# ctr -n k8s.io task exec --exec-id $RANDOM -t busybox sh -/ # ip a 1: lo: <LOOPBACK,UP,LOWER_UP> mtu 65536 qdisc noqueue qlen 1000 link/loopback 00:00:00:00:00:00 brd 00:00:00:00:00:00 inet 127.0.0.1/8 scope host lo valid_lft forever preferred_lft forever inet6 ::1/128 scope host valid_lft forever preferred_lft forever 3: eth0@if12: <BROADCAST,MULTICAST,UP,LOWER_UP,M-DOWN> mtu 1500 qdisc noqueue link/ether d2:f2:8d:53:fc:95 brd ff:ff:ff:ff:ff:ff inet 10.22.0.13/24 brd 10.22.0.255 scope global eth0 valid_lft forever preferred_lft forever / # ping 114.114.114.114 PING 114.114.114.114 (114.114.114.114): 56 data bytes 64 bytes from 114.114.114.114: seq=0 ttl=127 time=17.264 ms 64 bytes from 114.114.114.114: seq=0 ttl=127 time=13.838 ms 64 bytes from 114.114.114.114: seq=1 ttl=127 time=18.024 ms 64 bytes from 114.114.114.114: seq=2 ttl=127 time=15.316 msTry it out: Create two containers named busybox-1 and busybox-2 and use nc -l -p 8080 to expose a TCP service port for communication.

5. Sharing Directories with the Host
By executing the following scheme, we can achieve sharing of /tmp between the container and the host:
[root@docker scripts]# ctr -n k8s.io c create v4ehxdz8.mirror.aliyuncs.com/library/busybox:latest busybox1 --mount type=bind,src=/tmp,dst=/host,options=rbind:rw [root@docker scripts]# ctr -n k8s.io t start -d busybox1 bash [root@docker scripts]# ctr -n k8s.io t exec -t --exec-id $RANDOM busybox1 sh / # echo "Hello world" > /host/1 / # [root@docker scripts]# cat /tmp/1 Hello world6. Sharing Namespaces with Other Containers
This section only provides an example of PID namespace sharing; other namespace sharing is similar to this scheme.
First, we will experiment with Docker’s namespace sharing:
[root@docker scripts]# docker run --rm -it -d busybox sh 687c80243ee15e0a2171027260e249400feeeee2607f88d1f029cc270402cdd1 [root@docker scripts]# docker run --rm -it -d --pid="container:687c80243ee15e0a2171027260e249400feeeee2607f88d1f029cc270402cdd1" busybox cat fa2c09bd9c042128ebb2256685ce20e265f4c06da6d9406bc357d149af7b83d2 [root@docker scripts]# docker ps -a CONTAINER ID IMAGE COMMAND CREATED STATUS PORTS NAMES fa2c09bd9c04 busybox "cat" 2 seconds ago Up 1 second pedantic_goodall 687c80243ee1 busybox "sh" 22 seconds ago Up 21 seconds hopeful_franklin [root@docker scripts]# docker exec -it 687c80243ee1 sh / # ps aux PID USER TIME COMMAND 1 root 0:00 sh 8 root 0:00 cat 15 root 0:00 sh 22 root 0:00 ps auxNext, we will implement PID namespace sharing based on containerd in a similar manner:
[root@docker scripts]# ctr -n k8s.io t ls TASK PID STATUS busybox 2255 RUNNING busybox1 2652 RUNNING [root@docker scripts]# # Here, 2652 is the pid number of the existing task [root@docker scripts]# ctr -n k8s.io c create --with-ns "pid:/proc/2652/ns/pid" v4ehxdz8.mirror.aliyuncs.com/library/python:3.6-slim python [root@docker scripts]# ctr -n k8s.io t start -d python python # Here, we start a python command [root@docker scripts]# ctr -n k8s.io t exec -t --exec-id $RANDOM busybox1 sh / # ps aux PID USER TIME COMMAND 1 root 0:00 sh 34 root 0:00 python3 41 root 0:00 sh 47 root 0:00 ps aux7. Using Docker/Containerd Together
Reference link: https://docs.docker.com/engine/reference/commandline/dockerd/ After completing the installation/configuration of containerd, we can install the Docker client and service on the host. Execute the following command:
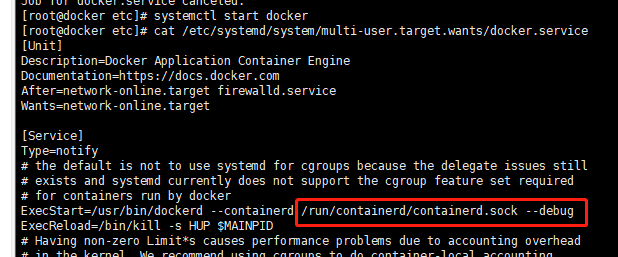
yum install -y yum-utils device-mapper-persistent-data lvm2 yum-config-manager --add-repo https://download.docker.com/linux/centos/docker-ce.repo yum update -y && yum install -y docker-ce-18.06.2.ce systemctl enable dockerEdit /etc/systemd/system/multi-user.target.wants/docker.service file and add the --containerd startup option:

Save and exit, then execute the following command:
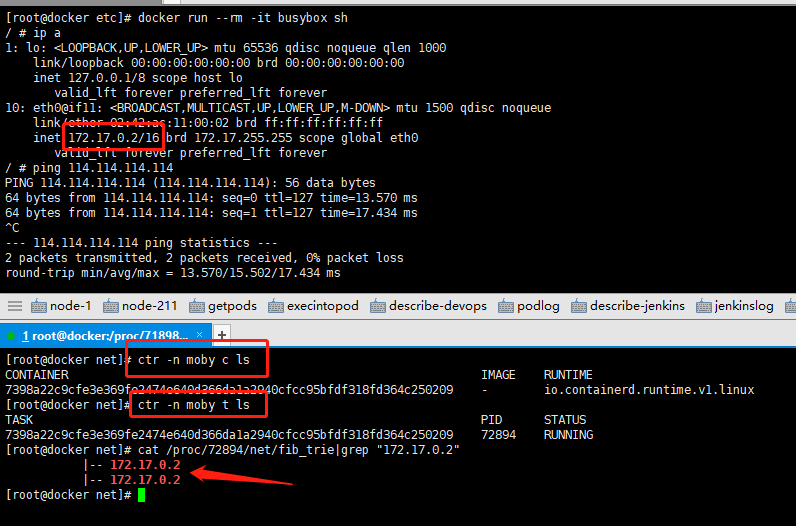
[root@docker ~]# systemctl daemon-reload [root@docker ~]# systemctl start docker [root@docker ~]# ps aux|grep docker root 72570 5.0 2.9 872668 55216 ? Ssl 01:31 0:00 /usr/bin/dockerd --containerd /run/containerd/containerd.sock --debugVerification:


