
Author
Author

Happy Holden has been specializing in printed circuit technology since 1970, working for companies such as HP, NanYa Westwood, Merix, Foxconn, and Gentex. Currently, Happy serves as the technical editor for I-Connect007 magazine and is the author of “Automation and Advanced Processes in Printed Circuit Manufacturing” and “25 Essential Skills for Electronic Engineers”.
Introduction
My three favorite sensors for controlling wet processes are the process concentration sensor based on specific gravity, the amp-hour based replenishment sensor for plating solutions, and the active concentration sensor with color indicators. To initiate wet process control, I recommend using real-time analyzers (conductivity probes and thermometers) for process audits (Table 1). You can also add liquid hydrometers, multimeters, and color analyzers.
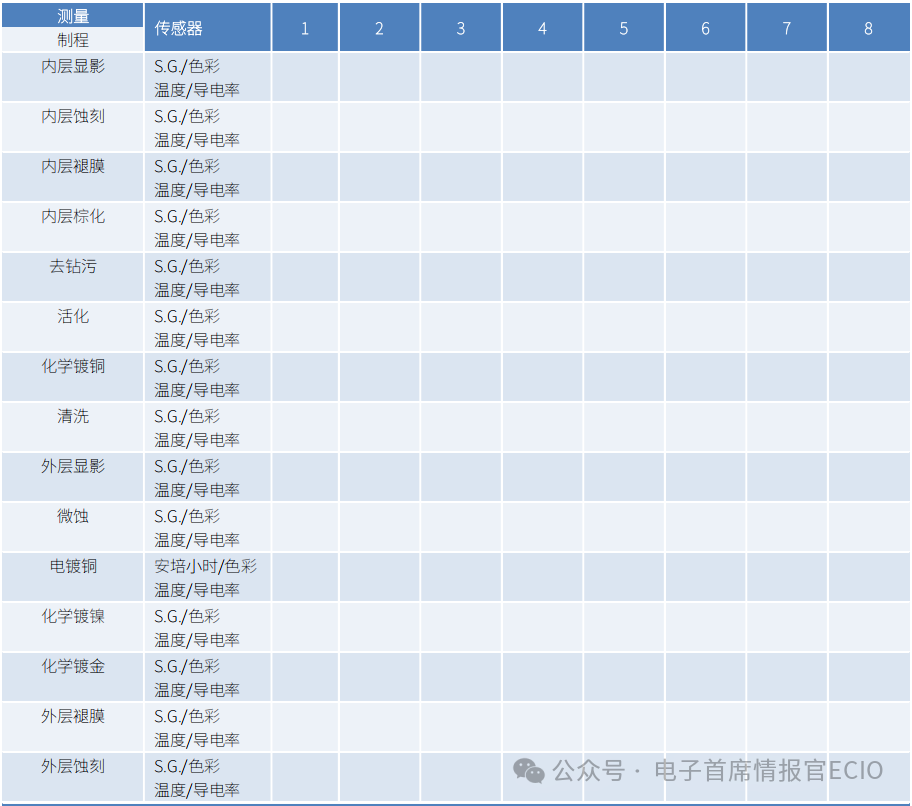
Table 1: PCB Process Audit Table
General Concentration (Specific Gravity) of Wet Process Additives
Real-time analyzers are important but somewhat complex instruments. I find it helpful to start with a simple liquid hydrometer borrowed from a chemistry lab (or purchased for $24), as shown in Figure 1.
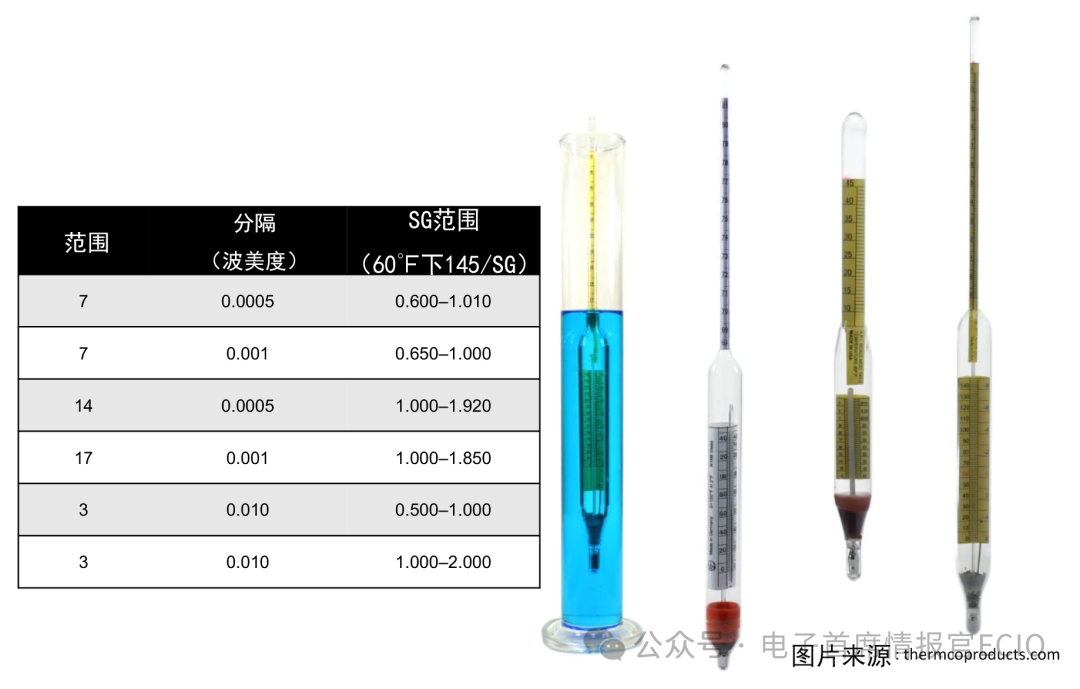
Figure 1: Real-time measurement of chemical solution concentration using a simple liquid hydrometer
During the process audit, when checking the wet process, use the hydrometer and thermometer to measure specific gravity and temperature, take a small sample of the solution and place it in a sealed bottle, then measure the conductivity and temperature of the rinse water for that process. When measuring the electroplating process, use a multimeter to measure the voltage drop from the rectifier to each anode bar. Later, add a shunt of 50 or 100 milliohms in series to measure the current. Do this once an hour, and if there is a next shift, hand the worksheet to the next shift.
If the specific gravity varies throughout the day, then specific gravity control may help manage that process, especially if it corresponds to similar changes in the real-time analyzer. The greatest changes in specific gravity occur during the processes of dissolving photoresist, adding metals (such as activated or chemical copper plating) to the board, or removing copper from the board (micro-etching or final etching).
If the company is considering upgrading to UHDI processes, then fine line etching will be a major issue. Don Ball from Chemcut elaborates in his column article “Chemical Control and Equipment for High-Density Circuits”: to maintain a specific gravity of 1.27 SG, the control limits must be ±0.01~0.02 SG, and the specific gravity control for final etching must be upgraded, whether it is copper chloride or alkaline chloride. This will require an investment of $5,000 to $10,000.
When I was at HP, the specific gravity sensor developed in 1975 (Figure 2) could meet these requirements at a cost of less than $50, but it had to be homemade and calibrated. At that time, the maintenance department made the specific gravity sensor for us. Although the patent for the sensor has long expired, it is still not mentioned in sensor or instrumentation books. At that time, this invention caused quite a stir at HP because mechanical engineers told us, “It will never work.” This was because they could not find any reference to that principle in any sensor or measurement textbook. We said, “Sorry, but it does work. You forgot the details of Archimedes’ principle— for underwater objects, even if we move the calibration nut up and down on the threaded rod, it will change the applied gravity, but the buoyancy position is based on the mass of the displacement, which does not change. Therefore, the only way for the threaded rod to float is if the specific gravity of the solution changes.”
In the next column article, I will provide the design drawings for making this SG sensor, along with technical specifications, which can be used for UHDI final etching control, costing less than $50.
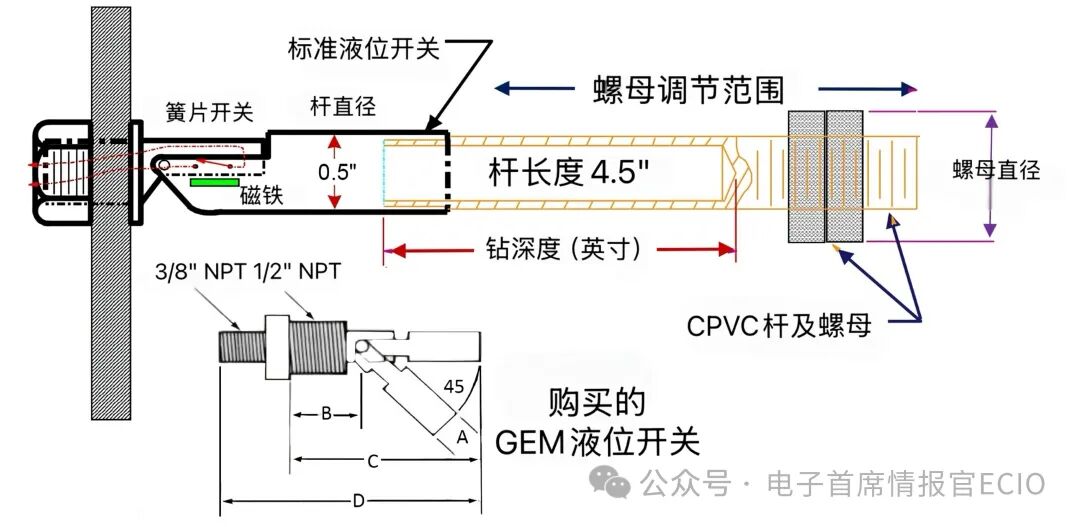
Figure 2: A very precise and accurate specific gravity sensor can be made by machining a solid plastic rod, threading it, and drilling to a specific depth to reduce its weight, with two plastic nuts of specific diameters adding extra weight placed at specific locations. When the sensor reaches the required SG, a reed switch will close and power the circuit.
Plating Additives (Amp-Hour Measurement)
Measuring the current load in plating solutions has been around for a long time. It is helpful because the electroplating process consumes many additives in the plating solution, depending on its current usage over time. Figure 3 shows a high-power, very low-resistance (50 mΩ) shunt. Current shunt
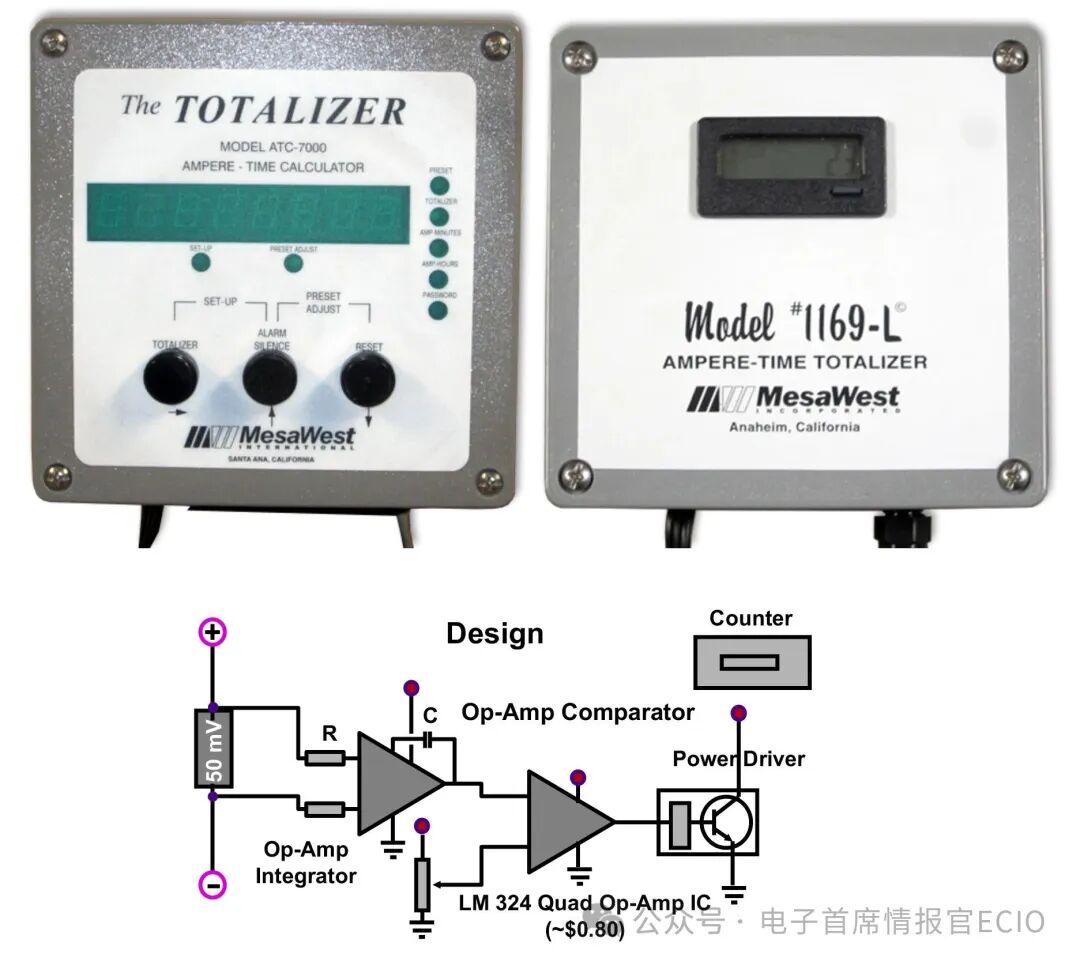
Figure 3: Amp-hour accumulators can be purchased, or a simple voltage-frequency circuit can be designed and built for less than $20, connecting it to a purchased 50 or 100 milliohm power shunt.
Color Indicators
Color changes in process solutions can indicate changes in the concentration of chemicals in that process. Many experienced operators learn this over years of using the same process. However, the human eye is not calibrated to distinguish subtle color changes that sensors can perceive, especially if you happen to be colorblind. However, the solutions are very reasonably priced.
If you have ever dealt with a backyard swimming pool that needs to control chlorine levels (to prevent algae or other biological growth), you can assign this simple task to a child. Pool test kits (as well as most PCB process test kits) cost less than 60 cents per test (Figure 4). If data (control) or visibility is needed, using an electronic colorimeter is also convenient. I found a portable colorimeter produced by Hach for $668, and there is also a laboratory colorimeter made in China for $279 on Amazon. Another option is to DIY, as middle and high school students around the world have been doing for years. Examples of three DIY colorimeters are shown in Figure 5. The most famous is the LEGO Student Colorimeter, which can be made for less than $25, or you can purchase a kit from the student union.
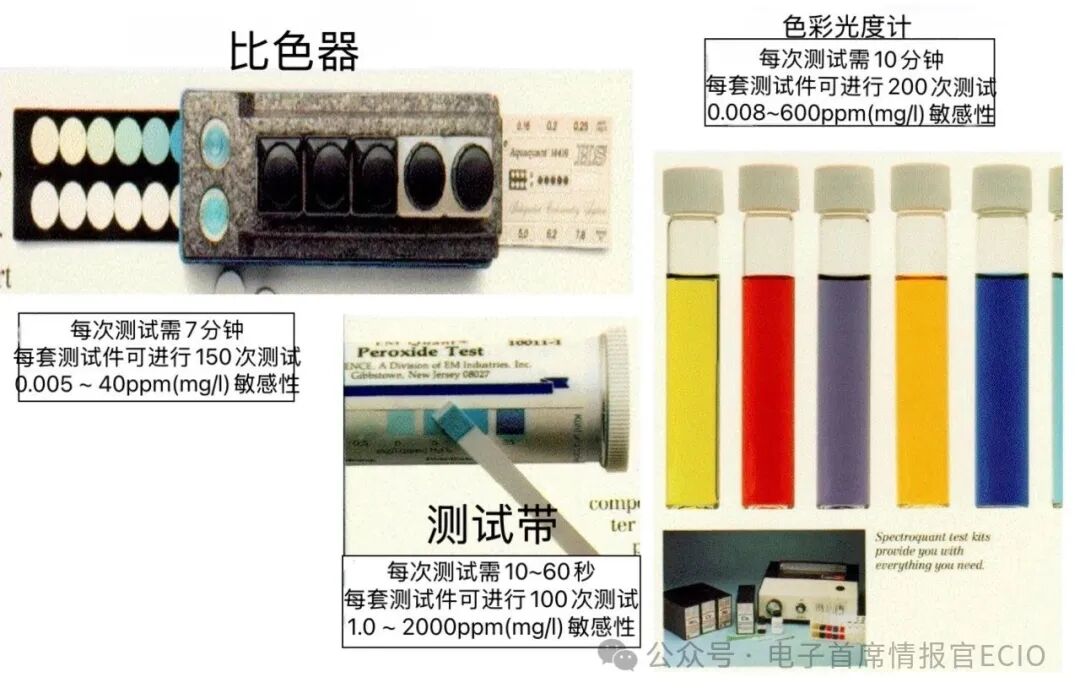
Figure 4: Color indicator test kits can be used for most PCB processes
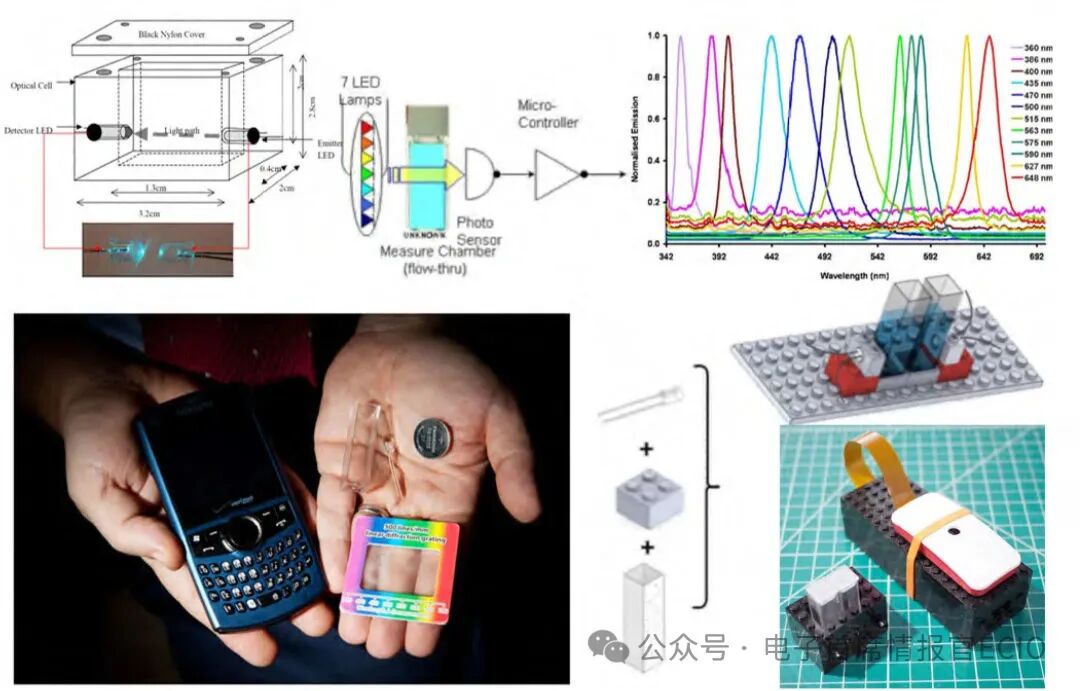
Figure 5: A colorimeter can be DIYed using two LEDs, a battery, and a light sensor (LED, CdS photoresistor, or purchased color sensor), including the LEGO student colorimeter.
Conclusion
But the current situation is that there are very few sensors or probes specifically designed for PCB manufacturing. Most are designed for the chemical industry and must be explosion-proof, operating in very strong solvent and acid/base environments. Therefore, their costs are usually very high. The next column article will introduce how to DIY displays and chemical controllers through examples I have built and some that can be purchased.

Above is a collaboration with the Electronic Chief Intelligence Officer (partial)
Order does not indicate priority